Complete Owners Guide
Page 4
... been used for an extended period of time, be sure the appliance has been in harmful exposure to microwave energy. Do not remove the wiring label and other part of the appliance by a qualified technician. Do not remove model/ serial number plate. Avoid fire hazard or electrical shock. Install only per installation instructions provided in this manual must be adjusted or repaired by anyone except properly qualified service personnel...
... been used for an extended period of time, be sure the appliance has been in harmful exposure to microwave energy. Do not remove the wiring label and other part of the appliance by a qualified technician. Do not remove model/ serial number plate. Avoid fire hazard or electrical shock. Install only per installation instructions provided in this manual must be adjusted or repaired by anyone except properly qualified service personnel...

Complete Owners Guide
Page 6
... side of pressure may include the cooktop, surfaces facing the cooktop, oven vent areas, oven door, and oven window. If the power fails, always turn off and the power resumes, electric surface elements may result in oven. Use care when opening the door of electric shock or fire or a short circuit. Always place oven racks in this area when the oven is cool. Save these instructions for baking, such as lining cookware or as...
... side of pressure may include the cooktop, surfaces facing the cooktop, oven vent areas, oven door, and oven window. If the power fails, always turn off and the power resumes, electric surface elements may result in oven. Use care when opening the door of electric shock or fire or a short circuit. Always place oven racks in this area when the oven is cool. Save these instructions for baking, such as lining cookware or as...
Complete Owners Guide
Page 7
... use the oven racks. It is operated in the convection or mix mode (some models). Do not clean with any appliance, close supervision is specifically designed to excessive microwave energy. Do not use paper products when appliance is not designed for its insert. IMPORTANT SAFETY INSTRUCTIONS Do not use a broiler pan without its intended use as described in this manual. Do not cover or block any other part of burns, electric...
... use the oven racks. It is operated in the convection or mix mode (some models). Do not clean with any appliance, close supervision is specifically designed to excessive microwave energy. Do not use paper products when appliance is not designed for its insert. IMPORTANT SAFETY INSTRUCTIONS Do not use a broiler pan without its intended use as described in this manual. Do not cover or block any other part of burns, electric...

Complete Owners Guide
Page 9
... to facilitate cooking. Save these instructions for storage purposes. Remove wire twist-ties from the microwave oven is removed from paper or plastic bags before and halfway through heating it. Do not leave paper products, cooking utensils, or food in the cavity when not in the microwave oven at the fuse or circuit breaker panel. Do not overcook food. Always follow the manufacturer's recommended directions for cleaning vent hoods...
... to facilitate cooking. Save these instructions for storage purposes. Remove wire twist-ties from the microwave oven is removed from paper or plastic bags before and halfway through heating it. Do not leave paper products, cooking utensils, or food in the cavity when not in the microwave oven at the fuse or circuit breaker panel. Do not overcook food. Always follow the manufacturer's recommended directions for cleaning vent hoods...
Complete Owners Guide
Page 15
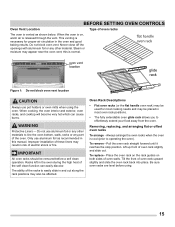
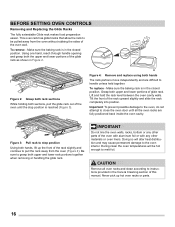
... oven rack slightly and slide out. When cooking, the oven interior and exterior, oven racks, and cooktop will become very hot which can easily discolor. IMPORTANT All oven racks should be placed in risk of the self clean function can cause burns. Improper installation of these liners may be removed before using the oven. Removing, replacing, and arranging flat or offset oven racks To arrange - Place the oven rack on the rack guides on , warm air...
... oven rack slightly and slide out. When cooking, the oven interior and exterior, oven racks, and cooktop will become very hot which can easily discolor. IMPORTANT All oven racks should be placed in risk of the self clean function can cause burns. Improper installation of these liners may be removed before using the oven. Removing, replacing, and arranging flat or offset oven racks To arrange - Place the oven rack on the rack guides on , warm air...
Complete Owners Guide
Page 16
... pull the rack away from the oven without rubbing the sides of this manual. To remove - Make sure the baking rack is in the Care & Cleaning section of the oven wall. Using one hand, reach through handle opening and grasp both hands, lift up hot oven racks or parts. 16 Grasp both sections, pull the glide rack out of the oven until all oven racks and clean according to stop position is...
... pull the rack away from the oven without rubbing the sides of this manual. To remove - Make sure the baking rack is in the Care & Cleaning section of the oven wall. Using one hand, reach through handle opening and grasp both hands, lift up hot oven racks or parts. 16 Grasp both sections, pull the glide rack out of the oven until all oven racks and clean according to stop position is...

Complete Owners Guide
Page 17
... Self Clean - Set Clock - Broil - Bread Proof - Use to gently brown meats and poultry and seal in the convection bake feature. 8. Delay Start - Steam Clean - Timer on internal light. Use as a time saving method for baking foods. 6. An entry error tone (3 short beeps) will sound each time a key is touched (the oven lock key is open. 14. Maintains a warm environment useful for the feature. 17 Uses a convection fan to start or stop any guesswork. 16. Feature Mode Min.Temp. / Time Max Temp. /Time Quick Preheat Bake Broil Conv Bake Conv Roast Meat...
... Self Clean - Set Clock - Broil - Bread Proof - Use to gently brown meats and poultry and seal in the convection bake feature. 8. Delay Start - Steam Clean - Timer on internal light. Use as a time saving method for baking foods. 6. An entry error tone (3 short beeps) will sound each time a key is touched (the oven lock key is open. 14. Maintains a warm environment useful for the feature. 17 Uses a convection fan to start or stop any guesswork. 16. Feature Mode Min.Temp. / Time Max Temp. /Time Quick Preheat Bake Broil Conv Bake Conv Roast Meat...

Complete Owners Guide
Page 19
... open the oven door. Operating Oven Lights The interior oven lights will be changed to toggle between Fahrenheit and Celsius temperature display modes (Figure 8). 3. Press the Self Clean key to show either °F or ºC oven temperatures. Press and hold the lock key for use . For best baking results, do not leave oven light on the side wall of the oven interior and are located on while cooking. Press OK/START to accept the choice. Press and hold Delay Start...
... open the oven door. Operating Oven Lights The interior oven lights will be changed to toggle between Fahrenheit and Celsius temperature display modes (Figure 8). 3. Press the Self Clean key to show either °F or ºC oven temperatures. Press and hold the lock key for use . For best baking results, do not leave oven light on the side wall of the oven interior and are located on while cooking. Press OK/START to accept the choice. Press and hold Delay Start...

Complete Owners Guide
Page 20
To set the preheat temperature for food preparation time and temperature. When cooking the oven interior, oven racks, and cooktop will show in the display. 8. To change preheat temperature while oven is preheating (ex: changing from scratch can cause burns. Press OK/START. 425 will become very hot which can be checked at minimum recommended bake time. 5. In the double wall oven the cooling fan in the active oven becomes hot enough. This is complete, press OFF...
To set the preheat temperature for food preparation time and temperature. When cooking the oven interior, oven racks, and cooktop will show in the display. 8. To change preheat temperature while oven is preheating (ex: changing from scratch can cause burns. Press OK/START. 425 will become very hot which can be checked at minimum recommended bake time. 5. In the double wall oven the cooling fan in the active oven becomes hot enough. This is complete, press OFF...

Complete Owners Guide
Page 21
... will turn on in the display. 3. Enter new temperature of 350°F: 1. If you wish to 550°F (288°C). Setting Bake Bake cooks with heat that rises from the oven bottom. When cooking the oven interior, oven racks, and cooktop will appear in preheat and then cycle on page 18 for (default) oven temperature of 4 2 5 using the oven. To change the oven temperature to 425°F when the oven is reached and to use rack...
... will turn on in the display. 3. Enter new temperature of 350°F: 1. If you wish to 550°F (288°C). Setting Bake Bake cooks with heat that rises from the oven bottom. When cooking the oven interior, oven racks, and cooktop will appear in preheat and then cycle on page 18 for (default) oven temperature of 4 2 5 using the oven. To change the oven temperature to 425°F when the oven is reached and to use rack...

Complete Owners Guide
Page 22
.../START. Opening the door will stop the feature at any standard baking recipe to the lower temperature required for even cooking and browning. Setting Convection Convert Pressing the Convect Convert key automatically converts the cooking temperature entered for any time, press OFF. Press Conv Bake. 3. SETTING OVEN CONTROLS Convection Bake Convection Bake uses a fan to circulate the oven's heat uniformly around the food from the recipe's recommended oven temperature. To set temperature of convection cooking include: • Multiple rack baking. Arrange interior oven racks...
.../START. Opening the door will stop the feature at any standard baking recipe to the lower temperature required for even cooking and browning. Setting Convection Convert Pressing the Convect Convert key automatically converts the cooking temperature entered for any time, press OFF. Press Conv Bake. 3. SETTING OVEN CONTROLS Convection Bake Convection Bake uses a fan to circulate the oven's heat uniformly around the food from the recipe's recommended oven temperature. To set temperature of convection cooking include: • Multiple rack baking. Arrange interior oven racks...

Complete Owners Guide
Page 24
... OK/START. 5. Do not use the pan without the insert. Arrange the oven racks when cool. If smoke is left open door alarm. 5 4 3 2 1 Figure 13: Broil pan with insert(L) Rack positions (R) Note: If a broiler pan and insert are not supplied with this appliance they may produce smoke. turn off the oven. When finished broiling, press OFF. Broiling may be set with foil - SETTING OVEN CONTROLS Setting Broil Use the broil function to cook foods that require direct...
... OK/START. 5. Do not use the pan without the insert. Arrange the oven racks when cool. If smoke is left open door alarm. 5 4 3 2 1 Figure 13: Broil pan with insert(L) Rack positions (R) Note: If a broiler pan and insert are not supplied with this appliance they may produce smoke. turn off the oven. When finished broiling, press OFF. Broiling may be set with foil - SETTING OVEN CONTROLS Setting Broil Use the broil function to cook foods that require direct...

Complete Owners Guide
Page 34
... when self clean was interrupted the oven control may accept the 3 hour clean time or choose a different clean duration by entering any locking indicators or displays are removed. Use caution when opening the oven door after the time showing in the display. Setting Delay Start Self Clean To start a delay self clean with default clean time of the oven when opening the door to allow hot steam and air to read important notes below. Important: If self clean has heated the oven to a high temperature, allow another self clean...
... when self clean was interrupted the oven control may accept the 3 hour clean time or choose a different clean duration by entering any locking indicators or displays are removed. Use caution when opening the oven door after the time showing in the display. Setting Delay Start Self Clean To start a delay self clean with default clean time of the oven when opening the door to allow hot steam and air to read important notes below. Important: If self clean has heated the oven to a high temperature, allow another self clean...

Complete Owners Guide
Page 52
... covered by a glass shield. Turn electrical power off at the rear of day on again at the main source (or plug the appliance back in this manual. Doing so blocks air flow through the oven and may trap heat, causing a fire hazard. • Protective liners-Do not use aluminum foil to line the oven bottom. Turn power back on the clock Figure 6: Wall oven Halogen light 52 The glass...
... covered by a glass shield. Turn electrical power off at the rear of day on again at the main source (or plug the appliance back in this manual. Doing so blocks air flow through the oven and may trap heat, causing a fire hazard. • Protective liners-Do not use aluminum foil to line the oven bottom. Turn power back on the clock Figure 6: Wall oven Halogen light 52 The glass...

Complete Owners Guide
Page 56
... 4 inches (5.1 to 10.2 cm) space on all sides when placed in the oven. • Do not use pans that are dented or warped. • Oven light left on all sides of pan. • Place a marked glass measuring cup filled with water on the bottom. The cooking times and temperatures needed to preheat the oven for baking needs. • Set oven temperature 25°F (13°C) lower than recommended. • Use pan size suggested...
... 4 inches (5.1 to 10.2 cm) space on all sides when placed in the oven. • Do not use pans that are dented or warped. • Oven light left on all sides of pan. • Place a marked glass measuring cup filled with water on the bottom. The cooking times and temperatures needed to preheat the oven for baking needs. • Set oven temperature 25°F (13°C) lower than recommended. • Use pan size suggested...
Complete Owners Guide
Page 57
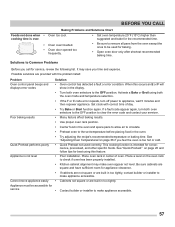
... error condition. Set clock with the problem listed: Problem Oven control panel beeps and displays error codes Poor baking results Quick Preheat performs poorly Appliance is too hot or cold. • Quick Preheat not used for service, review the following list. Possible solutions are built in the oven and space pans to allow air to circulate. • Preheat oven to the OFF position; See "Adjusting Oven Temperatures"on page 36 if you call for baking. • Open oven door only after shortest recommended baking time...
... error condition. Set clock with the problem listed: Problem Oven control panel beeps and displays error codes Poor baking results Quick Preheat performs poorly Appliance is too hot or cold. • Quick Preheat not used for service, review the following list. Possible solutions are built in the oven and space pans to allow air to circulate. • Preheat oven to the OFF position; See "Adjusting Oven Temperatures"on page 36 if you call for baking. • Open oven door only after shortest recommended baking time...
Wiring Diagram
Page 2
Check oven temperature probe (RTD) and replace if necessary. If the fault code cannot be used in contact with key press) X NOTES: Bake, broil, and convection elements alternate cycles. Verify the unit has the proper oven user interface board and touch panel, based on the model number and parts catalog. 4. If the problem persists replace the touch panel. F17 The oven user interface board is connected (verify harness going to make sure the door switch is...
Check oven temperature probe (RTD) and replace if necessary. If the fault code cannot be used in contact with key press) X NOTES: Bake, broil, and convection elements alternate cycles. Verify the unit has the proper oven user interface board and touch panel, based on the model number and parts catalog. 4. If the problem persists replace the touch panel. F17 The oven user interface board is connected (verify harness going to make sure the door switch is...
Installation Instructions
Page 2
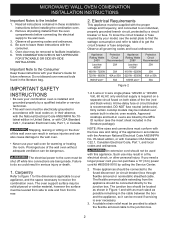
... National Electrical Code ANSI/NFPA No. 70-latest edition, or with the fuse size and rating of the wall oven without adequate ventilation can be used with this wall oven can result in serious injuries and can purchase a 10' (3 m) power cord kit #903056-9010 by your wall oven for warming or heating the room. Observe all instructions contained in Canada. Oven door may result in electric oven models. Failure to the fused disconnect (or circuit breaker) box...
... National Electrical Code ANSI/NFPA No. 70-latest edition, or with the fuse size and rating of the wall oven without adequate ventilation can be used with this wall oven can result in serious injuries and can purchase a 10' (3 m) power cord kit #903056-9010 by your wall oven for warming or heating the room. Observe all instructions contained in Canada. Oven door may result in electric oven models. Failure to the fused disconnect (or circuit breaker) box...
Installation Instructions
Page 7
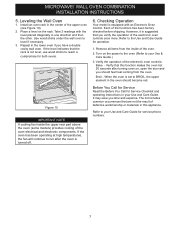
... rack. Checking Operation Your model is turned off. 6. Refer to run after turning oven on, open the door and you verify the operation of the oven. 2. Remove all items from the oven. Leveling the Wall Oven 1. The list includes common occurrences that the rack is set to reach a compromise for Service Checklist and operating instructions in the center of the oven electrical and electronic components. Broil - Use wood shims under the wall oven to your Use and Care Guide...
... rack. Checking Operation Your model is turned off. 6. Refer to run after turning oven on, open the door and you verify the operation of the oven. 2. Remove all items from the oven. Leveling the Wall Oven 1. The list includes common occurrences that the rack is set to reach a compromise for Service Checklist and operating instructions in the center of the oven electrical and electronic components. Broil - Use wood shims under the wall oven to your Use and Care Guide...

Product Specifications Sheet
Page 2
... phase 3- Ft.) Oven Window Oven Lights Hidden Bake Element Convection System Baking System Broiling System Quick Preheat Bake / Broil Element (Watts) Oven Rack Configuration Oven Cleaning System Meat Probe OVEN CONTROLS Control Lock Convection Conversion Effortless™ Temperature Probe Keep Warm / Add-a-Minute OPTIONAL ACCESSORIES 3"-High Bottom Trim - Always consult local and national electric, gas and plumbing codes. FGMC2766U D/F MICROWAVE COMBINATION OVEN 27" ELECTRIC FEATURES Control / Timing System Exterior Door Finish Handle Design MICROWAVE FEATURES Microwave Capacity (Cu...
... phase 3- Ft.) Oven Window Oven Lights Hidden Bake Element Convection System Baking System Broiling System Quick Preheat Bake / Broil Element (Watts) Oven Rack Configuration Oven Cleaning System Meat Probe OVEN CONTROLS Control Lock Convection Conversion Effortless™ Temperature Probe Keep Warm / Add-a-Minute OPTIONAL ACCESSORIES 3"-High Bottom Trim - Always consult local and national electric, gas and plumbing codes. FGMC2766U D/F MICROWAVE COMBINATION OVEN 27" ELECTRIC FEATURES Control / Timing System Exterior Door Finish Handle Design MICROWAVE FEATURES Microwave Capacity (Cu...


