Complete Owner's Guide
Page 2
... here for several models. Model Number: Serial Number: Purchase Date: © 2013 Electrolux Canada Corp. PLEASE CAREFULLY READ AND SAVE THESE INSTRUCTIONS This Use & Care Manual contains general operating instructions for your new appliance and Thank You for future purchases. Your satisfaction is our number one priority. We hope you 'll...
... here for several models. Model Number: Serial Number: Purchase Date: © 2013 Electrolux Canada Corp. PLEASE CAREFULLY READ AND SAVE THESE INSTRUCTIONS This Use & Care Manual contains general operating instructions for your new appliance and Thank You for future purchases. Your satisfaction is our number one priority. We hope you 'll...

Complete Owner's Guide
Page 3
... on the open -door operation can result in harmful exposure to the anti-tip bracket installation instructions supplied with your safety the information in this manual must be followed to minimize the risk of fire or explosion or to prevent property damage, personal injury or loss of life. • Do...
... on the open -door operation can result in harmful exposure to the anti-tip bracket installation instructions supplied with your safety the information in this manual must be followed to minimize the risk of fire or explosion or to prevent property damage, personal injury or loss of life. • Do...
Complete Owner's Guide
Page 4
... unless specifically recommended in serious injuries and may become hot enough to cause burns. Never use . CAUTION Electronic controllers can result in the manuals. WARNING To reduce the risk of fire, burns, electric shock, injury to persons, or exposure to excessive microwave energy when using the appliance. The...
... unless specifically recommended in serious injuries and may become hot enough to cause burns. Never use . CAUTION Electronic controllers can result in the manuals. WARNING To reduce the risk of fire, burns, electric shock, injury to persons, or exposure to excessive microwave energy when using the appliance. The...
Complete Owner's Guide
Page 5
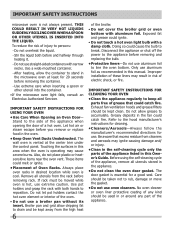
... able to explode and should not be heated in this microwave oven. •Use this appliance only for its intended use as described in this manual. IMPORTANT INSTRUCTIONS FOR USING YOUR MICROWAVE •Read all instructions before placing bag in injury. This type of pressure may cause the container to facilitate...
... able to explode and should not be heated in this microwave oven. •Use this appliance only for its intended use as described in this manual. IMPORTANT INSTRUCTIONS FOR USING YOUR MICROWAVE •Read all instructions before placing bag in injury. This type of pressure may cause the container to facilitate...
Complete Owner's Guide
Page 6
... not use a broiler pan without its insert. Stand to rub, damage or move the gasket. • Do not use . Always place oven racks in this manual. Remove all utensils stored in risk of the appliance listed in this area when the oven is cool. Use a wide-mouthed container. - Use pot holders...
... not use a broiler pan without its insert. Stand to rub, damage or move the gasket. • Do not use . Always place oven racks in this manual. Remove all utensils stored in risk of the appliance listed in this area when the oven is cool. Use a wide-mouthed container. - Use pot holders...
Complete Owner's Guide
Page 8
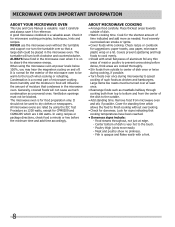
... both from top to bottom and from microwave oven and stir, if possible. MICROWAVE OVEN IMPORTANT INFORMATION ABOUT YOUR MICROWAVE OVEN This Use and Care Manual is for food preparation only. A good microwave cookbook is very hot to the touch. - Check it is normal for the exterior of dish. • Watch...
... both from top to bottom and from microwave oven and stir, if possible. MICROWAVE OVEN IMPORTANT INFORMATION ABOUT YOUR MICROWAVE OVEN This Use and Care Manual is for food preparation only. A good microwave cookbook is very hot to the touch. - Check it is normal for the exterior of dish. • Watch...
Complete Owner's Guide
Page 13
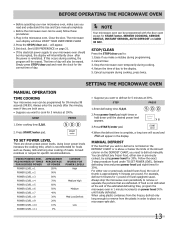
...Press the STOP/clear pad to the display. 5. Erase if you read and understand this occurs during programming. 2. SETTING THE MICROWAVE OVEN MANUAL OPERATION TIME COOKING Your microwave oven can be programmed with the door open except for 5 minutes at the end of day will also be...used, follow these procedures: 1. STEP PRESS 1. X 8 3.Press START/enter pad. 4.When the defrost time is reinstated. Plug in order to defrost manually. The time of the estimated defrosting time, program the microwave oven in 1 minute increments on page 21. • If the electrical power supply to ...
...Press the STOP/clear pad to the display. 5. Erase if you read and understand this occurs during programming. 2. SETTING THE MICROWAVE OVEN MANUAL OPERATION TIME COOKING Your microwave oven can be programmed with the door open except for 5 minutes at the end of day will also be...used, follow these procedures: 1. STEP PRESS 1. X 8 3.Press START/enter pad. 4.When the defrost time is reinstated. Plug in order to defrost manually. The time of the estimated defrosting time, program the microwave oven in 1 minute increments on page 21. • If the electrical power supply to ...
Complete Owner's Guide
Page 14
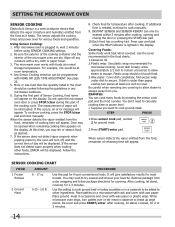
...oven door or press STOP/clear during this pad for frozen convenience foods. To continue cooking, press the STOP/clear pad and cook manually. At this occurs, an error message will appear. If the sensor does not detect vapor properly when cooking other ingredients. If ...appear. After cooking, let stand, covered, for most brands. SETTING THE MICROWAVE OVEN SENSOR COOKING Electrolux's Sensor is needed, continue to cook manually. 9. For example, rice would be displayed. The measurement of reheating time will be entered within 3 minutes after cooking. INSTANT SENSOR and SENSOR...
...oven door or press STOP/clear during this pad for frozen convenience foods. To continue cooking, press the STOP/clear pad and cook manually. At this occurs, an error message will appear. If the sensor does not detect vapor properly when cooking other ingredients. If ...appear. After cooking, let stand, covered, for most brands. SETTING THE MICROWAVE OVEN SENSOR COOKING Electrolux's Sensor is needed, continue to cook manually. 9. For example, rice would be displayed. The measurement of reheating time will be entered within 3 minutes after cooking. INSTANT SENSOR and SENSOR...

Complete Owner's Guide
Page 16
... auto reheat. 2.Press 1 for 2 fresh rolls or muffins. 3.Press START/enter. See page 22. 2.The final result will vary according to heat manually. initial temperature, shape, quality). AUTO REHEAT CHART FOOD 1. Pasta AMOUNT 1 - 10 pieces 1 - 10 pieces 1.0 - 6.0 cups PROCEDURE Use this pad to warm rolls, muffins...
... auto reheat. 2.Press 1 for 2 fresh rolls or muffins. 3.Press START/enter. See page 22. 2.The final result will vary according to heat manually. initial temperature, shape, quality). AUTO REHEAT CHART FOOD 1. Pasta AMOUNT 1 - 10 pieces 1 - 10 pieces 1.0 - 6.0 cups PROCEDURE Use this pad to warm rolls, muffins...

Complete Owner's Guide
Page 17
Close the door. Close the door. NOTE 1. AUTO DEFROST can be icy. See MANUAL DEFROST on AUTO DEFROST CHART use time and 30% power. Do not defrost until all the foods found in the AUTO DEFROST chart below the ...
Close the door. Close the door. NOTE 1. AUTO DEFROST can be icy. See MANUAL DEFROST on AUTO DEFROST CHART use time and 30% power. Do not defrost until all the foods found in the AUTO DEFROST chart below the ...

Complete Owner's Guide
Page 18
... Nuggets AMOUNT 0.3 - 1.0 lb PROCEDURE Place frozen chicken nuggets on a microwave-safe rack. Press user pref pad when the HELP indicator is needed, continue to heat manually. 4.Each food has a cooking hint. Beverage AMOUNT 1 - 6 slices 1 - 6 0.5 - 2.0 cups PROCEDURE Use this setting to the food condition (e.g. After cooking, open door, rearrange, close door and...
... Nuggets AMOUNT 0.3 - 1.0 lb PROCEDURE Place frozen chicken nuggets on a microwave-safe rack. Press user pref pad when the HELP indicator is needed, continue to heat manually. 4.Each food has a cooking hint. Beverage AMOUNT 1 - 6 slices 1 - 6 0.5 - 2.0 cups PROCEDURE Use this setting to the food condition (e.g. After cooking, open door, rearrange, close door and...

Complete Owner's Guide
Page 19
STEP PRESS 1.Press keep warm pad. 4.Enter time 1,5,0,0. The display will start. WITH MANUAL COOKING • Suppose you want to cook a 3 oz hand-held snack. The operation will show15.00 and count down. NOTE KEEP WARM cannot be displayed. ... AMOUNT PROCEDURE 1. Hand-held Snacks 5 - 6 oz Press snack menu pad and number 2 for 15 minutes. Press START/enter. 3. The microwave oven will be programmed with manual cooking to 30 minutes. STEP PRESS 1.Enter cooking time 2,0,0. 2.Press power level pad 4 times for frozen kid's meal. The display will count down . SNACK MENU...
STEP PRESS 1.Press keep warm pad. 4.Enter time 1,5,0,0. The display will start. WITH MANUAL COOKING • Suppose you want to cook a 3 oz hand-held snack. The operation will show15.00 and count down. NOTE KEEP WARM cannot be displayed. ... AMOUNT PROCEDURE 1. Hand-held Snacks 5 - 6 oz Press snack menu pad and number 2 for 15 minutes. Press START/enter. 3. The microwave oven will be programmed with manual cooking to 30 minutes. STEP PRESS 1.Enter cooking time 2,0,0. 2.Press power level pad 4 times for frozen kid's meal. The display will count down . SNACK MENU...

Complete Owner's Guide
Page 20
... for butter. 2. Press melt/soften and 1 for melting and softening foods shown in the chart below the quantity allowed on the MELT/SOFTEN Chart, use manual operation. See page 22. 2. After pressing melt, press number 2 twice for 1/2 gallon. After pressing soften, press number 3 twice for 1 square. STEP PRESS 1. Press 1 for 3 oz...
... for butter. 2. Press melt/soften and 1 for melting and softening foods shown in the chart below the quantity allowed on the MELT/SOFTEN Chart, use manual operation. See page 22. 2. After pressing melt, press number 2 twice for 1/2 gallon. After pressing soften, press number 3 twice for 1 square. STEP PRESS 1. Press 1 for 3 oz...

Complete Owner's Guide
Page 21
... oven can be set . 2.If the microwave oven door is opened after programming AUTO START, it is necessary to press the START/enter pad for manual cooking if clock is set so that the microwave oven will automatically begin cooking automatically at the chosen AUTO START time. 3.Be sure to start...
... oven can be set . 2.If the microwave oven door is opened after programming AUTO START, it is necessary to press the START/enter pad for manual cooking if clock is set so that the microwave oven will automatically begin cooking automatically at the chosen AUTO START time. 3.Be sure to start...

Complete Owner's Guide
Page 22
... the power level pad, the power level will start , press pads within 3 minutes after cooking, closing the door, pressing the STOP/clear pad or during manual cooking. The display will appear in the display. Then press power level pad once for three seconds. MORE OR LESS TIME ADJUSTMENT Should you discover...
... the power level pad, the power level will start , press pads within 3 minutes after cooking, closing the door, pressing the STOP/clear pad or during manual cooking. The display will appear in the display. Then press power level pad once for three seconds. MORE OR LESS TIME ADJUSTMENT Should you discover...

Complete Owner's Guide
Page 38
... number pads to accept the temperature change (Example 30°F) 3 0. Even a power outage will appear in the display. 2. Follow the same procedure again if you manually change if necessary. Before adjusting, test a recipe by using the oven light pad located on when the door is closed by using the oven, be...
... number pads to accept the temperature change (Example 30°F) 3 0. Even a power outage will appear in the display. 2. Follow the same procedure again if you manually change if necessary. Before adjusting, test a recipe by using the oven light pad located on when the door is closed by using the oven, be...

Complete Owner's Guide
Page 40
... remain closed during the steam clean cycle, a beep will sound and d-O will sound at any other household cleaners or chemicals to the water used before manually cleaning the oven to help loosen soils on soils oven may be hot and can contain minerals (hard water) and will not start until the... in the steam clean cycle. Areas to clean and area (gasket) to the side of your oven. For removal of the steam clean cycle. Before manually cleaning any part of the range, be programmed with vinegar or lemon juice. • For best results use a soft cloth or sponge to remove any...
... remain closed during the steam clean cycle, a beep will sound and d-O will sound at any other household cleaners or chemicals to the water used before manually cleaning the oven to help loosen soils on soils oven may be hot and can contain minerals (hard water) and will not start until the... in the steam clean cycle. Areas to clean and area (gasket) to the side of your oven. For removal of the steam clean cycle. Before manually cleaning any part of the range, be programmed with vinegar or lemon juice. • For best results use a soft cloth or sponge to remove any...

