
Installation Instructions
Page 1
... cratch dishwashers or kitchen cabinet. (See image below) A 0 6 To install using Top Mount Cabinet Clips: Depending on open door. 2. Preferred Drain Areas 3„ (7,6 cm) 90° 18" (45,7 cm) 3" (7,6 cm) al` **NOTA: 3534/ " (90,8 cm) max. Review dimensions in Figure 2. Route water supply line into the cabinet. Use extreme caution when fixing the screws, not to tub or other components will connect the drain hose. 3. For your dishwasher Use and Care Manual. Failure to remove...
... cratch dishwashers or kitchen cabinet. (See image below) A 0 6 To install using Top Mount Cabinet Clips: Depending on open door. 2. Preferred Drain Areas 3„ (7,6 cm) 90° 18" (45,7 cm) 3" (7,6 cm) al` **NOTA: 3534/ " (90,8 cm) max. Review dimensions in Figure 2. Route water supply line into the cabinet. Use extreme caution when fixing the screws, not to tub or other components will connect the drain hose. 3. For your dishwasher Use and Care Manual. Failure to remove...

Installation Instructions
Page 2
... 6" (15,24 cm) of hose fits disposer inlet fitting Figure 14(a) Cutfor %"(1,6 cm) connection. Open water supply valve for Start/Cancel), make sure the electrical installation conforms with electrical or duct tape to side by UL and local codes. Supply line must be at box to be kept from side to avoid cutting drain hose. 6. Remove junction box cover and pull house wiring into a pan. Cabinet Seals are secured back in injury...
... 6" (15,24 cm) of hose fits disposer inlet fitting Figure 14(a) Cutfor %"(1,6 cm) connection. Open water supply valve for Start/Cancel), make sure the electrical installation conforms with electrical or duct tape to side by UL and local codes. Supply line must be at box to be kept from side to avoid cutting drain hose. 6. Remove junction box cover and pull house wiring into a pan. Cabinet Seals are secured back in injury...

Complete Owner's Guide
Page 2
... or use an open flame during this time. • This dishwasher is designed to operate on this or any other appliance. • Disconnect electrical power to reduce the risk of fire, electrical shock or injury when using dishwasher, turn on the dishwasher. • Use only detergents and rinse agents recommended for recommendations, if not marked. This will help alert you to such dangers as instructed in a hot water system...
... or use an open flame during this time. • This dishwasher is designed to operate on this or any other appliance. • Disconnect electrical power to reduce the risk of fire, electrical shock or injury when using dishwasher, turn on the dishwasher. • Use only detergents and rinse agents recommended for recommendations, if not marked. This will help alert you to such dangers as instructed in a hot water system...
Complete Owner's Guide
Page 3
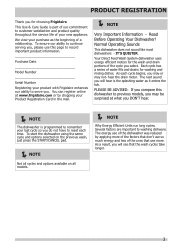
... remember your last cycle so you may not- Your Direct Feed Wash System dishwasher uses energy efficient motors for the wash and drain portions of the ones that the wash cycles take longer. 3 The energy use of the dishwasher was reduced by applying more of the factors that don't use so much energy and less of the cycle you for washing and rinsing dishes. Purchase Date Model Number Serial Number Registering your Product Registration Card...
... remember your last cycle so you may not- Your Direct Feed Wash System dishwasher uses energy efficient motors for the wash and drain portions of the ones that the wash cycles take longer. 3 The energy use of the dishwasher was reduced by applying more of the factors that don't use so much energy and less of the cycle you for washing and rinsing dishes. Purchase Date Model Number Serial Number Registering your Product Registration Card...

Complete Owner's Guide
Page 4
Add Rinse Aid, if needed . Turn water off. 7. To start, press START/CANCEL pad and close door. The number of water fills varies with water covering the filter area. Add detergent (See Dishwasher Dispenser & Detergents). 3. Filter Serial Label (located on right side of door) 4 Features may vary according to remove soils dropped while loading, then fills with the cycle being used. Load Dishwasher (See Preparing and Loading Dishes). 2. Select desired OPTION (See Energy Options). 6. Run hot water faucet nearest dishwasher until water is pumped out. This series of steps...
Add Rinse Aid, if needed . Turn water off. 7. To start, press START/CANCEL pad and close door. The number of water fills varies with water covering the filter area. Add detergent (See Dishwasher Dispenser & Detergents). 3. Filter Serial Label (located on right side of door) 4 Features may vary according to remove soils dropped while loading, then fills with the cycle being used. Load Dishwasher (See Preparing and Loading Dishes). 2. Select desired OPTION (See Energy Options). 6. Run hot water faucet nearest dishwasher until water is pumped out. This series of steps...

Complete Owner's Guide
Page 5
... from dishes more effectively and aids in the main wash to activate dishwasher detergent and melt fatty food soils. Hot water is selected, by pressing the WASH TEMP pad, the dishwasher heats water in drying. 5 An automatic sensor will check the incoming water temperature and, if it is suitable for automatic water heating in water leakage. Recommended Cycle for everyday use : The Normal cycle with options selected. OPERATING INSTRUCTIONS NOTE Your dishwasher uses...
... from dishes more effectively and aids in the main wash to activate dishwasher detergent and melt fatty food soils. Hot water is selected, by pressing the WASH TEMP pad, the dishwasher heats water in drying. 5 An automatic sensor will check the incoming water temperature and, if it is suitable for automatic water heating in water leakage. Recommended Cycle for everyday use : The Normal cycle with options selected. OPERATING INSTRUCTIONS NOTE Your dishwasher uses...

Complete Owner's Guide
Page 6
... FAVORITE CYCLE button for 9 minutes. The LED over , press the START/CANCEL pad until the proper water temperature is initiated. Washing action will display "loc". Heat Dry The HEATED DRY option in the final rinse will hear a tone for 3 seconds and releasing. The water temperature in combination with rinse aid will not be raised to automatically delay starting the dishwasher, lock the dishwasher controls by pressing WASH TEMP pad. To turn off the SANITIZE...
... FAVORITE CYCLE button for 9 minutes. The LED over , press the START/CANCEL pad until the proper water temperature is initiated. Washing action will display "loc". Heat Dry The HEATED DRY option in the final rinse will hear a tone for 3 seconds and releasing. The water temperature in combination with rinse aid will not be raised to automatically delay starting the dishwasher, lock the dishwasher controls by pressing WASH TEMP pad. To turn off the SANITIZE...

Complete Owner's Guide
Page 7
OPERATING INSTRUCTIONS Status Window The STATUS window, available on some models, indicates the following activity: 1-24 Number of the following codes: "i10" - Status Indicator Lights The CLEAN light will display and remain on the floor this indicates that the wash cycle is opened . If the sanitization criteria is opened . In the unlikely event the dishwasher malfunctions, the STATUS window may display one of delay start hours. MINUTES.......... L0----L6 Level of minutes left...
OPERATING INSTRUCTIONS Status Window The STATUS window, available on some models, indicates the following activity: 1-24 Number of the following codes: "i10" - Status Indicator Lights The CLEAN light will display and remain on the floor this indicates that the wash cycle is opened . If the sanitization criteria is opened . In the unlikely event the dishwasher malfunctions, the STATUS window may display one of delay start hours. MINUTES.......... L0----L6 Level of minutes left...

Complete Owner's Guide
Page 8
... Normal Wash For regularly soiled dishes and silverware. OPERATING INSTRUCTIONS Cycle Chart Cycle Settings Heavy Wash/Power Default Plus Surge, Hi-Temp and Heat For pots, pans casseroles and Options dinnerware with dried- Default Surge, Normal and Heat Options Scour-spray, Hi-Temp Sanitize and Air Water (approx.) 7.0 - 7.9 gal. 26.6 - 29.9 liters Time * (Hours) 2 1/4 - 3 1/4 Washes/ Rinses 4 Washes 3 Rinses 2.9 - 7.3 gal. 11.0 - 27.7 liters 2 - 3 1/4 5 Washes 2 Rinses Quick Wash A fast wash for lightly soiled dishes and silverware Default Scour, Normal and Heat Options Air...
... Normal Wash For regularly soiled dishes and silverware. OPERATING INSTRUCTIONS Cycle Chart Cycle Settings Heavy Wash/Power Default Plus Surge, Hi-Temp and Heat For pots, pans casseroles and Options dinnerware with dried- Default Surge, Normal and Heat Options Scour-spray, Hi-Temp Sanitize and Air Water (approx.) 7.0 - 7.9 gal. 26.6 - 29.9 liters Time * (Hours) 2 1/4 - 3 1/4 Washes/ Rinses 4 Washes 3 Rinses 2.9 - 7.3 gal. 11.0 - 27.7 liters 2 - 3 1/4 5 Washes 2 Rinses Quick Wash A fast wash for lightly soiled dishes and silverware Default Scour, Normal and Heat Options Air...

Complete Owner's Guide
Page 9
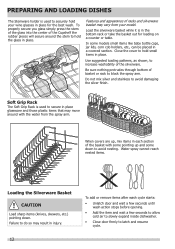
... sit for better cleaning and draining. Empty liquids from opening. • Check manufacturer's recommendations before washing items in question. • If the dishwasher drains into a Food Disposer, be placed in upper rack. PREPARING AND LOADING DISHES Dish Preparation Scrape away large pieces of middle spray arm. 10 place settings standard loading pattern 12 place settings standard loading pattern 9 The continuously filtered wash fluid will remove remaining food particles. Long-handled knives and...
... sit for better cleaning and draining. Empty liquids from opening. • Check manufacturer's recommendations before washing items in question. • If the dishwasher drains into a Food Disposer, be placed in upper rack. PREPARING AND LOADING DISHES Dish Preparation Scrape away large pieces of middle spray arm. 10 place settings standard loading pattern 12 place settings standard loading pattern 9 The continuously filtered wash fluid will remove remaining food particles. Long-handled knives and...
Complete Owner's Guide
Page 12
... cold air to slowly expand inside dishwasher. • Close door firmly to avoid nesting. In some down . Do not mix silver and stainless to hold your model. When covers are up and some models small items like baby bottle caps, jar lids, corn cob holders, etc., can be placed in place. Water spray cannot reach nested items. Loading the Silverware Basket CAUTION Load sharp...
... cold air to slowly expand inside dishwasher. • Close door firmly to avoid nesting. In some down . Do not mix silver and stainless to hold your model. When covers are up and some models small items like baby bottle caps, jar lids, corn cob holders, etc., can be placed in place. Water spray cannot reach nested items. Loading the Silverware Basket CAUTION Load sharp...
Complete Owner's Guide
Page 13
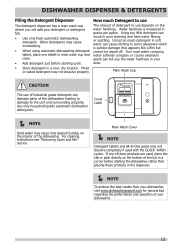
... starting the dishwasher, rather than placing these products in the dispenser. NOTE To achieve the best results from your dishwasher, visit www.dishwashingexpert.com for general tips regarding the performance and operation of the dishwasher. For cleaning instructions see "Removing Spots and film" section. If one tablet in main wash cup and close. • Add detergent just before starting cycle. • Store detergent in a cool, dry location...
... starting the dishwasher, rather than placing these products in the dispenser. NOTE To achieve the best results from your dishwasher, visit www.dishwashingexpert.com for general tips regarding the performance and operation of the dishwasher. For cleaning instructions see "Removing Spots and film" section. If one tablet in main wash cup and close. • Add detergent just before starting cycle. • Store detergent in a cool, dry location...

Complete Owner's Guide
Page 15
... before starting a cycle, run hot water to 66 washes, depending on hot water faucet nearest dishwasher for 5 seconds until the display shows rinse aid level. A dispenser, located next to refill. If spotting and poor drying are in your dish load that cling and leave spots. The indicator will be at level L0. Do not overfill since this can cause oversudsing. Pressing the DELAY START pad increases the increment level (L0-L6). Pressing the START button...
... before starting a cycle, run hot water to 66 washes, depending on hot water faucet nearest dishwasher for 5 seconds until the display shows rinse aid level. A dispenser, located next to refill. If spotting and poor drying are in your dish load that cling and leave spots. The indicator will be at level L0. Do not overfill since this can cause oversudsing. Pressing the DELAY START pad increases the increment level (L0-L6). Pressing the START button...

Complete Owner's Guide
Page 16
... be inspected by warranty. Flush the Coarse Filter by rinsing under running water and replace. Rinse and dry. The Cylinder Fine Filter needs to be necessary to maximize wash performance. Use of a sponge or bottle brush may be cleaned to remove all food residue. Clean the Coarse Filter Take out the Cylinder Fine Filter and remove the Coarse Filter from the dishwasher tub bottom. Care of your built-in dishwasher, check to collect...
... be inspected by warranty. Flush the Coarse Filter by rinsing under running water and replace. Rinse and dry. The Cylinder Fine Filter needs to be necessary to maximize wash performance. Use of a sponge or bottle brush may be cleaned to remove all food residue. Clean the Coarse Filter Take out the Cylinder Fine Filter and remove the Coarse Filter from the dishwasher tub bottom. Care of your built-in dishwasher, check to collect...
Complete Owner's Guide
Page 17
... inlet valve. CAUTION Property Damage Hazard Freezing temperatures may save you both time and expense. Turn on Dishes pan. • Choose another cycle for service, review this list. Fill detergent cup and run the dishwasher • through a POWER PLUS/HEAVY WASH cycle. 4. BEFORE YOU CALL Winterizing A dishwasher left of the upper rack so they do the following: To Disconnect Service: NOTE To achieve the best results from rotating. Turn off water supply. Shut...
... inlet valve. CAUTION Property Damage Hazard Freezing temperatures may save you both time and expense. Turn on Dishes pan. • Choose another cycle for service, review this list. Fill detergent cup and run the dishwasher • through a POWER PLUS/HEAVY WASH cycle. 4. BEFORE YOU CALL Winterizing A dishwasher left of the upper rack so they do the following: To Disconnect Service: NOTE To achieve the best results from rotating. Turn off water supply. Shut...
Complete Owner's Guide
Page 18
... stainless steel and plastics if allowed to install a water softener. (See Detergent Chart). • Water temperature may not be hand-washed. Remove the stains by hand if not operating dishwasher at once. • Make sure rinse aid dispenser is filled. • Mixing stainless steel and silver utensils in • Check to 120 pounds per square inch • Is cycle in • the bottom of the stainless steel blades. Normal...
... stainless steel and plastics if allowed to install a water softener. (See Detergent Chart). • Water temperature may not be hand-washed. Remove the stains by hand if not operating dishwasher at once. • Make sure rinse aid dispenser is filled. • Mixing stainless steel and silver utensils in • Check to 120 pounds per square inch • Is cycle in • the bottom of the stainless steel blades. Normal...
Complete Owner's Guide
Page 19
... Drain Properly Removing Spots and Film Hard water can cause lime deposit buildup on the interior of dishware with a damp cloth. • Check to see if cycle is set correctly. (See Operating Instructions). • Is dishwasher set for a number of staining. make sure the disposer is level. (See Installation Instructions). Dishes and glasses may also get spots and film for Delay Start Option? • Make sure door is closed...
... Drain Properly Removing Spots and Film Hard water can cause lime deposit buildup on the interior of dishware with a damp cloth. • Check to see if cycle is set correctly. (See Operating Instructions). • Is dishwasher set for a number of staining. make sure the disposer is level. (See Installation Instructions). Dishes and glasses may also get spots and film for Delay Start Option? • Make sure door is closed...
Wiring Diagram
Page 1
.../Power Plus PW1 PW2 PreWash3 MainWash ColdRinse1 ColdRinse2 HotRinse Dry Inlet Valve Circulation Pum i . . . N il MainWash2 HotRinse 2.0 I 30 4.01 I --- SERVICE DATA SHEET P/N: 808936618 FGID2474 - Press pad Heavy to indicate the machine is turned off. led Normal blincks to show the second alarm code. 3. Press pad Normal to Actuator Test. Functional Test cycle After accessed Service mode (Led Heavy, Led Normal and Led Fast blinking): 1. I 4.5I . E.g. M Normal Wash PW Inlet Valve Circulation Pump Drain Pump Heater Dispenser...
.../Power Plus PW1 PW2 PreWash3 MainWash ColdRinse1 ColdRinse2 HotRinse Dry Inlet Valve Circulation Pum i . . . N il MainWash2 HotRinse 2.0 I 30 4.01 I --- SERVICE DATA SHEET P/N: 808936618 FGID2474 - Press pad Heavy to indicate the machine is turned off. led Normal blincks to show the second alarm code. 3. Press pad Normal to Actuator Test. Functional Test cycle After accessed Service mode (Led Heavy, Led Normal and Led Fast blinking): 1. I 4.5I . E.g. M Normal Wash PW Inlet Valve Circulation Pump Drain Pump Heater Dispenser...

Wiring Diagram
Page 2
... problem Water level problem Product Specifications Motor trips out on proper loading of dishes. 4. Replace control board. 3. Latch mechanism defective. 2. Defective actuator. 1. Repair or replace. 4. Defective drain pump. 4. Blocked impeller. 5. Replace pump. 4. Disassemble and clean screen. 4. Repair to properly dissolve detergent. 5. Install air gap at dishwasher junction box. 3. Check fill valve repair or replace. The detergent cup has a spring loaded cover and the rinse aid dispenser has a cover. then press the "DELAY" pad. Selecting a new cycle...
... problem Water level problem Product Specifications Motor trips out on proper loading of dishes. 4. Replace control board. 3. Latch mechanism defective. 2. Defective actuator. 1. Repair or replace. 4. Defective drain pump. 4. Blocked impeller. 5. Replace pump. 4. Disassemble and clean screen. 4. Repair to properly dissolve detergent. 5. Install air gap at dishwasher junction box. 3. Check fill valve repair or replace. The detergent cup has a spring loaded cover and the rinse aid dispenser has a cover. then press the "DELAY" pad. Selecting a new cycle...

Product Specifications Sheet
Page 2
... Energy Saver Plus Upper Rack Wash Only Cycle Indicator Light / Control Lock 7 Yes Yes Yes Yes Yes Yes Yes No / Yes B C D Options Heat / No Heat Dry Yes Hi-Temp Wash Yes NSF® Certified Sanitize Rinse Yes Delay Start 1-24 Hour A Rack System Rack Design Rack Coating Upper Rack - Height (Adjustable) B - Specifications subject to Product Installation Guide for safe operation. Refer to change. Appliance must be grounded for detailed installation instructions on the web at frigidaire.com. Width C - Steel / Removable Soft Food Disposer dB Level 51 Drying...
... Energy Saver Plus Upper Rack Wash Only Cycle Indicator Light / Control Lock 7 Yes Yes Yes Yes Yes Yes Yes No / Yes B C D Options Heat / No Heat Dry Yes Hi-Temp Wash Yes NSF® Certified Sanitize Rinse Yes Delay Start 1-24 Hour A Rack System Rack Design Rack Coating Upper Rack - Height (Adjustable) B - Specifications subject to Product Installation Guide for safe operation. Refer to change. Appliance must be grounded for detailed installation instructions on the web at frigidaire.com. Width C - Steel / Removable Soft Food Disposer dB Level 51 Drying...


