
Wiring Diagram (All Languages)
Page 2
...WIRING GRN/YEL SPLICE RED GRN/YEL SERVICE CORD RED GRN/YEL LT. BLUE PORKCHOP TAN/YELLOW LT. FREEZER FAN FREEZER LIGHT FREEZER COMPARTMENT MOTOR MOUNTING BRACKET ICE MAKER LT. BLUE REFRIGERATOR LIGHT LT. BLUE BLACK BLACK GRN/YEL BLUE MACHINE COMPARTMENT LT. BLUE BLACK RED YELLOW LT. BLUE ...TAN TAN LT. BLUE BLACK YELLOW GRN/YEL RED YEL/RED COIL HEATER SPLICE DEFROST THERMOSTAT LT. REFRIGERATOR COMPARTMENT DEFROST TIMER BROWN ORANGE RED LT. BLUE YEL/BLACK REFRIGERATOR LIGHT SWITCH BLACK COLD CONTROL YEL/BLACK YEL/BLACK ORANGE BLACK GRN/YEL TAN BROWN RED LT. ...
...WIRING GRN/YEL SPLICE RED GRN/YEL SERVICE CORD RED GRN/YEL LT. BLUE PORKCHOP TAN/YELLOW LT. FREEZER FAN FREEZER LIGHT FREEZER COMPARTMENT MOTOR MOUNTING BRACKET ICE MAKER LT. BLUE REFRIGERATOR LIGHT LT. BLUE BLACK BLACK GRN/YEL BLUE MACHINE COMPARTMENT LT. BLUE BLACK RED YELLOW LT. BLUE ...TAN TAN LT. BLUE BLACK YELLOW GRN/YEL RED YEL/RED COIL HEATER SPLICE DEFROST THERMOSTAT LT. REFRIGERATOR COMPARTMENT DEFROST TIMER BROWN ORANGE RED LT. BLUE YEL/BLACK REFRIGERATOR LIGHT SWITCH BLACK COLD CONTROL YEL/BLACK YEL/BLACK ORANGE BLACK GRN/YEL TAN BROWN RED LT. ...

Installation Instructions (All Languages)
Page 1
... of important safety instructions and to become familiar witrh your new refrigerator. √ Send in Registration card to enjoy your refrigerator must rest firmly on a solid floor. Final Checks Shipping material removed Fresh Food and Freezer controls set Crisper Humidity controls set Registration Card sent in Refer... is complete INSTALLATION CHECKOFF LIST Doors Handles are secure and tight Door seals completely to cabinet on all sides Freezer door is level across the top Leveling Refrigerator is level, side to side and tilted 1/4" (6mm) front to back Toe grille is properly attached to...
... of important safety instructions and to become familiar witrh your new refrigerator. √ Send in Registration card to enjoy your refrigerator must rest firmly on a solid floor. Final Checks Shipping material removed Fresh Food and Freezer controls set Crisper Humidity controls set Registration Card sent in Refer... is complete INSTALLATION CHECKOFF LIST Doors Handles are secure and tight Door seals completely to cabinet on all sides Freezer door is level across the top Leveling Refrigerator is level, side to side and tilted 1/4" (6mm) front to back Toe grille is properly attached to...

Complete Owner's Guide (English)
Page 1
All about the Use &Care of your Refrigerator 242008000 (February 2009) TABLE OF CONTENTS Important Safety Instructions 2 Installation 4 Door Removal Instructions 5 Connecting Water Supply 7 Ice Service 8 Controls 8 Normal Operating Sounds and Sights 9 Care and Cleaning 10 Before you Call 11 Major Appliance Warranty 12 www.frigidaire.com USA 1-800-944-9044 www.frigidaire.ca Canada 1-800-265-8352
All about the Use &Care of your Refrigerator 242008000 (February 2009) TABLE OF CONTENTS Important Safety Instructions 2 Installation 4 Door Removal Instructions 5 Connecting Water Supply 7 Ice Service 8 Controls 8 Normal Operating Sounds and Sights 9 Care and Cleaning 10 Before you Call 11 Major Appliance Warranty 12 www.frigidaire.com USA 1-800-944-9044 www.frigidaire.ca Canada 1-800-265-8352

Complete Owner's Guide (English)
Page 2
...avoided, will result in 2 WARNING WARNING indicates a potentially hazardous situation which is setting solid on all sides Freezer door is level across the top Leveling Refrigerator is level, side-to-side and tilted 1/4" (6mm) front-to-back Toe grille is properly attached ...to cabinet on all corners Electrical Power House power turned on Refrigerator plugged in the presence of automatic ...
...avoided, will result in 2 WARNING WARNING indicates a potentially hazardous situation which is setting solid on all sides Freezer door is level across the top Leveling Refrigerator is level, side-to-side and tilted 1/4" (6mm) front-to-back Toe grille is properly attached ...to cabinet on all corners Electrical Power House power turned on Refrigerator plugged in the presence of automatic ...

Complete Owner's Guide (English)
Page 3
...days". Proper Disposal of the temperature control panel (Electronic controls), or turning the Freezer and Fresh Food controls to the light bulb and other electrical components. Operating the refrigerator with rugs, bedspreads, plastic sheets or stretch wrap may not easily climb inside... into a properly grounded three prong receptacle. The power cord of the appliance is not covered under your refrigerator you throw away your old refrigerator or freezer, please follow the instructions below to a Ground Fault Interruptor (GFI) circuit. To turn off accidentally. Electrical...
...days". Proper Disposal of the temperature control panel (Electronic controls), or turning the Freezer and Fresh Food controls to the light bulb and other electrical components. Operating the refrigerator with rugs, bedspreads, plastic sheets or stretch wrap may not easily climb inside... into a properly grounded three prong receptacle. The power cord of the appliance is not covered under your refrigerator you throw away your old refrigerator or freezer, please follow the instructions below to a Ground Fault Interruptor (GFI) circuit. To turn off accidentally. Electrical...

Complete Owner's Guide (English)
Page 4
...side-to back. Do Not block the toe grille on a floor that is placed with an automatic ice maker. Then level the refrigerator from front to -side. If you may have to allow additional space so the door can be able to adjust leveling screws.... or rise above 110°F (43°C). Your refrigerator is essential for ease of installation, proper air circulation, and plumbing and electrical connections: Sides & Top Back 3/8 inch 1 inch NOTE If your refrigerator. To level your refrigerator. Use the refrigerator only as instructed in this Use & Care Guide. ...
...side-to back. Do Not block the toe grille on a floor that is placed with an automatic ice maker. Then level the refrigerator from front to -side. If you may have to allow additional space so the door can be able to adjust leveling screws.... or rise above 110°F (43°C). Your refrigerator is essential for ease of installation, proper air circulation, and plumbing and electrical connections: Sides & Top Back 3/8 inch 1 inch NOTE If your refrigerator. To level your refrigerator. Use the refrigerator only as instructed in this Use & Care Guide. ...

Complete Owner's Guide (English)
Page 5
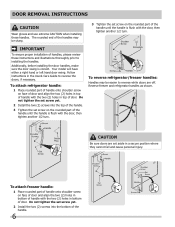
... hinge and tighten with adjustable wrench. 14 Remove cabinet and hinge hole plugs and move to opposite side. 15 Lower freezer door onto center hinge pin. 16 Close freezer door. Set door aside. 3 Unscrew center hinge pin using adjustable wrench. Reversing the door swing should be reversed,...adjustable wrench. 10 Reverse door handles (see instruction on opposite side of door while tightening screws to install top hinge. 17 Flip toe grille and reinstall. 18 Plug in which your refrigerator doors open (door swing) can be performed by removing inside screw and install center hinge. 7 Remove ...
... hinge and tighten with adjustable wrench. 14 Remove cabinet and hinge hole plugs and move to opposite side. 15 Lower freezer door onto center hinge pin. 16 Close freezer door. Set door aside. 3 Unscrew center hinge pin using adjustable wrench. Reversing the door swing should be reversed,...adjustable wrench. 10 Reverse door handles (see instruction on opposite side of door while tightening screws to install top hinge. 17 Flip toe grille and reinstall. 18 Plug in which your refrigerator doors open (door swing) can be performed by removing inside screw and install center hinge. 7 Remove ...
Complete Owner's Guide (English)
Page 6
...handles, make sure the door swing is flush with the door, then tighten another 1/2 turn . Reverse freezer and refrigerator handles as shown. Do not tighten the set aside in top of door. IMPORTANT To ensure proper installation of the handle until the handle is correct. Your model ...Install the two (2) screws into the top of the handle. 3 Tighten the set screw on the rounded part of door. Follow instructions in bottom of the handle until the handle is flush with the door, then tighten another 1/2 turn . To reverse refrigerator/freezer handles: Handles may be easier to...
...handles, make sure the door swing is flush with the door, then tighten another 1/2 turn . Reverse freezer and refrigerator handles as shown. Do not tighten the set aside in top of door. IMPORTANT To ensure proper installation of the handle until the handle is correct. Your model ...Install the two (2) screws into the top of the handle. 3 Tighten the set screw on the rounded part of door. Follow instructions in bottom of the handle until the handle is flush with the door, then tighten another 1/2 turn . To reverse refrigerator/freezer handles: Handles may be easier to...

Complete Owner's Guide (English)
Page 7
... with water when your water dispenser works properly, this tubing is maintained and working properly. Turn OFF water supply at the rear of your refrigerator. NOTE A kit is available from electric power source. 2 Place end of 30-100 psi. (System is to be responsible...) Copper water line Water Valve Bracket Valve Inlet Water Valve Copper water line from electrical power before connecting a water supply line to the refrigerator. CAUTION To avoid property damage: • Copper tubing is clear. Connecting the Water Supply WARNING To avoid electric shock, which can damage...
... with water when your water dispenser works properly, this tubing is maintained and working properly. Turn OFF water supply at the rear of your refrigerator. NOTE A kit is available from electric power source. 2 Place end of 30-100 psi. (System is to be responsible...) Copper water line Water Valve Bracket Valve Inlet Water Valve Copper water line from electrical power before connecting a water supply line to the refrigerator. CAUTION To avoid property damage: • Copper tubing is clear. Connecting the Water Supply WARNING To avoid electric shock, which can damage...
Complete Owner's Guide (English)
Page 8
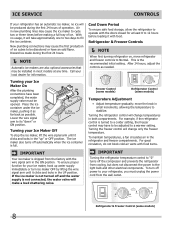
... turned off power to fill the ice container. Turning the freezer control will be discolored or have an odd flavor. Refrigerator & Freezer Control (some models) Temperature Adjustment • Adjust temperature gradually: move refrigerator and freezer controls to a warmer setting. The ice maker also turns...supply immediately or turn off and the water supply is full. IMPORTANT Your ice maker is the recommended initial setting. Freezer Control (some models) Refrigerator Control (some models) 8 For good circulation, do not block cold air vents with the wire signal arm in ...
... turned off power to fill the ice container. Turning the freezer control will be discolored or have an odd flavor. Refrigerator & Freezer Control (some models) Temperature Adjustment • Adjust temperature gradually: move refrigerator and freezer controls to a warmer setting. The ice maker also turns...supply immediately or turn off and the water supply is full. IMPORTANT Your ice maker is the recommended initial setting. Freezer Control (some models) Refrigerator Control (some models) 8 For good circulation, do not block cold air vents with the wire signal arm in ...

Complete Owner's Guide (English)
Page 9
... 3 pounds of major components in the past. J Condenser May create minimal sounds from forced air. 9 E Electronic control & automatic defrost control These parts can cause: A Evaporator Refrigerant through the condenser. B Evaporator fan You may hear air being forced through the evaporator may introduce unfamiliar sounds. This is operating correctly. D Automatic ice maker... or sizzling sound. Some surfaces on usage conditions. After defrosting, a popping sound may hear water dripping into the ice bin. These sounds normally indicate your freezer compartment.
... 3 pounds of major components in the past. J Condenser May create minimal sounds from forced air. 9 E Electronic control & automatic defrost control These parts can cause: A Evaporator Refrigerant through the condenser. B Evaporator fan You may hear air being forced through the evaporator may introduce unfamiliar sounds. This is operating correctly. D Automatic ice maker... or sizzling sound. Some surfaces on usage conditions. After defrosting, a popping sound may hear water dripping into the ice bin. These sounds normally indicate your freezer compartment.
Complete Owner's Guide (English)
Page 10
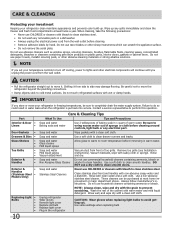
...at least twice a year. Do not use razor blades or other electrical components will continue until you store or move your refrigerator in the refrigerator CAUTION: Wear gloves when replacing light bulbs to perform this operation. Part Interior & Door • Liners • Door Gaskets...dry with bleach to prevent scratching. Care & Cleaning Protecting your investment Keeping your refrigerator clean maintains appearance and prevents odor build-up any spills immediately and clean the freezer and fresh food compartments at most home improvement or major department stores. Shifting ...
...at least twice a year. Do not use razor blades or other electrical components will continue until you store or move your refrigerator in the refrigerator CAUTION: Wear gloves when replacing light bulbs to perform this operation. Part Interior & Door • Liners • Door Gaskets...dry with bleach to prevent scratching. Care & Cleaning Protecting your investment Keeping your refrigerator clean maintains appearance and prevents odor build-up any spills immediately and clean the freezer and fresh food compartments at most home improvement or major department stores. Shifting ...

Complete Owner's Guide (English)
Page 11
Freezer temperature too cold. Automatic ice maker not working . Before You Call 1-800-944-9044 (United States) 1-800-265-8352 (Canada) Visit our web site at www.frigidaire.com. Refrigerator temperature too cold. Reset circuit breaker. • The temperature control is ...tightly pushed into electrical outlet. • Check/replace fuse with a 15 amp time-delay fuse. Wait 20 minutes and check again. • Set freezer control to a warmer setting until freezer...
Freezer temperature too cold. Automatic ice maker not working . Before You Call 1-800-944-9044 (United States) 1-800-265-8352 (Canada) Visit our web site at www.frigidaire.com. Refrigerator temperature too cold. Reset circuit breaker. • The temperature control is ...tightly pushed into electrical outlet. • Check/replace fuse with a 15 amp time-delay fuse. Wait 20 minutes and check again. • Set freezer control to a warmer setting until freezer...

Complete Owner's Guide (English)
Page 12
... have been removed, altered or cannot be required. Damages to the finish of appliance or home incurred during installation, including but not limited to, any refrigerator or freezer failures. 6. THIS WRITTEN WARRANTY GIVES YOU SPECIFIC LEGAL RIGHTS. Service calls to correct the installation of your appliance or to instruct you Need Service...
... have been removed, altered or cannot be required. Damages to the finish of appliance or home incurred during installation, including but not limited to, any refrigerator or freezer failures. 6. THIS WRITTEN WARRANTY GIVES YOU SPECIFIC LEGAL RIGHTS. Service calls to correct the installation of your appliance or to instruct you Need Service...

Product Specifications Sheet (English)
Page 1
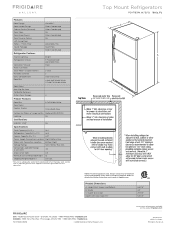
... humidity-controlled crisper drawers. SpillSafe™ Shelves Designed to see what's inside. frigidaire.com Ft. Cool Zone™ Drawer Clear Dairy Door ENERGY STAR® Available in our humidity-controlled crisper drawers. Bright Lighting Our bright lighting makes it . Top Mount Product Dimensions Height (Including Hinges & Rollers) Width Depth 66-1/8" 30" ... system makes it easy to keep food organized and easy to find when you need it easy to keep spills contained, making cleanup a breeze. Top Mount Refrigerators FGHT1834 W / B / Q Signature Features 18 Cu.
... humidity-controlled crisper drawers. SpillSafe™ Shelves Designed to see what's inside. frigidaire.com Ft. Cool Zone™ Drawer Clear Dairy Door ENERGY STAR® Available in our humidity-controlled crisper drawers. Bright Lighting Our bright lighting makes it . Top Mount Product Dimensions Height (Including Hinges & Rollers) Width Depth 66-1/8" 30" ... system makes it easy to keep food organized and easy to find when you need it easy to keep spills contained, making cleanup a breeze. Top Mount Refrigerators FGHT1834 W / B / Q Signature Features 18 Cu.
Product Specifications Sheet (English)
Page 2
... information available on the web at frigidaire.com. Frigidaire Professional Top Mount Refrigerators FGHT1834K W / B / Q 18 Cu. Half-Width White 1 Fixed Full-Width White Door Racks Non-Slip Bin Liner Tall Bottle Retainers Gallon Door Storage Freezer Features Door Bins Door Racks Freezer Shelves 4 2 Full-Width White ... Door Stops Door Hinge Covers Door Reverse Option Left-Swing Door Rollers - Hinges and Rollers) B - Ft.) 14.13 Freezer Capacity (Cu. Ft.) 4.07 Power Supply Connection Location Right Bottom Rear Water Inlet Connection Location Bottom Right Voltage Rating 120V ...
... information available on the web at frigidaire.com. Frigidaire Professional Top Mount Refrigerators FGHT1834K W / B / Q 18 Cu. Half-Width White 1 Fixed Full-Width White Door Racks Non-Slip Bin Liner Tall Bottle Retainers Gallon Door Storage Freezer Features Door Bins Door Racks Freezer Shelves 4 2 Full-Width White ... Door Stops Door Hinge Covers Door Reverse Option Left-Swing Door Rollers - Hinges and Rollers) B - Ft.) 14.13 Freezer Capacity (Cu. Ft.) 4.07 Power Supply Connection Location Right Bottom Rear Water Inlet Connection Location Bottom Right Voltage Rating 120V ...


