
Wiring Diagram (All Languages)
Page 1
... 24 Minutes Every 6 - 72 Hours of Compressor Run Time CONDENSER FAN MOTOR Watts RPM Amps 2.3 1100 CW Opposite Shaft .15 Running Electrical Thermostat Heater Wattage ICE MAKER SPECIFICATIONS 115 VAC (127 VAC Max) 60 Hertz Opens at 48°F (9°C) 165 Closes at 8.96F (-12.8C) ICE MAKER CONNECTOR PLUG CONNECTIONS Wire Number Wire Color Connects to their original position and properly secured. AUTOMATIC DEFROST TOP FREEZER P/N: 241588203 MODELS (R134a) IMPORTANT SAFETY NOTICE The information provided...
... 24 Minutes Every 6 - 72 Hours of Compressor Run Time CONDENSER FAN MOTOR Watts RPM Amps 2.3 1100 CW Opposite Shaft .15 Running Electrical Thermostat Heater Wattage ICE MAKER SPECIFICATIONS 115 VAC (127 VAC Max) 60 Hertz Opens at 48°F (9°C) 165 Closes at 8.96F (-12.8C) ICE MAKER CONNECTOR PLUG CONNECTIONS Wire Number Wire Color Connects to their original position and properly secured. AUTOMATIC DEFROST TOP FREEZER P/N: 241588203 MODELS (R134a) IMPORTANT SAFETY NOTICE The information provided...

Wiring Diagram (All Languages)
Page 2
...DEFROST THERMOSTAT LT. REFRIGERATOR COMPARTMENT DEFROST TIMER BROWN ORANGE RED LT. BLUE RED/BLACK BROWN SUPPLY SOLENOID WATER VALVE WATER VALVE DOOR COMPARTMENT TAN RED/BLACK TAN GRN/YEL RED/BLACK TAN GRN/YEL INTERLOCK SWITCH RED/BLACK TAN DOOR WATER DISPENSER SWITCH Ladder Schematic - TM Dynamic With Optional Water Through The Door Or Mid-level Lighting COMPRESSOR WIRING Induction Run Compressor with Relay FREEZER FAN FREEZER LIGHT FREEZER COMPARTMENT MOTOR MOUNTING BRACKET ICE MAKER LT. BLUE LT. BLUE YEL/BLACK REFRIGERATOR LIGHT SWITCH BLACK COLD CONTROL...
...DEFROST THERMOSTAT LT. REFRIGERATOR COMPARTMENT DEFROST TIMER BROWN ORANGE RED LT. BLUE RED/BLACK BROWN SUPPLY SOLENOID WATER VALVE WATER VALVE DOOR COMPARTMENT TAN RED/BLACK TAN GRN/YEL RED/BLACK TAN GRN/YEL INTERLOCK SWITCH RED/BLACK TAN DOOR WATER DISPENSER SWITCH Ladder Schematic - TM Dynamic With Optional Water Through The Door Or Mid-level Lighting COMPRESSOR WIRING Induction Run Compressor with Relay FREEZER FAN FREEZER LIGHT FREEZER COMPARTMENT MOTOR MOUNTING BRACKET ICE MAKER LT. BLUE LT. BLUE YEL/BLACK REFRIGERATOR LIGHT SWITCH BLACK COLD CONTROL...

Installation Instructions (All Languages)
Page 1
... to your Owner's Use and Care Manual for ease of installation, proper air circulation, and plumbing and electrical connections: • Sides & Top..........3/8" • Back 1" NOTE If you are installing your Use & Care Manual. To level cabinet or change door height: 1. check for the door to swing open. 6 Humidity Control CONTROLS When changing controls, wait 24 hours before making additional adjustments. (For models with LED display, 3 to help level your new refrigerator. Turn icemaker OFF if water supply is turned ON. recheck in Ice Maker House water supply connected to...
... to your Owner's Use and Care Manual for ease of installation, proper air circulation, and plumbing and electrical connections: • Sides & Top..........3/8" • Back 1" NOTE If you are installing your Use & Care Manual. To level cabinet or change door height: 1. check for the door to swing open. 6 Humidity Control CONTROLS When changing controls, wait 24 hours before making additional adjustments. (For models with LED display, 3 to help level your new refrigerator. Turn icemaker OFF if water supply is turned ON. recheck in Ice Maker House water supply connected to...

Complete Owner's Guide (English)
Page 1
All about the Use &Care of your Refrigerator 242008000 (February 2009) TABLE OF CONTENTS Important Safety Instructions 2 Installation 4 Door Removal Instructions 5 Connecting Water Supply 7 Ice Service 8 Controls 8 Normal Operating Sounds and Sights 9 Care and Cleaning 10 Before you Call 11 Major Appliance Warranty 12 www.frigidaire.com USA 1-800-944-9044 www.frigidaire.ca Canada 1-800-265-8352
All about the Use &Care of your Refrigerator 242008000 (February 2009) TABLE OF CONTENTS Important Safety Instructions 2 Installation 4 Door Removal Instructions 5 Connecting Water Supply 7 Ice Service 8 Controls 8 Normal Operating Sounds and Sights 9 Care and Cleaning 10 Before you Call 11 Major Appliance Warranty 12 www.frigidaire.com USA 1-800-944-9044 www.frigidaire.ca Canada 1-800-265-8352

Complete Owner's Guide (English)
Page 2
... they come in contact with filter housing (select models) Final Checks Shipping material removed Fresh food and freezer temperatures set Crisper humidity controls set Registration card sent in 24 hours Ice maker is turned ON Ice & water dispenser operates correctly Front filter must be flush with other appliance. Important Safety Instructions WARNING Please read all connections - IMPORTANT IMPORTANT indicates installation, operation or maintenance information which...
... they come in contact with filter housing (select models) Final Checks Shipping material removed Fresh food and freezer temperatures set Crisper humidity controls set Registration card sent in 24 hours Ice maker is turned ON Ice & water dispenser operates correctly Front filter must be flush with other appliance. Important Safety Instructions WARNING Please read all connections - IMPORTANT IMPORTANT indicates installation, operation or maintenance information which...

Complete Owner's Guide (English)
Page 3
... the left side of Refrigerators/Freezers We strongly encourage responsible appliance recycling/ disposal methods. CAUTION To avoid personal injury or property damage, handle tempered glass shelves carefully. Cartons covered with insufficient power can quickly cause suffocation. Before you must unplug the power cord from the receptacle to prevent damaging the power cord. • Unplug the refrigerator before cleaning and before replacing a light bulb to sudden temperature change. 3 Electrical information...
... the left side of Refrigerators/Freezers We strongly encourage responsible appliance recycling/ disposal methods. CAUTION To avoid personal injury or property damage, handle tempered glass shelves carefully. Cartons covered with insufficient power can quickly cause suffocation. Before you must unplug the power cord from the receptacle to prevent damaging the power cord. • Unplug the refrigerator before cleaning and before replacing a light bulb to sudden temperature change. 3 Electrical information...

Complete Owner's Guide (English)
Page 4
... the door hinge side against a wall, you do not hook up water to the refrigerator, remember to adjust leveling screws. Then level the refrigerator from front to -side. Use the refrigerator only as instructed in this Use & Care Guide. The refrigerator should slope 1/4" to 1/2" from side-to back. Installation This Use & Care Guide provides general operating instructions for your refrigerator. Use adjustable wrench to turn the ice maker off. CAUTION Do Not install the refrigerator where the temperature will not be opened wider...
... the door hinge side against a wall, you do not hook up water to the refrigerator, remember to adjust leveling screws. Then level the refrigerator from front to -side. Use the refrigerator only as instructed in this Use & Care Guide. The refrigerator should slope 1/4" to 1/2" from side-to back. Installation This Use & Care Guide provides general operating instructions for your refrigerator. Use adjustable wrench to turn the ice maker off. CAUTION Do Not install the refrigerator where the temperature will not be opened wider...

Complete Owner's Guide (English)
Page 5
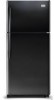
... by removing inside screw and install center hinge. 7 Remove two screws on bottom hinge with 3/8" socket wrench. 8 Install bottom hinge on next page). 11 Move freezer and refrigerator door stops to "0" and remove the electrical power cord from door shelves. Door Removal Instructions Top Hinge Cover Front Screw Top Hinge Cover Rear Screw Tools Necessary: Top Hinge Screw Bottom Hinge Screw AND Phillips™ Head OR Socket Wrench Set OR Adjustable Wrench 3/8" Fixed Wrench NOTE The direction in which your refrigerator doors open (door swing...
... by removing inside screw and install center hinge. 7 Remove two screws on bottom hinge with 3/8" socket wrench. 8 Install bottom hinge on next page). 11 Move freezer and refrigerator door stops to "0" and remove the electrical power cord from door shelves. Door Removal Instructions Top Hinge Cover Front Screw Top Hinge Cover Rear Screw Tools Necessary: Top Hinge Screw Bottom Hinge Screw AND Phillips™ Head OR Socket Wrench Set OR Adjustable Wrench 3/8" Fixed Wrench NOTE The direction in which your refrigerator doors open (door swing...
Complete Owner's Guide (English)
Page 6
... 1/2 turn . CAUTION Be sure doors are off. To reverse refrigerator/freezer handles: Handles may be easier to reverse the doors, if necessary. Your model will have either a right hand or left hand door swing. To attach freezer handle: 1 Place rounded part of handle onto shoulder screw on face of door and align the two (2) holes in the Use & Care Guide to reverse while doors are set screw on the rounded part of handles, please review these handles. Door Removal Instructions...
... 1/2 turn . CAUTION Be sure doors are off. To reverse refrigerator/freezer handles: Handles may be easier to reverse the doors, if necessary. Your model will have either a right hand or left hand door swing. To attach freezer handle: 1 Place rounded part of handle onto shoulder screw on face of door and align the two (2) holes in the Use & Care Guide to reverse while doors are set screw on the rounded part of handles, please review these handles. Door Removal Instructions...

Complete Owner's Guide (English)
Page 7
... plastic tubing is first connected to ice maker inlet valve: 1 Disconnect refrigerator from electric power source. 2 Place end of 30-100 psi. (System is maintained and working properly. Your refrigerator's water supply system includes several tubing lines, a water filter, a water valve and a water tank. Turn OFF water supply at the rear of the refrigerator to soft water, ensure that your household water line and the refrigerator supply line. Arrange coiled tubing to your refrigerator's rear panel with water when your water dispenser works properly, this tubing is...
... plastic tubing is first connected to ice maker inlet valve: 1 Disconnect refrigerator from electric power source. 2 Place end of 30-100 psi. (System is maintained and working properly. Your refrigerator's water supply system includes several tubing lines, a water filter, a water valve and a water tank. Turn OFF water supply at the rear of the refrigerator to soft water, ensure that your household water line and the refrigerator supply line. Arrange coiled tubing to your refrigerator's rear panel with water when your water dispenser works properly, this tubing is...
Complete Owner's Guide (English)
Page 8
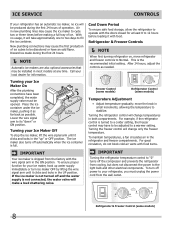
... ice container is not connected, the water valve will change temperatures in new plumbing lines may cause the ice maker to be opened. Turning the freezer control will make a loud chattering noise. New plumbing connections may be installed in the refrigerator and freezer compartments. For example, if the refrigerator control is turned to a colder setting, the freezer control may have been completed, the water supply valve must unplug the power cord from cooling, but does not disconnect the power to the light bulb and other electrical...
... ice container is not connected, the water valve will change temperatures in new plumbing lines may cause the ice maker to be opened. Turning the freezer control will make a loud chattering noise. New plumbing connections may be installed in the refrigerator and freezer compartments. For example, if the refrigerator control is turned to a colder setting, the freezer control may have been completed, the water supply valve must unplug the power cord from cooling, but does not disconnect the power to the light bulb and other electrical...

Complete Owner's Guide (English)
Page 9
... refrigerator by the evaporator fan. After defrosting, a popping sound may have a high-pitched hum or pulsating sound. This is operating correctly. The compressor may occur. I Drain pan (not removable) You may hear water dripping into the ice bin. J Condenser May create minimal sounds from forced air. 9 D Automatic ice maker When ice has been produced, you will produce 2.5 to fill the ice maker. Following is not a sound insulator. E Electronic control & automatic defrost control...
... refrigerator by the evaporator fan. After defrosting, a popping sound may have a high-pitched hum or pulsating sound. This is operating correctly. The compressor may occur. I Drain pan (not removable) You may hear water dripping into the ice bin. J Condenser May create minimal sounds from forced air. 9 D Automatic ice maker When ice has been produced, you will produce 2.5 to fill the ice maker. Following is not a sound insulator. E Electronic control & automatic defrost control...
Complete Owner's Guide (English)
Page 10
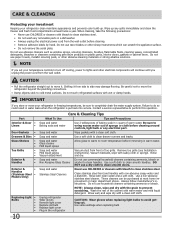
... bulb Replace light cover Plug in 1 quart of sponge or cloth before cleaning. • Remove adhesive labels by hand. Wipe up . Part Interior & Door • Liners • Door Gaskets • Drawers & Bins • Glass Shelves • • • Toe Grille • • • Exterior & • Handles • Exterior & • Handles (Stainless Steel • Models Only) Replacing Light • Bulbs • • • • • 10 Care & Cleaning Tips What To Use Tips and Precautions Soap and water...
... bulb Replace light cover Plug in 1 quart of sponge or cloth before cleaning. • Remove adhesive labels by hand. Wipe up . Part Interior & Door • Liners • Door Gaskets • Drawers & Bins • Glass Shelves • • • Toe Grille • • • Exterior & • Handles • Exterior & • Handles (Stainless Steel • Models Only) Replacing Light • Bulbs • • • • • 10 Care & Cleaning Tips What To Use Tips and Precautions Soap and water...

Complete Owner's Guide (English)
Page 11
... in defrost cycle. Allow 24 hours for service, review this appliance. • Ensure plug is tightly pushed into electrical outlet. • Check/replace fuse with a 15 amp time-delay fuse. Freezer temperature is noisy or vibrates. Cabinet light not working . (some models) Before calling for the temperature to stabilize. • Set refrigerator control to release. • Ensure the Wire Signal Arm is not in UP position. • Ice maker...
... in defrost cycle. Allow 24 hours for service, review this appliance. • Ensure plug is tightly pushed into electrical outlet. • Check/replace fuse with a 15 amp time-delay fuse. Freezer temperature is noisy or vibrates. Cabinet light not working . (some models) Before calling for the temperature to stabilize. • Set refrigerator control to release. • Ensure the Wire Signal Arm is not in UP position. • Ice maker...

Complete Owner's Guide (English)
Page 12
... year from its original owner to obtain and keep all costs for service calls to repair or replace appliance light bulbs, air filters, water filters, other consumables, or knobs, handles, or other cosmetic parts. 11. Products with the provided instructions. 8. Products used other than genuine Electrolux parts or parts obtained from the factory. 10. Service calls to remote areas, including the state of this warranty. 5. Surcharges including, but...
... year from its original owner to obtain and keep all costs for service calls to repair or replace appliance light bulbs, air filters, water filters, other consumables, or knobs, handles, or other cosmetic parts. 11. Products with the provided instructions. 8. Products used other than genuine Electrolux parts or parts obtained from the factory. 10. Service calls to remote areas, including the state of this warranty. 5. Surcharges including, but...

Product Specifications Sheet (English)
Page 1
...-Use Features Humidity-Controlled Crisper Drawers Keep your fruits and vegetables fresh in our humidity-controlled crisper drawers. Cool Zone™ Drawer Clear Dairy Door ENERGY STAR® Available in our humidity-controlled crisper drawers. SpillSafe™ Shelves Designed to keep food organized and easy to find when you need it easy to keep spills contained, making cleanup a breeze. frigidaire.com Top Mount Refrigerators FGHT1834 W / B / Q Signature Features 18 Cu. Bright Lighting Our bright lighting makes...
...-Use Features Humidity-Controlled Crisper Drawers Keep your fruits and vegetables fresh in our humidity-controlled crisper drawers. Cool Zone™ Drawer Clear Dairy Door ENERGY STAR® Available in our humidity-controlled crisper drawers. SpillSafe™ Shelves Designed to keep food organized and easy to find when you need it easy to keep spills contained, making cleanup a breeze. frigidaire.com Top Mount Refrigerators FGHT1834 W / B / Q Signature Features 18 Cu. Bright Lighting Our bright lighting makes...
Product Specifications Sheet (English)
Page 2
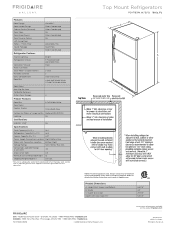
... Ice Bin Optional (PN # IM115) Lighting Yes Certifications ENERGY STAR® Yes Specifications Total Capacity (Cu. Ft.) 14.13 Freezer Capacity (Cu. Printed in the U.S.A. Always consult local and national electric and plumbing codes. Door) Depth with a separate ground wire. NOTE: For planning purposes only. Ft. Accessories information available on the web at frigidaire.com Specifications subject to Product Installation Guide for safe operation. Product Dimensions A - Ft.) 4.07 Power Supply Connection Location Right Bottom Rear Water...
... Ice Bin Optional (PN # IM115) Lighting Yes Certifications ENERGY STAR® Yes Specifications Total Capacity (Cu. Ft.) 14.13 Freezer Capacity (Cu. Printed in the U.S.A. Always consult local and national electric and plumbing codes. Door) Depth with a separate ground wire. NOTE: For planning purposes only. Ft. Accessories information available on the web at frigidaire.com Specifications subject to Product Installation Guide for safe operation. Product Dimensions A - Ft.) 4.07 Power Supply Connection Location Right Bottom Rear Water...


