Complete Owner's Guide (English)
Page 1
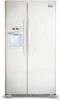
All about the Use &Care of your Refrigerator 242108500 (January 2010) TABLE OF CONTENTS Important Safety Instructions 2 Features at a Glance 4 Installation 5 Door Removal Instructions 7 Handle Installation 8 Connecting Water Supply 9 Controls 10 Storage Features 12 Automatic Ice & Water Dispenser 13 Changing the Filter 15 Normal Operating Sounds and Sights 17 Care and Cleaning 18 Before you Call 19 Major Appliance Warranty 21 www.frigidaire.com USA 1-800-944-9044 www.frigidaire.ca Canada 1-800-265-8352
All about the Use &Care of your Refrigerator 242108500 (January 2010) TABLE OF CONTENTS Important Safety Instructions 2 Features at a Glance 4 Installation 5 Door Removal Instructions 7 Handle Installation 8 Connecting Water Supply 9 Controls 10 Storage Features 12 Automatic Ice & Water Dispenser 13 Changing the Filter 15 Normal Operating Sounds and Sights 17 Care and Cleaning 18 Before you Call 19 Major Appliance Warranty 21 www.frigidaire.com USA 1-800-944-9044 www.frigidaire.ca Canada 1-800-265-8352
Complete Owner's Guide (English)
Page 2
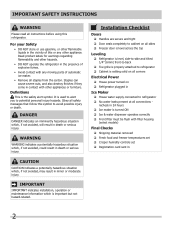
... It is setting solid on all corners Electrical Power House power turned on all sides Freezer door is level across the top Leveling Refrigerator is level, side-to-side and tilted 1/4" (6mm) front-to-back Toe grille is properly attached to ... CAUTION CAUTION indicates a potentially hazardous situation which is important but not hazard-related. Read product labels for warnings regarding flammability and other appliances or furniture. For your Safety • DO NOT store or use gasoline, or other flammable liquids in the presence of explosive fumes....
... It is setting solid on all corners Electrical Power House power turned on all sides Freezer door is level across the top Leveling Refrigerator is level, side-to-side and tilted 1/4" (6mm) front-to-back Toe grille is properly attached to ... CAUTION CAUTION indicates a potentially hazardous situation which is important but not hazard-related. Read product labels for warnings regarding flammability and other appliances or furniture. For your Safety • DO NOT store or use gasoline, or other flammable liquids in the presence of explosive fumes....
Complete Owner's Guide (English)
Page 3
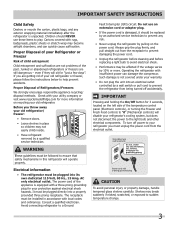
... or more information on recycling your old refrigerator. IMPORTANT Pressing and holding the On/Off button for 3 seconds, located on the left side of child entrapment Child entrapment and suffocation are still dangerous - Cartons covered with rugs, bedspreads, plastic sheets or stretch wrap may be ... controlled by a wall switch or pull cord to play. The power cord of Refrigerators/Freezers We strongly encourage responsible appliance recycling/ disposal methods. CAUTION To avoid personal injury or property damage, handle tempered glass shelves carefully. Proper Disposal of the...
... or more information on recycling your old refrigerator. IMPORTANT Pressing and holding the On/Off button for 3 seconds, located on the left side of child entrapment Child entrapment and suffocation are still dangerous - Cartons covered with rugs, bedspreads, plastic sheets or stretch wrap may be ... controlled by a wall switch or pull cord to play. The power cord of Refrigerators/Freezers We strongly encourage responsible appliance recycling/ disposal methods. CAUTION To avoid personal injury or property damage, handle tempered glass shelves carefully. Proper Disposal of the...
Complete Owner's Guide (English)
Page 7
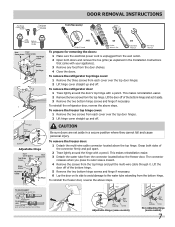
... TO CONNECT Insert tube and push until mark touches face of the bottom hinge and set aside in the Installation Instructions that came with your appliance). 3 Remove any food from the door shelves. 4 Close the doors. Press outer ring against face of the connector firmly and pull apart. 2 ...Adjustable Wrench 3/8" Fixed Wrench To prepare for removing the doors: 1 Make sure the electrical power cord is unplugged from the wall outlet. 2 Open both sides of fitting 2. To remove the freezer top hinge cover: 1 Remove the two screws from each cover over the top door hinges. 2 Lift hinge ...
... TO CONNECT Insert tube and push until mark touches face of the bottom hinge and set aside in the Installation Instructions that came with your appliance). 3 Remove any food from the door shelves. 4 Close the doors. Press outer ring against face of the connector firmly and pull apart. 2 ...Adjustable Wrench 3/8" Fixed Wrench To prepare for removing the doors: 1 Make sure the electrical power cord is unplugged from the wall outlet. 2 Open both sides of fitting 2. To remove the freezer top hinge cover: 1 Remove the two screws from each cover over the top door hinges. 2 Lift hinge ...
Complete Owner's Guide (English)
Page 18
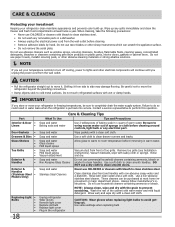
...power to lights and other sharp instruments which can be sure to completely drain the water supply system. These cleaners can scratch the appliance surface. • Do not remove the serial plate. Use same wattage when replacing bulb Do not use CHLORIDE or cleaners with the... towels, metallic scouring pads, or other abrasive cleaning materials or strong alkaline solutions. NOTE If you unplug the power cord from side to perform this operation. Always follow manufacturer's instructions. NOTE: Always clean, wipe and dry with bleach to move the refrigerator beyond the ...
...power to lights and other sharp instruments which can be sure to completely drain the water supply system. These cleaners can scratch the appliance surface. • Do not remove the serial plate. Use same wattage when replacing bulb Do not use CHLORIDE or cleaners with the... towels, metallic scouring pads, or other abrasive cleaning materials or strong alkaline solutions. NOTE If you unplug the power cord from side to perform this operation. Always follow manufacturer's instructions. NOTE: Always clean, wipe and dry with bleach to move the refrigerator beyond the ...
Complete Owner's Guide (English)
Page 21
...loss due to any after hour, weekend, or holiday service calls, tolls, ferry trip charges, or mileage expense for appliances not in your appliance or to instruct you how to establish the warranty period should service be readily determined. 2. CLAIMS BASED ON IMPLIED ... receipts. Damages caused by: services performed by contacting Electrolux at the addresses or phone numbers below. If You Need Service Keep your appliance. 9. This warranty only applies in a commercial setting. 7. Obligations for servicing, such as described or illustrated are not covered by ...
...loss due to any after hour, weekend, or holiday service calls, tolls, ferry trip charges, or mileage expense for appliances not in your appliance or to instruct you how to establish the warranty period should service be readily determined. 2. CLAIMS BASED ON IMPLIED ... receipts. Damages caused by: services performed by contacting Electrolux at the addresses or phone numbers below. If You Need Service Keep your appliance. 9. This warranty only applies in a commercial setting. 7. Obligations for servicing, such as described or illustrated are not covered by ...

Wiring Diagram (All Languages)
Page 1
...SIDE BY SIDE - ice maker information Test Cycling Press the momemtary contact on the ON/OFF switch for 5 seconds. The correct fill is activated. Water Fill Adjustment Motor Gear TUR Mounting N Plate Screws Ice Maker ON/OFF Switch Mounting Plate Screw Timing Gear Disconnect power cord before servicing this appliance...1.5 Base Voltage 115 vac (127 vac max) DEFROST SPECIFICATIONS Cabinet Size Thermostat Cut-in Cut-out Heater Watts Ohms 23', 23' CD, 26' 25° F (-4° C) 47° F (8° C) 450 30 Elecrttonic Timer - (ADC) Defrost 24 minutes every 6-...
...SIDE BY SIDE - ice maker information Test Cycling Press the momemtary contact on the ON/OFF switch for 5 seconds. The correct fill is activated. Water Fill Adjustment Motor Gear TUR Mounting N Plate Screws Ice Maker ON/OFF Switch Mounting Plate Screw Timing Gear Disconnect power cord before servicing this appliance...1.5 Base Voltage 115 vac (127 vac max) DEFROST SPECIFICATIONS Cabinet Size Thermostat Cut-in Cut-out Heater Watts Ohms 23', 23' CD, 26' 25° F (-4° C) 47° F (8° C) 450 30 Elecrttonic Timer - (ADC) Defrost 24 minutes every 6-...

Installation Instructions (All Languages)
Page 1
...supply? • If you had to remove the refrigerator and freezer doors, did you for choosing Frigidaire. 8 Installation Checkoff List Doors Door seals completely to cabinet on all sides Doors are possible if any connections that doors close and seal properly). 1 •... 3.) 3 If the freezer door is designed to be part of a builtin kitchen cabinet system. or you will impair cooling ability of your new appliance • Do not use a flat-blade screwdriver or 3/8 inch socket wrench to raise or lower the front rollers. (See illustration 2.) 7/16"...
...supply? • If you had to remove the refrigerator and freezer doors, did you for choosing Frigidaire. 8 Installation Checkoff List Doors Door seals completely to cabinet on all sides Doors are possible if any connections that doors close and seal properly). 1 •... 3.) 3 If the freezer door is designed to be part of a builtin kitchen cabinet system. or you will impair cooling ability of your new appliance • Do not use a flat-blade screwdriver or 3/8 inch socket wrench to raise or lower the front rollers. (See illustration 2.) 7/16"...


