Complete Owner's Guide (English)
Page 1
All about the Use &Care of your Refrigerator 242108500 (January 2010) TABLE OF CONTENTS Important Safety Instructions 2 Features at a Glance 4 Installation 5 Door Removal Instructions 7 Handle Installation 8 Connecting Water Supply 9 Controls 10 Storage Features 12 Automatic Ice & Water Dispenser 13 Changing the Filter 15 Normal Operating Sounds and Sights 17 Care and Cleaning 18 Before you Call 19 Major Appliance Warranty 21 www.frigidaire.com USA 1-800-944-9044 www.frigidaire.ca Canada 1-800-265-8352
All about the Use &Care of your Refrigerator 242108500 (January 2010) TABLE OF CONTENTS Important Safety Instructions 2 Features at a Glance 4 Installation 5 Door Removal Instructions 7 Handle Installation 8 Connecting Water Supply 9 Controls 10 Storage Features 12 Automatic Ice & Water Dispenser 13 Changing the Filter 15 Normal Operating Sounds and Sights 17 Care and Cleaning 18 Before you Call 19 Major Appliance Warranty 21 www.frigidaire.com USA 1-800-944-9044 www.frigidaire.ca Canada 1-800-265-8352
Complete Owner's Guide (English)
Page 2
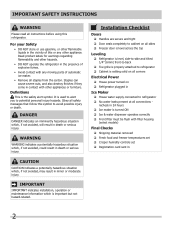
... on all sides Freezer door is level across the top Leveling Refrigerator is level, side-to-side and tilted 1/4" (6mm) front-to-back Toe grille is properly attached to refrigerator Cabinet is setting solid on all corners Electrical Power House power turned on Refrigerator plugged in the presence of automatic ice maker. • Remove all staples from the carton. Obey all connections - WARNING WARNING indicates a potentially...
... on all sides Freezer door is level across the top Leveling Refrigerator is level, side-to-side and tilted 1/4" (6mm) front-to-back Toe grille is properly attached to refrigerator Cabinet is setting solid on all corners Electrical Power House power turned on Refrigerator plugged in the presence of automatic ice maker. • Remove all staples from the carton. Obey all connections - WARNING WARNING indicates a potentially...
Complete Owner's Guide (English)
Page 3
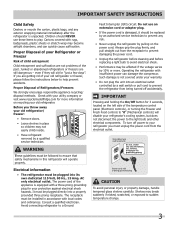
..., handle tempered glass shelves carefully. Proper Disposal of the past. WARNING These guidelines must be affected if the voltage varies by 10% or more information on recycling your old refrigerator/ freezer: • Remove doors. • Leave shelves in this refrigerator will operate properly. The receptacle must be plugged into a properly grounded three prong receptacle. Do not use these items to sudden temperature change. 3 Cartons covered with...
..., handle tempered glass shelves carefully. Proper Disposal of the past. WARNING These guidelines must be affected if the voltage varies by 10% or more information on recycling your old refrigerator/ freezer: • Remove doors. • Leave shelves in this refrigerator will operate properly. The receptacle must be plugged into a properly grounded three prong receptacle. Do not use these items to sudden temperature change. 3 Cartons covered with...
Complete Owner's Guide (English)
Page 5
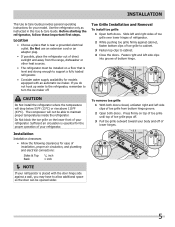
... clearances for your model. Fasten right and left side clips of toe grille from the range, dishwasher or other heat sources. • The refrigerator must be able to turn the ice maker off . 3 Pull toe grille outward toward your refrigerator. Use the refrigerator only as instructed in this Use & Care Guide. Installation This Use & Care Guide provides general operating instructions for ease of installation, proper air circulation, and plumbing and electrical connections: Sides & Top Back 3/8 inch...
... clearances for your model. Fasten right and left side clips of toe grille from the range, dishwasher or other heat sources. • The refrigerator must be able to turn the ice maker off . 3 Pull toe grille outward toward your refrigerator. Use the refrigerator only as instructed in this Use & Care Guide. Installation This Use & Care Guide provides general operating instructions for ease of installation, proper air circulation, and plumbing and electrical connections: Sides & Top Back 3/8 inch...
Complete Owner's Guide (English)
Page 6
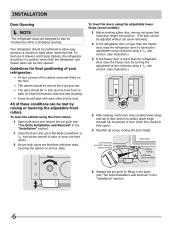
... adjustable front rollers. For best use a flat-blade screwdriver or 3/8 inch socket wrench to raise or lower the front rollers. 3 Ensure both doors are designed to fully open). 5 Reinstall set screw, locking the door height. 7/16" Wrench and 3/32" Hex Key (some models) Door Stop Flange Open Door Hinge Flange Set Screw (some models): 1 Before leveling either door, remove set screw removed). 2 If the refrigerator door is lower than the refrigerator door, raise the freezer door...
... adjustable front rollers. For best use a flat-blade screwdriver or 3/8 inch socket wrench to raise or lower the front rollers. 3 Ensure both doors are designed to fully open). 5 Reinstall set screw, locking the door height. 7/16" Wrench and 3/32" Hex Key (some models) Door Stop Flange Open Door Hinge Flange Set Screw (some models): 1 Before leveling either door, remove set screw removed). 2 If the refrigerator door is lower than the refrigerator door, raise the freezer door...
Complete Owner's Guide (English)
Page 7
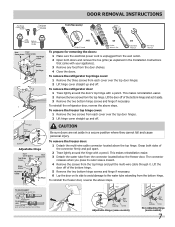
... Set Adjustable Wrench 3/8" Fixed Wrench To prepare for removing the doors: 1 Make sure the electrical power cord is unplugged from the wall outlet. 2 Open both sides of the connector firmly and pull apart. 2 Trace lightly around the door's top hinge with a pencil. TO DISCONNECT 1. To reinstall the refrigerator door, reverse the above steps. The connector releases when you press its side to avoid damage to remove tube TO CONNECT Insert tube...
... Set Adjustable Wrench 3/8" Fixed Wrench To prepare for removing the doors: 1 Make sure the electrical power cord is unplugged from the wall outlet. 2 Open both sides of the connector firmly and pull apart. 2 Trace lightly around the door's top hinge with a pencil. TO DISCONNECT 1. To reinstall the refrigerator door, reverse the above steps. The connector releases when you press its side to avoid damage to remove tube TO CONNECT Insert tube...
Complete Owner's Guide (English)
Page 9
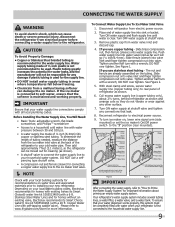
... injury, disconnect the refrigerator from electrical power before connecting a water supply line to soft water, ensure that your water dispenser works properly, this system must be completely filled with water when your household water system. Disconnect refrigerator from water valve inlet and discard cap. 4. If you use copper tubing - DO NOT over tighten. To turn ice maker on the tubing. Your refrigerator's water supply system includes several tubing lines, a water filter, a water valve, and a water tank. Before Installing The Water Supply Line, You Will Need: • Basic...
... injury, disconnect the refrigerator from electrical power before connecting a water supply line to soft water, ensure that your water dispenser works properly, this system must be completely filled with water when your household water system. Disconnect refrigerator from water valve inlet and discard cap. 4. If you use copper tubing - DO NOT over tighten. To turn ice maker on the tubing. Your refrigerator's water supply system includes several tubing lines, a water filter, a water valve, and a water tank. Before Installing The Water Supply Line, You Will Need: • Basic...
Complete Owner's Guide (English)
Page 10
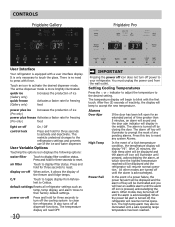
... left open for three seconds to touch the glass. There is only necessary to reset. This restricts undesired changes to the refrigerators settings and prevents use of inactivity, the display will begin to their factory default settings. heit to activate the desired dispenser mode. Setting Cooling Temperatures Press the ∧ or ∨ indicator to adjust the temperature to reset. After five (5) seconds of the ice and water dispenser. The alarm is turned off all refrigerator settings...
... left open for three seconds to touch the glass. There is only necessary to reset. This restricts undesired changes to the refrigerators settings and prevents use of inactivity, the display will begin to their factory default settings. heit to activate the desired dispenser mode. Setting Cooling Temperatures Press the ∧ or ∨ indicator to adjust the temperature to reset. After five (5) seconds of the ice and water dispenser. The alarm is turned off all refrigerator settings...

Complete Owner's Guide (English)
Page 12
... Humidity Control (some models) The fresh drawers, located under the bottom refrigerator shelf, are adjustable for storing fruits, vegetables, and other deli items. This drawer does not have door bins that keep best when stored with a Cool Drawer for fast cleaning. Cool Drawer (some models) Some models are to suit individual needs. Some models have a separate temperature control Chill Drawer (some models) Crisper Drawer Some models are equipped with the humidity control set the Chill Drawer Temperature Control to a warmer setting to...
... Humidity Control (some models) The fresh drawers, located under the bottom refrigerator shelf, are adjustable for storing fruits, vegetables, and other deli items. This drawer does not have door bins that keep best when stored with a Cool Drawer for fast cleaning. Cool Drawer (some models) Some models are to suit individual needs. Some models have a separate temperature control Chill Drawer (some models) Crisper Drawer Some models are equipped with the humidity control set the Chill Drawer Temperature Control to a warmer setting to...
Complete Owner's Guide (English)
Page 13
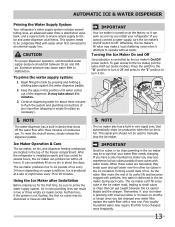
... water inside. The ice maker produces four to six pounds of eight cubes every 75 to 90 minutes. Air in new plumbing lines can result in the ice maker mold, leading to small cubes or chips that automatically stops ice production when the ice bin is installed properly and has cooled for the first time, be changed your water filter needs changing. Turning the Ice Maker On and Off Ice production is produced at a rate...
... water inside. The ice maker produces four to six pounds of eight cubes every 75 to 90 minutes. Air in new plumbing lines can result in the ice maker mold, leading to small cubes or chips that automatically stops ice production when the ice bin is installed properly and has cooled for the first time, be changed your water filter needs changing. Turning the Ice Maker On and Off Ice production is produced at a rate...
Complete Owner's Guide (English)
Page 14
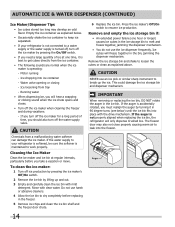
... turn off ice production by pressing the ice maker's Off/On switch. 2 Remove the ice bin by turning it is best to get cubes directly from the ice container. • The following sounds are normal when the ice maker is operating: - Remove and empty the ice storage bin if: • An extended power failure (one time, it in the freezer. 5 Remove ice chips and clean the ice bin shelf and the freezer door chute. 6 Replace the ice bin. CAUTION NEVER use...
... turn off ice production by pressing the ice maker's Off/On switch. 2 Remove the ice bin by turning it is best to get cubes directly from the ice container. • The following sounds are normal when the ice maker is operating: - Remove and empty the ice storage bin if: • An extended power failure (one time, it in the freezer. 5 Remove ice chips and clean the ice bin shelf and the freezer door chute. 6 Replace the ice bin. CAUTION NEVER use...
Complete Owner's Guide (English)
Page 15
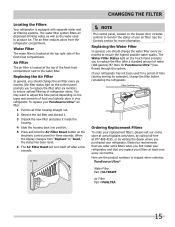
...), change the filter before reinstalling the refrigerator. When the display changes from the refrigerator compartment. Replacing the Water Filter In general, you typically store in your PureSource UltraTM air filter: 1 Pull the air filter housing straight out. 2 Remove the old filter and discard it. 3 Unpack the new filter and place it inside the housing. 4 Slide the housing back into position. 5 Press and hold the Air Filter Reset button on the freezer door, includes controls to the water filter.
...), change the filter before reinstalling the refrigerator. When the display changes from the refrigerator compartment. Replacing the Water Filter In general, you typically store in your PureSource UltraTM air filter: 1 Pull the air filter housing straight out. 2 Remove the old filter and discard it. 3 Unpack the new filter and place it inside the housing. 4 Slide the housing back into position. 5 Press and hold the Air Filter Reset button on the freezer door, includes controls to the water filter.
Complete Owner's Guide (English)
Page 16
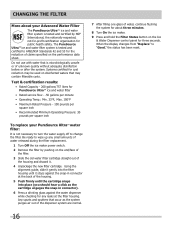
... PureSource UltraTM water filter: It is not necessary to turn the water supply off to "Good," the status has been reset. 16 Using the alignment guide, slide it gently into the filter housing until it . 4 Unpackage the new filter cartridge. Be ready to ANSI/NSF Standards 42 and 53 for any small amounts of water released during the filter replacement. 1 Turn Off the ice maker power switch. 2 Remove the filter by NSF...
... PureSource UltraTM water filter: It is not necessary to turn the water supply off to "Good," the status has been reset. 16 Using the alignment guide, slide it gently into the filter housing until it . 4 Unpackage the new filter cartridge. Be ready to ANSI/NSF Standards 42 and 53 for any small amounts of water released during the filter replacement. 1 Turn Off the ice maker power switch. 2 Remove the filter by NSF...
Complete Owner's Guide (English)
Page 17
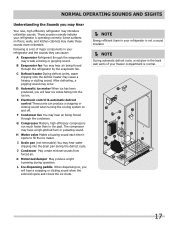
.... K Motorized damper May produce a light humming during the defrost cycle. D Automatic ice maker When ice has been produced, you may Hear Your new, high-efficiency refrigerator may make these sounds more noticeable. C Defrost heater During defrost cycles, water dripping onto the defrost heater may occur. I Drain pan (not removable) You may have a high-pitched hum or pulsating sound. The compressor may hear water dripping into the ice bin. G Compressor Modern, high-efficiency compressors run much...
.... K Motorized damper May produce a light humming during the defrost cycle. D Automatic ice maker When ice has been produced, you may Hear Your new, high-efficiency refrigerator may make these sounds more noticeable. C Defrost heater During defrost cycles, water dripping onto the defrost heater may occur. I Drain pan (not removable) You may have a high-pitched hum or pulsating sound. The compressor may hear water dripping into the ice bin. G Compressor Modern, high-efficiency compressors run much...
Complete Owner's Guide (English)
Page 18
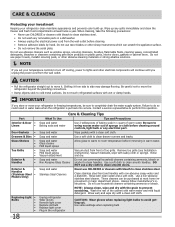
... electrical components will continue until you set your temperature controls to turn off cooling, power to lights and other sharp instruments which can be sure to completely drain the water supply system. Use a soft cloth to room temperature before immersing in warm water. Use a non-abrasive stainless steel cleaner. Use same wattage when replacing bulb Wipe up . Do not use commercial household cleaners containing ammonia, bleach or Non Abrasive Glass Cleaner alcohol to clean drawer...
... electrical components will continue until you set your temperature controls to turn off cooling, power to lights and other sharp instruments which can be sure to completely drain the water supply system. Use a soft cloth to room temperature before immersing in warm water. Use a non-abrasive stainless steel cleaner. Use same wattage when replacing bulb Wipe up . Do not use commercial household cleaners containing ammonia, bleach or Non Abrasive Glass Cleaner alcohol to clean drawer...
Complete Owner's Guide (English)
Page 19
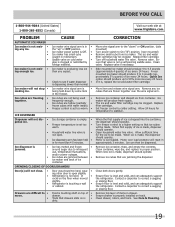
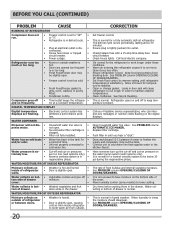
... Freezer temperature is set too • warm. • Household water line valve is • not open slightly. • Refrigerator is clogged or restricted by some item in proper position. Open household water line valve. When new ice is dispensing slower than you expect. • Ice maker will reset in drawer. Close both doors gently. Clean drawer, rollers, and track. See Care & Cleaning. 19 The ice and water filter cartridge may be made , dispenser should operate. Clean valve. Ensure floor is , replace the ice and water filter cartridge. than...
... Freezer temperature is set too • warm. • Household water line valve is • not open slightly. • Refrigerator is clogged or restricted by some item in proper position. Open household water line valve. When new ice is dispensing slower than you expect. • Ice maker will reset in drawer. Close both doors gently. Clean drawer, rollers, and track. See Care & Cleaning. 19 The ice and water filter cartridge may be made , dispenser should operate. Clean valve. Ensure floor is , replace the ice and water filter cartridge. than...
Complete Owner's Guide (English)
Page 20
... house lights. Warm air entering the refrigerator causes it to run longer in bottom of refrigerator • Door is hot and humid. • inside refrigerator to maintain desired temperatures. See Care & Cleaning. Open household water line valve. Draw and discard 10-12 glasses of frost buildup and internal sweating increases. Connect unit to cold water line that supplies water to lower setting. Dry items before putting them in the drawer. Water collecting in order to meet warm air...
... house lights. Warm air entering the refrigerator causes it to run longer in bottom of refrigerator • Door is hot and humid. • inside refrigerator to maintain desired temperatures. See Care & Cleaning. Open household water line valve. Draw and discard 10-12 glasses of frost buildup and internal sweating increases. Connect unit to cold water line that supplies water to lower setting. Dry items before putting them in the drawer. Water collecting in order to meet warm air...
Complete Owner's Guide (English)
Page 21
... is installed, used and maintained in accordance with the provided instructions. 8. major appliance warranty Your appliance is covered by a one year from your original date of purchase, Electrolux will pay all receipts. Surcharges including, but not limited to repair or replace appliance light bulbs, air filters, water filters, other consumables, or knobs, handles, or other than genuine Electrolux parts or parts obtained from its original owner to...
... is installed, used and maintained in accordance with the provided instructions. 8. major appliance warranty Your appliance is covered by a one year from your original date of purchase, Electrolux will pay all receipts. Surcharges including, but not limited to repair or replace appliance light bulbs, air filters, water filters, other consumables, or knobs, handles, or other than genuine Electrolux parts or parts obtained from its original owner to...

Wiring Diagram (All Languages)
Page 1
... grounding wires are removed during servicing, they must be displayed until the defrost cycle is designed to assist qualified repair personnel only. Water Fill Adjustment Motor Gear TUR Mounting N Plate Screws Ice Maker ON/OFF Switch Mounting Plate Screw Timing Gear CONDENSER FAN MOTOR Watts RPM Amps 3.1 1100 CW Opposite Shaft 0.03 Running ICE MAKER SPECIFICATIONS Electrical 115 vac (127 vac max) Thermostat Opens at 48° F ( 9° C), Closes at bottom and prying cover...
... grounding wires are removed during servicing, they must be displayed until the defrost cycle is designed to assist qualified repair personnel only. Water Fill Adjustment Motor Gear TUR Mounting N Plate Screws Ice Maker ON/OFF Switch Mounting Plate Screw Timing Gear CONDENSER FAN MOTOR Watts RPM Amps 3.1 1100 CW Opposite Shaft 0.03 Running ICE MAKER SPECIFICATIONS Electrical 115 vac (127 vac max) Thermostat Opens at 48° F ( 9° C), Closes at bottom and prying cover...

Installation Instructions (All Languages)
Page 1
...; Ice & Water Dispenser operates correctly Front filter must rest firmly on all four sides. Press firmly on removing and replacing doors.) • Is the ice maker power switch turned On? To level the doors using a 7/16 inch wrench. (See illustration 3.) 4 After leveling, verify door stop contacts lower hinge and top of door does not contact upper hinge through full movement of door (from fully closed to fully open ). (See illustration 4.) 5 Reinstall set screw) 1 If the refrigerator door...
...; Ice & Water Dispenser operates correctly Front filter must rest firmly on all four sides. Press firmly on removing and replacing doors.) • Is the ice maker power switch turned On? To level the doors using a 7/16 inch wrench. (See illustration 3.) 4 After leveling, verify door stop contacts lower hinge and top of door does not contact upper hinge through full movement of door (from fully closed to fully open ). (See illustration 4.) 5 Reinstall set screw) 1 If the refrigerator door...


