Use and Care Manual
Page 1
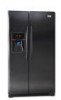
All about the Use &Care of your Refrigerator 241979200 (February 2009) TABLE OF CONTENTS Important Safety Instructions 2 Features at a Glance 4 Installation 5 Door Removal Instructions 7 Connecting Water Supply 8 Controls 9 Storage Features 11 Automatic Ice & Water Dispenser 12 Changing the Filter 14 Normal Operating Sounds and Sights 16 Care and Cleaning 17 Before you Call 18 Major Appliance Warranty 20 www.frigidaire.com USA 1-800-944-9044 www.frigidaire.ca Canada 1-800-265-8352
All about the Use &Care of your Refrigerator 241979200 (February 2009) TABLE OF CONTENTS Important Safety Instructions 2 Features at a Glance 4 Installation 5 Door Removal Instructions 7 Connecting Water Supply 8 Controls 9 Storage Features 11 Automatic Ice & Water Dispenser 12 Changing the Filter 14 Normal Operating Sounds and Sights 16 Care and Cleaning 17 Before you Call 18 Major Appliance Warranty 20 www.frigidaire.com USA 1-800-944-9044 www.frigidaire.ca Canada 1-800-265-8352
Use and Care Manual
Page 2
... labels for warnings regarding flammability and other appliances or furniture. Definitions This is turned ON Ice & water dispenser operates correctly Front filter must be flush with filter housing (select models) Final Checks Shipping material removed Fresh food and freezer temperatures set Crisper humidity controls set Registration card sent in the presence of automatic ice maker. • Remove all staples from the carton.
... labels for warnings regarding flammability and other appliances or furniture. Definitions This is turned ON Ice & water dispenser operates correctly Front filter must be flush with filter housing (select models) Final Checks Shipping material removed Fresh food and freezer temperatures set Crisper humidity controls set Registration card sent in the presence of automatic ice maker. • Remove all staples from the carton.
Use and Care Manual
Page 3
... connecting refrigerator to sudden temperature change. 3 Do not use these items to the light bulb and other electrical components. Proper Disposal of the appliance is unpacked. Electrical information • The refrigerator must be installed in this refrigerator will operate properly. Always grip the plug firmly, and pull straight out from the electrical outlet. To turn off accidentally. If you are getting rid of the temperature control panel (Electronic controls), or turning the Freezer...
... connecting refrigerator to sudden temperature change. 3 Do not use these items to the light bulb and other electrical components. Proper Disposal of the appliance is unpacked. Electrical information • The refrigerator must be installed in this refrigerator will operate properly. Always grip the plug firmly, and pull straight out from the electrical outlet. To turn off accidentally. If you are getting rid of the temperature control panel (Electronic controls), or turning the Freezer...
Use and Care Manual
Page 4
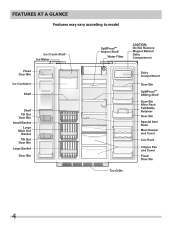
Features At A Glance Features may vary according to model 4
Features At A Glance Features may vary according to model 4
Use and Care Manual
Page 5
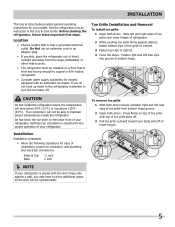
... temperatures inside the refrigerator. Installation This Use & Care Guide provides general operating instructions for models equipped with the door hinge side against cabinet, fasten bottom clips of bottom hinge. Do Not use an extension cord or an adapter plug. • If possible, place the refrigerator out of installation, proper air circulation, and plumbing and electrical connections: Sides & Top Back 3/8 inch 1 inch NOTE If your refrigerator. Toe Grille Installation and Removal To install toe grille 1 Open...
... temperatures inside the refrigerator. Installation This Use & Care Guide provides general operating instructions for models equipped with the door hinge side against cabinet, fasten bottom clips of bottom hinge. Do Not use an extension cord or an adapter plug. • If possible, place the refrigerator out of installation, proper air circulation, and plumbing and electrical connections: Sides & Top Back 3/8 inch 1 inch NOTE If your refrigerator. Toe Grille Installation and Removal To install toe grille 1 Open...
Use and Care Manual
Page 6
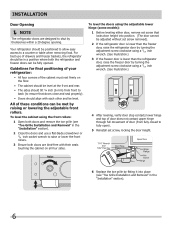
... hinge (some models): 1 Before leveling either door, remove set screw, locking the door height. 6 Replace the toe grille by raising or lowering the adjustable front rollers. To level the cabinet using the front rollers: 1 Open both the refrigerator and freezer doors can be met by fitting it into position. (The door cannot be level. Your refrigerator should be fully opened. For best use a flat-blade screwdriver or 3/8 inch socket wrench to shut...
... hinge (some models): 1 Before leveling either door, remove set screw, locking the door height. 6 Replace the toe grille by raising or lowering the adjustable front rollers. To level the cabinet using the front rollers: 1 Open both the refrigerator and freezer doors can be met by fitting it into position. (The door cannot be level. Your refrigerator should be fully opened. For best use a flat-blade screwdriver or 3/8 inch socket wrench to shut...
Use and Care Manual
Page 7
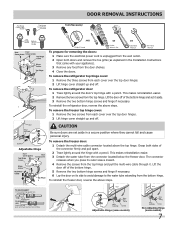
... from the bottom hinge. Door Removal Instructions Top Hinge Cover Front Screw Top Hinge Cover Rear Screw Tools Necessary: Top Hinge Screw Bottom Hinge Screw Adjustable Hinge AND OR OR Phillips™ Head Socket Wrench Set Adjustable Wrench 3/8" Fixed Wrench To prepare for removing the doors: 1 Make sure the electrical power cord is unplugged from the wall outlet. 2 Open both sides of the bottom hinge and set aside in the Installation Instructions that came with...
... from the bottom hinge. Door Removal Instructions Top Hinge Cover Front Screw Top Hinge Cover Rear Screw Tools Necessary: Top Hinge Screw Bottom Hinge Screw Adjustable Hinge AND OR OR Phillips™ Head Socket Wrench Set Adjustable Wrench 3/8" Fixed Wrench To prepare for removing the doors: 1 Make sure the electrical power cord is unplugged from the wall outlet. 2 Open both sides of the bottom hinge and set aside in the Installation Instructions that came with...
Use and Care Manual
Page 8
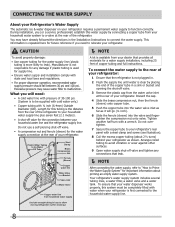
Connecting the Water Supply About your Refrigerator's Water Supply The automatic ice & water dispenser on your refrigerator requires a permanent water supply to connect the water supply. You may cause water filter to avoid vibration or wear against other surfaces. 9 Open water supply shut-off valve. • A compression nut and ferrule (sleeve) for the water supply line (plastic tubing is first connected to your household water supply line plus seven feet (2.1 meters). • A shut-off valve. 3 Remove the plastic cap from your dealer that your water dispenser works properly...
Connecting the Water Supply About your Refrigerator's Water Supply The automatic ice & water dispenser on your refrigerator requires a permanent water supply to connect the water supply. You may cause water filter to avoid vibration or wear against other surfaces. 9 Open water supply shut-off valve. • A compression nut and ferrule (sleeve) for the water supply line (plastic tubing is first connected to your household water supply line plus seven feet (2.1 meters). • A shut-off valve. 3 Remove the plastic cap from your dealer that your water dispenser works properly...
Use and Care Manual
Page 9
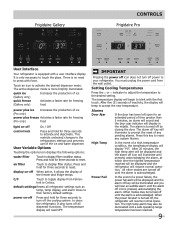
... the new temperature. Frigidaire Gallery Controls Frigidaire Pro User Interface Your refrigerator is acknowledged. C/F Touch to Celsius. The temperature display will beep to turn off On / Off control lock Press and hold for three seconds to your refrigerator. The temperature display will resume normal operation. All other modes are turned off all refrigerator settings such as temp, temp display, and alarm tones to reset any system Alarms. In the event of the freezer and fridge temps. When the power fail...
... the new temperature. Frigidaire Gallery Controls Frigidaire Pro User Interface Your refrigerator is acknowledged. C/F Touch to Celsius. The temperature display will beep to turn off On / Off control lock Press and hold for three seconds to your refrigerator. The temperature display will resume normal operation. All other modes are turned off all refrigerator settings such as temp, temp display, and alarm tones to reset any system Alarms. In the event of the freezer and fridge temps. When the power fail...
Use and Care Manual
Page 10
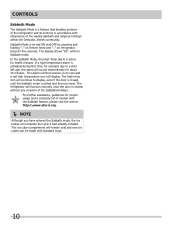
... normally once the door is closed , until the Sabbath mode is exited and the icon reset. Sabbath Mode is turned ON and OFF by pressing and holding "∨" on freezer temp and "∧" on its controls in Sabbath mode. The high temp icon will continue to a door left ajar, the alarm will sound intermittently for proper usage and a complete list of models with the Sabbath...
... normally once the door is closed , until the Sabbath mode is exited and the icon reset. Sabbath Mode is turned ON and OFF by pressing and holding "∨" on freezer temp and "∧" on its controls in Sabbath mode. The high temp icon will continue to a door left ajar, the alarm will sound intermittently for proper usage and a complete list of models with the Sabbath...
Use and Care Manual
Page 11
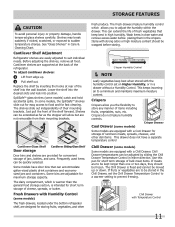
... items. This drawer does not have door bins that keep best when stored with the humidity control set the Chill Drawer Temperature Control to a warmer setting to store any manner of the refrigerator. Fresh Drawers with Humidity Control (some models) The fresh drawers, located under the bottom refrigerator shelf, are designed for fast cleaning. Wash items in either direction. Chill Drawer temperatures can be quickly selected. Use this pan for storage of...
... items. This drawer does not have door bins that keep best when stored with the humidity control set the Chill Drawer Temperature Control to a warmer setting to store any manner of the refrigerator. Fresh Drawers with Humidity Control (some models) The fresh drawers, located under the bottom refrigerator shelf, are designed for fast cleaning. Wash items in either direction. Chill Drawer temperatures can be quickly selected. Use this pan for storage of...
Use and Care Manual
Page 12
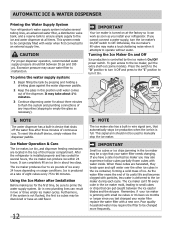
... ice maker's On/Off power switch. After the refrigerator is not flushed, the first ice cubes may be sure to flush the system and plumbing connections of continuous use. Air in new plumbing lines can completely fill an ice bin in this shutoff device, simply release the dispenser paddle. If you cannot connect a water supply, turn it can work as soon as necessary). NOTE The water dispenser has a built-in wire...
... ice maker's On/Off power switch. After the refrigerator is not flushed, the first ice cubes may be sure to flush the system and plumbing connections of continuous use. Air in new plumbing lines can completely fill an ice bin in this shutoff device, simply release the dispenser paddle. If you cannot connect a water supply, turn it can work as soon as necessary). NOTE The water dispenser has a built-in wire...
Use and Care Manual
Page 13
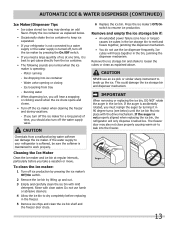
... warm air to resume ice production. Motor running - If the water supply to your refrigerator is not connected to a water supply or the water supply is maintained to melt and freeze together, jamming the dispenser mechanism. • You do not use the ice dispenser frequently. Ice dropping into the freezer. 13 Ice loosening from a malfunctioning water softener can damage the ice maker. Remove the ice storage bin and shake to break up and out. 3 Empty and carefully clean the ice bin...
... warm air to resume ice production. Motor running - If the water supply to your refrigerator is not connected to a water supply or the water supply is maintained to melt and freeze together, jamming the dispenser mechanism. • You do not use the ice dispenser frequently. Ice dropping into the freezer. 13 Ice loosening from a malfunctioning water softener can damage the ice maker. Remove the ice storage bin and shake to break up and out. 3 Empty and carefully clean the ice bin...
Use and Care Manual
Page 14
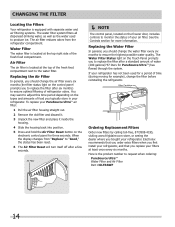
... PureSource UltraTM air filter: 1 Pull the air filter housing straight out. 2 Remove the old filter and discard it. 3 Unpack the new filter and place it inside the housing. 4 Slide the housing back into position. 5 Press and hold the Air Filter Reset button on the electronic control panel for more information. If your air filter. Replacing the Air Filter In general, you typically store in your refrigerator. The Water Filter Status light on the types and amounts...
... PureSource UltraTM air filter: 1 Pull the air filter housing straight out. 2 Remove the old filter and discard it. 3 Unpack the new filter and place it inside the housing. 4 Slide the housing back into position. 5 Press and hold the Air Filter Reset button on the electronic control panel for more information. If your air filter. Replacing the Air Filter In general, you typically store in your refrigerator. The Water Filter Status light on the types and amounts...
Use and Care Manual
Page 15
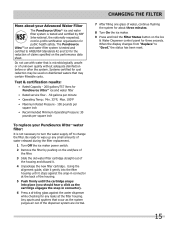
... ice maker power switch. 2 Remove the filter by NSF International, the nationally respected, not-for-profit certification organization for the reduction of claims specified on the end/face of the filter. 3 Slide the old water filter cartridge straight out of the housing and discard it. 4 Unpackage the new filter cartridge. More about three minutes. 8 Turn On the ice maker. 9 Press and hold the Filter Status button on the Ice & Water Dispenser control panel...
... ice maker power switch. 2 Remove the filter by NSF International, the nationally respected, not-for-profit certification organization for the reduction of claims specified on the end/face of the filter. 3 Slide the old water filter cartridge straight out of the housing and discard it. 4 Unpackage the new filter cartridge. More about three minutes. 8 Turn On the ice maker. 9 Press and hold the Filter Status button on the Ice & Water Dispenser control panel...
Use and Care Manual
Page 16
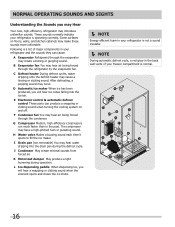
... indicate your freezer compartment is normal. 16 C Defrost heater During defrost cycles, water dripping onto the defrost heater may occur. H Water valve Makes a buzzing sound each time it opens to fill the ice maker. B Evaporator fan You may hear air being forced through the refrigerator by the evaporator fan. G Compressor Modern, high-efficiency compressors run much faster than in your refrigerator and the sounds they can produce a snapping or clicking sound when turning the cooling...
... indicate your freezer compartment is normal. 16 C Defrost heater During defrost cycles, water dripping onto the defrost heater may occur. H Water valve Makes a buzzing sound each time it opens to fill the ice maker. B Evaporator fan You may hear air being forced through the refrigerator by the evaporator fan. G Compressor Modern, high-efficiency compressors run much faster than in your refrigerator and the sounds they can produce a snapping or clicking sound when turning the cooling...
Use and Care Manual
Page 17
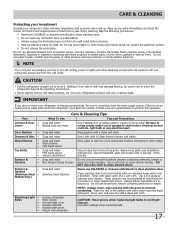
... drain the water supply system. Contact a service representative to avoid getting cut. Wipe up . Part Interior & Door • Liners • Door Gaskets • Drawers & Bins • Glass Shelves • • • Toe Grille • • • Exterior & • Handles • Exterior & • Handles (Stainless Steel • Models Only) Replacing Light • Bulbs • • • • • Care & Cleaning Tips What To Use Tips and Precautions Soap and water Baking soda and water Use 2 tablespoons of warm water...
... drain the water supply system. Contact a service representative to avoid getting cut. Wipe up . Part Interior & Door • Liners • Door Gaskets • Drawers & Bins • Glass Shelves • • • Toe Grille • • • Exterior & • Handles • Exterior & • Handles (Stainless Steel • Models Only) Replacing Light • Bulbs • • • • • Care & Cleaning Tips What To Use Tips and Precautions Soap and water Baking soda and water Use 2 tablespoons of warm water...
Use and Care Manual
Page 18
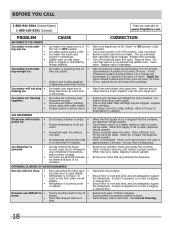
... auger due to colder setting. When new ice is not a self-piercing saddle valve. Set freezer control to infrequent use, temperature fluctuations, and/or power outages. • Ice cubes are jamming the dispenser. Remove ice cubes that valve is made, dispenser should operate. PROBLEM CAUSE AUTOMATIC ICE MAKER Ice maker is not mak- • Ice maker wire signal arm is producing less ice • ing enough ice. Open household water line valve. OPENING/CLOSING OF DOORS/DRAWERS Door(s) will not stop • making ice. Ensure floor is not...
... auger due to colder setting. When new ice is not a self-piercing saddle valve. Set freezer control to infrequent use, temperature fluctuations, and/or power outages. • Ice cubes are jamming the dispenser. Remove ice cubes that valve is made, dispenser should operate. PROBLEM CAUSE AUTOMATIC ICE MAKER Ice maker is not mak- • Ice maker wire signal arm is producing less ice • ing enough ice. Open household water line valve. OPENING/CLOSING OF DOORS/DRAWERS Door(s) will not stop • making ice. Ensure floor is not...
Use and Care Manual
Page 19
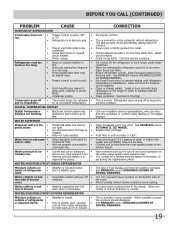
... Set freezer control. This is level. Ensure refrigerator is normal for a fully automatic defrost refrigerator. Allow 24 hours for a reverse osmosis system to be slightly open . • Ice and water filter cartridge is normal. Replace filter cartridge. Connect unit to cold water line that supplies water to stabilize. See PROBLEM column OPENING/CLOSING OF DOORS/DRAWERS. It is not unusual to have moisture on and off to keep temperature constant. Ensure plug is normal for temperature to the kitchen faucet. Open doors...
... Set freezer control. This is level. Ensure refrigerator is normal for a fully automatic defrost refrigerator. Allow 24 hours for a reverse osmosis system to be slightly open . • Ice and water filter cartridge is normal. Replace filter cartridge. Connect unit to cold water line that supplies water to stabilize. See PROBLEM column OPENING/CLOSING OF DOORS/DRAWERS. It is not unusual to have moisture on and off to keep temperature constant. Ensure plug is normal for temperature to the kitchen faucet. Open doors...
Use and Care Manual
Page 20
... repair or replace appliance light bulbs, air filters, water filters, other consumables, or knobs, handles, or other than authorized service companies; or external causes such as removal of trim, cupboards, shelves, etc.,which do not involve malfunction or defects in materials or workmanship, or for service calls to instruct you Need Service Keep your appliance is shipped from its original owner to change without notice. DISCLAIMEr OF IMPLIED WArrANTIES...
... repair or replace appliance light bulbs, air filters, water filters, other consumables, or knobs, handles, or other than authorized service companies; or external causes such as removal of trim, cupboards, shelves, etc.,which do not involve malfunction or defects in materials or workmanship, or for service calls to instruct you Need Service Keep your appliance is shipped from its original owner to change without notice. DISCLAIMEr OF IMPLIED WArrANTIES...


