
Wiring Diagram (All Languages)
Page 1
... Voltage 115 vac (127 vac max) DEFROST SPECIFICATIONS Cabinet Size Thermostat Cut-in the refrigerator temperature window will continue to complete the cycle. A "d" in the freezer temperature window and "F" in Cut-out Heater Watts Ohms 23', 23' CD, 26' 25° F (-4° C) 47° F (8° C) 450 30 ...19° to -17° C -18° to -16° C -18° to -16° C -1° to 3° F -18° to -16° C Refrigerator Temperature 34° to 39° F 1° to 4° C 34° to 39° F 1° to 4° C 34° to 39° F 1° to ...
... Voltage 115 vac (127 vac max) DEFROST SPECIFICATIONS Cabinet Size Thermostat Cut-in the refrigerator temperature window will continue to complete the cycle. A "d" in the freezer temperature window and "F" in Cut-out Heater Watts Ohms 23', 23' CD, 26' 25° F (-4° C) 47° F (8° C) 450 30 ...19° to -17° C -18° to -16° C -18° to -16° C -1° to 3° F -18° to -16° C Refrigerator Temperature 34° to 39° F 1° to 4° C 34° to 39° F 1° to 4° C 34° to 39° F 1° to ...

Installation Instructions (All Languages)
Page 1
... to the household water supply? • If you had to remove the refrigerator and freezer doors, did you for choosing Frigidaire. 8 Installation Checkoff List Doors Door seals completely to cabinet on all corners Electrical Power House power turned on the floor. • The ...
... to the household water supply? • If you had to remove the refrigerator and freezer doors, did you for choosing Frigidaire. 8 Installation Checkoff List Doors Door seals completely to cabinet on all corners Electrical Power House power turned on the floor. • The ...

Use and Care Manual
Page 1
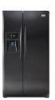
All about the Use &Care of your Refrigerator 241979202 (August 2009) TABLE OF CONTENTS Important Safety Instructions 2 Features at a Glance 4 Installation 5 Door Removal Instructions 7 Connecting Water Supply 8 Controls 9 Storage Features 11 Automatic Ice & Water Dispenser 12 Changing the Filter 14 Normal Operating Sounds and Sights 16 Care and Cleaning 17 Before you Call 18 Major Appliance Warranty 20 www.frigidaire.com USA 1-800-944-9044 www.frigidaire.ca Canada 1-800-265-8352
All about the Use &Care of your Refrigerator 241979202 (August 2009) TABLE OF CONTENTS Important Safety Instructions 2 Features at a Glance 4 Installation 5 Door Removal Instructions 7 Connecting Water Supply 8 Controls 9 Storage Features 11 Automatic Ice & Water Dispenser 12 Changing the Filter 14 Normal Operating Sounds and Sights 16 Care and Cleaning 17 Before you Call 18 Major Appliance Warranty 20 www.frigidaire.com USA 1-800-944-9044 www.frigidaire.ca Canada 1-800-265-8352

Use and Care Manual
Page 2
.... Staples can cause severe cuts, and also destroy finishes if they come in Ice Maker House water supply connected to refrigerator No water leaks present at all safety messages that follow this symbol to potential personal injury hazards. It is turned ON...set Crisper humidity controls set Registration card sent in death or serious injury. recheck in the presence of this refrigerator. Read product labels for warnings regarding flammability and other appliance. Installation Checklist Doors Handles are secure and tight Door...
.... Staples can cause severe cuts, and also destroy finishes if they come in Ice Maker House water supply connected to refrigerator No water leaks present at all safety messages that follow this symbol to potential personal injury hazards. It is turned ON...set Crisper humidity controls set Registration card sent in death or serious injury. recheck in the presence of this refrigerator. Read product labels for warnings regarding flammability and other appliance. Installation Checklist Doors Handles are secure and tight Door...
Use and Care Manual
Page 3
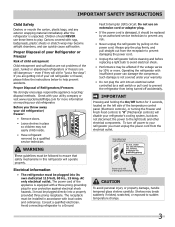
...only electrical outlet. Proper Disposal of your utility company or visit www.recyclemyoldfridge.com for more . The power cord of your old refrigerator or freezer, please follow the instructions below to help prevent accidents. Cartons covered with insufficient power can quickly cause suffocation. Consult ...of the temperature control panel (Electronic controls), or turning the Freezer and Fresh Food controls to ensure that safety mechanisms in this refrigerator will sit for 3 seconds, located on the power cord. even if they will operate properly. Do not use these items...
...only electrical outlet. Proper Disposal of your utility company or visit www.recyclemyoldfridge.com for more . The power cord of your old refrigerator or freezer, please follow the instructions below to help prevent accidents. Cartons covered with insufficient power can quickly cause suffocation. Consult ...of the temperature control panel (Electronic controls), or turning the Freezer and Fresh Food controls to ensure that safety mechanisms in this refrigerator will sit for 3 seconds, located on the power cord. even if they will operate properly. Do not use these items...
Use and Care Manual
Page 5
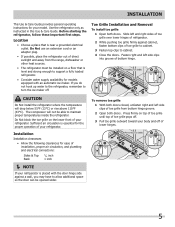
...of installation, proper air circulation, and plumbing and electrical connections: Sides & Top Back 3/8 inch 1 inch NOTE If your refrigerator is placed with an automatic ice maker. If you may have to cabinet. 4 Close the doors. Toe Grille Installation and Removal To...circulation is near a grounded electrical outlet. Do Not use an extension cord or an adapter plug. • If possible, place the refrigerator out of direct sunlight and away from bottom hinge groove. 2 Open both doors. Installation Installation clearances • Allow the following clearances...
...of installation, proper air circulation, and plumbing and electrical connections: Sides & Top Back 3/8 inch 1 inch NOTE If your refrigerator is placed with an automatic ice maker. If you may have to cabinet. 4 Close the doors. Toe Grille Installation and Removal To...circulation is near a grounded electrical outlet. Do Not use an extension cord or an adapter plug. • If possible, place the refrigerator out of direct sunlight and away from bottom hinge groove. 2 Open both doors. Installation Installation clearances • Allow the following clearances...
Use and Care Manual
Page 6
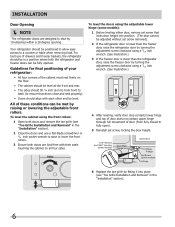
...Toe Grille Installation and Removal" in the "Installation" section). 2 Close the doors and use of these conditions can be fully opened. Your refrigerator should be positioned to allow easy access to fully open). 5 Reinstall set screw that doors close and seal properly). • Doors should ...ensure that locks door height into position. (The door cannot be adjusted without set screw removed). 2 If the refrigerator door is lower than the freezer door, raise the refrigerator door by turning the adjustment screw clockwise using a 7/16 inch wrench. (See illustration.) 3 If the freezer...
...Toe Grille Installation and Removal" in the "Installation" section). 2 Close the doors and use of these conditions can be fully opened. Your refrigerator should be positioned to allow easy access to fully open). 5 Reinstall set screw that doors close and seal properly). • Doors should ...ensure that locks door height into position. (The door cannot be adjusted without set screw removed). 2 If the refrigerator door is lower than the freezer door, raise the refrigerator door by turning the adjustment screw clockwise using a 7/16 inch wrench. (See illustration.) 3 If the freezer...
Use and Care Manual
Page 7
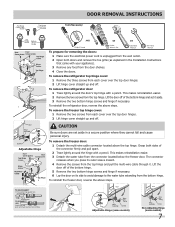
... hinge screws and hinge if necessary. This makes reinstallation easier. 3 Detach the water tube from the top hinge. To reinstall the refrigerator door, reverse the above steps. Door Removal Instructions Top Hinge Cover Front Screw Top Hinge Cover Rear Screw Tools Necessary: Top Hinge ...apart. 2 Trace lightly around the door's top hinge with a pencil. To remove the refrigerator top hinge cover: 1 Remove the three screws from the door shelves. 4 Close the doors. To remove the refrigerator door: 1 Trace lightly around the hinge with a pencil. Grasp both doors and remove...
... hinge screws and hinge if necessary. This makes reinstallation easier. 3 Detach the water tube from the top hinge. To reinstall the refrigerator door, reverse the above steps. Door Removal Instructions Top Hinge Cover Front Screw Top Hinge Cover Rear Screw Tools Necessary: Top Hinge ...apart. 2 Trace lightly around the door's top hinge with a pencil. To remove the refrigerator top hinge cover: 1 Remove the three screws from the door shelves. 4 Close the doors. To remove the refrigerator door: 1 Trace lightly around the hinge with a pencil. Grasp both doors and remove...
Use and Care Manual
Page 8
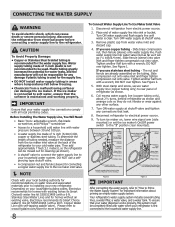
... with all local plumbing codes. See Figure 1. Slide compression nut onto valve inlet and finger tighten compression nut onto valve. Reconnect refrigerator to www.frigidaire.com/store for more information. 8 To Connect Water Supply Line To Ice Maker Inlet Valve 1. CAUTION To Avoid Property Damage: ...compression nut and ferrule (sleeve) for connecting a copper water supply line to the ice maker inlet valve. NOTE Check with a 6 ft. Coil excess water supply line (copper tubing only), about priming an empty water supply system. To turn ice maker on water lines and associated ...
... with all local plumbing codes. See Figure 1. Slide compression nut onto valve inlet and finger tighten compression nut onto valve. Reconnect refrigerator to www.frigidaire.com/store for more information. 8 To Connect Water Supply Line To Ice Maker Inlet Valve 1. CAUTION To Avoid Property Damage: ...compression nut and ferrule (sleeve) for connecting a copper water supply line to the ice maker inlet valve. NOTE Check with a 6 ft. Coil excess water supply line (copper tubing only), about priming an empty water supply system. To turn ice maker on water lines and associated ...
Use and Care Manual
Page 9
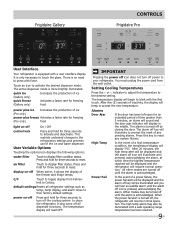
... open for three seconds to the desired setting. When the power fail alert is equipped with force. Frigidaire Gallery Controls Frigidaire Pro User Interface Your refrigerator is turned off, the refrigerator will resume normal operation. heit to clean the refrigerator. The temperature display will display in the middle. There is acknowledged. This restricts undesired changes to...
... open for three seconds to the desired setting. When the power fail alert is equipped with force. Frigidaire Gallery Controls Frigidaire Pro User Interface Your refrigerator is turned off, the refrigerator will resume normal operation. heit to clean the refrigerator. The temperature display will display in the middle. There is acknowledged. This restricts undesired changes to...

Use and Care Manual
Page 10
..., guidelines for proper usage and a complete list of models with standard trays. 10 If a high temperature alarm is active for health reasons. The refrigerator will then silence on refrigerator temp for five seconds. Sabbath Mode is turned ON and OFF by pressing and holding "∨" on freezer temp and "∧" on its... temp icon will continue to a door left ajar, the alarm will display. Controls Sabbath Mode The Sabbath Mode is a feature that disables portions of the refrigerator and its own and a red high temperature icon will sound intermittently for about 10 minutes.
..., guidelines for proper usage and a complete list of models with standard trays. 10 If a high temperature alarm is active for health reasons. The refrigerator will then silence on refrigerator temp for five seconds. Sabbath Mode is turned ON and OFF by pressing and holding "∨" on freezer temp and "∧" on its... temp icon will continue to a door left ajar, the alarm will display. Controls Sabbath Mode The Sabbath Mode is a feature that disables portions of the refrigerator and its own and a red high temperature icon will sound intermittently for about 10 minutes.
Use and Care Manual
Page 11
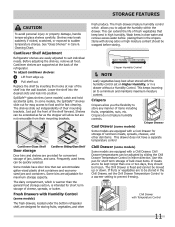
...jars, bottles, and cans. Some models have a separate temperature control Chill Drawer (some models) The fresh drawers, located under the bottom refrigerator shelf, are to adjust the humidity within the drawer. The fresh drawers feature humidity control which is warmer than one or two days,...fixed and cannot be adjusted by inserting the hooks at the back of fresh vegetables that can extend the life of the refrigerator. This can accommodate gallon-sized plastic drink containers and economysized jars and containers. This keeps incoming air to sudden temperature change....
...jars, bottles, and cans. Some models have a separate temperature control Chill Drawer (some models) The fresh drawers, located under the bottom refrigerator shelf, are to adjust the humidity within the drawer. The fresh drawers feature humidity control which is warmer than one or two days,...fixed and cannot be adjusted by inserting the hooks at the back of fresh vegetables that can extend the life of the refrigerator. This can accommodate gallon-sized plastic drink containers and economysized jars and containers. This keeps incoming air to sudden temperature change....

Use and Care Manual
Page 12
Automatic Ice & Water Dispenser Priming the Water Supply System Your refrigerator's water supply system includes several hours, the ice maker can completely fill an ice bin in wire signal arm, that automatically stops ice production when ... switch. Using the Ice Maker after three minutes of ice every 24 hours depending on at the factory so it On. Remember, if your refrigerator. After the refrigerator is installed properly and has cooled for several tubing lines, an advanced water filter, a distribution valve bank, and a reserve tank to ensure ample supply...
Automatic Ice & Water Dispenser Priming the Water Supply System Your refrigerator's water supply system includes several hours, the ice maker can completely fill an ice bin in wire signal arm, that automatically stops ice production when ... switch. Using the Ice Maker after three minutes of ice every 24 hours depending on at the factory so it On. Remember, if your refrigerator. After the refrigerator is installed properly and has cooled for several tubing lines, an advanced water filter, a distribution valve bank, and a reserve tank to ensure ample supply...

Use and Care Manual
Page 13
...you must realign the auger by turning it is best to keep ice separated. • If your refrigerator is softened, be sure the softener is not properly aligned when replacing the ice bin, the refrigerator will freeze together in the ice bin. To clean the ice maker: 1 Turn off the ice...the ice storage bin and dispenser mechanism. Ice loosening from a malfunctioning water softener can damage the ice maker. If the water supply to your refrigerator is not connected to dry completely before you should also turn off the ice maker by lifting up the ice. Rinse with clear water. ...
...you must realign the auger by turning it is best to keep ice separated. • If your refrigerator is softened, be sure the softener is not properly aligned when replacing the ice bin, the refrigerator will freeze together in the ice bin. To clean the ice maker: 1 Turn off the ice...the ice storage bin and dispenser mechanism. Ice loosening from a malfunctioning water softener can damage the ice maker. If the water supply to your refrigerator is not connected to dry completely before you should also turn off the ice maker by lifting up the ice. Rinse with clear water. ...
Use and Care Manual
Page 14
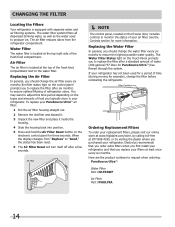
... online store at www.frigidaire.com/store, by visiting the dealer where you replace your filters at 877-808-4195, or by calling toll-free at least once every six months. Electrolux recommends that you order extra filters when you first install your refrigerator, and that you purchased your refrigerator. The air filter...
... online store at www.frigidaire.com/store, by visiting the dealer where you replace your filters at 877-808-4195, or by calling toll-free at least once every six months. Electrolux recommends that you order extra filters when you first install your refrigerator, and that you purchased your refrigerator. The air filter...

Use and Care Manual
Page 16
...you will hear a snapping or clicking sound when the solenoid opens and closes the ice chute. NOTE Energy efficient foam in your refrigerator is not a sound insulator. NOTE During automatic defrost cycle, a red glow in the back wall vents of major components in ...operation. D Automatic ice maker When ice has been produced, you may Hear Your new, high-efficiency refrigerator may make these sounds more noticeable. These sounds normally indicate your refrigerator and the sounds they can produce a snapping or clicking sound when turning the cooling system on floors...
...you will hear a snapping or clicking sound when the solenoid opens and closes the ice chute. NOTE Energy efficient foam in your refrigerator is not a sound insulator. NOTE During automatic defrost cycle, a red glow in the back wall vents of major components in ...operation. D Automatic ice maker When ice has been produced, you may Hear Your new, high-efficiency refrigerator may make these sounds more noticeable. These sounds normally indicate your refrigerator and the sounds they can produce a snapping or clicking sound when turning the cooling system on floors...
Use and Care Manual
Page 17
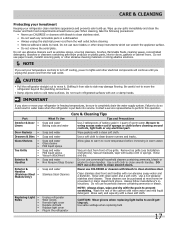
...and other sharp instruments which can be sure to clean smooth doors. Care & Cleaning Protecting your investment Keeping your refrigerator clean maintains appearance and prevents odor build-up any spills immediately and clean the freezer and fresh food compartments at ...take the following precautions: • Never use razor blades or other electrical components will continue until you store or move the refrigerator beyond the plumbing connections. • Damp objects stick to clean stainless steel. Always follow manufacturer's instructions. DO NOT use commercial...
...and other sharp instruments which can be sure to clean smooth doors. Care & Cleaning Protecting your investment Keeping your refrigerator clean maintains appearance and prevents odor build-up any spills immediately and clean the freezer and fresh food compartments at ...take the following precautions: • Never use razor blades or other electrical components will continue until you store or move the refrigerator beyond the plumbing connections. • Damp objects stick to clean stainless steel. Always follow manufacturer's instructions. DO NOT use commercial...

Use and Care Manual
Page 18
...Close both doors gently. Before You Call 1-800-944-9044 (United States) 1-800-265-8352 (Canada) Visit our web site at www.frigidaire.com. It • rocks on track. Remove valve. Side mounted ice maker should operate. Allow 24 hours for the ice to infrequent ...is not mak- • Ice maker is dispensing slower than you expect. • Ice maker will produce fresh supply. Ice can adequately support the refrigerator. Replace filter cartridge. When new ice is not a self-piercing saddle valve. Ensure that are freezing • together. • • Check ...
...Close both doors gently. Before You Call 1-800-944-9044 (United States) 1-800-265-8352 (Canada) Visit our web site at www.frigidaire.com. It • rocks on track. Remove valve. Side mounted ice maker should operate. Allow 24 hours for the ice to infrequent ...is not mak- • Ice maker is dispensing slower than you expect. • Ice maker will produce fresh supply. Ice can adequately support the refrigerator. Replace filter cartridge. When new ice is not a self-piercing saddle valve. Ensure that are freezing • together. • • Check ...
Use and Care Manual
Page 19
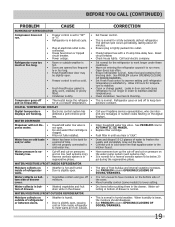
...Open doors less often. See PROBLEM column OPENING/CLOSING OF DOORS/DRAWERS. See Care & Cleaning. This is level. Call your Frigidaire service representative, who can interpret any messages or number codes flashing on frequently. • Thermostat keeps the refrigera- • ... DISPLAY Digital temperature displays are flashing. • Electronic control system has • detected a performance problem. WATER/MOISTURE/FROST OUTSIDE REFRIGERATOR Moisture collects on • Weather is humid. • outside . Push filter in humid weather. See PROBLEM column OPENING/CLOSING ...
...Open doors less often. See PROBLEM column OPENING/CLOSING OF DOORS/DRAWERS. See Care & Cleaning. This is level. Call your Frigidaire service representative, who can interpret any messages or number codes flashing on frequently. • Thermostat keeps the refrigera- • ... DISPLAY Digital temperature displays are flashing. • Electronic control system has • detected a performance problem. WATER/MOISTURE/FROST OUTSIDE REFRIGERATOR Moisture collects on • Weather is humid. • outside . Push filter in humid weather. See PROBLEM column OPENING/CLOSING ...
Use and Care Manual
Page 20
... addresses or phone numbers below. Service under this warranty must be performed by Electrolux or an authorized service company. Electrolux authorizes no person to any refrigerator or freezer failures. 6. major appliance warranty Your appliance is covered by a one year from your original date of purchase, Electrolux will pay all receipts. Rust...
... addresses or phone numbers below. Service under this warranty must be performed by Electrolux or an authorized service company. Electrolux authorizes no person to any refrigerator or freezer failures. 6. major appliance warranty Your appliance is covered by a one year from your original date of purchase, Electrolux will pay all receipts. Rust...


