

Installation Instructions (All Languages)
Page 1
... on the lower front of toe grille to refrigerator No water leaks present at all connections - CAUTION Shifting the refrigerator from side to side may damage flooring. 3 Connect Water Supply What you for choosing Frigidaire. 8 Installation Checkoff List Doors &#...61551; Door seals completely to cabinet on all four sides. Do not over -tighten retaining straps. • Never use refrigerator handles to your household water supply line plus 7 feet...
... on the lower front of toe grille to refrigerator No water leaks present at all connections - CAUTION Shifting the refrigerator from side to side may damage flooring. 3 Connect Water Supply What you for choosing Frigidaire. 8 Installation Checkoff List Doors &#...61551; Door seals completely to cabinet on all four sides. Do not over -tighten retaining straps. • Never use refrigerator handles to your household water supply line plus 7 feet...
Use and Care Manual
Page 1
All about the Use &Care of your Refrigerator 242288200 (November 2012) TABLE OF CONTENTS Important Safety Instructions 2 Storage Features 15 Features at a Glance 4 Automatic Ice & Water Dispenser 17 Installation 5 Changing the Filter 20 Door Removal Instructions 7 Normal Operating Sounds and Sights..........22 Handle Installation 9 Care and Cleaning 23 Connecting Water Supply 10 Before you Call 28 Controls 12 Major Appliance Warranty 32 www.frigidaire.com USA 1-800-944-9044 www.frigidaire.ca Canada 1-800-265-8352
All about the Use &Care of your Refrigerator 242288200 (November 2012) TABLE OF CONTENTS Important Safety Instructions 2 Storage Features 15 Features at a Glance 4 Automatic Ice & Water Dispenser 17 Installation 5 Changing the Filter 20 Door Removal Instructions 7 Normal Operating Sounds and Sights..........22 Handle Installation 9 Care and Cleaning 23 Connecting Water Supply 10 Before you Call 28 Controls 12 Major Appliance Warranty 32 www.frigidaire.com USA 1-800-944-9044 www.frigidaire.ca Canada 1-800-265-8352
Use and Care Manual
Page 2
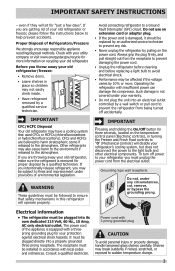
... product labels for warnings regarding flammability and other appliance. Children should NEVER use gasoline, or other appliances or furniture. For your Refrigerator or Freezer Risk of child entrapment Child entrapment and suffocation are not problems of automatic ice maker. • Remove all connections... - Definitions This is used to alert you to refrigerator Cabinet is important but not hazard-related. DANGER DANGER indicates an imminently hazardous situation which is setting solid on all...
... product labels for warnings regarding flammability and other appliance. Children should NEVER use gasoline, or other appliances or furniture. For your Refrigerator or Freezer Risk of child entrapment Child entrapment and suffocation are not problems of automatic ice maker. • Remove all connections... - Definitions This is used to alert you to refrigerator Cabinet is important but not hazard-related. DANGER DANGER indicates an imminently hazardous situation which is setting solid on all...
Use and Care Manual
Page 3
...The receptacle must be installed in accordance with local codes and ordinances. Consult a qualified electrician. IMPORTANT CFC/HCFC Disposal Your old refrigerator may be affected if the voltage varies by a wall switch or pull cord to the atmosphere. The power cord of environmental ...Always grip the plug firmly, and pull straight out from the receptacle to prevent damaging the power cord. • Unplug the refrigerator before cleaning and before replacing a light bulb to ensure that used CFCs or HCFCs (chlorofluorocarbons or hydrochlorofluorocarbons). IMPORTANT Pressing and holding ...
...The receptacle must be installed in accordance with local codes and ordinances. Consult a qualified electrician. IMPORTANT CFC/HCFC Disposal Your old refrigerator may be affected if the voltage varies by a wall switch or pull cord to the atmosphere. The power cord of environmental ...Always grip the plug firmly, and pull straight out from the receptacle to prevent damaging the power cord. • Unplug the refrigerator before cleaning and before replacing a light bulb to ensure that used CFCs or HCFCs (chlorofluorocarbons or hydrochlorofluorocarbons). IMPORTANT Pressing and holding ...
Use and Care Manual
Page 4
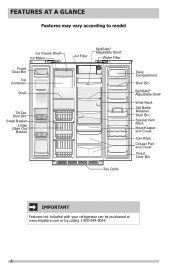
FEATURES AT A GLANCE Features may vary according to model Ice Cream Shelf Ice Maker Fixed Door Bin Ice Container Shelf Tilt Out Door Bin Small Basket Large Glide Out Basket Air Filter SpillSafe® Adjustable Shelf Water Filter Toe Grille Dairy Compartment Door Bin SpillSafe® Adjustable Shelf Wine Rack Tall Bottle Retainer Door Bin Special Item Rack Meat Keeper and Cover Can Rack Crisper Pan and Cover Fixed Door Bin IMPORTANT Features not included with your refrigerator can be purchased at www.frigidaire.com or by calling 1-800-944-9044. 4
FEATURES AT A GLANCE Features may vary according to model Ice Cream Shelf Ice Maker Fixed Door Bin Ice Container Shelf Tilt Out Door Bin Small Basket Large Glide Out Basket Air Filter SpillSafe® Adjustable Shelf Water Filter Toe Grille Dairy Compartment Door Bin SpillSafe® Adjustable Shelf Wine Rack Tall Bottle Retainer Door Bin Special Item Rack Meat Keeper and Cover Can Rack Crisper Pan and Cover Fixed Door Bin IMPORTANT Features not included with your refrigerator can be purchased at www.frigidaire.com or by calling 1-800-944-9044. 4
Use and Care Manual
Page 5
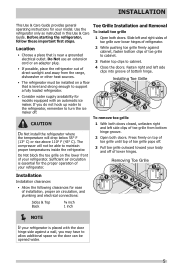
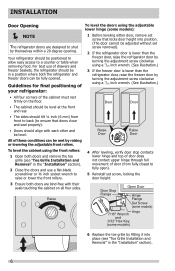
... Open both doors closed, unfasten right and left side clips of toe grille from the range, dishwasher or other heat sources. • The refrigerator must be installed on a floor that is level and strong enough to cabinet. 4 Close the doors. Location • Choose a place that ... cabinet, fasten bottom clips of lower hinges. Do Not use an extension cord or an adapter plug. • If possible, place the refrigerator out of installation, proper air circulation, and plumbing and electrical connections: 1 With both doors. Installation Installation clearances • Allow the following...
... Open both doors closed, unfasten right and left side clips of toe grille from the range, dishwasher or other heat sources. • The refrigerator must be installed on a floor that is level and strong enough to cabinet. 4 Close the doors. Location • Choose a place that ... cabinet, fasten bottom clips of lower hinges. Do Not use an extension cord or an adapter plug. • If possible, place the refrigerator out of installation, proper air circulation, and plumbing and electrical connections: 1 With both doors. Installation Installation clearances • Allow the following...
Use and Care Manual
Page 6
... turning the adjustment screw clockwise using a 7/16 inch wrench. (See illustration.) • All four corners of drawers and freezer baskets, the refrigerator should be level at the front and rear. Raise Door Stop Flange Open Door Hinge Flange Set Screw (some models) 7/16" Wrench Hinge ..." in a position where both doors are designed to fully open). 5 Reinstall set screw removed). 2 If the refrigerator door is lower than the freezer door, raise the refrigerator door by turning the adjustment screw clockwise using the adjustable lower hinge (some models) 6 Replace the toe grille by...
... turning the adjustment screw clockwise using a 7/16 inch wrench. (See illustration.) • All four corners of drawers and freezer baskets, the refrigerator should be level at the front and rear. Raise Door Stop Flange Open Door Hinge Flange Set Screw (some models) 7/16" Wrench Hinge ..." in a position where both doors are designed to fully open). 5 Reinstall set screw removed). 2 If the refrigerator door is lower than the freezer door, raise the refrigerator door by turning the adjustment screw clockwise using the adjustable lower hinge (some models) 6 Replace the toe grille by...
Use and Care Manual
Page 7
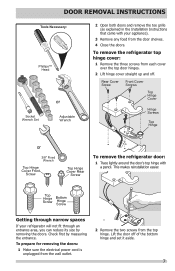
... Top Hinge or 3/8" Fixed Wrench Top Hinge Cover Front Screw Top Hinge Cover Rear Screw To remove the refrigerator door: 1 Trace lightly around the door's top hinge with your refrigerator will not fit through an entrance area, you can reduce its size by measuring the entrance. Top Hinge... Adjustable Wrench 2 Open both doors and remove the toe grille (as explained in the Installation Instructions that came with a pencil. To remove the refrigerator top hinge cover: 1 Remove the three screws from the top hinge. To prepare for removing the doors: 1 Make sure the electrical power cord...
... Top Hinge or 3/8" Fixed Wrench Top Hinge Cover Front Screw Top Hinge Cover Rear Screw To remove the refrigerator door: 1 Trace lightly around the door's top hinge with your refrigerator will not fit through an entrance area, you can reduce its size by measuring the entrance. Top Hinge... Adjustable Wrench 2 Open both doors and remove the toe grille (as explained in the Installation Instructions that came with a pencil. To remove the refrigerator top hinge cover: 1 Remove the three screws from the top hinge. To prepare for removing the doors: 1 Make sure the electrical power cord...
Use and Care Manual
Page 8
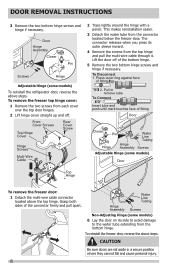
Door Hinge Assembly Closer Pin Screws Hinge Adjustable Hinge (some models) To reinstall the refrigerator door, reverse the above steps. The connector releases when you press its side to avoid damage to remove tube To Connect Insert tube and push ...
Door Hinge Assembly Closer Pin Screws Hinge Adjustable Hinge (some models) To reinstall the refrigerator door, reverse the above steps. The connector releases when you press its side to avoid damage to remove tube To Connect Insert tube and push ...
Use and Care Manual
Page 9
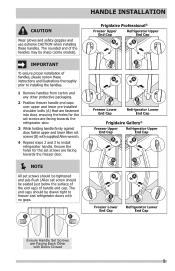
... wrench. 4 Repeat steps 2 and 3 to freezer and refrigerator doors with Doors Closed 9 HANDLE INSTALLATION Frigidaire Professional® Freezer Upper End Cap Refrigerator Upper End Cap Freezer Lower End Cap Refrigerator Lower End Cap Frigidaire Gallery® Freezer Upper End Cap Refrigerator Upper End Cap Freezer Lower End Cap Refrigerator Lower End Cap Ensure Handle Set Screws are...
... wrench. 4 Repeat steps 2 and 3 to freezer and refrigerator doors with Doors Closed 9 HANDLE INSTALLATION Frigidaire Professional® Freezer Upper End Cap Refrigerator Upper End Cap Freezer Lower End Cap Refrigerator Lower End Cap Frigidaire Gallery® Freezer Upper End Cap Refrigerator Upper End Cap Freezer Lower End Cap Refrigerator Lower End Cap Ensure Handle Set Screws are...
Use and Care Manual
Page 10
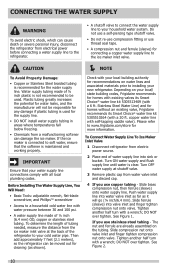
... which can cause death or severe personal injury, disconnect the refrigerator from electrical power before connecting a water supply line to the refrigerator. • A shutoff valve to connect the water supply line to www.frigidaire.com/store for more information. If the ice maker is ... (sleeve) for homes without an existing valve, Frigidaire recommends its Smart Choice® water line kit 5305513409 (with a wrench; Tighten another half turn with a 6 ft. The nut and ferrule are already assembled on your new refrigerator. To determine the length of tubing needed, measure...
... which can cause death or severe personal injury, disconnect the refrigerator from electrical power before connecting a water supply line to the refrigerator. • A shutoff valve to connect the water supply line to www.frigidaire.com/store for more information. If the ice maker is ... (sleeve) for homes without an existing valve, Frigidaire recommends its Smart Choice® water line kit 5305513409 (with a wrench; Tighten another half turn with a 6 ft. The nut and ferrule are already assembled on your new refrigerator. To determine the length of tubing needed, measure...
Use and Care Manual
Page 11
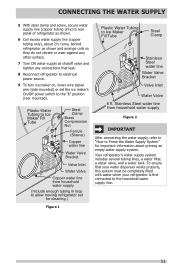
... maker on, lower wire signal arm (side mounted) or set the ice maker's On/Off power switch to the "I" position (rear mounted). Your refrigerator's water supply system includes several tubing lines, a water filter, a water valve, and a water tank. CONNECTING THE WATER SUPPLY 5 With steel clamp...shutoff valve and tighten any connections that your water dispenser works properly, this system must be completely filled with water when your refrigerator is first connected to the household water supply line. 11 Stainless Steel water line from household water supply (Include enough tubing in...
... maker on, lower wire signal arm (side mounted) or set the ice maker's On/Off power switch to the "I" position (rear mounted). Your refrigerator's water supply system includes several tubing lines, a water filter, a water valve, and a water tank. CONNECTING THE WATER SUPPLY 5 With steel clamp...shutoff valve and tighten any connections that your water dispenser works properly, this system must be completely filled with water when your refrigerator is first connected to the household water supply line. 11 Stainless Steel water line from household water supply (Include enough tubing in...
Use and Care Manual
Page 13
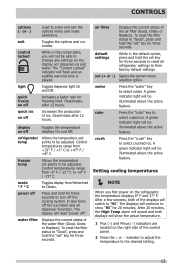
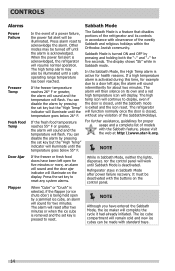
..."HI". To reset the filter status to their factory default settings. default settings While in the locked state, you first power on the refrigerator, the temperature displays 0° F and 37° F. Deactivates after 12 hours. freezer temp Allows the temperature set (+ or -) ...High Temp alarm will sound and both of the displays will be illuminated above the active feature. Toggles dispenser light On and Off. refrigerator temp Allows the temperature setpoints to change any settings on the display nor dispense ice and water. Control temperatures range from +33&#...
..."HI". To reset the filter status to their factory default settings. default settings While in the locked state, you first power on the refrigerator, the temperature displays 0° F and 37° F. Deactivates after 12 hours. freezer temp Allows the temperature set (+ or -) ...High Temp alarm will sound and both of the displays will be illuminated above the active feature. Toggles dispenser light On and Off. refrigerator temp Allows the temperature setpoints to change any settings on the display nor dispense ice and water. Control temperatures range from +33&#...
Use and Care Manual
Page 14
...closed , until the temperature goes below 55° F. If a high temperature alarm is activated during this time, for health reasons. The refrigerator will complete the cycle it had already initiated. For further assistance, guidelines for proper usage and a complete list of models with standard trays....F or greater, the alarm will sound and the temperature will illuminate until the Sabbath mode is a feature that disables portions of the refrigerator and its own and a red high temperature icon will resume normal operation. When the power fail alert is deactivated. You can disable...
...closed , until the temperature goes below 55° F. If a high temperature alarm is activated during this time, for health reasons. The refrigerator will complete the cycle it had already initiated. For further assistance, guidelines for proper usage and a complete list of models with standard trays....F or greater, the alarm will sound and the temperature will illuminate until the Sabbath mode is a feature that disables portions of the refrigerator and its own and a red high temperature icon will resume normal operation. When the power fail alert is deactivated. You can disable...
Use and Care Manual
Page 15
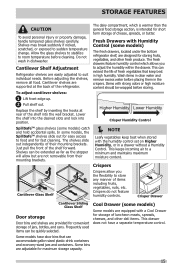
... in clear water and remove excess water before storing. SpillSafeTM glass shelves (some models) The fresh drawers, located under the bottom refrigerator shelf, are designed for storage of their mounting brackets. Just pull the front of items including fruits, vegetables, nuts, etc. ... needs. Before adjusting the shelves, remove all food. Cool Drawer (some models) Some models are supported at rear of the refrigerator. Frequently used items can be quickly selected. Some bins are easily adjusted to adjust the humidity within the drawer. This keeps ...
... in clear water and remove excess water before storing. SpillSafeTM glass shelves (some models) The fresh drawers, located under the bottom refrigerator shelf, are designed for storage of their mounting brackets. Just pull the front of items including fruits, vegetables, nuts, etc. ... needs. Before adjusting the shelves, remove all food. Cool Drawer (some models) Some models are supported at rear of the refrigerator. Frequently used items can be quickly selected. Some bins are easily adjusted to adjust the humidity within the drawer. This keeps ...
Use and Care Manual
Page 17
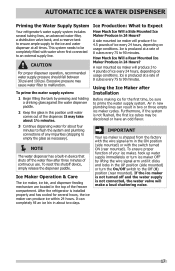
... and dispenser feeding mechanism are located in 24 Hours? AUTOMATIC ICE & WATER DISPENSER Priming the Water Supply System Ice Production: What to Expect Your refrigerator's water supply system includes several hours, the ice maker can produce ice within 24 hours. A rear mounted ice maker will produce 3 to 90 ...until it clicks and locks in the ON position (side mounted) or with water when first connected to an external supply line. After the refrigerator is produced at all times. It may be discolored or have an odd flavor. 3 Continue dispensing water for the first time, be ...
... and dispenser feeding mechanism are located in 24 Hours? AUTOMATIC ICE & WATER DISPENSER Priming the Water Supply System Ice Production: What to Expect Your refrigerator's water supply system includes several hours, the ice maker can produce ice within 24 hours. A rear mounted ice maker will produce 3 to 90 ...until it clicks and locks in the ON position (side mounted) or with water when first connected to an external supply line. After the refrigerator is produced at all times. It may be discolored or have an odd flavor. 3 Continue dispensing water for the first time, be ...
Use and Care Manual
Page 18
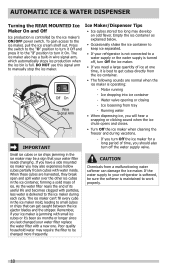
... Wire Signal Arm - Poor quality household water may be sure the softener is turned off the water supply valve. If the water supply to your refrigerator is softened, be a sign that can get cubes directly from the ice container. • The following sounds are harvested, they break open and ...cycle. Press the switch to the "O" position to turn it Off and press it to the "I" position to small cubes or chips that your refrigerator is not connected to a water supply or the water supply is maintained to the ice maker, pull the ice cream shelf out. Ice Maker/...
... Wire Signal Arm - Poor quality household water may be sure the softener is turned off the water supply valve. If the water supply to your refrigerator is softened, be a sign that can get cubes directly from the ice container. • The following sounds are harvested, they break open and ...cycle. Press the switch to the "O" position to turn it Off and press it to the "I" position to small cubes or chips that your refrigerator is not connected to a water supply or the water supply is maintained to the ice maker, pull the ice cream shelf out. Ice Maker/...
Use and Care Manual
Page 19
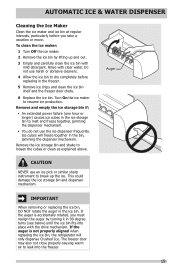
... and out. 3 Empty and carefully clean the ice bin with clear water. If the auger is not properly aligned when replacing the ice bin, the refrigerator will freeze together in the bin, jamming the dispenser mechanism. Rinse with mild detergent. Turn On the ice maker to melt and freeze together, jamming...
... and out. 3 Empty and carefully clean the ice bin with clear water. If the auger is not properly aligned when replacing the ice bin, the refrigerator will freeze together in the bin, jamming the dispenser mechanism. Rinse with mild detergent. Turn On the ice maker to melt and freeze together, jamming...

Use and Care Manual
Page 20
... Filter Status on the control panel prompts you to ensure the highest possible water quality. Frigidaire recommends that you order extra filters when you first install your refrigerator, and that you replace your filters at 877-808-4195, or by calling toll-free... filtering system. To replace your replacement filters, please visit our online store at www.frigidaire.com/store, by visiting the dealer where you typically store in your refrigerator. If your refrigerator. Filter Cartridge Air Filter Ordering Replacement Filters To order your PureSource UltraTM air filter: ...
... Filter Status on the control panel prompts you to ensure the highest possible water quality. Frigidaire recommends that you order extra filters when you first install your refrigerator, and that you replace your filters at 877-808-4195, or by calling toll-free... filtering system. To replace your replacement filters, please visit our online store at www.frigidaire.com/store, by visiting the dealer where you typically store in your refrigerator. If your refrigerator. Filter Cartridge Air Filter Ordering Replacement Filters To order your PureSource UltraTM air filter: ...
Use and Care Manual
Page 22
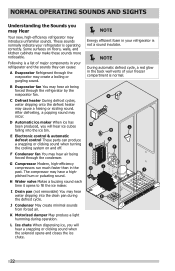
.... After defrosting, a popping sound may introduce unfamiliar sounds. G Compressor Modern, high-efficiency compressors run much faster than in your refrigerator and the sounds they can produce a snapping or clicking sound when turning the cooling system on floors, walls, and kitchen cabinets may... May create minimal sounds from forced air. NORMAL OPERATING SOUNDS AND SIGHTS Understanding the Sounds you may Hear Your new, high-efficiency refrigerator may occur. B Evaporator fan You may have a highpitched hum or pulsating sound. The compressor may hear air being forced through ...
.... After defrosting, a popping sound may introduce unfamiliar sounds. G Compressor Modern, high-efficiency compressors run much faster than in your refrigerator and the sounds they can produce a snapping or clicking sound when turning the cooling system on floors, walls, and kitchen cabinets may... May create minimal sounds from forced air. NORMAL OPERATING SOUNDS AND SIGHTS Understanding the Sounds you may Hear Your new, high-efficiency refrigerator may occur. B Evaporator fan You may have a highpitched hum or pulsating sound. The compressor may hear air being forced through ...


