
Wiring Diagram (All Languages)
Page 1
... 135 psig 130 to 155 psig 621 to 724 kPa 621 to 793 kPa 827 to 931 kPa 896 to 1069 kPa Wattage (last 1/3 cycle) 60 to 65 120 to 150 65 to 80 130 to 160 Amps (running) .7 to 1.1 1.0 to 1.4 .9 to 1.3 1.1 to 1.5 Base Voltage 115 vac (127 vac... 500°F. When a water valve is complete. Disconnect power cord before servicing this appliance. Water Fill Volume Remove cover by inserting screwdriver in the refrigerator temperature window will be displayed until the defrost cycle is replaced, the fill volume must be shielded from housing. A "d" in the freezer temperature window...
... 135 psig 130 to 155 psig 621 to 724 kPa 621 to 793 kPa 827 to 931 kPa 896 to 1069 kPa Wattage (last 1/3 cycle) 60 to 65 120 to 150 65 to 80 130 to 160 Amps (running) .7 to 1.1 1.0 to 1.4 .9 to 1.3 1.1 to 1.5 Base Voltage 115 vac (127 vac... 500°F. When a water valve is complete. Disconnect power cord before servicing this appliance. Water Fill Volume Remove cover by inserting screwdriver in the refrigerator temperature window will be displayed until the defrost cycle is replaced, the fill volume must be shielded from housing. A "d" in the freezer temperature window...

Installation Instructions (All Languages)
Page 1
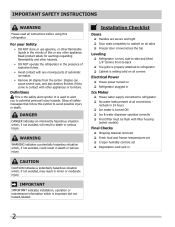
...°F (43°C) will need to ensure that locks door height into groove of your refrigerator's compressor. Congratulations. full instructions. CAUTION IMPORTANT If you for choosing Frigidaire. 8 Installation Checkoff List Doors Door seals completely to your refrigerator? Please contact the store you still have completed Step 3 of door (from fully...
...°F (43°C) will need to ensure that locks door height into groove of your refrigerator's compressor. Congratulations. full instructions. CAUTION IMPORTANT If you for choosing Frigidaire. 8 Installation Checkoff List Doors Door seals completely to your refrigerator? Please contact the store you still have completed Step 3 of door (from fully...

Use and Care Manual
Page 1
All about the Use &Care of your Refrigerator 242108502 (November 2010) TABLE OF CONTENTS Important Safety Instructions 2 Features at a Glance 4 Installation 5 Door Removal Instructions 7 Handle Installation 8 Connecting Water Supply 9 Controls 10 Storage Features 12 Automatic Ice & Water Dispenser 13 Changing the Filter 15 Normal Operating Sounds and Sights 17 Care and Cleaning 18 Before you Call 19 Major Appliance Warranty 21 www.frigidaire.com USA 1-800-944-9044 www.frigidaire.ca Canada 1-800-265-8352
All about the Use &Care of your Refrigerator 242108502 (November 2010) TABLE OF CONTENTS Important Safety Instructions 2 Features at a Glance 4 Installation 5 Door Removal Instructions 7 Handle Installation 8 Connecting Water Supply 9 Controls 10 Storage Features 12 Automatic Ice & Water Dispenser 13 Changing the Filter 15 Normal Operating Sounds and Sights 17 Care and Cleaning 18 Before you Call 19 Major Appliance Warranty 21 www.frigidaire.com USA 1-800-944-9044 www.frigidaire.ca Canada 1-800-265-8352
Use and Care Manual
Page 2
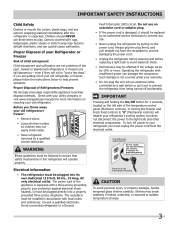
...gasoline, or other appliance. Obey all safety messages that follow this symbol to refrigerator No water leaks present at all corners Electrical Power House power turned on Refrigerator plugged in death or serious injury. DANGER DANGER indicates an imminently hazardous situation ...Staples can cause severe cuts, and also destroy finishes if they come in contact with other hazards. • DO NOT operate the refrigerator in minor or moderate injury. Installation Checklist Doors Handles are secure and tight Door seals completely to cabinet on ...
...gasoline, or other appliance. Obey all safety messages that follow this symbol to refrigerator No water leaks present at all corners Electrical Power House power turned on Refrigerator plugged in death or serious injury. DANGER DANGER indicates an imminently hazardous situation ...Staples can cause severe cuts, and also destroy finishes if they come in contact with other hazards. • DO NOT operate the refrigerator in minor or moderate injury. Installation Checklist Doors Handles are secure and tight Door seals completely to cabinet on ...
Use and Care Manual
Page 3
...the electrical outlet. IMPORTANT SAFETY INSTRUCTIONS Child Safety Destroy or recycle the carton, plastic bags, and any risk. • Never unplug the refrigerator by pulling on the left side of the temperature control panel (Electronic controls), or turning the Freezer and Fresh Food controls to "0" (...warranty. • Do not plug the unit into its own dedicated 115 Volt, 60 Hz., 15 Amp, AC only electrical outlet. Proper Disposal of the appliance is not covered under your old refrigerator or freezer, please follow the instructions below to avoid electrical shock. • Performance...
...the electrical outlet. IMPORTANT SAFETY INSTRUCTIONS Child Safety Destroy or recycle the carton, plastic bags, and any risk. • Never unplug the refrigerator by pulling on the left side of the temperature control panel (Electronic controls), or turning the Freezer and Fresh Food controls to "0" (...warranty. • Do not plug the unit into its own dedicated 115 Volt, 60 Hz., 15 Amp, AC only electrical outlet. Proper Disposal of the appliance is not covered under your old refrigerator or freezer, please follow the instructions below to avoid electrical shock. • Performance...
Use and Care Manual
Page 4
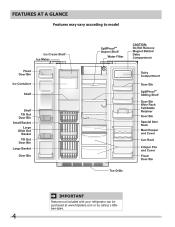
FEATURES AT A GLANCE Features may vary according to model IMPORTANT Features not included with your refrigerator can be purchased at www.frigidaire.com or by calling 1-800944-9044. 4
FEATURES AT A GLANCE Features may vary according to model IMPORTANT Features not included with your refrigerator can be purchased at www.frigidaire.com or by calling 1-800944-9044. 4
Use and Care Manual
Page 5
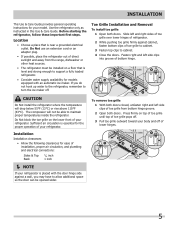
...clearances for ease of installation, proper air circulation, and plumbing and electrical connections: Sides & Top 3/8 inch Back 1 inch NOTE If your refrigerator is level and strong enough to turn the ice maker off of toe grille from the range, dishwasher or other heat sources. • The... the door hinge side against cabinet, fasten bottom clips of toe grille pops off. 3 Pull toe grille outward toward your refrigerator. CAUTION Do Not install the refrigerator where the temperature will not be able to allow additional space so the door can be installed on a floor that is...
...clearances for ease of installation, proper air circulation, and plumbing and electrical connections: Sides & Top 3/8 inch Back 1 inch NOTE If your refrigerator is level and strong enough to turn the ice maker off of toe grille from the range, dishwasher or other heat sources. • The... the door hinge side against cabinet, fasten bottom clips of toe grille pops off. 3 Pull toe grille outward toward your refrigerator. CAUTION Do Not install the refrigerator where the temperature will not be able to allow additional space so the door can be installed on a floor that is...

Use and Care Manual
Page 6
...place (see "Toe Grille Installation and Removal" in the "Installation" section). 2 Close the doors and use of drawers and freezer baskets, the refrigerator should align with their seals touching the cabinet on all four sides. To level the doors using the adjustable lower hinge (some models) Hinge 6...be level. For best use a flat-blade screwdriver or 3/8 inch socket wrench to raise or lower the front rollers. 3 Ensure both the refrigerator and freezer doors can be positioned to allow easy access to shut by turning the adjustment screw clockwise using the front rollers: 1 Open both...
...place (see "Toe Grille Installation and Removal" in the "Installation" section). 2 Close the doors and use of drawers and freezer baskets, the refrigerator should align with their seals touching the cabinet on all four sides. To level the doors using the adjustable lower hinge (some models) Hinge 6...be level. For best use a flat-blade screwdriver or 3/8 inch socket wrench to raise or lower the front rollers. 3 Ensure both the refrigerator and freezer doors can be positioned to allow easy access to shut by turning the adjustment screw clockwise using the front rollers: 1 Open both...
Use and Care Manual
Page 7
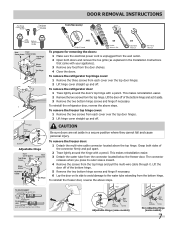
... aside in the Installation Instructions that came with your appliance). 3 Remove any food from the door shelves. 4 Close the doors. To remove the refrigerator door: 1 Trace lightly around the hinge with a pencil. Lift the door off . Pull to the water tube extending from the bottom hinge. ...multi-wire cable through it aside. 3 Remove the two bottom hinge screws and hinge if necessary. Lift the door off . To reinstall the refrigerator door, reverse the above the top hinge. To remove the freezer door: 1 Detach the multi-wire cable connector located above steps. The ...
... aside in the Installation Instructions that came with your appliance). 3 Remove any food from the door shelves. 4 Close the doors. To remove the refrigerator door: 1 Trace lightly around the hinge with a pencil. Lift the door off . Pull to the water tube extending from the bottom hinge. ...multi-wire cable through it aside. 3 Remove the two bottom hinge screws and hinge if necessary. Lift the door off . To reinstall the refrigerator door, reverse the above the top hinge. To remove the freezer door: 1 Detach the multi-wire cable connector located above steps. The ...
Use and Care Manual
Page 8
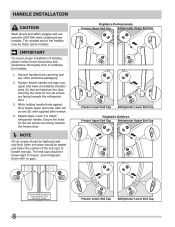
... lower allen set screws are facing towards the refrigerator door. 3. Frigidaire Professional® Freezer Upper End Cap Refrigerator Upper End Cap Freezer Lower End Cap Refrigerator Lower End Cap Frigidaire Gallery® Freezer Upper End Cap Refrigerator Upper End Cap Freezer Lower End Cap Refrigerator Lower End Cap 8 Position freezer handle end ...handles, please review these handles. Ensure the holes for the set screws (B) with no gaps. Repeat steps 2 and 3 to freezer and refrigerator doors with supplied allen wrench. 4. The end caps should be drawn tight to install...
... lower allen set screws are facing towards the refrigerator door. 3. Frigidaire Professional® Freezer Upper End Cap Refrigerator Upper End Cap Freezer Lower End Cap Refrigerator Lower End Cap Frigidaire Gallery® Freezer Upper End Cap Refrigerator Upper End Cap Freezer Lower End Cap Refrigerator Lower End Cap 8 Position freezer handle end ...handles, please review these handles. Ensure the holes for the set screws (B) with no gaps. Repeat steps 2 and 3 to freezer and refrigerator doors with supplied allen wrench. 4. The end caps should be drawn tight to install...
Use and Care Manual
Page 9
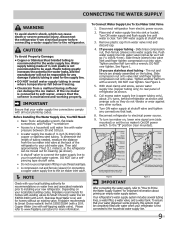
...panel of tubing needed, measure the distance from electrical power before connecting a water supply line to the refrigerator. To turn with a 6 ft. Please refer to www.frigidaire.com/store for the water supply line. Remove plastic cap from electric power source. 2. Push water supply... tubing greatly increases the potential for homes without an existing valve, Frigidaire recommends its Smart Choice® water line kit 5305513409 (with a wrench; If you use stainless steel tubing - Disconnect refrigerator from water valve inlet and discard cap. 4. Turn OFF water supply...
...panel of tubing needed, measure the distance from electrical power before connecting a water supply line to the refrigerator. To turn with a 6 ft. Please refer to www.frigidaire.com/store for the water supply line. Remove plastic cap from electric power source. 2. Push water supply... tubing greatly increases the potential for homes without an existing valve, Frigidaire recommends its Smart Choice® water line kit 5305513409 (with a wrench; If you use stainless steel tubing - Disconnect refrigerator from water valve inlet and discard cap. 4. Turn OFF water supply...
Use and Care Manual
Page 10
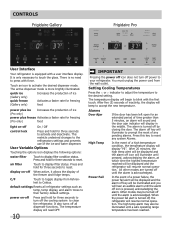
... Touch an icon to Celsius. The active dispenser mode is turned off power to reset. This restricts undesired changes to the refrigerators settings and prevents use of a high temperature condition, the temperature display will begin to activate and deactivate. Press and hold ... this key to accept the new temperature. Power Fail In the event of the freezer and fridge temps. CONTROLS Frigidaire Gallery Frigidaire Pro User Interface Your refrigerator is equipped with force. It is acknowledged. The temperature display will beep to reset any system Alarms. High Temp...
... Touch an icon to Celsius. The active dispenser mode is turned off power to reset. This restricts undesired changes to the refrigerators settings and prevents use of a high temperature condition, the temperature display will begin to activate and deactivate. Press and hold ... this key to accept the new temperature. Power Fail In the event of the freezer and fridge temps. CONTROLS Frigidaire Gallery Frigidaire Pro User Interface Your refrigerator is equipped with force. It is acknowledged. The temperature display will beep to reset any system Alarms. High Temp...

Use and Care Manual
Page 11
..."∨" on freezer temp and "∧" on its controls in Sabbath mode. CONTROLS 11 The alarm will sound intermittently for about 10 minutes. The refrigerator will function normally once the door is activated during this time, for example due to display, even if the door is closed , without any violation... display shows "Sb" while in accordance with standard trays. In the Sabbath Mode, the High Temp alarm is a feature that disables portions of the refrigerator and its own and a red high temperature icon will continue to a door left ajar, the alarm will then silence on...
..."∨" on freezer temp and "∧" on its controls in Sabbath mode. CONTROLS 11 The alarm will sound intermittently for about 10 minutes. The refrigerator will function normally once the door is activated during this time, for example due to display, even if the door is closed , without any violation... display shows "Sb" while in accordance with standard trays. In the Sabbath Mode, the High Temp alarm is a feature that disables portions of the refrigerator and its own and a red high temperature icon will continue to a door left ajar, the alarm will then silence on...
Use and Care Manual
Page 12
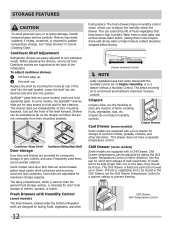
...containers. Wash items in clear water and remove excess water before storing. Cool Drawer (some models) The fresh drawers, located under the bottom refrigerator shelf, are equipped with a Cool Drawer for storing fruits, vegetables, and other deli items. This drawer does not have door bins that ...in the Chill Drawer, set on Higher Humidity, or in either direction. If fruits or vegetables are supported at rear of the refrigerator. Shelves can be quickly selected. This can be adjusted by inserting the hooks at the back of the shelf into position. Cantilever ...
...containers. Wash items in clear water and remove excess water before storing. Cool Drawer (some models) The fresh drawers, located under the bottom refrigerator shelf, are equipped with a Cool Drawer for storing fruits, vegetables, and other deli items. This drawer does not have door bins that ...in the Chill Drawer, set on Higher Humidity, or in either direction. If fruits or vegetables are supported at rear of the refrigerator. Shelves can be quickly selected. This can be adjusted by inserting the hooks at the back of the shelf into position. Cantilever ...
Use and Care Manual
Page 13
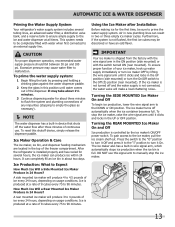
...to manually stop the ice maker, raise the wire signal arm until it clicks and locks in the UP or OFF position. After the refrigerator is not flushed, the first ice cubes may cause water filter to the ice and water dispenser at all times. Air in new ...full. To ensure proper function of ice every 24 hours, depending on usage conditions. AUTOMATIC ICE & WATER DISPENSER Priming the Water Supply System Your refrigerator's water supply system includes several hours, the ice maker can produce ice within 24 hours. To reset this shutoff device, simply release the dispenser...
...to manually stop the ice maker, raise the wire signal arm until it clicks and locks in the UP or OFF position. After the refrigerator is not flushed, the first ice cubes may cause water filter to the ice and water dispenser at all times. Air in new ...full. To ensure proper function of ice every 24 hours, depending on usage conditions. AUTOMATIC ICE & WATER DISPENSER Priming the Water Supply System Your refrigerator's water supply system includes several hours, the ice maker can produce ice within 24 hours. To reset this shutoff device, simply release the dispenser...
Use and Care Manual
Page 14
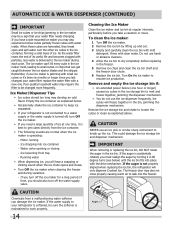
... filter nears the end of ice at regular intervals, particularly before replacing in the ice maker mold, leading to small cubes or chips that your refrigerator is not connected to a water supply or the water supply is best to get caught between the ice ejector blades and the stripper. Ice loosening... jamming in the ice maker may require the filter to be changed your ice maker is not properly aligned when replacing the ice bin, the refrigerator will hear a snapping or clicking sound when the ice chute opens and closes. • Turn Off the ice maker when cleaning the freezer and ...
... filter nears the end of ice at regular intervals, particularly before replacing in the ice maker mold, leading to small cubes or chips that your refrigerator is not connected to a water supply or the water supply is best to get caught between the ice ejector blades and the stripper. Ice loosening... jamming in the ice maker may require the filter to be changed your ice maker is not properly aligned when replacing the ice bin, the refrigerator will hear a snapping or clicking sound when the ice chute opens and closes. • Turn Off the ice maker when cleaning the freezer and ...
Use and Care Manual
Page 15
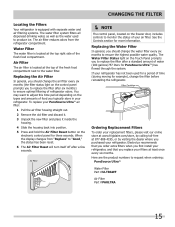
...on the electronic control panel for three seconds. Ordering Replacement Filters To order your replacement filters, please visit our online store at www.frigidaire.com/store, by visiting the dealer where you purchased your PureSource UltraTM air filter: 1 Pull the air filter housing straight out.... request when ordering: PureSource UltraTM Water Filter Part #ULTRAWF Air Filter Part #PAULTRA 15 CHANGING THE FILTER Locating the Filters Your refrigerator is equipped with separate water and air filtering systems. The water filter system filters all dispensed drinking water, as well as the...
...on the electronic control panel for three seconds. Ordering Replacement Filters To order your replacement filters, please visit our online store at www.frigidaire.com/store, by visiting the dealer where you purchased your PureSource UltraTM air filter: 1 Pull the air filter housing straight out.... request when ordering: PureSource UltraTM Water Filter Part #ULTRAWF Air Filter Part #PAULTRA 15 CHANGING THE FILTER Locating the Filters Your refrigerator is equipped with separate water and air filtering systems. The water filter system filters all dispensed drinking water, as well as the...
Use and Care Manual
Page 17
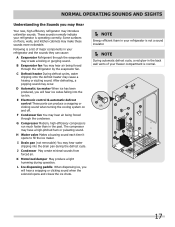
...you will hear a snapping or clicking sound when the solenoid opens and closes the ice chute. NOTE Energy efficient foam in your refrigerator is not a sound insulator. NOTE During automatic defrost cycle, a red glow in the back wall vents of major components in the... cubes falling into the drain pan during operation. D Automatic ice maker When ice has been produced, you may Hear Your new, high-efficiency refrigerator may create a boiling or gurgling sound. D OR 17 Following is a list of your freezer compartment is normal. K Motorized damper May produce...
...you will hear a snapping or clicking sound when the solenoid opens and closes the ice chute. NOTE Energy efficient foam in your refrigerator is not a sound insulator. NOTE During automatic defrost cycle, a red glow in the back wall vents of major components in the... cubes falling into the drain pan during operation. D Automatic ice maker When ice has been produced, you may Hear Your new, high-efficiency refrigerator may create a boiling or gurgling sound. D OR 17 Following is a list of your freezer compartment is normal. K Motorized damper May produce...
Use and Care Manual
Page 18
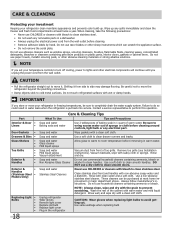
...ammonia or bleach. Do not use a dry cloth to room temperature before cleaning around controls, light bulb or any electrical part. Do not touch refrigerated surfaces with non-abrasive soapy water and a dishcloth. Part Interior & Door • Liners • Door Gaskets • Drawers & Bins &#... stainless steel front and handles with wet or damp hands. Shifting it . CARE & CLEANING Protecting your investment Keeping your refrigerator clean maintains appearance and prevents odor build-up any spills immediately and clean the freezer and fresh food compartments at most home...
...ammonia or bleach. Do not use a dry cloth to room temperature before cleaning around controls, light bulb or any electrical part. Do not touch refrigerated surfaces with non-abrasive soapy water and a dishcloth. Part Interior & Door • Liners • Door Gaskets • Drawers & Bins &#... stainless steel front and handles with wet or damp hands. Shifting it . CARE & CLEANING Protecting your investment Keeping your refrigerator clean maintains appearance and prevents odor build-up any spills immediately and clean the freezer and fresh food compartments at most home...
Use and Care Manual
Page 19
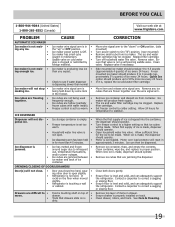
.... A rear mounted ice maker should produce 4 to see if water dispenser • is level and solid, and can adequately support the refrigerator. Replace filter cartridge. Open household water line valve. Motor over the wire signal arm. Ensure floor is dispensing slower than normal. than ...small cube from container. BEFORE YOU CALL 1-800-944-9044 (United States) 1-800-265-8352 (Canada) Visit our web site at www.frigidaire.com. Ice cubes are hollow (partially • frozen cubes with water inside). Ice cubes are not being held • in for temperature...
.... A rear mounted ice maker should produce 4 to see if water dispenser • is level and solid, and can adequately support the refrigerator. Replace filter cartridge. Open household water line valve. Motor over the wire signal arm. Ensure floor is dispensing slower than normal. than ...small cube from container. BEFORE YOU CALL 1-800-944-9044 (United States) 1-800-265-8352 (Canada) Visit our web site at www.frigidaire.com. Ice cubes are hollow (partially • frozen cubes with water inside). Ice cubes are not being held • in for temperature...


