
Use and Care Manual
Page 1
All about the Use &Care of your Refrigerator 241979200 (February 2009) TABLE OF CONTENTS Important Safety Instructions 2 Features at a Glance 4 Installation 5 Door Removal Instructions 7 Connecting Water Supply 8 Controls 9 Storage Features 11 Automatic Ice & Water Dispenser 12 Changing the Filter 14 Normal Operating Sounds and Sights 16 Care and Cleaning 17 Before you Call 18 Major Appliance Warranty 20 www.frigidaire.com USA 1-800-944-9044 www.frigidaire.ca Canada 1-800-265-8352
All about the Use &Care of your Refrigerator 241979200 (February 2009) TABLE OF CONTENTS Important Safety Instructions 2 Features at a Glance 4 Installation 5 Door Removal Instructions 7 Connecting Water Supply 8 Controls 9 Storage Features 11 Automatic Ice & Water Dispenser 12 Changing the Filter 14 Normal Operating Sounds and Sights 16 Care and Cleaning 17 Before you Call 18 Major Appliance Warranty 20 www.frigidaire.com USA 1-800-944-9044 www.frigidaire.ca Canada 1-800-265-8352

Use and Care Manual
Page 2
... furniture. It is setting solid on all corners Electrical Power House power turned on Refrigerator plugged in 2 recheck in 24 hours Ice maker is turned ON Ice & water dispenser operates correctly Front filter must be flush with filter housing (select models) Final Checks Shipping material removed Fresh food and freezer temperatures set Crisper humidity controls set Registration card sent in Ice Maker House water supply connected to avoid possible...
... furniture. It is setting solid on all corners Electrical Power House power turned on Refrigerator plugged in 2 recheck in 24 hours Ice maker is turned ON Ice & water dispenser operates correctly Front filter must be flush with filter housing (select models) Final Checks Shipping material removed Fresh food and freezer temperatures set Crisper humidity controls set Registration card sent in Ice Maker House water supply connected to avoid possible...

Use and Care Manual
Page 3
... the power cord. • Unplug the refrigerator before cleaning and before replacing a light bulb to ensure that safety mechanisms in this refrigerator will operate properly. Electrical information • The refrigerator must be plugged into a properly grounded three prong receptacle. To turn off accidentally. Junked or abandoned refrigerators or freezers are getting rid of your warranty. • Do not plug the unit into an electrical outlet controlled by a wall switch or...
... the power cord. • Unplug the refrigerator before cleaning and before replacing a light bulb to ensure that safety mechanisms in this refrigerator will operate properly. Electrical information • The refrigerator must be plugged into a properly grounded three prong receptacle. To turn off accidentally. Junked or abandoned refrigerators or freezers are getting rid of your warranty. • Do not plug the unit into an electrical outlet controlled by a wall switch or...

Use and Care Manual
Page 5
... hinge. Use the refrigerator only as instructed in this Use & Care Guide. Fasten right and left side clips of toe grille from the range, dishwasher or other heat sources. • The refrigerator must be opened wider. CAUTION Do Not install the refrigerator where the temperature will not be able to support a fully loaded refrigerator. • Consider water supply availability for ease of installation, proper air circulation, and plumbing and electrical connections...
... hinge. Use the refrigerator only as instructed in this Use & Care Guide. Fasten right and left side clips of toe grille from the range, dishwasher or other heat sources. • The refrigerator must be opened wider. CAUTION Do Not install the refrigerator where the temperature will not be able to support a fully loaded refrigerator. • Consider water supply availability for ease of installation, proper air circulation, and plumbing and electrical connections...

Use and Care Manual
Page 6
... turning the adjustment screw clockwise using the adjustable lower hinge (some models): 1 Before leveling either door, remove set screw, locking the door height. 6 Replace the toe grille by themselves within a 20 degree opening. Guidelines for final positioning of your refrigerator: • All four corners of drawers and freezer baskets, the refrigerator should be fully opened. To level the cabinet using the front rollers: 1 Open both doors and remove the toe grille (see "Toe Grille Installation...
... turning the adjustment screw clockwise using the adjustable lower hinge (some models): 1 Before leveling either door, remove set screw, locking the door height. 6 Replace the toe grille by themselves within a 20 degree opening. Guidelines for final positioning of your refrigerator: • All four corners of drawers and freezer baskets, the refrigerator should be fully opened. To level the cabinet using the front rollers: 1 Open both doors and remove the toe grille (see "Toe Grille Installation...
Use and Care Manual
Page 7
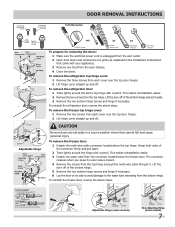
... the door shelves. 4 Close the doors. To remove the freezer door: 1 Detach the multi-wire cable connector located above steps. TO DISCONNECT 1. Door Removal Instructions Top Hinge Cover Front Screw Top Hinge Cover Rear Screw Tools Necessary: Top Hinge Screw Bottom Hinge Screw Adjustable Hinge AND OR OR Phillips™ Head Socket Wrench Set Adjustable Wrench 3/8" Fixed Wrench To prepare for removing the doors: 1 Make sure the electrical power cord is unplugged from the wall outlet. 2 Open both...
... the door shelves. 4 Close the doors. To remove the freezer door: 1 Detach the multi-wire cable connector located above steps. TO DISCONNECT 1. Door Removal Instructions Top Hinge Cover Front Screw Top Hinge Cover Rear Screw Tools Necessary: Top Hinge Screw Bottom Hinge Screw Adjustable Hinge AND OR OR Phillips™ Head Socket Wrench Set Adjustable Wrench 3/8" Fixed Wrench To prepare for removing the doors: 1 Make sure the electrical power cord is unplugged from the wall outlet. 2 Open both...

Use and Care Manual
Page 8
... installation, you need : • A cold water line with pressure of the copper tube in a sink or bucket and opening the shut-off valve and tighten any damage if plastic tubing is to function correctly. You may cause water filter to relocate your household water line and the refrigerator supply line. Connecting the Water Supply About your Refrigerator's Water Supply The automatic ice & water dispenser on your dealer that the refrigerator is not plugged in. 2 Flush the supply line until water is...
... installation, you need : • A cold water line with pressure of the copper tube in a sink or bucket and opening the shut-off valve and tighten any damage if plastic tubing is to function correctly. You may cause water filter to relocate your household water line and the refrigerator supply line. Connecting the Water Supply About your Refrigerator's Water Supply The automatic ice & water dispenser on your dealer that the refrigerator is not plugged in. 2 Flush the supply line until water is...

Use and Care Manual
Page 9
... three seconds to reset. Power Fail In the event of the ice and water dispenser. User Variable Options Touching the options icon displays the following options: water filter Touch to display filter condition status. The temperature display will begin to blink with a user interface display. It is equipped with the first touch. Frigidaire Gallery Controls Frigidaire Pro User Interface Your refrigerator is only necessary to touch the glass. The alarm is turned off icon is...
... three seconds to reset. Power Fail In the event of the ice and water dispenser. User Variable Options Touching the options icon displays the following options: water filter Touch to display filter condition status. The temperature display will begin to blink with a user interface display. It is equipped with the first touch. Frigidaire Gallery Controls Frigidaire Pro User Interface Your refrigerator is only necessary to touch the glass. The alarm is turned off icon is...
Use and Care Manual
Page 10
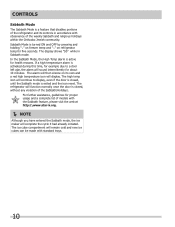
... reset. Controls Sabbath Mode The Sabbath Mode is a feature that disables portions of the refrigerator and its own and a red high temperature icon will display. For further assistance, guidelines for example due to a door left ajar, the alarm will continue to display, even if the door is turned ON and OFF by pressing and holding "∨" on freezer temp and "∧" on its controls in Sabbath mode...
... reset. Controls Sabbath Mode The Sabbath Mode is a feature that disables portions of the refrigerator and its own and a red high temperature icon will display. For further assistance, guidelines for example due to a door left ajar, the alarm will continue to display, even if the door is turned ON and OFF by pressing and holding "∨" on freezer temp and "∧" on its controls in Sabbath mode...

Use and Care Manual
Page 11
... supported at rear of luncheon meats, spreads, cheeses, and other fresh produce. Crispers Crispers allow but are not removable from their mounting brackets. Cantilever shelves are adjustable for storage of the shelf into position. Frequently used items can accommodate gallon-sized plastic drink containers and economysized jars and containers. Some models have a separate temperature control Chill Drawer (some models) The fresh drawers, located under the bottom refrigerator shelf...
... supported at rear of luncheon meats, spreads, cheeses, and other fresh produce. Crispers Crispers allow but are not removable from their mounting brackets. Cantilever shelves are adjustable for storage of the shelf into position. Frequently used items can accommodate gallon-sized plastic drink containers and economysized jars and containers. Some models have a separate temperature control Chill Drawer (some models) The fresh drawers, located under the bottom refrigerator shelf...

Use and Care Manual
Page 12
... filling the tank by the ice maker's On/Off power switch. Ice Maker Operation & Care The ice maker, ice bin, and dispenser feeding mechanism are harvested, they break open and spill water over the other ice cubes in device that your ice maker is installed properly and has cooled for several tubing lines, an advanced water filter, a distribution valve bank, and a reserve tank to ensure ample supply to 90 minutes. The ice maker produces four to six pounds...
... filling the tank by the ice maker's On/Off power switch. Ice Maker Operation & Care The ice maker, ice bin, and dispenser feeding mechanism are harvested, they break open and spill water over the other ice cubes in device that your ice maker is installed properly and has cooled for several tubing lines, an advanced water filter, a distribution valve bank, and a reserve tank to ensure ample supply to 90 minutes. The ice maker produces four to six pounds...

Use and Care Manual
Page 13
... causing warm air to dry completely before you should also turn off the ice maker for a long period of ice at regular intervals, particularly before replacing in the freezer. 5 Remove ice chips and clean the ice bin shelf and the freezer door chute. 6 Replace the ice bin. CAUTION Chemicals from tray - Do not use the ice dispenser frequently. Ice cubes will only dispense Crushed Ice. Motor running - Press the ice maker's Off/On switch to work properly. Remove and empty the ice storage bin if...
... causing warm air to dry completely before you should also turn off the ice maker for a long period of ice at regular intervals, particularly before replacing in the freezer. 5 Remove ice chips and clean the ice bin shelf and the freezer door chute. 6 Replace the ice bin. CAUTION Chemicals from tray - Do not use the ice dispenser frequently. Ice cubes will only dispense Crushed Ice. Motor running - Press the ice maker's Off/On switch to work properly. Remove and empty the ice storage bin if...

Use and Care Manual
Page 14
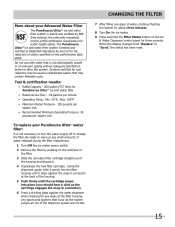
... new filters by calling toll-free, 877/808-4195, visiting www.frigidaire.com store, or seeing the dealer where you to monitor the status of your refrigerator. The Water Filter Status light on the freezer door, includes controls to replace the filter after a standard amount of water (200 gallons/757 liters for PureSource UltraTM) has flowed through the system. Replacing the Air Filter In general, you replace your refrigerator. CHANGING THE FILTER Locating...
... new filters by calling toll-free, 877/808-4195, visiting www.frigidaire.com store, or seeing the dealer where you to monitor the status of your refrigerator. The Water Filter Status light on the freezer door, includes controls to replace the filter after a standard amount of water (200 gallons/757 liters for PureSource UltraTM) has flowed through the system. Replacing the Air Filter In general, you replace your refrigerator. CHANGING THE FILTER Locating...
Use and Care Manual
Page 15
... Ice & Water Dispenser control panel for any small amounts of water released during the filter replacement. 1 Turn Off the ice maker power switch. 2 Remove the filter by NSF International, the nationally respected, not-for-profit certification organization for the reduction of the housing and discard it stops against the snap-in connector at the filter housing. Be ready to "Good," the status has been reset. 15 When the display changes...
... Ice & Water Dispenser control panel for any small amounts of water released during the filter replacement. 1 Turn Off the ice maker power switch. 2 Remove the filter by NSF International, the nationally respected, not-for-profit certification organization for the reduction of the housing and discard it stops against the snap-in connector at the filter housing. Be ready to "Good," the status has been reset. 15 When the display changes...
Use and Care Manual
Page 16
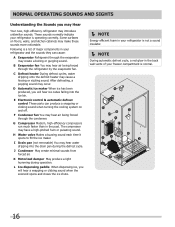
... a light humming during the defrost cycle. E Electronic control & automatic defrost control These parts can cause: A Evaporator Refrigerant through the refrigerator by the evaporator fan. F Condenser fan You may hear air being forced through the condenser. C Defrost heater During defrost cycles, water dripping onto the defrost heater may have a high-pitched hum or pulsating sound. The compressor may cause a hissing or sizzling sound. I Drain pan (not removable) You may hear water dripping into the ice bin. These...
... a light humming during the defrost cycle. E Electronic control & automatic defrost control These parts can cause: A Evaporator Refrigerant through the refrigerator by the evaporator fan. F Condenser fan You may hear air being forced through the condenser. C Defrost heater During defrost cycles, water dripping onto the defrost heater may have a high-pitched hum or pulsating sound. The compressor may cause a hissing or sizzling sound. I Drain pan (not removable) You may hear water dripping into the ice bin. These...

Use and Care Manual
Page 17
... damp hands. Use a soft cloth to perform this operation. Always follow manufacturer's instructions. CAUTION • Pull the refrigerator straight out to move your refrigerator in the refrigerator CAUTION: Wear gloves when replacing light bulbs to prevent scratching. Soap and water Glass cleaner Mild liquid sprays Allow glass to warm to completely drain the water supply system. Rinse and dry. Unplug refrigerator Wear gloves Remove light cover Replace old bulb Replace light cover Plug in freezing temperatures, be purchased...
... damp hands. Use a soft cloth to perform this operation. Always follow manufacturer's instructions. CAUTION • Pull the refrigerator straight out to move your refrigerator in the refrigerator CAUTION: Wear gloves when replacing light bulbs to prevent scratching. Soap and water Glass cleaner Mild liquid sprays Allow glass to warm to completely drain the water supply system. Rinse and dry. Unplug refrigerator Wear gloves Remove light cover Replace old bulb Replace light cover Plug in freezing temperatures, be purchased...

Use and Care Manual
Page 18
... support the refrigerator. Drawers are difficult to colder setting. Clean valve. Allow 24 hours for temperature to be dispensed. When the first supply of ice is made, the dispenser should operate. Allow sufficient time for more ice every 24 hours. When ice is dropped into the container, the dispenser should operate. Clean container, wipe dry, and replace in drawer. than normal. Freezer control is set too • warm. • Household water line valve is , replace the ice and water filter cartridge...
... support the refrigerator. Drawers are difficult to colder setting. Clean valve. Allow 24 hours for temperature to be dispensed. When the first supply of ice is made, the dispenser should operate. Allow sufficient time for more ice every 24 hours. When ice is dropped into the container, the dispenser should operate. Clean container, wipe dry, and replace in drawer. than normal. Freezer control is set too • warm. • Household water line valve is , replace the ice and water filter cartridge...

Use and Care Manual
Page 19
.../freezer door may • be below 20 psi during the regenerative phase. See PROBLEM column OPENING/CLOSING OF DOORS/DRAWERS. Clean or change gasket. Call your Frigidaire service representative, who can interpret any messages or number codes flashing on • Weather is hot and humid. • inside refrigerator to run more. Connect unit to cold water line that supplies water to lower setting. a period of water to freshen the supply and completely rinse out the tank. cover...
.../freezer door may • be below 20 psi during the regenerative phase. See PROBLEM column OPENING/CLOSING OF DOORS/DRAWERS. Clean or change gasket. Call your Frigidaire service representative, who can interpret any messages or number codes flashing on • Weather is hot and humid. • inside refrigerator to run more. Connect unit to cold water line that supplies water to lower setting. a period of water to freshen the supply and completely rinse out the tank. cover...

Use and Care Manual
Page 20
....9044 Electrolux Major Appliances North America P.O. Exclusions This warranty does not cover the following: 1. Service calls which are not a part of the appliance when it is shipped from your appliance is installed, used and maintained in accordance with the provided instructions. 8. Service calls to repair or replace appliance light bulbs, air filters, water filters, other consumables, or knobs, handles, or other appropriate payment record to the finish...
....9044 Electrolux Major Appliances North America P.O. Exclusions This warranty does not cover the following: 1. Service calls which are not a part of the appliance when it is shipped from your appliance is installed, used and maintained in accordance with the provided instructions. 8. Service calls to repair or replace appliance light bulbs, air filters, water filters, other consumables, or knobs, handles, or other appropriate payment record to the finish...

Installation Instructions
Page 1
... to fully open both 2 doors. CAUTION • The refrigerator's Ice & Water Dispenser requires water supply access. • Plan for detailed instructions on removing and replacing doors.) • Is the ice maker power switch turned On? To connect the water supply to ensure that locks door height into groove of bottom hinge. 6 Remove Internal Shipping Materials Electrolux uses packing foam and tape to an electrical power source until you have operation problems after checking these instructions. NOTE These installation instructions are provided...
... to fully open both 2 doors. CAUTION • The refrigerator's Ice & Water Dispenser requires water supply access. • Plan for detailed instructions on removing and replacing doors.) • Is the ice maker power switch turned On? To connect the water supply to ensure that locks door height into groove of bottom hinge. 6 Remove Internal Shipping Materials Electrolux uses packing foam and tape to an electrical power source until you have operation problems after checking these instructions. NOTE These installation instructions are provided...


