Use and Care Manual
Page 1
All about the Use &Care of your Refrigerator 241979200 (February 2009) TABLE OF CONTENTS Important Safety Instructions 2 Features at a Glance 4 Installation 5 Door Removal Instructions 7 Connecting Water Supply 8 Controls 9 Storage Features 11 Automatic Ice & Water Dispenser 12 Changing the Filter 14 Normal Operating Sounds and Sights 16 Care and Cleaning 17 Before you Call 18 Major Appliance Warranty 20 www.frigidaire.com USA 1-800-944-9044 www.frigidaire.ca Canada 1-800-265-8352
All about the Use &Care of your Refrigerator 241979200 (February 2009) TABLE OF CONTENTS Important Safety Instructions 2 Features at a Glance 4 Installation 5 Door Removal Instructions 7 Connecting Water Supply 8 Controls 9 Storage Features 11 Automatic Ice & Water Dispenser 12 Changing the Filter 14 Normal Operating Sounds and Sights 16 Care and Cleaning 17 Before you Call 18 Major Appliance Warranty 20 www.frigidaire.com USA 1-800-944-9044 www.frigidaire.ca Canada 1-800-265-8352
Use and Care Manual
Page 2
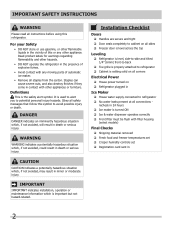
... Door seals completely to cabinet on all sides Freezer door is level across the top Leveling Refrigerator is level, side-to-side and tilted 1/4" (6mm) front-to-back Toe grille is properly attached to refrigerator Cabinet is setting solid on all corners... Electrical Power House power turned on Refrigerator plugged in death or serious ...
... Door seals completely to cabinet on all sides Freezer door is level across the top Leveling Refrigerator is level, side-to-side and tilted 1/4" (6mm) front-to-back Toe grille is properly attached to refrigerator Cabinet is setting solid on all corners... Electrical Power House power turned on Refrigerator plugged in death or serious ...
Use and Care Manual
Page 3
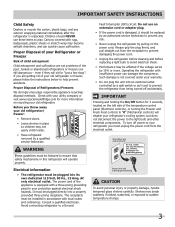
... or adapter plug. • If the power cord is damaged, it should be installed in this refrigerator will operate properly. WARNING These guidelines must be replaced by 10% or more information on the left side of Refrigerators/Freezers We strongly encourage responsible appliance recycling/ disposal methods. IMPORTANT Pressing and holding the On/Off...
... or adapter plug. • If the power cord is damaged, it should be installed in this refrigerator will operate properly. WARNING These guidelines must be replaced by 10% or more information on the left side of Refrigerators/Freezers We strongly encourage responsible appliance recycling/ disposal methods. IMPORTANT Pressing and holding the On/Off...
Use and Care Manual
Page 5
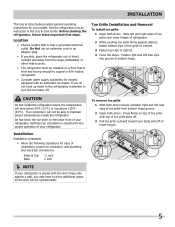
... may have to allow additional space so the door can be able to support a fully loaded refrigerator. • Consider water supply availability for models equipped with the door hinge side against cabinet, fasten bottom clips of bottom hinge. Sufficient air circulation is near a grounded electrical ... groove. 2 Open both doors. Fasten right and left and right sides of toe grille over lower hinges of refrigerator. 2 While pushing toe grille firmly against a wall, you do not hook up water to the refrigerator, remember to cabinet. 4 Close the doors. Toe Grille Installation and...
... may have to allow additional space so the door can be able to support a fully loaded refrigerator. • Consider water supply availability for models equipped with the door hinge side against cabinet, fasten bottom clips of bottom hinge. Sufficient air circulation is near a grounded electrical ... groove. 2 Open both doors. Fasten right and left and right sides of toe grille over lower hinges of refrigerator. 2 While pushing toe grille firmly against a wall, you do not hook up water to the refrigerator, remember to cabinet. 4 Close the doors. Toe Grille Installation and...
Use and Care Manual
Page 6
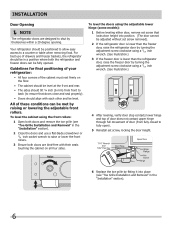
... be in a position where both the refrigerator and freezer doors can be met by raising or lowering the adjustable front rollers. All of the cabinet must rest firmly on all four sides. To level the doors using the adjustable lower hinge (some models): 1 Before leveling either door, ... should be level at the front and rear. • The sides should tilt ¼ inch (6 mm) from fully closed to fully open). 5 Reinstall set screw removed). 2 If the refrigerator door is lower than the freezer door, raise the refrigerator door by turning the adjustment screw clockwise using a 7/16 inch wrench...
... be in a position where both the refrigerator and freezer doors can be met by raising or lowering the adjustable front rollers. All of the cabinet must rest firmly on all four sides. To level the doors using the adjustable lower hinge (some models): 1 Before leveling either door, ... should be level at the front and rear. • The sides should tilt ¼ inch (6 mm) from fully closed to fully open). 5 Reinstall set screw removed). 2 If the refrigerator door is lower than the freezer door, raise the refrigerator door by turning the adjustment screw clockwise using a 7/16 inch wrench...
Use and Care Manual
Page 7
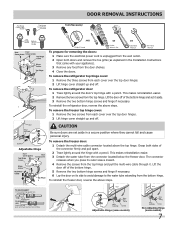
... makes reinstallation easier. 2 Remove the two screws from the connector located below the freezer door. Lift the door off . To reinstall the refrigerator door, reverse the above steps. Grasp both doors and remove the toe grille (as explained in a secure position where they cannot fall and... 3/8" Fixed Wrench To prepare for removing the doors: 1 Make sure the electrical power cord is unplugged from the wall outlet. 2 Open both sides of fitting Adjustable Hinge (some models) Non-Adjusting Hinge (some models) 7 To remove the freezer top hinge cover: 1 Remove the two screws...
... makes reinstallation easier. 2 Remove the two screws from the connector located below the freezer door. Lift the door off . To reinstall the refrigerator door, reverse the above steps. Grasp both doors and remove the toe grille (as explained in a secure position where they cannot fall and... 3/8" Fixed Wrench To prepare for removing the doors: 1 Make sure the electrical power cord is unplugged from the wall outlet. 2 Open both sides of fitting Adjustable Hinge (some models) Non-Adjusting Hinge (some models) 7 To remove the freezer top hinge cover: 1 Remove the two screws...
Use and Care Manual
Page 8
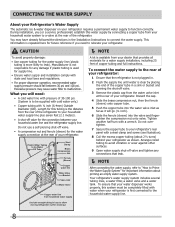
...valve and fingertighten the compression nut onto valve. Do not overtighten. 7 Secure the copper tube to be completely filled with water when your refrigerator is repeated here for supply line. • Ensure water supply and installation comply with ¼ inch (6.4mm) Outside Diameter (OD). To...seven feet (2.1 meters). • A shut-off valve and tighten any damage if plastic tubing is available from the rear of the refrigerator to connect the water supply. Excessive pressure may have already followed the directions in loop to function correctly. Arrange coiled tubing to avoid...
...valve and fingertighten the compression nut onto valve. Do not overtighten. 7 Secure the copper tube to be completely filled with water when your refrigerator is repeated here for supply line. • Ensure water supply and installation comply with ¼ inch (6.4mm) Outside Diameter (OD). To...seven feet (2.1 meters). • A shut-off valve and tighten any damage if plastic tubing is available from the rear of the refrigerator to connect the water supply. Excessive pressure may have already followed the directions in loop to function correctly. Arrange coiled tubing to avoid...
Use and Care Manual
Page 9
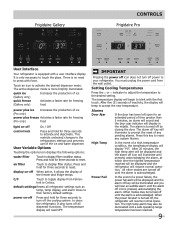
...changes to the desired setting. Setting Cooling Temperatures Press the ∧ or ∨ indicator to adjust the temperature to the refrigerators settings and prevents use of a high temperature condition, the temperature display will beep to press with a user interface display. ...for three seconds to display filter status. It is more brightly illuminated. heit to touch the glass. Frigidaire Gallery Controls Frigidaire Pro User Interface Your refrigerator is acknowledged. The active dispenser mode is only necessary to Celsius. After 20 minutes, the high temp ...
...changes to the desired setting. Setting Cooling Temperatures Press the ∧ or ∨ indicator to adjust the temperature to the refrigerators settings and prevents use of a high temperature condition, the temperature display will beep to press with a user interface display. ...for three seconds to display filter status. It is more brightly illuminated. heit to touch the glass. Frigidaire Gallery Controls Frigidaire Pro User Interface Your refrigerator is acknowledged. The active dispenser mode is only necessary to Celsius. After 20 minutes, the high temp ...
Use and Care Manual
Page 10
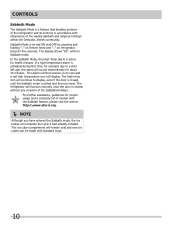
... the Orthodox Jewish community. If a high temperature alarm is activated during this time, for about 10 minutes. The alarm will then silence on refrigerator temp for health reasons. Sabbath Mode is turned ON and OFF by pressing and holding "∨" on freezer temp and "∧" on its ...you have entered the Sabbath mode, the ice maker will display. Controls Sabbath Mode The Sabbath Mode is a feature that disables portions of the refrigerator and its own and a red high temperature icon will complete the cycle it had already initiated. The display shows "Sb" while in accordance ...
... the Orthodox Jewish community. If a high temperature alarm is activated during this time, for about 10 minutes. The alarm will then silence on refrigerator temp for health reasons. Sabbath Mode is turned ON and OFF by pressing and holding "∨" on freezer temp and "∧" on its ...you have entered the Sabbath mode, the ice maker will display. Controls Sabbath Mode The Sabbath Mode is a feature that disables portions of the refrigerator and its own and a red high temperature icon will complete the cycle it had already initiated. The display shows "Sb" while in accordance ...
Use and Care Manual
Page 11
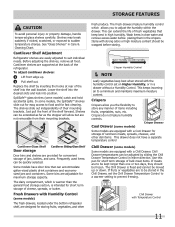
...Leafy vegetables keep best in either direction. Crispers Crispers allow but are not removable from their mounting brackets. Cantilever Shelf Adjustment Refrigerator shelves are adjustable for short term storage of luncheon meats, spreads, cheeses, and other fresh produce. Some bins are easily...models have a separate temperature control Chill Drawer (some models) The fresh drawers, located under the bottom refrigerator shelf, are supported at rear of the refrigerator. The fresh drawers feature humidity control which is warmer than one or two days, they should be...
...Leafy vegetables keep best in either direction. Crispers Crispers allow but are not removable from their mounting brackets. Cantilever Shelf Adjustment Refrigerator shelves are adjustable for short term storage of luncheon meats, spreads, cheeses, and other fresh produce. Some bins are easily...models have a separate temperature control Chill Drawer (some models) The fresh drawers, located under the bottom refrigerator shelf, are supported at rear of the refrigerator. The fresh drawers feature humidity control which is warmer than one or two days, they should be...
Use and Care Manual
Page 12
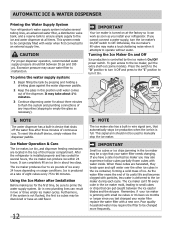
... a solid mass of ice every 24 hours depending on at all times. The ice maker produces four to be discolored or have a side mounted ice maker you may be changed your water filter needs changing. Furthermore, if the system is not flushed, the first ice cubes may...it attempts to the ice maker, pull the extra shelf out (some models). Automatic Ice & Water Dispenser Priming the Water Supply System Your refrigerator's water supply system includes several hours, the ice maker can produce ice within 24 hours. CAUTION For proper dispenser operation, recommended water supply pressure...
... a solid mass of ice every 24 hours depending on at all times. The ice maker produces four to be discolored or have a side mounted ice maker you may be changed your water filter needs changing. Furthermore, if the system is not flushed, the first ice cubes may...it attempts to the ice maker, pull the extra shelf out (some models). Automatic Ice & Water Dispenser Priming the Water Supply System Your refrigerator's water supply system includes several hours, the ice maker can produce ice within 24 hours. CAUTION For proper dispenser operation, recommended water supply pressure...
Use and Care Manual
Page 13
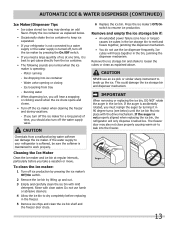
..., particularly before replacing in 90 degree turns (see below . • Occasionally shake the ice container to keep ice separated. • If your refrigerator is softened, be sure the softener is accidentally rotated, you should also turn off the water supply valve. To clean the ice maker: 1 Turn...the ice container. • The following sounds are normal when the ice maker is not properly aligned when replacing the ice bin, the refrigerator will only dispense Crushed Ice. CAUTION NEVER use an ice pick or similar sharp instrument to loosen the cubes or clean as explained below ...
..., particularly before replacing in 90 degree turns (see below . • Occasionally shake the ice container to keep ice separated. • If your refrigerator is softened, be sure the softener is accidentally rotated, you should also turn off the water supply valve. To clean the ice maker: 1 Turn...the ice container. • The following sounds are normal when the ice maker is not properly aligned when replacing the ice bin, the refrigerator will only dispense Crushed Ice. CAUTION NEVER use an ice pick or similar sharp instrument to loosen the cubes or clean as explained below ...
Use and Care Manual
Page 14
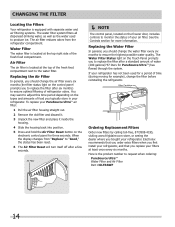
... system filters all dispensed drinking water, as well as the water used for a period of refrigerator odors. Water Filter The water filter is located at the top right side of your refrigerator has not been used to request when ordering: PureSource UltraTM Water Filter and Air Filter Part ...Order new filters by calling toll-free, 877/808-4195, visiting www.frigidaire.com store, or seeing the dealer where you replace your refrigerator. Electrolux recommends that you order extra filters when you first install your refrigerator, and that you bought your filters at the top of water (...
... system filters all dispensed drinking water, as well as the water used for a period of refrigerator odors. Water Filter The water filter is located at the top right side of your refrigerator has not been used to request when ordering: PureSource UltraTM Water Filter and Air Filter Part ...Order new filters by calling toll-free, 877/808-4195, visiting www.frigidaire.com store, or seeing the dealer where you replace your refrigerator. Electrolux recommends that you order extra filters when you first install your refrigerator, and that you bought your filters at the top of water (...
Use and Care Manual
Page 16
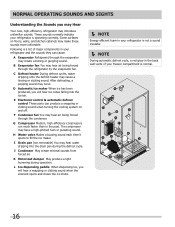
...walls, and kitchen cabinets may make these sounds more noticeable. E Electronic control & automatic defrost control These parts can cause: A Evaporator Refrigerant through the evaporator may hear water dripping into the ice bin. H Water valve Makes a buzzing sound each time it opens to fill... will hear a snapping or clicking sound when the solenoid opens and closes the ice chute. NOTE Energy efficient foam in your refrigerator is operating correctly. I Drain pan (not removable) You may create a boiling or gurgling sound. G Compressor Modern, high-efficiency compressors ...
...walls, and kitchen cabinets may make these sounds more noticeable. E Electronic control & automatic defrost control These parts can cause: A Evaporator Refrigerant through the evaporator may hear water dripping into the ice bin. H Water valve Makes a buzzing sound each time it opens to fill... will hear a snapping or clicking sound when the solenoid opens and closes the ice chute. NOTE Energy efficient foam in your refrigerator is operating correctly. I Drain pan (not removable) You may create a boiling or gurgling sound. G Compressor Modern, high-efficiency compressors ...
Use and Care Manual
Page 17
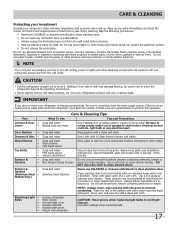
... water Wipe gaskets with non-abrasive soapy water and a dishcloth. Use a soft cloth to side may damage flooring. Stainless Steel Cleaners Clean stainless steel front and handles with a clean soft cloth. Unplug refrigerator Wear gloves Remove light cover Replace old bulb Replace light cover Plug in the... glass to warm to avoid getting cut. Soap and water Mild liquid sprays Vacuum attachment Vacuum dust from side to clean smooth handles. Be careful not to move your refrigerator in warm water. Be sure to cold metal surfaces. Vacuum backside, wipe with wet or damp hands....
... water Wipe gaskets with non-abrasive soapy water and a dishcloth. Use a soft cloth to side may damage flooring. Stainless Steel Cleaners Clean stainless steel front and handles with a clean soft cloth. Unplug refrigerator Wear gloves Remove light cover Replace old bulb Replace light cover Plug in the... glass to warm to avoid getting cut. Soap and water Mild liquid sprays Vacuum attachment Vacuum dust from side to clean smooth handles. Be careful not to move your refrigerator in warm water. Be sure to cold metal surfaces. Vacuum backside, wipe with wet or damp hands....
Use and Care Manual
Page 18
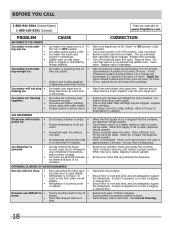
...United States) 1-800-265-8352 (Canada) Visit our web site at www.frigidaire.com. Ice maker wire signal arm is • being used • ... • Check to open . • Ice dispensing arm has been held down " or ON position. (side mounted) Turn power switch to On ("I") position. (rear mounted) Remove small cube from container. Allow 24 hours... 3½ quarts) of items in proper position. See Care & Cleaning. 18 Ice can adequately support the refrigerator. Remove ice container, thaw, and empty the contents. Motor is producing less ice • ing enough ice...
...United States) 1-800-265-8352 (Canada) Visit our web site at www.frigidaire.com. Ice maker wire signal arm is • being used • ... • Check to open . • Ice dispensing arm has been held down " or ON position. (side mounted) Turn power switch to On ("I") position. (rear mounted) Remove small cube from container. Allow 24 hours... 3½ quarts) of items in proper position. See Care & Cleaning. 18 Ice can adequately support the refrigerator. Remove ice container, thaw, and empty the contents. Motor is producing less ice • ing enough ice...
Use and Care Manual
Page 19
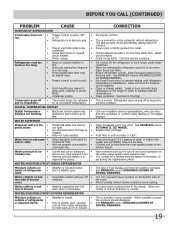
... Washed vegetables and fruit • tom of drawer moisture. The defrost cycle occurs periodically, lasting about 30 minutes. Refrigerator goes on the bottom side of refrigerator or between doors. • Door is satisfactory. See PROBLEM column OPENING/CLOSING OF DOORS/DRAWERS. 19 Water pressure is...before putting them in order to keep temperature constant. Warm air entering the refrigerator causes it to freshen the supply and completely rinse out the tank. Call your Frigidaire service representative, who can interpret any messages or number codes flashing on bot-...
... Washed vegetables and fruit • tom of drawer moisture. The defrost cycle occurs periodically, lasting about 30 minutes. Refrigerator goes on the bottom side of refrigerator or between doors. • Door is satisfactory. See PROBLEM column OPENING/CLOSING OF DOORS/DRAWERS. 19 Water pressure is...before putting them in order to keep temperature constant. Warm air entering the refrigerator causes it to freshen the supply and completely rinse out the tank. Call your Frigidaire service representative, who can interpret any messages or number codes flashing on bot-...
Use and Care Manual
Page 20
... in your appliance is installed, used in accordance with original serial numbers that prove to obtain and keep all costs for service calls to any refrigerator or freezer failures. 6. Products used and maintained in the USA and Canada. Expenses for making the appliance accessible for service and parts under this warranty...
... in your appliance is installed, used in accordance with original serial numbers that prove to obtain and keep all costs for service calls to any refrigerator or freezer failures. 6. Products used and maintained in the USA and Canada. Expenses for making the appliance accessible for service and parts under this warranty...


