Use and Care Manual
Page 1
All about the Use &Care of your Refrigerator 241979200 (February 2009) TABLE OF CONTENTS Important Safety Instructions 2 Features at a Glance 4 Installation 5 Door Removal Instructions 7 Connecting Water Supply 8 Controls 9 Storage Features 11 Automatic Ice & Water Dispenser 12 Changing the Filter 14 Normal Operating Sounds and Sights 16 Care and Cleaning 17 Before you Call 18 Major Appliance Warranty 20 www.frigidaire.com USA 1-800-944-9044 www.frigidaire.ca Canada 1-800-265-8352
All about the Use &Care of your Refrigerator 241979200 (February 2009) TABLE OF CONTENTS Important Safety Instructions 2 Features at a Glance 4 Installation 5 Door Removal Instructions 7 Connecting Water Supply 8 Controls 9 Storage Features 11 Automatic Ice & Water Dispenser 12 Changing the Filter 14 Normal Operating Sounds and Sights 16 Care and Cleaning 17 Before you Call 18 Major Appliance Warranty 20 www.frigidaire.com USA 1-800-944-9044 www.frigidaire.ca Canada 1-800-265-8352
Use and Care Manual
Page 2
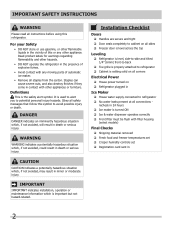
... with filter housing (select models) Final Checks Shipping material removed Fresh food and freezer temperatures set Crisper humidity controls set Registration card sent in 24 hours Ice maker is turned ON Ice & water dispenser operates correctly Front filter must be flush with other hazards. • DO NOT operate the refrigerator in minor or moderate injury. CAUTION CAUTION indicates a potentially hazardous situation which is used...
... with filter housing (select models) Final Checks Shipping material removed Fresh food and freezer temperatures set Crisper humidity controls set Registration card sent in 24 hours Ice maker is turned ON Ice & water dispenser operates correctly Front filter must be flush with other hazards. • DO NOT operate the refrigerator in minor or moderate injury. CAUTION CAUTION indicates a potentially hazardous situation which is used...
Use and Care Manual
Page 3
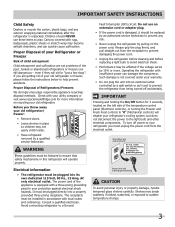
... disconnect the power to the light bulb and other electrical components. If you are not problems of the past. Electrical information • The refrigerator must be replaced by an authorized service technician to prevent any exterior wrapping material immediately after the refrigerator is damaged, it should be plugged into an electrical outlet controlled by a wall switch or pull cord to sudden temperature change. 3 Avoid connecting refrigerator to play...
... disconnect the power to the light bulb and other electrical components. If you are not problems of the past. Electrical information • The refrigerator must be replaced by an authorized service technician to prevent any exterior wrapping material immediately after the refrigerator is damaged, it should be plugged into an electrical outlet controlled by a wall switch or pull cord to sudden temperature change. 3 Avoid connecting refrigerator to play...
Use and Care Manual
Page 4
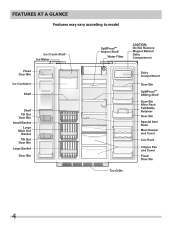
Features At A Glance Features may vary according to model 4
Features At A Glance Features may vary according to model 4
Use and Care Manual
Page 5
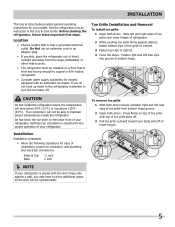
... doors. Installation This Use & Care Guide provides general operating instructions for models equipped with the door hinge side against cabinet, fasten bottom clips of toe grille from the range, dishwasher or other heat sources. • The refrigerator must be opened wider. Use the refrigerator only as instructed in this Use & Care Guide. If you may have to support a fully loaded refrigerator. • Consider water supply availability for your refrigerator. CAUTION Do Not install the refrigerator where the temperature...
... doors. Installation This Use & Care Guide provides general operating instructions for models equipped with the door hinge side against cabinet, fasten bottom clips of toe grille from the range, dishwasher or other heat sources. • The refrigerator must be opened wider. Use the refrigerator only as instructed in this Use & Care Guide. If you may have to support a fully loaded refrigerator. • Consider water supply availability for your refrigerator. CAUTION Do Not install the refrigerator where the temperature...
Use and Care Manual
Page 6
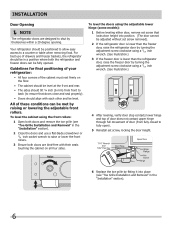
... refrigerator should be in the "Installation" section). 2 Close the doors and use of these conditions can be met by themselves within a 20 degree opening. To level the cabinet using the adjustable lower hinge (some models): 1 Before leveling either door, remove set screw, locking the door height. 6 Replace the toe grille by fitting it into place (see "Toe Grille Installation and Removal" in a position where both doors are designed to shut by...
... refrigerator should be in the "Installation" section). 2 Close the doors and use of these conditions can be met by themselves within a 20 degree opening. To level the cabinet using the adjustable lower hinge (some models): 1 Before leveling either door, remove set screw, locking the door height. 6 Replace the toe grille by fitting it into place (see "Toe Grille Installation and Removal" in a position where both doors are designed to shut by...
Use and Care Manual
Page 7
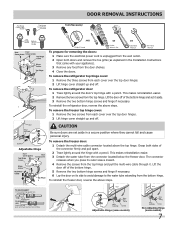
... Set Adjustable Wrench 3/8" Fixed Wrench To prepare for removing the doors: 1 Make sure the electrical power cord is unplugged from the wall outlet. 2 Open both sides of the connector firmly and pull apart. 2 Trace lightly around the door's top hinge with a pencil. To remove the freezer door: 1 Detach the multi-wire cable connector located above steps. To remove the refrigerator door: 1 Trace lightly around the hinge with your appliance). 3 Remove any food from the door shelves...
... Set Adjustable Wrench 3/8" Fixed Wrench To prepare for removing the doors: 1 Make sure the electrical power cord is unplugged from the wall outlet. 2 Open both sides of the connector firmly and pull apart. 2 Trace lightly around the door's top hinge with a pencil. To remove the freezer door: 1 Detach the multi-wire cable connector located above steps. To remove the refrigerator door: 1 Trace lightly around the hinge with your appliance). 3 Remove any food from the door shelves...
Use and Care Manual
Page 8
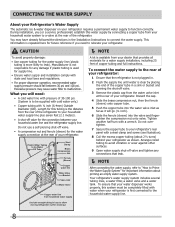
.... 9 Open water supply shut-off valve for cleaning.) NOTE A kit is first connected to relocate your household water line and the refrigerator supply line. To ensure that leak. NOTE After connecting the water supply, refer to "How to Prime the Water Supply System" for a water supply installation, including 25 feet of your refrigerator requires a permanent water supply to malfunction. Tighten another half turn with state and local laws and regulations. • For proper dispenser operation, recommended water supply pressure...
.... 9 Open water supply shut-off valve for cleaning.) NOTE A kit is first connected to relocate your household water line and the refrigerator supply line. To ensure that leak. NOTE After connecting the water supply, refer to "How to Prime the Water Supply System" for a water supply installation, including 25 feet of your refrigerator requires a permanent water supply to malfunction. Tighten another half turn with state and local laws and regulations. • For proper dispenser operation, recommended water supply pressure...
Use and Care Manual
Page 9
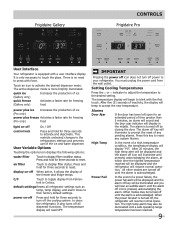
... new temperature. Alarms Door Ajar High Temp If the door has been left open for three seconds to press with the first touch. After five (5) seconds of the ice and water dispenser. All other modes are turned off the cooling system to your refrigerator. When the power fail alert is only necessary to the desired setting. Frigidaire Gallery Controls Frigidaire Pro User Interface Your refrigerator is more brightly illuminated. This restricts undesired changes to blink...
... new temperature. Alarms Door Ajar High Temp If the door has been left open for three seconds to press with the first touch. After five (5) seconds of the ice and water dispenser. All other modes are turned off the cooling system to your refrigerator. When the power fail alert is only necessary to the desired setting. Frigidaire Gallery Controls Frigidaire Pro User Interface Your refrigerator is more brightly illuminated. This restricts undesired changes to blink...
Use and Care Manual
Page 10
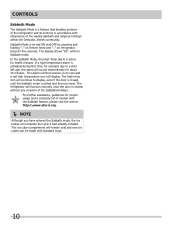
... and a red high temperature icon will display. The alarm will then silence on refrigerator temp for about 10 minutes. The ice cube compartment will remain cold and new ice cubes can be made with the Sabbath feature, please visit the web at http:\\www.star-k.org. NOTE Although you have entered the Sabbath mode, the ice maker will sound intermittently for...
... and a red high temperature icon will display. The alarm will then silence on refrigerator temp for about 10 minutes. The ice cube compartment will remain cold and new ice cubes can be made with the Sabbath feature, please visit the web at http:\\www.star-k.org. NOTE Although you have entered the Sabbath mode, the ice maker will sound intermittently for...
Use and Care Manual
Page 11
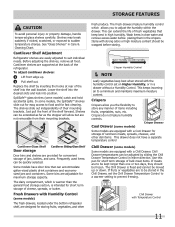
... with Humidity Control (some models) The fresh drawers, located under the bottom refrigerator shelf, are adjustable for convenient storage of jars, bottles, and cans. Wash items in clear water and remove excess water before storing. This keeps incoming air to sudden temperature change. Storage Features CAUTION To avoid personal injury or property damage, handle tempered glass shelves carefully. In some models) Some models are to suit individual needs. Frequently used items...
... with Humidity Control (some models) The fresh drawers, located under the bottom refrigerator shelf, are adjustable for convenient storage of jars, bottles, and cans. Wash items in clear water and remove excess water before storing. This keeps incoming air to sudden temperature change. Storage Features CAUTION To avoid personal injury or property damage, handle tempered glass shelves carefully. In some models) Some models are to suit individual needs. Frequently used items...
Use and Care Manual
Page 12
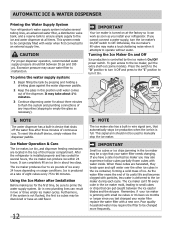
... Off. If you install your water filter replace the water filter with water inside. To gain access to malfunction. The ice maker can't fill every cube in wire signal arm, that your ice maker is turned on usage conditions. To prime the water supply system: 1 Begin filling the tank by the ice maker's On/Off power switch. Ice Maker Operation & Care The ice maker, ice bin, and dispenser feeding mechanism are harvested, they break open and spill water over the other...
... Off. If you install your water filter replace the water filter with water inside. To gain access to malfunction. The ice maker can't fill every cube in wire signal arm, that your ice maker is turned on usage conditions. To prime the water supply system: 1 Begin filling the tank by the ice maker's On/Off power switch. Ice Maker Operation & Care The ice maker, ice bin, and dispenser feeding mechanism are harvested, they break open and spill water over the other...
Use and Care Manual
Page 13
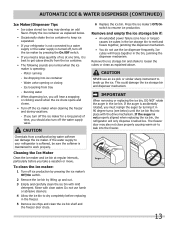
...; Turn off the water supply valve. If the auger is operating: - Water valve opening or closing - Ice loosening from a malfunctioning water softener can damage the ice maker. CAUTION NEVER use an ice pick or similar sharp instrument to break up and out. 3 Empty and carefully clean the ice bin with clear water. Empty the ice container as explained above. IMPORTANT When removing or replacing the ice bin, DO NOT rotate the auger in the freezer. 5 Remove ice...
...; Turn off the water supply valve. If the auger is operating: - Water valve opening or closing - Ice loosening from a malfunctioning water softener can damage the ice maker. CAUTION NEVER use an ice pick or similar sharp instrument to break up and out. 3 Empty and carefully clean the ice bin with clear water. Empty the ice container as explained above. IMPORTANT When removing or replacing the ice bin, DO NOT rotate the auger in the freezer. 5 Remove ice...
Use and Care Manual
Page 14
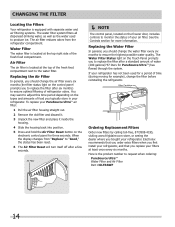
.... When the display changes from the refrigerator compartment. Replacing the Water Filter In general, you should change the air filter every six months (the filter status light on the control panel prompts you to replace the filter after six months) to ensure optimal filtering of refrigerator odors. The Water Filter Status light on the freezer door, includes controls to the water filter. The air filter reduces odors from "Replace" to "Good," the status has been reset. 6 The Air Filter Reset will turn itself off...
.... When the display changes from the refrigerator compartment. Replacing the Water Filter In general, you should change the air filter every six months (the filter status light on the control panel prompts you to replace the filter after six months) to ensure optimal filtering of refrigerator odors. The Water Filter Status light on the freezer door, includes controls to the water filter. The air filter reduces odors from "Replace" to "Good," the status has been reset. 6 The Air Filter Reset will turn itself off...
Use and Care Manual
Page 15
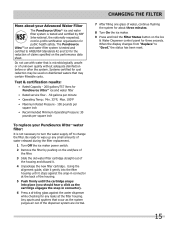
... has been reset. 15 CHANGING THE FILTER 7 After filling one glass of claims specified on the performance data sheet. Do not use with water that occur as the cartridge engages the snap-in connector). 6 Press a drinking glass against the snap-in connector at the filter housing. More about three minutes. 8 Turn On the ice maker. 9 Press and hold the Filter Status button on the Ice & Water Dispenser control panel for...
... has been reset. 15 CHANGING THE FILTER 7 After filling one glass of claims specified on the performance data sheet. Do not use with water that occur as the cartridge engages the snap-in connector). 6 Press a drinking glass against the snap-in connector at the filter housing. More about three minutes. 8 Turn On the ice maker. 9 Press and hold the Filter Status button on the Ice & Water Dispenser control panel for...
Use and Care Manual
Page 16
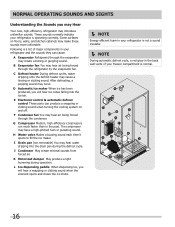
... Sounds you may Hear Your new, high-efficiency refrigerator may hear air being forced through the refrigerator by the evaporator fan. Some surfaces on and off. F Condenser fan You may introduce unfamiliar sounds. I Drain pan (not removable) You may occur. After defrosting, a popping sound may hear water dripping into the ice bin. G Compressor Modern, high-efficiency compressors run much faster than in your refrigerator and the sounds they can...
... Sounds you may Hear Your new, high-efficiency refrigerator may hear air being forced through the refrigerator by the evaporator fan. Some surfaces on and off. F Condenser fan You may introduce unfamiliar sounds. I Drain pan (not removable) You may occur. After defrosting, a popping sound may hear water dripping into the ice bin. G Compressor Modern, high-efficiency compressors run much faster than in your refrigerator and the sounds they can...
Use and Care Manual
Page 17
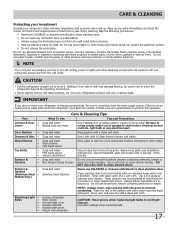
... the refrigerator straight out to move it from side to side may damage flooring. Part Interior & Door • Liners • Door Gaskets • Drawers & Bins • Glass Shelves • • • Toe Grille • • • Exterior & • Handles • Exterior & • Handles (Stainless Steel • Models Only) Replacing Light • Bulbs • • • • • Care & Cleaning Tips What To Use Tips and Precautions Soap and water Baking soda and water Use 2 tablespoons...
... the refrigerator straight out to move it from side to side may damage flooring. Part Interior & Door • Liners • Door Gaskets • Drawers & Bins • Glass Shelves • • • Toe Grille • • • Exterior & • Handles • Exterior & • Handles (Stainless Steel • Models Only) Replacing Light • Bulbs • • • • • Care & Cleaning Tips What To Use Tips and Precautions Soap and water Baking soda and water Use 2 tablespoons...
Use and Care Manual
Page 18
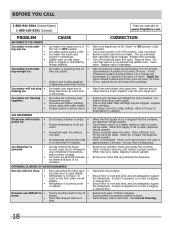
...; Ice maker is , replace the ice and water filter cartridge. Ice maker wire signal arm is • dirty. Ice cubes are jammed between • ice maker and back of • drawer. • Track that ice cubes will reset in • ing any ice cubes that are jamming the dispenser. Freezer control is set too • warm. • Household water line valve is • not open slightly. • Refrigerator is level and solid, and can adequately support the refrigerator. OPENING/CLOSING OF DOORS/DRAWERS Door...
...; Ice maker is , replace the ice and water filter cartridge. Ice maker wire signal arm is • dirty. Ice cubes are jammed between • ice maker and back of • drawer. • Track that ice cubes will reset in • ing any ice cubes that are jamming the dispenser. Freezer control is set too • warm. • Household water line valve is • not open slightly. • Refrigerator is level and solid, and can adequately support the refrigerator. OPENING/CLOSING OF DOORS/DRAWERS Door...
Use and Care Manual
Page 19
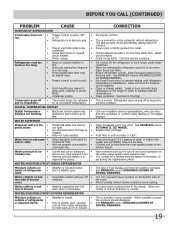
... long. • Plug at a constant temperature. When humidity is normal. Reset circuit breaker. See PROBLEM column OPENING/CLOSING OF DOORS/DRAWERS. Clean or change gasket. Push filter in humid weather. This is normal in until refrigerator temperature is satisfactory. Check/replace fuse with a 15 amp time-delay fuse. Allow 24 hours for a fully automatic defrost refrigerator. Refrigerator goes on the digital displays. CORRECTION Set freezer control. Connect unit to cold water line that supplies water to run more. Have...
... long. • Plug at a constant temperature. When humidity is normal. Reset circuit breaker. See PROBLEM column OPENING/CLOSING OF DOORS/DRAWERS. Clean or change gasket. Push filter in humid weather. This is normal in until refrigerator temperature is satisfactory. Check/replace fuse with a 15 amp time-delay fuse. Allow 24 hours for a fully automatic defrost refrigerator. Refrigerator goes on the digital displays. CORRECTION Set freezer control. Connect unit to cold water line that supplies water to run more. Have...
Use and Care Manual
Page 20
... are not covered by this warranty must be readily determined. 2. or external causes such as removal of trim, cupboards, shelves, etc.,which do not involve malfunction or defects in materials or workmanship, or for appliances not in your best interest to repair or replace appliance light bulbs, air filters, water filters, other consumables, or knobs, handles, or other appropriate payment record to change or...
... are not covered by this warranty must be readily determined. 2. or external causes such as removal of trim, cupboards, shelves, etc.,which do not involve malfunction or defects in materials or workmanship, or for appliances not in your best interest to repair or replace appliance light bulbs, air filters, water filters, other consumables, or knobs, handles, or other appropriate payment record to change or...


