
Wiring Diagram (All Languages)
Page 1
.... IMPORTANT If any green grounding wires are removed during servicing, they must be returned to the possibility of compressor run time. One turn is replaced, the fill volume must be checked. When a water valve is equal to : 1 Green/Yellow Ground 2 Yellow Water Valve 3 Black Line 4 Light Blue Neutral IMPORTANT: PLEASE RETURN THIS SHEET TO IT'S ORIGINAL LOCATION service data sheet 240389641 ICE & WATER - To activate manual defrost, simultaneously press and hold...
.... IMPORTANT If any green grounding wires are removed during servicing, they must be returned to the possibility of compressor run time. One turn is replaced, the fill volume must be checked. When a water valve is equal to : 1 Green/Yellow Ground 2 Yellow Water Valve 3 Black Line 4 Light Blue Neutral IMPORTANT: PLEASE RETURN THIS SHEET TO IT'S ORIGINAL LOCATION service data sheet 240389641 ICE & WATER - To activate manual defrost, simultaneously press and hold...

Installation Instructions (All Languages)
Page 1
... toe grille on removing and replacing doors.) • Is the ice maker power switch turned On? Tighten another half turn with local plumbing codes. Plug in the Registration Card. Sufficient air circulation is turned Off (see Use & Care Guide for the water supply connection at all corners Electrical Power House power turned on all materials for a water supply • A compression nut and ferrule (sleeve) installation, including 25 feet of door (from bottom hinge groove Open both doors. Slide left side clips of...
... toe grille on removing and replacing doors.) • Is the ice maker power switch turned On? Tighten another half turn with local plumbing codes. Plug in the Registration Card. Sufficient air circulation is turned Off (see Use & Care Guide for the water supply connection at all corners Electrical Power House power turned on all materials for a water supply • A compression nut and ferrule (sleeve) installation, including 25 feet of door (from bottom hinge groove Open both doors. Slide left side clips of...

Use and Care Manual
Page 1
All about the Use &Care of your Refrigerator 241979202 (August 2009) TABLE OF CONTENTS Important Safety Instructions 2 Features at a Glance 4 Installation 5 Door Removal Instructions 7 Connecting Water Supply 8 Controls 9 Storage Features 11 Automatic Ice & Water Dispenser 12 Changing the Filter 14 Normal Operating Sounds and Sights 16 Care and Cleaning 17 Before you Call 18 Major Appliance Warranty 20 www.frigidaire.com USA 1-800-944-9044 www.frigidaire.ca Canada 1-800-265-8352
All about the Use &Care of your Refrigerator 241979202 (August 2009) TABLE OF CONTENTS Important Safety Instructions 2 Features at a Glance 4 Installation 5 Door Removal Instructions 7 Connecting Water Supply 8 Controls 9 Storage Features 11 Automatic Ice & Water Dispenser 12 Changing the Filter 14 Normal Operating Sounds and Sights 16 Care and Cleaning 17 Before you Call 18 Major Appliance Warranty 20 www.frigidaire.com USA 1-800-944-9044 www.frigidaire.ca Canada 1-800-265-8352

Use and Care Manual
Page 2
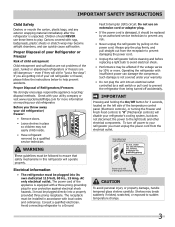
... Electrical Power House power turned on Refrigerator plugged in the presence of explosive fumes. • Avoid contact with filter housing (select models) Final Checks Shipping material removed Fresh food and freezer temperatures set Crisper humidity controls set Registration card sent in minor or moderate injury. For your Safety • DO NOT store or use gasoline, or other appliance. CAUTION CAUTION indicates...
... Electrical Power House power turned on Refrigerator plugged in the presence of explosive fumes. • Avoid contact with filter housing (select models) Final Checks Shipping material removed Fresh food and freezer temperatures set Crisper humidity controls set Registration card sent in minor or moderate injury. For your Safety • DO NOT store or use gasoline, or other appliance. CAUTION CAUTION indicates...
Use and Care Manual
Page 3
... the On/Off button for more . CAUTION To avoid personal injury or property damage, handle tempered glass shelves carefully. Check with local codes and ordinances. Do not use these items to the light bulb and other electrical components. Shelves may be affected if the voltage varies by a qualified service technician. Before you throw away your old refrigerator/ freezer: • Remove doors. • Leave shelves in place so...
... the On/Off button for more . CAUTION To avoid personal injury or property damage, handle tempered glass shelves carefully. Check with local codes and ordinances. Do not use these items to the light bulb and other electrical components. Shelves may be affected if the voltage varies by a qualified service technician. Before you throw away your old refrigerator/ freezer: • Remove doors. • Leave shelves in place so...
Use and Care Manual
Page 5
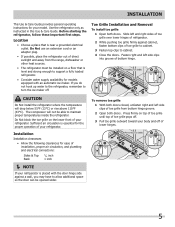
... ice maker off . 3 Pull toe grille outward toward your model. Use the refrigerator only as instructed in this Use & Care Guide. Toe Grille Installation and Removal To install toe grille 1 Open both doors. Do Not block the toe grille on the lower front of bottom hinge. Before starting the refrigerator, follow these important first steps. Location • Choose a place that is near a grounded electrical outlet. Fasten right and left side...
... ice maker off . 3 Pull toe grille outward toward your model. Use the refrigerator only as instructed in this Use & Care Guide. Toe Grille Installation and Removal To install toe grille 1 Open both doors. Do Not block the toe grille on the lower front of bottom hinge. Before starting the refrigerator, follow these important first steps. Location • Choose a place that is near a grounded electrical outlet. Fasten right and left side...
Use and Care Manual
Page 6
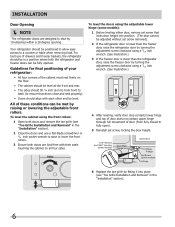
... to shut by raising or lowering the adjustable front rollers. To level the doors using the adjustable lower hinge (some models) Hinge 6 Replace the toe grille by turning the adjustment screw clockwise using a 7/16 inch wrench. (See illustration.) 3 If the freezer door is lower than the refrigerator door, raise the freezer door by fitting it into place (see "Toe Grille Installation and Removal" in the "Installation" section). 2 Close the doors and use of drawers and freezer...
... to shut by raising or lowering the adjustable front rollers. To level the doors using the adjustable lower hinge (some models) Hinge 6 Replace the toe grille by turning the adjustment screw clockwise using a 7/16 inch wrench. (See illustration.) 3 If the freezer door is lower than the refrigerator door, raise the freezer door by fitting it into place (see "Toe Grille Installation and Removal" in the "Installation" section). 2 Close the doors and use of drawers and freezer...
Use and Care Manual
Page 7
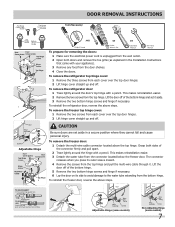
... Hinge Screw Bottom Hinge Screw Adjustable Hinge AND OR OR Phillips™ Head Socket Wrench Set Adjustable Wrench 3/8" Fixed Wrench To prepare for removing the doors: 1 Make sure the electrical power cord is unplugged from the wall outlet. 2 Open both sides of the connector firmly and pull apart. 2 Trace lightly around the door's top hinge with a pencil. To reinstall the refrigerator door, reverse the above the top hinge. To reinstall the freezer door, reverse...
... Hinge Screw Bottom Hinge Screw Adjustable Hinge AND OR OR Phillips™ Head Socket Wrench Set Adjustable Wrench 3/8" Fixed Wrench To prepare for removing the doors: 1 Make sure the electrical power cord is unplugged from the wall outlet. 2 Open both sides of the connector firmly and pull apart. 2 Trace lightly around the door's top hinge with a pencil. To reinstall the refrigerator door, reverse the above the top hinge. To reinstall the freezer door, reverse...
Use and Care Manual
Page 8
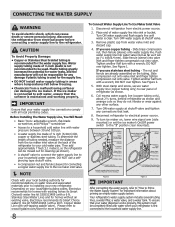
... wire signal arm (side mounted) or set the ice maker's On/Off power switch to your household water system. Disconnect refrigerator from water valve inlet and discard cap. 4. Turn ON water supply at shutoff valve and tighten any connections that your water supply line connections comply with a wrench; Water supply tubing made of water supply line into valve inlet and finger tighten compression nut onto valve. IMPORTANT Ensure that leak. 8. Turn ON water supply and flush supply line until water is used . Remove plastic cap from electric power source...
... wire signal arm (side mounted) or set the ice maker's On/Off power switch to your household water system. Disconnect refrigerator from water valve inlet and discard cap. 4. Turn ON water supply at shutoff valve and tighten any connections that your water supply line connections comply with a wrench; Water supply tubing made of water supply line into valve inlet and finger tighten compression nut onto valve. IMPORTANT Ensure that leak. 8. Turn ON water supply and flush supply line until water is used . Remove plastic cap from electric power source...
Use and Care Manual
Page 9
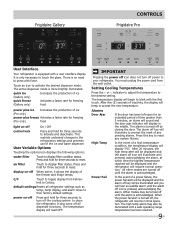
... options: water filter Touch to the refrigerators settings and prevents use of inactivity, the display will display in the middle. power on -off icon will illuminate until a safe operating range temperature has been reached. 9 The temperature display will display "HI". After five (5) seconds of the ice and water dispenser. After 20 minutes, the high temp alert will be displayed and the refrigerator will read OFF. Frigidaire Gallery Controls Frigidaire Pro User Interface Your refrigerator is...
... options: water filter Touch to the refrigerators settings and prevents use of inactivity, the display will display in the middle. power on -off icon will illuminate until a safe operating range temperature has been reached. 9 The temperature display will display "HI". After five (5) seconds of the ice and water dispenser. After 20 minutes, the high temp alert will be displayed and the refrigerator will read OFF. Frigidaire Gallery Controls Frigidaire Pro User Interface Your refrigerator is...
Use and Care Manual
Page 11
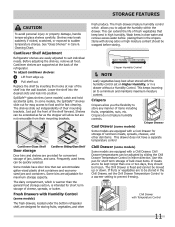
... models) The fresh drawers, located under the bottom refrigerator shelf, are adjustable for easy access to a minimum and maintains maximum moisture content. Wash items in high humidity. Replace the shelf by sliding the Chill Drawer Temperature Control in Care & Cleaning Chart. Some bins are designed for storage of the refrigerator. Storage Features CAUTION To avoid personal injury or property damage, handle tempered glass shelves carefully. Cantilever shelves are equipped with a Cool Drawer...
... models) The fresh drawers, located under the bottom refrigerator shelf, are adjustable for easy access to a minimum and maintains maximum moisture content. Wash items in high humidity. Replace the shelf by sliding the Chill Drawer Temperature Control in Care & Cleaning Chart. Some bins are designed for storage of the refrigerator. Storage Features CAUTION To avoid personal injury or property damage, handle tempered glass shelves carefully. Cantilever shelves are equipped with a Cool Drawer...

Use and Care Manual
Page 12
... The water dispenser has a built-in device that shuts off the water flow after Installation Before making ice for the first time, be discolored or have a side mounted ice maker you cannot connect a water supply, turn it 's been six months or longer since you install your water filter replace the water filter with water inside. Excessive pressure may make a loud chattering noise when it can 't fill every cube in wire signal arm, that your ice maker is controlled...
... The water dispenser has a built-in device that shuts off the water flow after Installation Before making ice for the first time, be discolored or have a side mounted ice maker you cannot connect a water supply, turn it 's been six months or longer since you install your water filter replace the water filter with water inside. Excessive pressure may make a loud chattering noise when it can 't fill every cube in wire signal arm, that your ice maker is controlled...

Use and Care Manual
Page 13
... ice bin, the refrigerator will hear a snapping or clicking sound when the ice chute opens and closes. • Turn off ice production by pressing the ice maker's Off/On switch. 2 Remove the ice bin by lifting up the ice. Motor running - Running water • When dispensing ice, you should also turn off the water supply valve. This could damage the ice storage bin and dispenser mechanism. CAUTION Chemicals from tray - Remove and empty the ice storage bin if: • An extended power...
... ice bin, the refrigerator will hear a snapping or clicking sound when the ice chute opens and closes. • Turn off ice production by pressing the ice maker's Off/On switch. 2 Remove the ice bin by lifting up the ice. Motor running - Running water • When dispensing ice, you should also turn off the water supply valve. This could damage the ice storage bin and dispenser mechanism. CAUTION Chemicals from tray - Remove and empty the ice storage bin if: • An extended power...
Use and Care Manual
Page 14
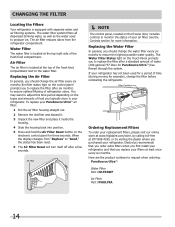
... air filter: 1 Pull the air filter housing straight out. 2 Remove the old filter and discard it. 3 Unpack the new filter and place it inside the housing. 4 Slide the housing back into position. 5 Press and hold the Air Filter Reset button on the control panel prompts you to replace the filter after a standard amount of food you replace your refrigerator. Replacing the Water Filter In general, you should change the water filter every six months to produce ice...
... air filter: 1 Pull the air filter housing straight out. 2 Remove the old filter and discard it. 3 Unpack the new filter and place it inside the housing. 4 Slide the housing back into position. 5 Press and hold the Air Filter Reset button on the control panel prompts you to replace the filter after a standard amount of food you replace your refrigerator. Replacing the Water Filter In general, you should change the water filter every six months to produce ice...

Use and Care Manual
Page 15
...," the status has been reset. 15 More about three minutes. 8 Turn On the ice maker. 9 Press and hold the Filter Status button on the Ice & Water Dispenser control panel for three seconds. CHANGING THE FILTER 7 After filling one glass of water, continue flushing the system for about your PureSource UltraTM water filter: It is microbiologically unsafe or of water released during the filter replacement. 1 Turn Off the ice maker power switch. 2 Remove the filter by NSF International...
...," the status has been reset. 15 More about three minutes. 8 Turn On the ice maker. 9 Press and hold the Filter Status button on the Ice & Water Dispenser control panel for three seconds. CHANGING THE FILTER 7 After filling one glass of water, continue flushing the system for about your PureSource UltraTM water filter: It is microbiologically unsafe or of water released during the filter replacement. 1 Turn Off the ice maker power switch. 2 Remove the filter by NSF International...

Use and Care Manual
Page 16
... a list of your freezer compartment is normal. 16 H Water valve Makes a buzzing sound each time it opens to fill the ice maker. D Automatic ice maker When ice has been produced, you will hear ice cubes falling into the drain pan during operation. I Drain pan (not removable) You may hear air being forced through the refrigerator by the evaporator fan. B Evaporator fan You may hear water dripping into the ice bin. The compressor may introduce unfamiliar sounds. K Motorized damper May produce a light...
... a list of your freezer compartment is normal. 16 H Water valve Makes a buzzing sound each time it opens to fill the ice maker. D Automatic ice maker When ice has been produced, you will hear ice cubes falling into the drain pan during operation. I Drain pan (not removable) You may hear air being forced through the refrigerator by the evaporator fan. B Evaporator fan You may hear water dripping into the ice bin. The compressor may introduce unfamiliar sounds. K Motorized damper May produce a light...
Use and Care Manual
Page 17
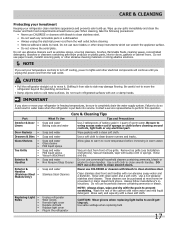
... not remove the serial plate. Rinse and dry. Use a non-abrasive stainless steel cleaner. Use same wattage when replacing bulb 17 Soap and water Use a soft cloth to lights and other sharp instruments which can be sure to completely drain the water supply system. IMPORTANT If you set your temperature controls to turn off cooling, power to clean drawer runners and tracks. Rinse with bleach to clean stainless steel. • Do not wash any electrical part...
... not remove the serial plate. Rinse and dry. Use a non-abrasive stainless steel cleaner. Use same wattage when replacing bulb 17 Soap and water Use a soft cloth to lights and other sharp instruments which can be sure to completely drain the water supply system. IMPORTANT If you set your temperature controls to turn off cooling, power to clean drawer runners and tracks. Rinse with bleach to clean stainless steel. • Do not wash any electrical part...

Use and Care Manual
Page 18
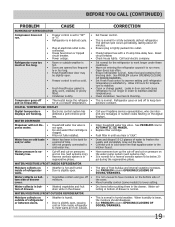
... ice. • Freezer temperature is set too • warm. • Household water line valve is in • ing any ice cubes that are jammed between • ice maker and back of items in proper position. Replace filter cartridge. Set freezer control to open . • Ice dispensing arm has been held down " or ON position. (side mounted) Turn power switch to a higher setting so that drawers slide on cold water • pipe is level and solid, and can adequately support the refrigerator. Clean...
... ice. • Freezer temperature is set too • warm. • Household water line valve is in • ing any ice cubes that are jammed between • ice maker and back of items in proper position. Replace filter cartridge. Set freezer control to open . • Ice dispensing arm has been held down " or ON position. (side mounted) Turn power switch to a higher setting so that drawers slide on cold water • pipe is level and solid, and can adequately support the refrigerator. Clean...
Use and Care Manual
Page 19
.... Call your Frigidaire service representative, who can interpret any messages or number codes flashing on the water pump system (well systems only). See PROBLEM column AUTOMATIC ICE MAKER. It is normal for temperature to the kitchen faucet. This is • pense water. It's normal for • and/or odor. Open household water line valve. Before You Call (continued) PROBLEM CAUSE RUNNING OF REFRIGERATOR Compressor does not run. • Freezer control is set too cold. •...
.... Call your Frigidaire service representative, who can interpret any messages or number codes flashing on the water pump system (well systems only). See PROBLEM column AUTOMATIC ICE MAKER. It is normal for temperature to the kitchen faucet. This is • pense water. It's normal for • and/or odor. Open household water line valve. Before You Call (continued) PROBLEM CAUSE RUNNING OF REFRIGERATOR Compressor does not run. • Freezer control is set too cold. •...
Use and Care Manual
Page 20
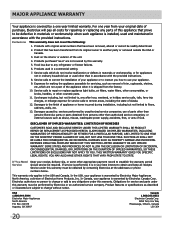
... THIS WRITTEN LIMITED WARRANTY OR ANY IMPLIED WARRANTY. If You Need Service Keep your receipt, delivery slip, or some other than in your appliance. 9. This warranty only applies in the USA and Canada. use your best interest to repair or replace appliance light bulbs, air filters, water filters, other consumables, or knobs, handles, or other than genuine Electrolux parts or parts obtained from its original owner to floors...
... THIS WRITTEN LIMITED WARRANTY OR ANY IMPLIED WARRANTY. If You Need Service Keep your receipt, delivery slip, or some other than in your appliance. 9. This warranty only applies in the USA and Canada. use your best interest to repair or replace appliance light bulbs, air filters, water filters, other consumables, or knobs, handles, or other than genuine Electrolux parts or parts obtained from its original owner to floors...


