
Complete Owner's Guide (English)
Page 1
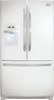
All about the Use &Care of your Refrigerator 242046800 (February 2010) TABLE OF CONTENTS Important Safety Instructions 2 Features at a Glance 4 Installation 5 Door Removal Instructions 9 Installing Door Handles 11 Connecting Water Supply 13 Controls 14 Automatic Ice & Water Dispenser 16 Storage Features 18 Storing Food and Saving Energy 22 Normal Operating Sounds and Sights 23 Changing the Filter 24 Care and Cleaning 26 Before you Call 29 Major Appliance Warranty 31 www.frigidaire.com USA 1-800-944-9044 www.frigidaire.ca Canada 1-800-265-8352
All about the Use &Care of your Refrigerator 242046800 (February 2010) TABLE OF CONTENTS Important Safety Instructions 2 Features at a Glance 4 Installation 5 Door Removal Instructions 9 Installing Door Handles 11 Connecting Water Supply 13 Controls 14 Automatic Ice & Water Dispenser 16 Storage Features 18 Storing Food and Saving Energy 22 Normal Operating Sounds and Sights 23 Changing the Filter 24 Care and Cleaning 26 Before you Call 29 Major Appliance Warranty 31 www.frigidaire.com USA 1-800-944-9044 www.frigidaire.ca Canada 1-800-265-8352
Complete Owner's Guide (English)
Page 2
...Ice Maker House water supply connected to avoid possible injury or death. Obey all safety messages that follow this symbol to refrigerator No water leaks present at all corners Electrical Power House power turned on all connections - WARNING WARNING indicates ...safety alert symbol. Read product labels for warnings regarding flammability and other hazards. • DO NOT operate the refrigerator in the presence of this refrigerator. Important Safety Instructions WARNING Please read all staples from the carton. It is important but not hazard-related. ...
...Ice Maker House water supply connected to avoid possible injury or death. Obey all safety messages that follow this symbol to refrigerator No water leaks present at all corners Electrical Power House power turned on all connections - WARNING WARNING indicates ...safety alert symbol. Read product labels for warnings regarding flammability and other hazards. • DO NOT operate the refrigerator in the presence of this refrigerator. Important Safety Instructions WARNING Please read all staples from the carton. It is important but not hazard-related. ...
Complete Owner's Guide (English)
Page 3
...Always grip the plug firmly, and pull straight out from the receptacle to prevent damaging the power cord. • Unplug the refrigerator before cleaning and before replacing a light bulb to a Ground CAUTION To avoid personal injury or property damage, handle tempered glass shelves...Fault Interrupter (GFI) circuit. IMPORTANT Pressing and holding the On/Off button for "just a few days". Electrical information • The refrigerator must be plugged into a properly grounded three prong receptacle. WARNING These guidelines must be followed to the light bulb and other electrical components....
...Always grip the plug firmly, and pull straight out from the receptacle to prevent damaging the power cord. • Unplug the refrigerator before cleaning and before replacing a light bulb to a Ground CAUTION To avoid personal injury or property damage, handle tempered glass shelves...Fault Interrupter (GFI) circuit. IMPORTANT Pressing and holding the On/Off button for "just a few days". Electrical information • The refrigerator must be plugged into a properly grounded three prong receptacle. WARNING These guidelines must be followed to the light bulb and other electrical components....
Complete Owner's Guide (English)
Page 5
...instructions for your model. Do Not block the toe grille on a floor that is level and strong enough to support a fully loaded refrigerator. • Consider water supply availability for models equipped with the door hinge side against a wall, you may have to allow additional ...space so the door can be positioned to allow easy access to maintain proper temperatures inside the refrigerator. Required Tools You will need the following clearances for ease of installation, proper air circulation, and plumbing and electrical connections: Sides & Top...
...instructions for your model. Do Not block the toe grille on a floor that is level and strong enough to support a fully loaded refrigerator. • Consider water supply availability for models equipped with the door hinge side against a wall, you may have to allow additional ...space so the door can be positioned to allow easy access to maintain proper temperatures inside the refrigerator. Required Tools You will need the following clearances for ease of installation, proper air circulation, and plumbing and electrical connections: Sides & Top...
Complete Owner's Guide (English)
Page 6
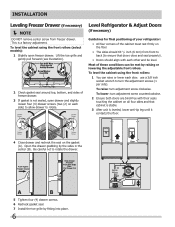
.... 4 Close drawer and recheck the seal on each side) to allow drawer to turn the adjustment screws (1 per side). Level Refrigerator & Adjust Doors (if necessary) Guidelines for final positioning of your refrigerator: • All four corners of the cabinet must rest firmly on the floor. • The sides should align with their...
.... 4 Close drawer and recheck the seal on each side) to allow drawer to turn the adjustment screws (1 per side). Level Refrigerator & Adjust Doors (if necessary) Guidelines for final positioning of your refrigerator: • All four corners of the cabinet must rest firmly on the floor. • The sides should align with their...

Complete Owner's Guide (English)
Page 7
... 1 Open door to provide access to screw. 2 Loosen screw. 3 Adjust door to 90 degrees. 3 Loosen or remove screw. A Open Door 90 degrees Bottom of the refrigerator door.
... 1 Open door to provide access to screw. 2 Loosen screw. 3 Adjust door to 90 degrees. 3 Loosen or remove screw. A Open Door 90 degrees Bottom of the refrigerator door.

Complete Owner's Guide (English)
Page 9
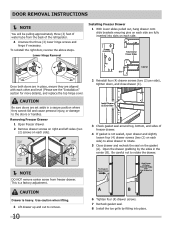
...This makes reinstallation easier. 2 Disconnect the harness by measuring the entrance. The connector releases when you can remove the doors. To remove the refrigerator doors: 1 Trace lightly around the door's top hinges with a pencil. To prepare for removing the doors: 1 Make sure the electrical power...the toe grille (see "Installation" section). 3 Remove any food from hinge. 9 Door Removal Instructions Getting through narrow spaces If your refrigerator will not fit through an entrance area, you press inward on the outer sleeve while pushing the tube toward the connector then while ...
...This makes reinstallation easier. 2 Disconnect the harness by measuring the entrance. The connector releases when you can remove the doors. To remove the refrigerator doors: 1 Trace lightly around the door's top hinges with a pencil. To prepare for removing the doors: 1 Make sure the electrical power...the toe grille (see "Installation" section). 3 Remove any food from hinge. 9 Door Removal Instructions Getting through narrow spaces If your refrigerator will not fit through an entrance area, you press inward on the outer sleeve while pushing the tube toward the connector then while ...
Complete Owner's Guide (English)
Page 10
... to rotate. 5 Close drawer and recheck the seal on the gasket (A). Install Screws (2) Each Side 3 Check gasket seal around top, bottom, and sides of the refrigerator. 4 Unscrew the three (3) lower hinge screws and hinge if necessary. Open the drawer grabbing by fitting into slots on each side. CAUTION Drawer is a factory...
... to rotate. 5 Close drawer and recheck the seal on the gasket (A). Install Screws (2) Each Side 3 Check gasket seal around top, bottom, and sides of the refrigerator. 4 Unscrew the three (3) lower hinge screws and hinge if necessary. Open the drawer grabbing by fitting into slots on each side. CAUTION Drawer is a factory...
Complete Owner's Guide (English)
Page 11
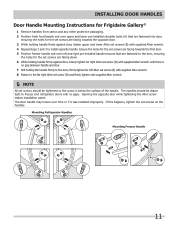
... the first door. 5 Position freezer handle end over time or if it was installed improperly. Installing Door Handles Door Handle Mounting Instructions for Frigidaire Gallery® 1 Remove handles from carton and any other protective packaging. 2 Position fresh food handle end over upper and lower pre-installed...and firmly tighten with supplied Allen wrench. NOTE All set screws should be tightened so the screw is no gaps. Mounting Refrigerator Handles Mounting Freezer Handle 11 Ensure the holes for the set screws are fastened into door, ensuring the holes for the set screws ...
... the first door. 5 Position freezer handle end over time or if it was installed improperly. Installing Door Handles Door Handle Mounting Instructions for Frigidaire Gallery® 1 Remove handles from carton and any other protective packaging. 2 Position fresh food handle end over upper and lower pre-installed...and firmly tighten with supplied Allen wrench. NOTE All set screws should be tightened so the screw is no gaps. Mounting Refrigerator Handles Mounting Freezer Handle 11 Ensure the holes for the set screws are fastened into door, ensuring the holes for the set screws ...

Complete Owner's Guide (English)
Page 12
The handles should be drawn tight to freezer and refrigerator doors with no gaps. Opening the opposite door while tightening the Allen screw makes installation easier. The door handle may loosen over left Allen set ... (B) with supplied Allen wrench until there is below the surface of the handle. Mounting Refrigerator Handles Mounting Freezer Handle 12 If this happens, tighten the set screws on the handles. Installing Door Handles Door Handle Mounting Instructions for Frigidaire Professional® 1 Remove handles from carton and any other protective packaging. 2 Position fresh...
The handles should be drawn tight to freezer and refrigerator doors with no gaps. Opening the opposite door while tightening the Allen screw makes installation easier. The door handle may loosen over left Allen set ... (B) with supplied Allen wrench until there is below the surface of the handle. Mounting Refrigerator Handles Mounting Freezer Handle 12 If this happens, tighten the set screws on the handles. Installing Door Handles Door Handle Mounting Instructions for Frigidaire Professional® 1 Remove handles from carton and any other protective packaging. 2 Position fresh...
Complete Owner's Guide (English)
Page 13
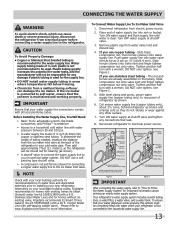
... on water lines and associated materials prior to soft water, ensure that leak. 8. Reconnect refrigerator to www.frigidaire.com/store for homes without an existing valve, Frigidaire recommends its Smart Choice® water line kit 5305513409 (with a 20 ft. Your refrigerator's water supply system includes several tubing lines, a water filter, a water valve, and a water...
... on water lines and associated materials prior to soft water, ensure that leak. 8. Reconnect refrigerator to www.frigidaire.com/store for homes without an existing valve, Frigidaire recommends its Smart Choice® water line kit 5305513409 (with a 20 ft. Your refrigerator's water supply system includes several tubing lines, a water filter, a water valve, and a water...
Complete Owner's Guide (English)
Page 14
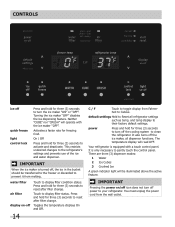
...ice maker is turned off, the ice in the bucket should be illuminated above the active feature. default settings Hold to clean the refrigerator. Your refrigerator is only necessary to turn the ice maker "ON" or "OFF". IMPORTANT Pressing the power on -off Touch to activate and ...three (3) dispenser modes: 1 Water 2 Ice Cubes 3 Crushed Ice A green indicator light will be transferred to the freezer or discarded to your refrigerator. You must unplug the power cord from Fahrenheit to their factory default settings. power Press and hold for three (3) seconds to turn off power ...
...ice maker is turned off, the ice in the bucket should be illuminated above the active feature. default settings Hold to clean the refrigerator. Your refrigerator is only necessary to turn the ice maker "ON" or "OFF". IMPORTANT Pressing the power on -off Touch to activate and ...three (3) dispenser modes: 1 Water 2 Ice Cubes 3 Crushed Ice A green indicator light will be transferred to the freezer or discarded to your refrigerator. You must unplug the power cord from Fahrenheit to their factory default settings. power Press and hold for three (3) seconds to turn off power ...
Complete Owner's Guide (English)
Page 15
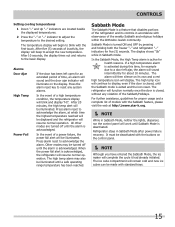
...setting. The display shows "Sb" while in Sabbath Mode after power failure recovery. The high temp icon will sound intermittently for health reasons. Refrigerator stays in Sabbath mode. All other modes are located beside the displayed temperatures. 2 Press the "∨" or "∧" indicator to adjust...any system alarms. In the event of inactivity, the display will resume normal operation. The high temp alarm may be displayed and the refrigerator will begin to acknowledge the alarm. In the Sabbath Mode, the High Temp alarm is acknowledged. Sabbath Mode The Sabbath Mode is ...
...setting. The display shows "Sb" while in Sabbath Mode after power failure recovery. The high temp icon will sound intermittently for health reasons. Refrigerator stays in Sabbath mode. All other modes are located beside the displayed temperatures. 2 Press the "∨" or "∧" indicator to adjust...any system alarms. In the event of inactivity, the display will resume normal operation. The high temp alarm may be displayed and the refrigerator will begin to acknowledge the alarm. In the Sabbath Mode, the High Temp alarm is acknowledged. Sabbath Mode The Sabbath Mode is ...
Complete Owner's Guide (English)
Page 16
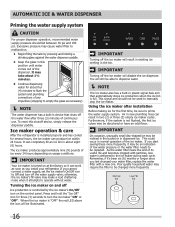
...turn off the ice maker will be illuminated. To reset this position until water comes out of the dispenser. Ice maker operation & care After the refrigerator is "OFF" the red LED above the icon will disable the ice dispenser. If you install your water filter, replace the water filter with ...NOTE The ice maker also has a built-in device that shuts off Ice production is not flushed, the first ice cubes may be changed your refrigerator. IMPORTANT Turning off the ice maker will still be able to be an indication of the ice maker. This could occur in the bin.
...turn off the ice maker will be illuminated. To reset this position until water comes out of the dispenser. Ice maker operation & care After the refrigerator is "OFF" the red LED above the icon will disable the ice dispenser. If you install your water filter, replace the water filter with ...NOTE The ice maker also has a built-in device that shuts off Ice production is not flushed, the first ice cubes may be changed your refrigerator. IMPORTANT Turning off the ice maker will still be able to be an indication of the ice maker. This could occur in the bin.

Complete Owner's Guide (English)
Page 17
...one time, it in the freezer. 5 Replace the ice bin. If the auger is not properly aligned when replacing the ice bin, the refrigerator will freeze together in the ice bin. Remove the ice bin and shake to melt and freeze together, jamming the dispenser mechanism. • You...or similar sharp instrument to leak into the fresh food compartment. Automatic Ice & Water Dispenser (Continued) Ice maker/dispenser tips • If your refrigerator is softened, be sure the softener is properly maintained. Chemicals from the ice bin. • Ice cubes stored too long may not close ...
...one time, it in the freezer. 5 Replace the ice bin. If the auger is not properly aligned when replacing the ice bin, the refrigerator will freeze together in the ice bin. Remove the ice bin and shake to melt and freeze together, jamming the dispenser mechanism. • You...or similar sharp instrument to leak into the fresh food compartment. Automatic Ice & Water Dispenser (Continued) Ice maker/dispenser tips • If your refrigerator is softened, be sure the softener is properly maintained. Chemicals from the ice bin. • Ice cubes stored too long may not close ...
Complete Owner's Guide (English)
Page 18
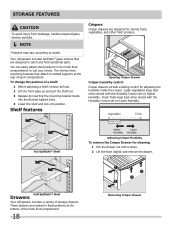
... can easily adjust shelf positions in fixed positions at the rear of the fresh food compartment. 18 Removing Crisper Drawer Half SpillSafeTM Shelf Drawers Your refrigerator includes a variety of a shelf: 1 Before adjusting a shelf, remove all food. 2 Lift the front edge up and pull the shelf out. 3 Replace by inserting the mounting... avoid injury from breakage, handle tempered glass shelves carefully. NOTE Features may vary according to slotted supports at the bottom of each compartment. Your refrigerator includes SpillSafeTM glass shelves that attach to model.
... can easily adjust shelf positions in fixed positions at the rear of the fresh food compartment. 18 Removing Crisper Drawer Half SpillSafeTM Shelf Drawers Your refrigerator includes a variety of a shelf: 1 Before adjusting a shelf, remove all food. 2 Lift the front edge up and pull the shelf out. 3 Replace by inserting the mounting... avoid injury from breakage, handle tempered glass shelves carefully. NOTE Features may vary according to slotted supports at the bottom of each compartment. Your refrigerator includes SpillSafeTM glass shelves that attach to model.
Complete Owner's Guide (English)
Page 19
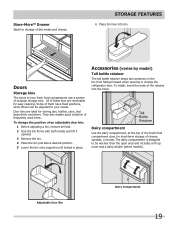
.... 4 Place the bin just above desired position. 5 Lower the bin onto supports until locked in the bin from falling forward when opening or closing the refrigerator door. Accessories (varies by model) Tall bottle retainer The tall bottle retainer keeps tall containers in place. Store-MoreTM Drawer Ideal for easy cleaning.
.... 4 Place the bin just above desired position. 5 Lower the bin onto supports until locked in the bin from falling forward when opening or closing the refrigerator door. Accessories (varies by model) Tall bottle retainer The tall bottle retainer keeps tall containers in place. Store-MoreTM Drawer Ideal for easy cleaning.
Complete Owner's Guide (English)
Page 22
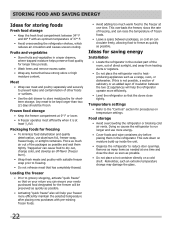
... • Store fruits and vegetables in the coolest part of the room, out of 37° F. • Avoid overcrowding the refrigerator shelves, which reduces air circulation and causes uneven cooling. This cuts down on temperature settings. Ideas for shortterm storage. Force as much warm...contamination of other foods or surfaces. • Use the deli drawer to store meat/poultry for saving energy Installation • Locate the refrigerator in crisper drawers, where trapped moisture helps preserve food quality for longer time periods. • Wash items and remove excess water. &#...
... • Store fruits and vegetables in the coolest part of the room, out of 37° F. • Avoid overcrowding the refrigerator shelves, which reduces air circulation and causes uneven cooling. This cuts down on temperature settings. Ideas for shortterm storage. Force as much warm...contamination of other foods or surfaces. • Use the deli drawer to store meat/poultry for saving energy Installation • Locate the refrigerator in crisper drawers, where trapped moisture helps preserve food quality for longer time periods. • Wash items and remove excess water. &#...
Complete Owner's Guide (English)
Page 23
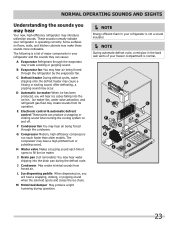
...23 F Condenser fan You may create sounds from forced air. The compressor may occur. Ice maker fan, water valve activation, and refrigerant gas fluid may hear air being forced through the condenser. Normal Operating Sounds and sights Understanding the sounds you will hear a snapping, ... water dripping into the ice bin. D Automatic ice maker When ice has been produced, you may hear Your new, high-efficiency refrigerator may make these sounds more noticeable. G Compressor Modern, high-efficiency compressors run much faster than older models. C Defrost heater During defrost...
...23 F Condenser fan You may create sounds from forced air. The compressor may occur. Ice maker fan, water valve activation, and refrigerant gas fluid may hear air being forced through the condenser. Normal Operating Sounds and sights Understanding the sounds you will hear a snapping, ... water dripping into the ice bin. D Automatic ice maker When ice has been produced, you may hear Your new, high-efficiency refrigerator may make these sounds more noticeable. G Compressor Modern, high-efficiency compressors run much faster than older models. C Defrost heater During defrost...
Complete Owner's Guide (English)
Page 24
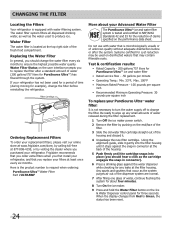
... In general, you purchased your replacement filters, please visit our online store at www.frigidaire.com/store, by calling toll-free at least once every six months. Frigidaire recommends that you order extra filters when you replace your refrigerator has not been used to NSF/ANSI Standards 42 and 53 for the reduction...
... In general, you purchased your replacement filters, please visit our online store at www.frigidaire.com/store, by calling toll-free at least once every six months. Frigidaire recommends that you order extra filters when you replace your refrigerator has not been used to NSF/ANSI Standards 42 and 53 for the reduction...


