Wiring Diagram (All Languages)
Page 1
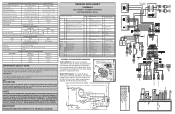
... defrost, simultaneously press and hold the Fresh Food up (+) and Fresh Food down (-) keys for 5 seconds. A "d" in the freezer temperature window and "F" in the refrigerator temperature window will distort the plastic liner. To deactivate manual defrost, simultaneously press and hold the Fresh.... BLU YEL WATER VALVE N ICE MAKER TUR Mounting Plate Screws Timing Gear NEUTRAL P-4 P-2 FF Ice Maker (2419801) AUTOMATIC DEFROST BOTTOM FREEZER - Standard compressor Defrost heater FF lighting Water valve,water disp. service data sheet 240389643 ICE & WATER - on POR only)Detection - ...
... defrost, simultaneously press and hold the Fresh Food up (+) and Fresh Food down (-) keys for 5 seconds. A "d" in the freezer temperature window and "F" in the refrigerator temperature window will distort the plastic liner. To deactivate manual defrost, simultaneously press and hold the Fresh.... BLU YEL WATER VALVE N ICE MAKER TUR Mounting Plate Screws Timing Gear NEUTRAL P-4 P-2 FF Ice Maker (2419801) AUTOMATIC DEFROST BOTTOM FREEZER - Standard compressor Defrost heater FF lighting Water valve,water disp. service data sheet 240389643 ICE & WATER - on POR only)Detection - ...
Installation Instructions (All Languages)
Page 1
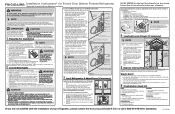
... in the center (B). If gasket is used . Be careful not to rotate. 3. Drawer Screw Push Against Freezer Drawer A Drawer Screw Grab Drawer At Center From Both Sides Then Pull Drawer Out B 5 Remove Internal Shipping Materials Frigidaire uses packing foam and tape to a range, need to remove the doors to get your refrigerator...
... in the center (B). If gasket is used . Be careful not to rotate. 3. Drawer Screw Push Against Freezer Drawer A Drawer Screw Grab Drawer At Center From Both Sides Then Pull Drawer Out B 5 Remove Internal Shipping Materials Frigidaire uses packing foam and tape to a range, need to remove the doors to get your refrigerator...
Complete Owner's Guide (English)
Page 2
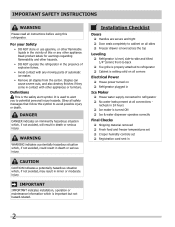
...2 recheck in 24 hours Ice maker is properly attached to refrigerator No water leaks present at all sides Freezer drawer is level across the top Leveling Refrigerator is level, side-to-side and tilted 1/4" (6mm) front-to-back ... Toe grille is turned ON Ice & water dispenser operates correctly Final Checks Shipping material removed Fresh food and freezer temperatures set Crisper humidity controls set Registration card sent in contact with any other appliances or furniture. CAUTION CAUTION indicates ...
...2 recheck in 24 hours Ice maker is properly attached to refrigerator No water leaks present at all sides Freezer drawer is level across the top Leveling Refrigerator is level, side-to-side and tilted 1/4" (6mm) front-to-back ... Toe grille is turned ON Ice & water dispenser operates correctly Final Checks Shipping material removed Fresh food and freezer temperatures set Crisper humidity controls set Registration card sent in contact with any other appliances or furniture. CAUTION CAUTION indicates ...
Complete Owner's Guide (English)
Page 3
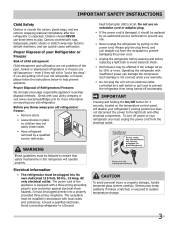
...AC only electrical outlet. Before you must be affected if the voltage varies by 10% or more information on recycling your old refrigerator/ freezer: • Remove doors. • Leave shelves in place so children may break suddenly if nicked, scratched, or exposed to play. ... company or visit www.recyclemyoldfridge.com for 3 seconds, located on the temperature control panel, will disable your old refrigerator or freezer, please follow the instructions below to prevent the refrigerator from the electrical outlet. Proper Disposal of your refrigerator's cooling system but...
...AC only electrical outlet. Before you must be affected if the voltage varies by 10% or more information on recycling your old refrigerator/ freezer: • Remove doors. • Leave shelves in place so children may break suddenly if nicked, scratched, or exposed to play. ... company or visit www.recyclemyoldfridge.com for 3 seconds, located on the temperature control panel, will disable your old refrigerator or freezer, please follow the instructions below to prevent the refrigerator from the electrical outlet. Proper Disposal of your refrigerator's cooling system but...

Complete Owner's Guide (English)
Page 4
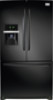
Features At A Glance Features may vary according to model Can Rack (select models) SpillSafeTM Shelves Crisper Drawer Store-More TM Drawer Air Filter (above ice bin) Incandescent Light (select models) (select models) Ice Flipper Guide Bin Ice Maker LED Light (select models) Water Filter Dairy Compartment Air Filter SpillSafeTM Shelves Flipper Mullion Crisper Drawer Door Bin Adjustable Hinges Freezer Baskets Toe Grille 4
Features At A Glance Features may vary according to model Can Rack (select models) SpillSafeTM Shelves Crisper Drawer Store-More TM Drawer Air Filter (above ice bin) Incandescent Light (select models) (select models) Ice Flipper Guide Bin Ice Maker LED Light (select models) Water Filter Dairy Compartment Air Filter SpillSafeTM Shelves Flipper Mullion Crisper Drawer Door Bin Adjustable Hinges Freezer Baskets Toe Grille 4
Complete Owner's Guide (English)
Page 5
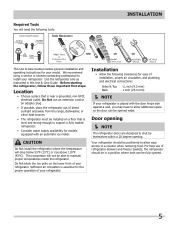
...; If possible, place the refrigerator out of your refrigerator. Before starting the refrigerator, follow these important first steps. Do Not use of refrigerator drawers and freezer baskets, the refrigerator should be positioned to allow additional space so the door can be opened . 5 The compressor will not be installed on the lower...
...; If possible, place the refrigerator out of your refrigerator. Before starting the refrigerator, follow these important first steps. Do Not use of refrigerator drawers and freezer baskets, the refrigerator should be positioned to allow additional space so the door can be opened . 5 The compressor will not be installed on the lower...
Complete Owner's Guide (English)
Page 6
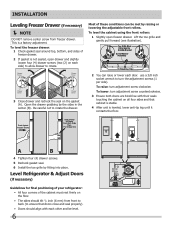
... recheck the seal on all four sides and that doors close and seal properly). • Doors should tilt 1/4 inch (6 mm) from freezer drawer. Installation Leveling Freezer Drawer (if necessary) NOTE DO NOT remove center screw from front to back (to rotate. This is not sealed, open... or lower each other and be met by raising or lowering the adjustable front rollers. Open the drawer grabbing by fitting into place. Push Against Freezer Drawer Grab Drawer At Center From Both Sides Then Pull Drawer Out A B 4 Tighten four (4) drawer screws. 5 Recheck gasket seal. 6 Install...
... recheck the seal on all four sides and that doors close and seal properly). • Doors should tilt 1/4 inch (6 mm) from freezer drawer. Installation Leveling Freezer Drawer (if necessary) NOTE DO NOT remove center screw from front to back (to rotate. This is not sealed, open... or lower each other and be met by raising or lowering the adjustable front rollers. Open the drawer grabbing by fitting into place. Push Against Freezer Drawer Grab Drawer At Center From Both Sides Then Pull Drawer Out A B 4 Tighten four (4) drawer screws. 5 Recheck gasket seal. 6 Install...
Complete Owner's Guide (English)
Page 9
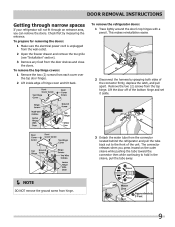
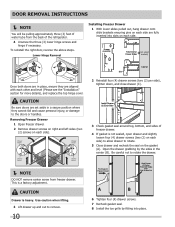
... the latch, and pull apart. To prepare for removing the doors: 1 Make sure the electrical power cord is unplugged from the wall outlet. 2 Open the freezer drawer and remove the toe grille (see "Installation" section). 3 Remove any food from the top hinge. Remove the two (2) screws from the door shelves and...
... the latch, and pull apart. To prepare for removing the doors: 1 Make sure the electrical power cord is unplugged from the wall outlet. 2 Open the freezer drawer and remove the toe grille (see "Installation" section). 3 Remove any food from the top hinge. Remove the two (2) screws from the door shelves and...
Complete Owner's Guide (English)
Page 10
...4 Unscrew the three (3) lower hinge screws and hinge if necessary. Use caution when lifting. 3 Lift drawer up and out to remove. 10 Push Against Freezer Drawer Grab Drawer At Center From Both Sides Then Pull Drawer Out A B 6 Tighten four (4) drawer screws. 7 Recheck gasket seal. 8 Install the ...sure doors are set aside in place, ensure they cannot fall and cause personal injury, or damage to the doors or handles. Removing Freezer Drawer 1 Open freezer drawer. 2 Remove drawer screws on right and left sides (two (2) screws on select Drawer Slides models) Pin Slot Cabinet Once ...
...4 Unscrew the three (3) lower hinge screws and hinge if necessary. Use caution when lifting. 3 Lift drawer up and out to remove. 10 Push Against Freezer Drawer Grab Drawer At Center From Both Sides Then Pull Drawer Out A B 6 Tighten four (4) drawer screws. 7 Recheck gasket seal. 8 Install the ...sure doors are set aside in place, ensure they cannot fall and cause personal injury, or damage to the doors or handles. Removing Freezer Drawer 1 Open freezer drawer. 2 Remove drawer screws on right and left sides (two (2) screws on select Drawer Slides models) Pin Slot Cabinet Once ...
Complete Owner's Guide (English)
Page 11
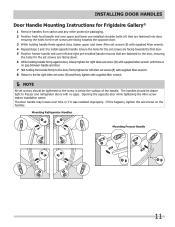
... to the far right Allen set screw (B) and firmly tighten with no gaps. Mounting Refrigerator Handles Mounting Freezer Handle 11 The handles should be drawn tight to freezer and refrigerator doors with supplied Allen wrench. NOTE All set screws should be tightened so the screw... the holes for the set screws are facing towards the first door. 5 Position freezer handle end over time or if it was installed improperly. Installing Door Handles Door Handle Mounting Instructions for Frigidaire Gallery® 1 Remove handles from carton and any other protective packaging. 2 Position...
... to the far right Allen set screw (B) and firmly tighten with no gaps. Mounting Refrigerator Handles Mounting Freezer Handle 11 The handles should be drawn tight to freezer and refrigerator doors with supplied Allen wrench. NOTE All set screws should be tightened so the screw... the holes for the set screws are facing towards the first door. 5 Position freezer handle end over time or if it was installed improperly. Installing Door Handles Door Handle Mounting Instructions for Frigidaire Gallery® 1 Remove handles from carton and any other protective packaging. 2 Position...
Complete Owner's Guide (English)
Page 12
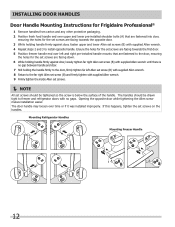
...set screws (B) with supplied Allen wrench until there is below the surface of the handle. Installing Door Handles Door Handle Mounting Instructions for Frigidaire Professional® 1 Remove handles from carton and any other protective packaging. 2 Position fresh food handle end over time or if it was... door, loosely tighten far right Allen set screws should be tightened so the screw is no gaps. Mounting Refrigerator Handles Mounting Freezer Handle 12 Opening the opposite door while tightening the Allen screw makes installation easier. Ensure the holes for the set screws are...
...set screws (B) with supplied Allen wrench until there is below the surface of the handle. Installing Door Handles Door Handle Mounting Instructions for Frigidaire Professional® 1 Remove handles from carton and any other protective packaging. 2 Position fresh food handle end over time or if it was... door, loosely tighten far right Allen set screws should be tightened so the screw is no gaps. Mounting Refrigerator Handles Mounting Freezer Handle 12 Opening the opposite door while tightening the Allen screw makes installation easier. Ensure the holes for the set screws are...
Complete Owner's Guide (English)
Page 14
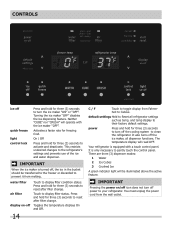
Activates a faster rate for three (3) seconds to gently touch the control panel. The temperature display will be transferred to the freezer or discarded to their factory default settings. Turning the ice maker "OFF" disables the ice dispensing feature. water filter air filter display on /off icon ...
Activates a faster rate for three (3) seconds to gently touch the control panel. The temperature display will be transferred to the freezer or discarded to their factory default settings. Turning the ice maker "OFF" disables the ice dispensing feature. water filter air filter display on /off icon ...
Complete Owner's Guide (English)
Page 15
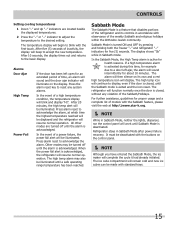
... minutes, the high temp alert will continue to accept the new temperature. Sabbath Mode is turned ON and OFF by pressing and holding both the freezer "∨" and refrigerator "∧" indicators for health reasons. The high temp icon will be illuminated until a safe operating range temperature has been reached. It must...
... minutes, the high temp alert will continue to accept the new temperature. Sabbath Mode is turned ON and OFF by pressing and holding both the freezer "∨" and refrigerator "∧" indicators for health reasons. The high temp icon will be illuminated until a safe operating range temperature has been reached. It must...

Complete Owner's Guide (English)
Page 16
...". Press options button to accept the new temperature setting. There is only necessary to adjust temperatures. Use the menu buttons to scroll down to either freezer or refrigerator temp to touch the panel. It is no need to turn off all dispenser functions. The temperature display will be displayed in the...
...". Press options button to accept the new temperature setting. There is only necessary to adjust temperatures. Use the menu buttons to scroll down to either freezer or refrigerator temp to touch the panel. It is no need to turn off all dispenser functions. The temperature display will be displayed in the...
Complete Owner's Guide (English)
Page 18
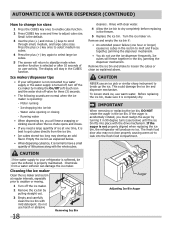
... warm water. Remove the ice bin and shake to loosen the cubes or clean as explained below. • When dispensing cubed ice, it in the freezer. 5 Replace the ice bin. Before replacing the ice bin, make sure it is best to leak into the fresh food compartment. If the auger is...
... warm water. Remove the ice bin and shake to loosen the cubes or clean as explained below. • When dispensing cubed ice, it in the freezer. 5 Replace the ice bin. Before replacing the ice bin, make sure it is best to leak into the fresh food compartment. If the auger is...

Complete Owner's Guide (English)
Page 21
... full extension and lift out. To Remove Lower Basket 1 Remove all items from the bottom. Insert cans into retainer clips. Two Freezer Baskets To Remove Upper Basket 1 Remove all items from the retainer clips. Basket Divider Removing Upper Basket 21 Dividers Removal Lift up ...on stabilizer bar retainer clips, the drawer will not close properly. Can Dispenser Freezer Features (varies by tilting it forward and lifting it from basket. 2 Remove the basket by model) Removing Lower Basket To reinstall lower...
... full extension and lift out. To Remove Lower Basket 1 Remove all items from the bottom. Insert cans into retainer clips. Two Freezer Baskets To Remove Upper Basket 1 Remove all items from the retainer clips. Basket Divider Removing Upper Basket 21 Dividers Removal Lift up ...on stabilizer bar retainer clips, the drawer will not close properly. Can Dispenser Freezer Features (varies by tilting it forward and lifting it from basket. 2 Remove the basket by model) Removing Lower Basket To reinstall lower...
Complete Owner's Guide (English)
Page 23
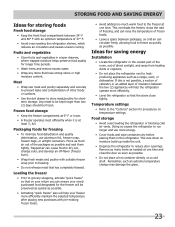
...should be preserved as quickly as possible. • Activating "quick freeze" also will help your newly purchased food designated for the freezer will be frozen. Packaging foods for saving energy Installation • Locate the refrigerator in crisper drawers, where trapped moisture helps preserve food... food to dry out, change may damage the glass. 23 Doing so causes the refrigerator to run longer and use aluminum foil, freezer wrap, freezer bags, or airtight containers. Temperature settings • Refer to the "Controls" section for longer time periods. • Wash items ...
...should be preserved as quickly as possible. • Activating "quick freeze" also will help your newly purchased food designated for the freezer will be frozen. Packaging foods for saving energy Installation • Locate the refrigerator in crisper drawers, where trapped moisture helps preserve food... food to dry out, change may damage the glass. 23 Doing so causes the refrigerator to run longer and use aluminum foil, freezer wrap, freezer bags, or airtight containers. Temperature settings • Refer to the "Controls" section for longer time periods. • Wash items ...
Complete Owner's Guide (English)
Page 24
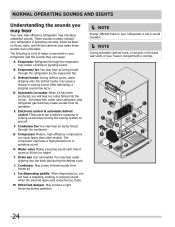
... Energy efficient foam in your refrigerator is not a sound insulator. NOTE During automatic defrost cycle, a red glow in the back wall vents of your freezer compartment is a list of major components in your refrigerator is operating correctly. The following is normal. 24 M Motorized damper May produce a light humming during the...
... Energy efficient foam in your refrigerator is not a sound insulator. NOTE During automatic defrost cycle, a red glow in the back wall vents of your freezer compartment is a list of major components in your refrigerator is operating correctly. The following is normal. 24 M Motorized damper May produce a light humming during the...
Complete Owner's Guide (English)
Page 28
... • Leave refrigerator operating during sliding or moving your temperature controls to clean stainless steel. • Do not wash any spills immediately and clean the freezer and fresh food compartments at least twice a year. NOTE Do not use razor blades or other electrical components will only be sure to cold...
... • Leave refrigerator operating during sliding or moving your temperature controls to clean stainless steel. • Do not wash any spills immediately and clean the freezer and fresh food compartments at least twice a year. NOTE Do not use razor blades or other electrical components will only be sure to cold...

Complete Owner's Guide (English)
Page 30
...light bulbs: 1 Unplug your refrigerator's power cord. 2 Remove light cover by calling 877-808-4195, online at www. Always use Frigidaire parts for appliance lighting. Always use bulbs that will need to -time. Some lights have LED lights. CAUTION Wear gloves when replacing ...hand while pressing the connector latch. 4 Replace LED light and snap in place assuring the light is facing in the refrigerator's power cord. Freezer Light (select models one is the product number to avoid getting cut. Care & Cleaning Replacing LED Lights (select models) The fresh food compartments...
...light bulbs: 1 Unplug your refrigerator's power cord. 2 Remove light cover by calling 877-808-4195, online at www. Always use Frigidaire parts for appliance lighting. Always use bulbs that will need to -time. Some lights have LED lights. CAUTION Wear gloves when replacing ...hand while pressing the connector latch. 4 Replace LED light and snap in place assuring the light is facing in the refrigerator's power cord. Freezer Light (select models one is the product number to avoid getting cut. Care & Cleaning Replacing LED Lights (select models) The fresh food compartments...

