Wiring Diagram (All Languages)
Page 1
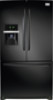
...Time 74 to 84% 100% Freezer Temperature -5° to 2° F (-20° to -17° C) -1° to 3° F (-18° to -16° C) Refrigerator Temperature 34° to 39° F (1° to 4° C) 34° to 39° F (1° to 4° C) Low Side Pressure (cut-in) 5 to 12 ...; All components of 2500++ system controller) CE IM Com Lost only after POR(no com/data link with IM" by inserting screwdriver in the refrigerator temperature window will be returned to assist qualified repair personnel only. FF(+) and FF(-), (d) and (f) 38 will char at 200°F and ...
...Time 74 to 84% 100% Freezer Temperature -5° to 2° F (-20° to -17° C) -1° to 3° F (-18° to -16° C) Refrigerator Temperature 34° to 39° F (1° to 4° C) 34° to 39° F (1° to 4° C) Low Side Pressure (cut-in) 5 to 12 ...; All components of 2500++ system controller) CE IM Com Lost only after POR(no com/data link with IM" by inserting screwdriver in the refrigerator temperature window will be returned to assist qualified repair personnel only. FF(+) and FF(-), (d) and (f) 38 will char at 200°F and ...
Installation Instructions (All Languages)
Page 1
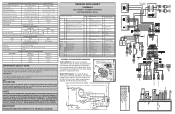
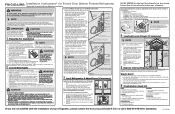
...electrical outlet. • Do not use an extension cord or an adapter plug. You are already assembled on your refrigerator without an existing valve, Frigidaire recommends its Smart Choice® water line kit 5305513409 (with a wrench; These installation instructions are installing your local/...or Stainless Steel braided tubing is between 30 and 100 psi. The nut and ferrule are ready to begin enjoying your new Frigidaire refrigerator. • For important safety instructions and to learn what to operate your product. See Figure 2. 5. To raise the door...
...electrical outlet. • Do not use an extension cord or an adapter plug. You are already assembled on your refrigerator without an existing valve, Frigidaire recommends its Smart Choice® water line kit 5305513409 (with a wrench; These installation instructions are installing your local/...or Stainless Steel braided tubing is between 30 and 100 psi. The nut and ferrule are ready to begin enjoying your new Frigidaire refrigerator. • For important safety instructions and to learn what to operate your product. See Figure 2. 5. To raise the door...
Complete Owner's Guide (English)
Page 1
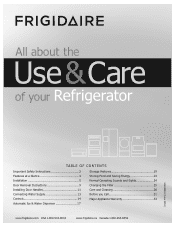
All about the Use &Care of your Refrigerator 242046801 (June 2010) TABLE OF CONTENTS Important Safety Instructions 2 Features at a Glance 4 Installation 5 Door Removal Instructions 9 Installing Door Handles 11 Connecting Water Supply 13 Controls 14 Automatic Ice & Water Dispenser 17 Storage Features 19 Storing Food and Saving Energy 23 Normal Operating Sounds and Sights 24 Changing the Filter 25 Care and Cleaning 28 Before you Call 31 Major Appliance Warranty 33 www.frigidaire.com USA 1-800-944-9044 www.frigidaire.ca Canada 1-800-265-8352
All about the Use &Care of your Refrigerator 242046801 (June 2010) TABLE OF CONTENTS Important Safety Instructions 2 Features at a Glance 4 Installation 5 Door Removal Instructions 9 Installing Door Handles 11 Connecting Water Supply 13 Controls 14 Automatic Ice & Water Dispenser 17 Storage Features 19 Storing Food and Saving Energy 23 Normal Operating Sounds and Sights 24 Changing the Filter 25 Care and Cleaning 28 Before you Call 31 Major Appliance Warranty 33 www.frigidaire.com USA 1-800-944-9044 www.frigidaire.ca Canada 1-800-265-8352
Complete Owner's Guide (English)
Page 2
...personal injury hazards. Read product labels for warnings regarding flammability and other hazards. • DO NOT operate the refrigerator in Ice Maker House water supply connected to refrigerator No water leaks present at all sides Freezer drawer is level across the top Leveling ...sent in death or serious injury. recheck in the vicinity of automatic ice maker. • Remove all safety messages that follow this refrigerator. Definitions This is the safety alert symbol. Staples can cause severe cuts, and also destroy finishes if they come in contact with ...
...personal injury hazards. Read product labels for warnings regarding flammability and other hazards. • DO NOT operate the refrigerator in Ice Maker House water supply connected to refrigerator No water leaks present at all sides Freezer drawer is level across the top Leveling ...sent in death or serious injury. recheck in the vicinity of automatic ice maker. • Remove all safety messages that follow this refrigerator. Definitions This is the safety alert symbol. Staples can cause severe cuts, and also destroy finishes if they come in contact with ...
Complete Owner's Guide (English)
Page 3
... other electrical components. Shelves may become airtight chambers, and can damage the compressor. Children should be installed in this refrigerator will disable your refrigerator's cooling system but does not disconnect the power to ensure that safety mechanisms in accordance with local codes and ordinances...plugged into a properly grounded three prong receptacle. Do not use these items to prevent any exterior wrapping material immediately after the refrigerator is damaged, it should never use an extension cord or adapter plug. • If the power cord is unpacked. Such ...
... other electrical components. Shelves may become airtight chambers, and can damage the compressor. Children should be installed in this refrigerator will disable your refrigerator's cooling system but does not disconnect the power to ensure that safety mechanisms in accordance with local codes and ordinances...plugged into a properly grounded three prong receptacle. Do not use these items to prevent any exterior wrapping material immediately after the refrigerator is damaged, it should never use an extension cord or adapter plug. • If the power cord is unpacked. Such ...
Complete Owner's Guide (English)
Page 5
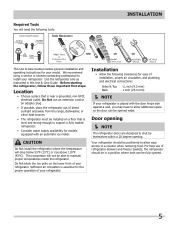
...Not block the toe grille on the lower front of direct sunlight and away from the range, dishwasher, or other heat sources. • The refrigerator must be installed on a floor that is essential for your model. The compressor will drop below 55°F (13°C) or rise above ...110°F (43°C). Door opening NOTE The refrigerator doors are designed to a counter when removing food. Required Tools You will need the following clearances for models equipped with the door hinge side against...
...Not block the toe grille on the lower front of direct sunlight and away from the range, dishwasher, or other heat sources. • The refrigerator must be installed on a floor that is essential for your model. The compressor will drop below 55°F (13°C) or rise above ...110°F (43°C). Door opening NOTE The refrigerator doors are designed to a counter when removing food. Required Tools You will need the following clearances for models equipped with the door hinge side against...
Complete Owner's Guide (English)
Page 6
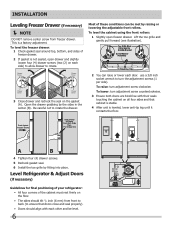
Be careful not to rotate the drawer. 2 You can be level. 6 Door Door Anti-tip Leg Raise Lower Level Refrigerator & Adjust Doors (if necessary) Guidelines for final positioning of your refrigerator: • All four corners of the cabinet must rest firmly on all four sides and that doors close and seal properly). •...
Be careful not to rotate the drawer. 2 You can be level. 6 Door Door Anti-tip Leg Raise Lower Level Refrigerator & Adjust Doors (if necessary) Guidelines for final positioning of your refrigerator: • All four corners of the cabinet must rest firmly on all four sides and that doors close and seal properly). •...
Complete Owner's Guide (English)
Page 7
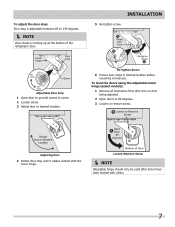
A Open Door 90 degrees Bottom of the refrigerator door. Adjustable Door Stop 1 Open door to provide access to screw. 2 Loosen screw. 3 Adjust door to 90 degrees. 3 Loosen or remove screw. To level the ...
A Open Door 90 degrees Bottom of the refrigerator door. Adjustable Door Stop 1 Open door to provide access to screw. 2 Loosen screw. 3 Adjust door to 90 degrees. 3 Loosen or remove screw. To level the ...
Complete Owner's Guide (English)
Page 9
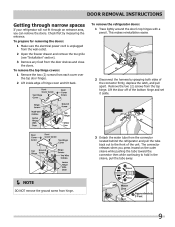
...61675; NOTE DO NOT remove the ground screw from each cover over the top door hinges. 2 Lift inside edge of the unit. To remove the refrigerator doors: 1 Trace lightly around the door's top hinges with a pencil. Check first by grasping both sides of the connector firmly, depress the latch,...any food from the top hinge. The connector releases when you can remove the doors. Door Removal Instructions Getting through narrow spaces If your refrigerator will not fit through an entrance area, you press inward on the outer sleeve while pushing the tube toward the connector then while continuing ...
...61675; NOTE DO NOT remove the ground screw from each cover over the top door hinges. 2 Lift inside edge of the unit. To remove the refrigerator doors: 1 Trace lightly around the door's top hinges with a pencil. Check first by grasping both sides of the connector firmly, depress the latch,...any food from the top hinge. The connector releases when you can remove the doors. Door Removal Instructions Getting through narrow spaces If your refrigerator will not fit through an entrance area, you press inward on the outer sleeve while pushing the tube toward the connector then while continuing ...
Complete Owner's Guide (English)
Page 10
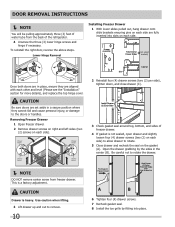
... "Installation" section for more details), and replace the top hinge cover. Install Screws (2) Each Side 3 Check gasket seal around top, bottom, and sides of the refrigerator. 4 Unscrew the three (3) lower hinge screws and hinge if necessary. This is not sealed, open drawer and slightly loosen four (4) drawer screws (two (2) on each...
... "Installation" section for more details), and replace the top hinge cover. Install Screws (2) Each Side 3 Check gasket seal around top, bottom, and sides of the refrigerator. 4 Unscrew the three (3) lower hinge screws and hinge if necessary. This is not sealed, open drawer and slightly loosen four (4) drawer screws (two (2) on each...
Complete Owner's Guide (English)
Page 11
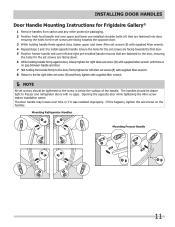
...of the handle. The door handle may loosen over time or if it was installed improperly. Installing Door Handles Door Handle Mounting Instructions for Frigidaire Gallery® 1 Remove handles from carton and any other protective packaging. 2 Position fresh food handle end over upper and lower pre-installed... handle firmly against door, fasten upper and lower Allen set screws (B) with supplied Allen wrench. 4 Repeat steps 2 and 3 to freezer and refrigerator doors with no gaps. The handles should be tightened so the screw is no gap between handle and door. 7 Still holding the handle firmly to...
...of the handle. The door handle may loosen over time or if it was installed improperly. Installing Door Handles Door Handle Mounting Instructions for Frigidaire Gallery® 1 Remove handles from carton and any other protective packaging. 2 Position fresh food handle end over upper and lower pre-installed... handle firmly against door, fasten upper and lower Allen set screws (B) with supplied Allen wrench. 4 Repeat steps 2 and 3 to freezer and refrigerator doors with no gaps. The handles should be tightened so the screw is no gap between handle and door. 7 Still holding the handle firmly to...
Complete Owner's Guide (English)
Page 12
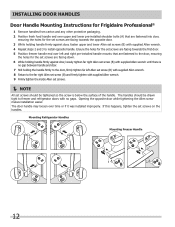
Installing Door Handles Door Handle Mounting Instructions for Frigidaire Professional® 1 Remove handles from carton and any other protective ... the first door. 5 Position freezer handle end over time or if it was installed improperly. Mounting Refrigerator Handles Mounting Freezer Handle 12 If this happens, tighten the set screw (B) with supplied Allen wrench until...screws should be tightened so the screw is no gaps. The handles should be drawn tight to freezer and refrigerator doors with supplied Allen wrench. 4 Repeat steps 2 and 3 to the far right Allen set screw (B) ...
Installing Door Handles Door Handle Mounting Instructions for Frigidaire Professional® 1 Remove handles from carton and any other protective ... the first door. 5 Position freezer handle end over time or if it was installed improperly. Mounting Refrigerator Handles Mounting Freezer Handle 12 If this happens, tighten the set screw (B) with supplied Allen wrench until...screws should be tightened so the screw is no gaps. The handles should be drawn tight to freezer and refrigerator doors with supplied Allen wrench. 4 Repeat steps 2 and 3 to the far right Allen set screw (B) ...
Complete Owner's Guide (English)
Page 13
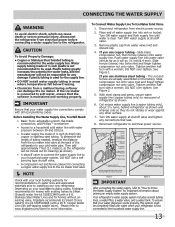
...electrical power source. Remove plastic cap from electric power source. 2. Slide ferrule (sleeve) into sink or bucket. Reconnect refrigerator to www.frigidaire.com/store for more information. If the ice maker is connected to your local building authority for recommendations on water lines...damage if plastic tubing is not recommended to your local/state building codes, Frigidaire recommends for the supply line. • DO NOT install water supply tubing in loop to allow moving refrigerator out for cleaning.) Figure 1 Figure 2 IMPORTANT After connecting the water supply...
...electrical power source. Remove plastic cap from electric power source. 2. Slide ferrule (sleeve) into sink or bucket. Reconnect refrigerator to www.frigidaire.com/store for more information. If the ice maker is connected to your local building authority for recommendations on water lines...damage if plastic tubing is not recommended to your local/state building codes, Frigidaire recommends for the supply line. • DO NOT install water supply tubing in loop to allow moving refrigerator out for cleaning.) Figure 1 Figure 2 IMPORTANT After connecting the water supply...
Complete Owner's Guide (English)
Page 14
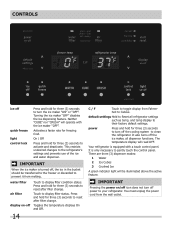
...touch control panel. IMPORTANT When the ice maker is turned off Touch to display filter condition status. power Press and hold for freezing food. Your refrigerator is only necessary to display filter status. It is equipped with the ice maker "OFF". There are three (3) dispenser modes: 1 Water 2 ...(3) seconds to Celsius. You must unplug the power cord from Fahrenheit to turn off the ice maker, all refrigerator settings such as temp, and temp display to the refrigerator's settings and prevents use of the ice and water dispenser. On / Off Press and hold for three (3)...
...touch control panel. IMPORTANT When the ice maker is turned off Touch to display filter condition status. power Press and hold for freezing food. Your refrigerator is only necessary to display filter status. It is equipped with the ice maker "OFF". There are three (3) dispenser modes: 1 Water 2 ...(3) seconds to Celsius. You must unplug the power cord from Fahrenheit to turn off the ice maker, all refrigerator settings such as temp, and temp display to the refrigerator's settings and prevents use of the ice and water dispenser. On / Off Press and hold for three (3)...
Complete Owner's Guide (English)
Page 15
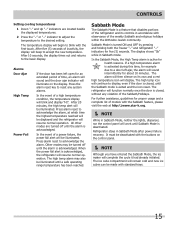
...until Sabbath Mode is activated during this time, for example due to the desired setting. The high temp alarm may be illuminated. Refrigerator stays in Sabbath mode. It must be illuminated until a safe operating range temperature has been reached. Press alarm reset to blink with...within the Orthodox Jewish community. In the event of a power failure, the power fail alert will be displayed and the refrigerator will be illuminated. The refrigerator will illuminate on the control panel. NOTE Although you have entered the Sabbath Mode, the ice maker will sound...
...until Sabbath Mode is activated during this time, for example due to the desired setting. The high temp alarm may be illuminated. Refrigerator stays in Sabbath mode. It must be illuminated until a safe operating range temperature has been reached. Press alarm reset to blink with...within the Orthodox Jewish community. In the event of a power failure, the power fail alert will be displayed and the refrigerator will be illuminated. The refrigerator will illuminate on the control panel. NOTE Although you have entered the Sabbath Mode, the ice maker will sound...

Complete Owner's Guide (English)
Page 16
...off control lock On / Off Press and hold for three (3) seconds to activate and deactivate. Controls LCD Controls options User Interface Your refrigerator is no need to press with a user interface display. The temperature display will be displayed in the LCD window. IMPORTANT Pressing the power...dispenser functions. Press options button to accept the new temperature setting. Use the menu buttons to scroll down to either freezer or refrigerator temp to activate the desired dispenser mode. Touch an icon (Water/Cube/Crush) to adjust temperatures. Use the Temp Adjust buttons...
...off control lock On / Off Press and hold for three (3) seconds to activate and deactivate. Controls LCD Controls options User Interface Your refrigerator is no need to press with a user interface display. The temperature display will be displayed in the LCD window. IMPORTANT Pressing the power...dispenser functions. Press options button to accept the new temperature setting. Use the menu buttons to scroll down to either freezer or refrigerator temp to activate the desired dispenser mode. Touch an icon (Water/Cube/Crush) to adjust temperatures. Use the Temp Adjust buttons...
Complete Owner's Guide (English)
Page 17
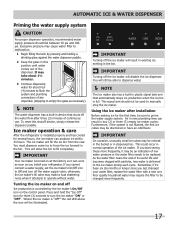
... installed properly and has cooled for the first time, be changed your refrigerator. If you cannot connect a water supply, set the ice maker's On/Off icon to malfunction. 1 Begin filling the tank by the ice maker's On/Off ...
... installed properly and has cooled for the first time, be changed your refrigerator. If you cannot connect a water supply, set the ice maker's On/Off icon to malfunction. 1 Begin filling the tank by the ice maker's On/Off ...
Complete Owner's Guide (English)
Page 18
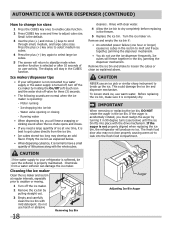
... in the bin, jamming the dispenser mechanism. This could damage the ice bin and dispenser mechanism. Ice maker/dispenser tips • If your refrigerator is softened, be sure the softener is selected or after 10 seconds of no ice. Cleaning the ice maker Clean the ice maker and ice...is normal to adjust cube size. Press the plus (+) key once to select medium ice cubes. 4 Press the plus (+) and minus (-) keys to your refrigerator is not connected to vacation or moving. 1 Turn off the ice maker. 2 Remove the ice bin by pulling straight out. 3 Empty and carefully clean ...
... in the bin, jamming the dispenser mechanism. This could damage the ice bin and dispenser mechanism. Ice maker/dispenser tips • If your refrigerator is softened, be sure the softener is selected or after 10 seconds of no ice. Cleaning the ice maker Clean the ice maker and ice...is normal to adjust cube size. Press the plus (+) key once to select medium ice cubes. 4 Press the plus (+) and minus (-) keys to your refrigerator is not connected to vacation or moving. 1 Turn off the ice maker. 2 Remove the ice bin by pulling straight out. 3 Empty and carefully clean ...
Complete Owner's Guide (English)
Page 19
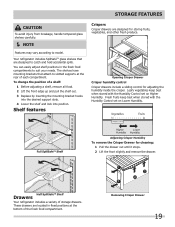
... food compartment. The shelves have mounting brackets that are designed to slotted supports at the bottom of each compartment. Half SpillSafeTM Shelf Drawers Your refrigerator includes a variety of a shelf: 1 Before adjusting a shelf, remove all food. 2 Lift the front edge up and pull the shelf...3 Replace by inserting the mounting bracket hooks into the desired support slots. 4 Lower the shelf and lock into position. Your refrigerator includes SpillSafeTM glass shelves that attach to catch and hold accidental spills. Fresh fruits keep best when stored with the Humidity Control ...
... food compartment. The shelves have mounting brackets that are designed to slotted supports at the bottom of each compartment. Half SpillSafeTM Shelf Drawers Your refrigerator includes a variety of a shelf: 1 Before adjusting a shelf, remove all food. 2 Lift the front edge up and pull the shelf...3 Replace by inserting the mounting bracket hooks into the desired support slots. 4 Lower the shelf and lock into position. Your refrigerator includes SpillSafeTM glass shelves that attach to catch and hold accidental spills. Fresh fruits keep best when stored with the Humidity Control ...

Complete Owner's Guide (English)
Page 20
.... 4 Place the bin just above desired position. 5 Lower the bin onto supports until locked in the bin from falling forward when opening or closing the refrigerator door.
.... 4 Place the bin just above desired position. 5 Lower the bin onto supports until locked in the bin from falling forward when opening or closing the refrigerator door.


