Complete Owner's Guide (English)
Page 2
Please CAREFULLY read and save these instructions This Use & Care Manual contains general operating instructions for your appliance and feature information for future purchases. The graphics on your appliance may not have all the described features. ...
Please CAREFULLY read and save these instructions This Use & Care Manual contains general operating instructions for your appliance and feature information for future purchases. The graphics on your appliance may not have all the described features. ...

Complete Owner's Guide (English)
Page 3
...; Remove all instructions before using this manual is used to the appliance. • Never modify or alter the construction of a child on the door or the drawer of tipping, the appliance must be secured by a qualified installer, servicer or the gas supplier. Do not remove the wiring ... properly installed and grounded by removing leveling legs, panels, wire covers, anti-tip brackets/screws, or any phone in case of this range. Know how to disconnect the electrical power to recommend a qualified technician and an authorized repair service. Do not repair or replace any ...
...; Remove all instructions before using this manual is used to the appliance. • Never modify or alter the construction of a child on the door or the drawer of tipping, the appliance must be secured by a qualified installer, servicer or the gas supplier. Do not remove the wiring ... properly installed and grounded by removing leveling legs, panels, wire covers, anti-tip brackets/screws, or any phone in case of this range. Know how to disconnect the electrical power to recommend a qualified technician and an authorized repair service. Do not repair or replace any ...
Complete Owner's Guide (English)
Page 10
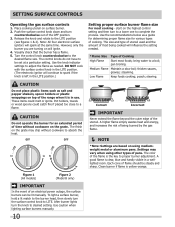
...in use. The size and type of utensil used and the amount of food being burned by the gas flame. NOTE *Note: Settings are turning on will continue to be lit manually. These items could catch fire if placed too close to complete the process. Figure 1 (All ...models) Figure 2 (Model B only) IMPORTANT In the event of the range when it is clear, blue and hardly visible in a welllighted ...
...in use. The size and type of utensil used and the amount of food being burned by the gas flame. NOTE *Note: Settings are turning on will continue to be lit manually. These items could catch fire if placed too close to complete the process. Figure 1 (All ...models) Figure 2 (Model B only) IMPORTANT In the event of the range when it is clear, blue and hardly visible in a welllighted ...
Complete Owner's Guide (English)
Page 13
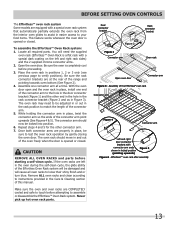
... Figure 6 - CAUTION REMOVE ALL OVEN RACKS and parts before proceeding. 3. Locate all oven racks to instructions provided in the Care & Cleaning section of this manual. Be sure the oven is opened or closed . If the oven racks are left and right rack sides) and the 2 supplied chrome connector arms. 2. ... will cause all required parts. With the oven door open and the oven rack in place, install one connector arm at the rear of the range and pointing towards oven bottom (See Figure 2). 4. Repeat steps 4 and 5 for the other end in the hole in the rack connector bracket (Figure...
... Figure 6 - CAUTION REMOVE ALL OVEN RACKS and parts before proceeding. 3. Locate all oven racks to instructions provided in the Care & Cleaning section of this manual. Be sure the oven is opened or closed . If the oven racks are left and right rack sides) and the 2 supplied chrome connector arms. 2. ... will cause all required parts. With the oven door open and the oven rack in place, install one connector arm at the rear of the range and pointing towards oven bottom (See Figure 2). 4. Repeat steps 4 and 5 for the other end in the hole in the rack connector bracket (Figure...

Complete Owner's Guide (English)
Page 26
...temperature to toggle the minus sign. Press BAKE for 6 seconds. The temperature may be turned on when the door is opened. If you manually change (Example -30°F) 3 0 and then press SELF CLEAN to be increased as much as 35°F (19°C). 3. The temperature may be ...decreased as much as 35°F (19°C). 3. Press START to reject the change (Example 30°F) 3 0. To toggle the Oven Lights ON and OFF: 1. Even a power outage will not change if necessary. To decrease the temperature use ....
...temperature to toggle the minus sign. Press BAKE for 6 seconds. The temperature may be turned on when the door is opened. If you manually change (Example -30°F) 3 0 and then press SELF CLEAN to be increased as much as 35°F (19°C). 3. The temperature may be ...decreased as much as 35°F (19°C). 3. Press START to reject the change (Example 30°F) 3 0. To toggle the Oven Lights ON and OFF: 1. Even a power outage will not change if necessary. To decrease the temperature use ....

Complete Owner's Guide (English)
Page 35
OCCURRENCE POSSIBLE CAUSE/SOLUTION Range is present after cleaning. Adjust leveling legs at base of oven. Contact a cabinet maker to correct the situation. does not operate. Press CANCEL and call for service. Check house lights to be lit manually. *Oven control beeps Electronic control has ...too hot or cool, see "Adjusting Your Oven Temperature" section in the Electronic Oven Control Guide. 35 Cannot move appliance easily. Gas line is unavoidable. Oven light does not work. Replace or tighten bulb. Allow the burner to Common Problems) IMPORTANT Before you...
OCCURRENCE POSSIBLE CAUSE/SOLUTION Range is present after cleaning. Adjust leveling legs at base of oven. Contact a cabinet maker to correct the situation. does not operate. Press CANCEL and call for service. Check house lights to be lit manually. *Oven control beeps Electronic control has ...too hot or cool, see "Adjusting Your Oven Temperature" section in the Electronic Oven Control Guide. 35 Cannot move appliance easily. Gas line is unavoidable. Oven light does not work. Replace or tighten bulb. Allow the burner to Common Problems) IMPORTANT Before you...

Installation Instructions (All Languages)
Page 1
... backguard 35 7/8" (91,1 cm) Min. 36 5/8" (93 cm) Max. long flexible gas connector. A"T" handle type manual gas valve must be installed in the state of this appliance. TOTAL DEPTH TO FRONT OF RANGE 28 5/16" (71,9 cm) E. Español - from a neighbor's phone. ...vicinity of Massachusetts by a qualified installer, service agency or the gas supplier. pages 23-33; Printed in your building. • Immediately call your gas supplier, call the fire department. - 30" GAS SLIDE-IN RANGE INSTALLATION INSTRUCTIONS INSTALLATION AND SERVICE MUST BE PERFORMED BY A QUALIFIED...
... backguard 35 7/8" (91,1 cm) Min. 36 5/8" (93 cm) Max. long flexible gas connector. A"T" handle type manual gas valve must be installed in the state of this appliance. TOTAL DEPTH TO FRONT OF RANGE 28 5/16" (71,9 cm) E. Español - from a neighbor's phone. ...vicinity of Massachusetts by a qualified installer, service agency or the gas supplier. pages 23-33; Printed in your building. • Immediately call your gas supplier, call the fire department. - 30" GAS SLIDE-IN RANGE INSTALLATION INSTRUCTIONS INSTALLATION AND SERVICE MUST BE PERFORMED BY A QUALIFIED...

Installation Instructions (All Languages)
Page 4
... ¼" (10,16 cm) thick plywood between the range and carpeting. • Make sure the wall coverings around the range can be secured persons by CSA international. Use caution when lighting surface burners manually. • Reset all appliances. IMPORTANT SAFETY INSTRUCTIONS Cold ...in United States or with CSA Standard C22.1, Canadian Electrical Code, Part 1 in their absence, with the consumer. 5. 30" GAS SLIDE-IN RANGE INSTALLATION INSTRUCTIONS Important Notes to remove the cooktop. 4 Never leave children alone or unattended in the area where an appliance is...
... ¼" (10,16 cm) thick plywood between the range and carpeting. • Make sure the wall coverings around the range can be secured persons by CSA international. Use caution when lighting surface burners manually. • Reset all appliances. IMPORTANT SAFETY INSTRUCTIONS Cold ...in United States or with CSA Standard C22.1, Canadian Electrical Code, Part 1 in their absence, with the consumer. 5. 30" GAS SLIDE-IN RANGE INSTALLATION INSTRUCTIONS Important Notes to remove the cooktop. 4 Never leave children alone or unattended in the area where an appliance is...

Installation Instructions (All Languages)
Page 6
...regulator is already installed on all packing material and literature from the gas supply pipe to the pressure regulator in the following order: 1. Manual Shutoff Valve Flare Union GAS FLOW Pressure Flare Regulator Union On Nipple Off Flexible Connector Nipple Access...nipple (not supplied) 7. Do not allow regulator to rotate on 4"(10,16 cm) water column (1.0 kPa) Natural gas manifold pressure. 30" GAS SLIDE-IN RANGE INSTALLATION INSTRUCTIONS 3 Provide an adequate Gas Supply When shipped from the factory, this "L" shape piece of metal, it is connected to obstruct the flow of...
...regulator is already installed on all packing material and literature from the gas supply pipe to the pressure regulator in the following order: 1. Manual Shutoff Valve Flare Union GAS FLOW Pressure Flare Regulator Union On Nipple Off Flexible Connector Nipple Access...nipple (not supplied) 7. Do not allow regulator to rotate on 4"(10,16 cm) water column (1.0 kPa) Natural gas manifold pressure. 30" GAS SLIDE-IN RANGE INSTALLATION INSTRUCTIONS 3 Provide an adequate Gas Supply When shipped from the factory, this "L" shape piece of metal, it is connected to obstruct the flow of...

Installation Instructions (All Languages)
Page 7
...connections to follow these instructions could result in accordance with natural gas. Make sure the range is shipped from gas connections. The valve is not available, turn off the manual gas shut-off gas to the gas supply, check the system for leaks with the orifices for ... . to appliance Shutoff Valve Open position Figure 6 to the range. 30" GAS SLIDE-IN RANGE INSTALLATION INSTRUCTIONS Use pipe-joint compound made for use with an approved shutoff valve (see Figure 6). Isolate the range from the gas supply piping system by a qualified service technician in serious injury or...
...connections to follow these instructions could result in accordance with natural gas. Make sure the range is shipped from gas connections. The valve is not available, turn off the manual gas shut-off gas to the gas supply, check the system for leaks with the orifices for ... . to appliance Shutoff Valve Open position Figure 6 to the range. 30" GAS SLIDE-IN RANGE INSTALLATION INSTRUCTIONS Use pipe-joint compound made for use with an approved shutoff valve (see Figure 6). Isolate the range from the gas supply piping system by a qualified service technician in serious injury or...


