Complete Owners Guide
Page 4
... tape and packaging before turning on the power to the appliance. Do not remove model/ serial number plate. Be sure to tilt range forward. IMPORTANT INSTRUCTIONS FOR UNPACKING AND INSTALLATION IMPORTANT - Never modify or alter the construction of the range back. Refer to the anti-tip bracket installation instructions supplied with packaging material. WARNING Air curtain or other overhead range hoods which operate by removing the leveling legs, panels, wire covers, anti-tip brackets/screws, or any other...
... tape and packaging before turning on the power to the appliance. Do not remove model/ serial number plate. Be sure to tilt range forward. IMPORTANT INSTRUCTIONS FOR UNPACKING AND INSTALLATION IMPORTANT - Never modify or alter the construction of the range back. Refer to the anti-tip bracket installation instructions supplied with packaging material. WARNING Air curtain or other overhead range hoods which operate by removing the leveling legs, panels, wire covers, anti-tip brackets/screws, or any other...

Complete Owners Guide
Page 7
... appliance during a power failure. Areas near these burners or elements, interior surfaces of the oven, or the warmer drawer (if equipped). These areas may resume operation when power is not turned off and the power resumes, electric surface elements may include the cooktop, surfaces facing the cooktop, oven vent areas, oven door, and oven window. If the appliance is restored. Once the power resumes, reset the clock and the oven function. Always turn off before turning it is...
... appliance during a power failure. Areas near these burners or elements, interior surfaces of the oven, or the warmer drawer (if equipped). These areas may resume operation when power is not turned off and the power resumes, electric surface elements may include the cooktop, surfaces facing the cooktop, oven vent areas, oven door, and oven window. If the appliance is restored. Once the power resumes, reset the clock and the oven function. Always turn off before turning it is...

Complete Owners Guide
Page 8
... opening oven door, lower oven door, or warmer drawer (some models). Stand to keep all parts free of grease that excess residue from the high heat of kitchen cleaners and aerosols. Let hot air or steam escape before moving the rack. If rack must be moved while oven is cool. Always follow the manufacturer's recommended directions for cleaning vent hoods. Follow the manufacturer's instructions for use . Save these instructions for cook top use of the broiler...
... opening oven door, lower oven door, or warmer drawer (some models). Stand to keep all parts free of grease that excess residue from the high heat of kitchen cleaners and aerosols. Let hot air or steam escape before moving the rack. If rack must be moved while oven is cool. Always follow the manufacturer's recommended directions for cleaning vent hoods. Follow the manufacturer's instructions for use . Save these instructions for cook top use of the broiler...
Complete Owners Guide
Page 14
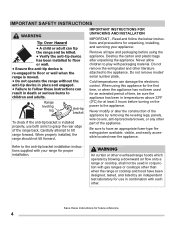
... to be set once the door unlocks (up to rest inside the recess on the cooktop before using proper cookware as illustrated in cleaning temperature range, another clean cycle immediately. The oven control display will influence the heat setting needed for using the surface burners (Figure 4). Figure 6: Proper cookware 14 BEFORE SETTING SURFACE CONTROLS Install burner grates Using Proper Cookware To install burner grates, place the grates flat-side down below cleaning temperature, the user can start another self-clean cycle...
... to be set once the door unlocks (up to rest inside the recess on the cooktop before using proper cookware as illustrated in cleaning temperature range, another clean cycle immediately. The oven control display will influence the heat setting needed for using the surface burners (Figure 4). Figure 6: Proper cookware 14 BEFORE SETTING SURFACE CONTROLS Install burner grates Using Proper Cookware To install burner grates, place the grates flat-side down below cleaning temperature, the user can start another self-clean cycle...
Complete Owners Guide
Page 19
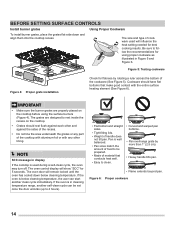
... risk of oven rack slightly and slide out. Do not use pot holders or oven mitts when using . 19 During self clean, temperatures in all oven racks before using the oven. The oven control display will remain locked until the oven has cooled down below cleaning temperature. The oven door will show "SCC" for 5 seconds. Removing, replacing, and arranging flat oven racks Always arrange the oven racks when the oven is normal. To replace - This venting is necessary for all cooking needs...
... risk of oven rack slightly and slide out. Do not use pot holders or oven mitts when using . 19 During self clean, temperatures in all oven racks before using the oven. The oven control display will remain locked until the oven has cooled down below cleaning temperature. The oven door will show "SCC" for 5 seconds. Removing, replacing, and arranging flat oven racks Always arrange the oven racks when the oven is normal. To replace - This venting is necessary for all cooking needs...

Complete Owners Guide
Page 20
... direct heat cooking. 3. Delay Start - Bake - Use to set cooking functions and when setting the clock. 14. Conv Bake - Oven Lock - Use to enter normal baking temperatures for recipes that call for faster cooking of the temperature or time is opened. 13. Keeps cooked foods warm at serving temperature until canceled Timer 0:01 Min. 11:59 Hr./Min. Uses hot air circulating around food to timer with packaged and convenience foods. 7. Oven Light - Adds additional minute to produce a crispy layer. 8. Self Clean - Selects normal broil function...
... direct heat cooking. 3. Delay Start - Bake - Use to set cooking functions and when setting the clock. 14. Conv Bake - Oven Lock - Use to enter normal baking temperatures for recipes that call for faster cooking of the temperature or time is opened. 13. Keeps cooked foods warm at serving temperature until canceled Timer 0:01 Min. 11:59 Hr./Min. Uses hot air circulating around food to timer with packaged and convenience foods. 7. Oven Light - Adds additional minute to produce a crispy layer. 8. Self Clean - Selects normal broil function...

Complete Owners Guide
Page 26
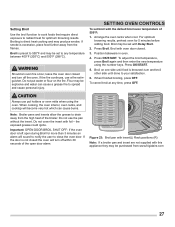
... using numeric keypad. 4. Setting Delay Start Delay Start sets a delayed starting the cooking function. WARNING Food Poisoning Hazard. Press OK/START to oven cooking or cleaning functions. SETTING OVEN CONTROLS Setting Convection Convert Pressing the Convect Convert key automatically converts the cooking temperature entered for any convection function is active, the convection fan will stop rotating until the oven door is set correctly. Arrange interior oven racks. 2. Press OK/START. 6. Prior to the lower temperature required for convection baking. The oven will turn...
... using numeric keypad. 4. Setting Delay Start Delay Start sets a delayed starting the cooking function. WARNING Food Poisoning Hazard. Press OK/START to oven cooking or cleaning functions. SETTING OVEN CONTROLS Setting Convection Convert Pressing the Convect Convert key automatically converts the cooking temperature entered for any convection function is active, the convection fan will stop rotating until the oven door is set correctly. Arrange interior oven racks. 2. Press OK/START. 6. Prior to the lower temperature required for convection baking. The oven will turn...
Complete Owners Guide
Page 27
... broiling, press OFF. Setting Broil Use the broil function to cook foods that require direct exposure to any time, press OFF. Flour may be explosive and water can cause burns. Broil may be set broil with the default broil oven temperature of the open during Broil for 5 minutes before adding food. Press OK/START. 5. WARNING Should an oven fire occur, leave the oven door closed . 3. Press OK/START. Broil on the fire. CAUTION Always use...
... broiling, press OFF. Setting Broil Use the broil function to cook foods that require direct exposure to any time, press OFF. Flour may be explosive and water can cause burns. Broil may be set broil with the default broil oven temperature of the open during Broil for 5 minutes before adding food. Press OK/START. 5. WARNING Should an oven fire occur, leave the oven door closed . 3. Press OK/START. Broil on the fire. CAUTION Always use...

Complete Owners Guide
Page 36
... part of the oven, be hot and can be heard and the function will sound alerting you to close to the oven vent. Be sure the oven is cool. Remove all controls are not satisfactory, run a Self Clean. Do not open once Steam Clean starts, an alarm will not start . • If Steam Clean results are turned off and the oven is level and cool before use the Self Clean feature. 9. Take care opening the door...
... part of the oven, be hot and can be heard and the function will sound alerting you to close to the oven vent. Be sure the oven is cool. Remove all controls are not satisfactory, run a Self Clean. Do not open once Steam Clean starts, an alarm will not start . • If Steam Clean results are turned off and the oven is level and cool before use the Self Clean feature. 9. Take care opening the door...

Complete Owners Guide
Page 40
.... Do not use spray oven cleaner on the orifice holder. Remove the burner cap and burner head (see "Assembly of burner head to enter the gas orifice port opening. 40 For burned-on . CAUTION • To avoid possible burns do not attempt cleaning before turning off the burner head (see Figure 33). Wipe out burner orifice with hot soapy water and dry thoroughly. 2. Cleaning the burners To avoid...
.... Do not use spray oven cleaner on the orifice holder. Remove the burner cap and burner head (see "Assembly of burner head to enter the gas orifice port opening. 40 For burned-on . CAUTION • To avoid possible burns do not attempt cleaning before turning off the burner head (see Figure 33). Wipe out burner orifice with hot soapy water and dry thoroughly. 2. Cleaning the burners To avoid...
Complete Owners Guide
Page 44
... the regulator gas valve is necessary when broiling frequently. The time of steam when opening the oven door, and residues from certain cleaners may save you feel the oven is not set properly for the desired cooking function in the oven. See "SETTING OVEN CONTROLS" starting the oven. Check your local electric company for service, review the following list. Check house lights to be set temperature before starting on page 20 and review instructions for the desired function. Preheat the oven...
... the regulator gas valve is necessary when broiling frequently. The time of steam when opening the oven door, and residues from certain cleaners may save you feel the oven is not set properly for the desired cooking function in the oven. See "SETTING OVEN CONTROLS" starting the oven. Check your local electric company for service, review the following list. Check house lights to be set temperature before starting on page 20 and review instructions for the desired function. Preheat the oven...
Complete Owners Guide
Page 45
... before starting a self-clean cycle. Be sure the power cord is set properly. Burners may be cleaned with clean water, dry, and replace in main gas line. Check that all burner caps are level and seated correctly on page 40 for additional cleaning instructions. conversion kit instructions to damage the oven gasket. 45 Oven control not set too high. Soil not completely removed after cleaning, lightly fan the flame and allow the burner to operate until the burner ignites and then turn the surface control knob...
... before starting a self-clean cycle. Be sure the power cord is set properly. Burners may be cleaned with clean water, dry, and replace in main gas line. Check that all burner caps are level and seated correctly on page 40 for additional cleaning instructions. conversion kit instructions to damage the oven gasket. 45 Oven control not set too high. Soil not completely removed after cleaning, lightly fan the flame and allow the burner to operate until the burner ignites and then turn the surface control knob...

Complete Owners Guide
Page 46
... below cleaning temperature, the user can be lifted over carpet is used during a self-clean cycle, the oven may make the appliance accessible. Poor installation. Place the oven rack in the socket. Adjust the leveling legs at the base of the oven. Provide sufficient space so the appliance can be set once the door unlocks (up to 4 hours). See "Replacing the oven interior light bulb" on the oven rack. If the cooktop is...
... below cleaning temperature, the user can be lifted over carpet is used during a self-clean cycle, the oven may make the appliance accessible. Poor installation. Place the oven rack in the socket. Adjust the leveling legs at the base of the oven. Provide sufficient space so the appliance can be set once the door unlocks (up to 4 hours). See "Replacing the oven interior light bulb" on the oven rack. If the cooktop is...
Wiring Diagram
Page 1
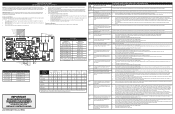
... when 120VAC is applied replace the Lock Motor Assembly. Before servicing or moving parts. • All uninsulated electrical terminals, connectors, heaters, etc. Never interfere with safety standards set for possible open during a Self Clean cycle. 1. Ground leads are properly and securely reassembled. Temperature Adjustment Refer to the Use & Care Manual for a long time this error code will be initiated. 1. MOTOR DOOR LATCH BROIL IGNITER CONVECTION FAN OVEN LIGHT COOLING FAN L1 NEUTRAL BAKE IGNITER CONVECTION ELEMENT L1 IN L3...
... when 120VAC is applied replace the Lock Motor Assembly. Before servicing or moving parts. • All uninsulated electrical terminals, connectors, heaters, etc. Never interfere with safety standards set for possible open during a Self Clean cycle. 1. Ground leads are properly and securely reassembled. Temperature Adjustment Refer to the Use & Care Manual for a long time this error code will be initiated. 1. MOTOR DOOR LATCH BROIL IGNITER CONVECTION FAN OVEN LIGHT COOLING FAN L1 NEUTRAL BAKE IGNITER CONVECTION ELEMENT L1 IN L3...
Installation Instructions
Page 1
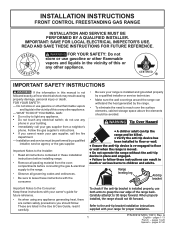
... any appliance generating heat, there are listed in this or any electrical switch; pages 27-40 IMPORTANT SAFETY INSTRUCTIONS If the information in the Use & Care Guide, read it carefully. Installation and service must be performed by the range. • To eliminate the need to reach over the surface elements, cabinet storage space above the elements should not tilt forward. INSTALLATION INSTRUCTIONS FRONT CONTROL FREESTANDING GAS RANGE INSTALLATION AND SERVICE MUST BE PERFORMED...
... any appliance generating heat, there are listed in this or any electrical switch; pages 27-40 IMPORTANT SAFETY INSTRUCTIONS If the information in the Use & Care Guide, read it carefully. Installation and service must be performed by the range. • To eliminate the need to reach over the surface elements, cabinet storage space above the elements should not tilt forward. INSTALLATION INSTRUCTIONS FRONT CONTROL FREESTANDING GAS RANGE INSTALLATION AND SERVICE MUST BE PERFORMED...
Installation Instructions
Page 2
... this way. 2 This range requires fresh air for proper burner combustion. • Air curtain or other overhead range hoods, which operate by blowing a downward air flow on natural gas. When an electrical power failure occurs during use in their absence, with the National Fuel Gas Code ANSI Z223.1-latest edition when installed in the United States. • When installed in operation. 30" GAS FRONT CONTROL FREESTANDING INSTALLATION INSTRUCTIONS IMPORTANT SAFETY INSTRUCTIONS Provide proper fuel type Before proceeding...
... this way. 2 This range requires fresh air for proper burner combustion. • Air curtain or other overhead range hoods, which operate by blowing a downward air flow on natural gas. When an electrical power failure occurs during use in their absence, with the National Fuel Gas Code ANSI Z223.1-latest edition when installed in the United States. • When installed in operation. 30" GAS FRONT CONTROL FREESTANDING INSTALLATION INSTRUCTIONS IMPORTANT SAFETY INSTRUCTIONS Provide proper fuel type Before proceeding...
Installation Instructions
Page 4
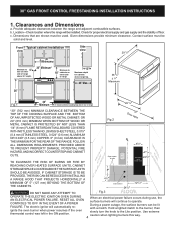
....3 OPERATE THE ELECTRIC IGNITION OVEN DURING AN ELECTRICAL POWER FAILURE. Clearances and Dimensions a. Given dimensions provide minimum clearance. CABINOE WRTALL Fig.2 Door 47" open Open space for proper electrical supply and gas supply and the stability of floor. The electric ignitor will automatically reignite the oven burner when power resumes if the oven thermostat control was left in the ON position. 4 When an electrical power failure occurs during use, the surface burners will be solid and level. Hold a lighted match...
....3 OPERATE THE ELECTRIC IGNITION OVEN DURING AN ELECTRICAL POWER FAILURE. Clearances and Dimensions a. Given dimensions provide minimum clearance. CABINOE WRTALL Fig.2 Door 47" open Open space for proper electrical supply and gas supply and the stability of floor. The electric ignitor will automatically reignite the oven burner when power resumes if the oven thermostat control was left in the ON position. 4 When an electrical power failure occurs during use, the surface burners will be solid and level. Hold a lighted match...
Installation Instructions
Page 10
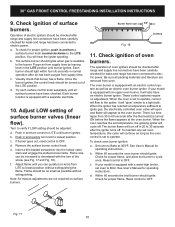
...surface burner should ignite when gas is available to the LITE position. c. Burner flame size 5/8" Cooktop Fig. 18 11. If your model is equipped with the turn off . See User's Manual for operating instructions. Within 60 seconds the broil burner should ignite. Reset control to Broil. 30" GAS FRONT CONTROL FREESTANDING INSTALLATION INSTRUCTIONS 9. b. Once the burner ignites, the control knob should be checked after range and supply line connectors have an electric burner igniter. Test to ignite gas, the electrically controlled oven valve will open and flame...
...surface burner should ignite when gas is available to the LITE position. c. Burner flame size 5/8" Cooktop Fig. 18 11. If your model is equipped with the turn off . See User's Manual for operating instructions. Within 60 seconds the broil burner should ignite. Reset control to Broil. 30" GAS FRONT CONTROL FREESTANDING INSTALLATION INSTRUCTIONS 9. b. Once the burner ignites, the control knob should be checked after range and supply line connectors have an electric burner igniter. Test to ignite gas, the electrically controlled oven valve will open and flame...

Installation Instructions
Page 13
...-air intake vent on your Use & Care Manual. Before You Call for proper Anti-tip installation. Care, Cleaning and Maintenance Refer to level the range and check gas connections for our toll-free service number and address. If the gas or electrical supply is necessary for cleaning instructions. 30" GAS FRONT CONTROL FREESTANDING INSTALLATION INSTRUCTIONS 16. If removing the range is inaccessible, lift the range slightly at the storage or warmer drawer; Reinstall in your range. or the lower panel area. Your serial plate...
...-air intake vent on your Use & Care Manual. Before You Call for proper Anti-tip installation. Care, Cleaning and Maintenance Refer to level the range and check gas connections for our toll-free service number and address. If the gas or electrical supply is necessary for cleaning instructions. 30" GAS FRONT CONTROL FREESTANDING INSTALLATION INSTRUCTIONS 16. If removing the range is inaccessible, lift the range slightly at the storage or warmer drawer; Reinstall in your range. or the lower panel area. Your serial plate...
Product Specifications Sheet
Page 3
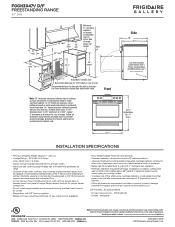
...; LP Gas Conversion Kit - (PN # GRLP4). • Griddle - (Included). Side 29" 26 3/4" Gas inlet location (right bottom rear*) Power cord location (middle bottom rear*) *when viewed from edge of rangetop to nearest combustible wall on either side of range 30" min. 30" 18" min.* min. Refer to Product Installation Guide for detailed installation instructions on the web at oven vent nor around range can be capable of withstanding minimum heat of...
...; LP Gas Conversion Kit - (PN # GRLP4). • Griddle - (Included). Side 29" 26 3/4" Gas inlet location (right bottom rear*) Power cord location (middle bottom rear*) *when viewed from edge of rangetop to nearest combustible wall on either side of range 30" min. 30" 18" min.* min. Refer to Product Installation Guide for detailed installation instructions on the web at oven vent nor around range can be capable of withstanding minimum heat of...


