Complete Owner's Guide (English)
Page 2
.... If you do to help you use this Use & Care manual. Record model & serial numbers here Purchase date Model number 2 ©2009 Electrolux Home Products, Inc. It contains instructions to serve you call Frigidaire Customer Services at a Glance 7 Before Setting Oven Controls 8-9 Removing, replacing &... , please use and maintain your product with Frigidaire enhances our ability to help us serve your Product Registration Card in the USA Serial plate location Serial plate location: lower oven drawer (some models) or storage drawer (some common problems that sold...
.... If you do to help you use this Use & Care manual. Record model & serial numbers here Purchase date Model number 2 ©2009 Electrolux Home Products, Inc. It contains instructions to serve you call Frigidaire Customer Services at a Glance 7 Before Setting Oven Controls 8-9 Removing, replacing &... , please use and maintain your product with Frigidaire enhances our ability to help us serve your Product Registration Card in the USA Serial plate location Serial plate location: lower oven drawer (some models) or storage drawer (some common problems that sold...

Complete Owner's Guide (English)
Page 3
... must be performed by properely installed anti-tip bracket provided with packaging material. •Proper Installation-Be sure your gas supplier from the range. For models equipped with a WARNING or CAUTION statement based on the risk type. Save these instructions for proper anti- IMPORTANT SAFETY INSTRUCTIONS Read all instructions before using...
... must be performed by properely installed anti-tip bracket provided with packaging material. •Proper Installation-Be sure your gas supplier from the range. For models equipped with a WARNING or CAUTION statement based on the risk type. Save these instructions for proper anti- IMPORTANT SAFETY INSTRUCTIONS Read all instructions before using...

Complete Owner's Guide (English)
Page 4
... result in serious burns or other flammable materials contact hot surfaces. • Do not use . Among these areas are not visible. IMPORTANT For electric ignition models only: Do not attempt to operate again. If the power fails, always turn off and the power resumes, the range will begin to operate the...
... result in serious burns or other flammable materials contact hot surfaces. • Do not use . Among these areas are not visible. IMPORTANT For electric ignition models only: Do not attempt to operate again. If the power fails, always turn off and the power resumes, the range will begin to operate the...
Complete Owner's Guide (English)
Page 7
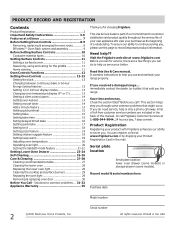
...colors vary with kitchen timer. 2. Large 1-piece oven door handle. 17. Broil pan (some models). 15. Bake-n-Warm™ lower oven rack. 28 29. Be sure to visit us online at www.frigidaire.com for your appliance may vary according to clean upswept cooktop. 20. 5,000 BTU simmer burner... (some models). 21. 9,000 BTU standard burner (some models). 29 22. 9,000 BTU center or accent burner (some models). 23. 12,000 BTU Quick Boil burner...
...colors vary with kitchen timer. 2. Large 1-piece oven door handle. 17. Broil pan (some models). 15. Bake-n-Warm™ lower oven rack. 28 29. Be sure to visit us online at www.frigidaire.com for your appliance may vary according to clean upswept cooktop. 20. 5,000 BTU simmer burner... (some models). 21. 9,000 BTU standard burner (some models). 29 22. 9,000 BTU center or accent burner (some models). 23. 12,000 BTU Quick Boil burner...
Complete Owner's Guide (English)
Page 8
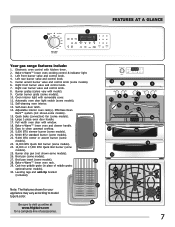
... oven mitts when using a single oven flat rack, place cookware on rack positions 2 & 5 (See Figs. 2 & 3). The offset oven rack (some models) design comes with 1 or 2 oven racks For best results when baking cakes using the appliance, oven racks and cooktop will become very hot which can...4 (See Figs. 2 &4). always arrange the oven racks when the oven is located below the control panel (See Fig. 1). The half rack (some models) is described later in this vent. BEFORE SETTING OVEN CONTROLS Oven vent location The oven vent is cool (prior to operating the oven). Air circulation...
... oven mitts when using a single oven flat rack, place cookware on rack positions 2 & 5 (See Figs. 2 & 3). The offset oven rack (some models) design comes with 1 or 2 oven racks For best results when baking cakes using the appliance, oven racks and cooktop will become very hot which can...4 (See Figs. 2 &4). always arrange the oven racks when the oven is located below the control panel (See Fig. 1). The half rack (some models) is described later in this vent. BEFORE SETTING OVEN CONTROLS Oven vent location The oven vent is cool (prior to operating the oven). Air circulation...
Complete Owner's Guide (English)
Page 9
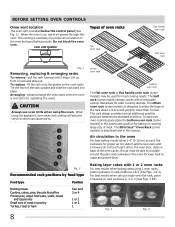
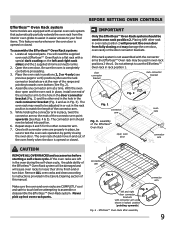
... connector brackets with connector arm ends shown in the Care & Cleaning section of this manual. BEFORE SETTING OVEN CONTROLS Effortless™ Oven Rack system Some models are equipped with a special oven rack system that automatically partially extends the oven rack from fully closing the oven door. Open the oven door. assembly...
... connector brackets with connector arm ends shown in the Care & Cleaning section of this manual. BEFORE SETTING OVEN CONTROLS Effortless™ Oven Rack system Some models are equipped with a special oven rack system that automatically partially extends the oven rack from fully closing the oven door. Open the oven door. assembly...
Complete Owner's Guide (English)
Page 11
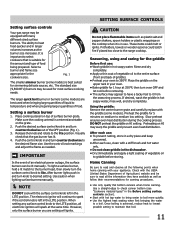
... when bringing large quantities of liquid to temperature and when preparing larger quantities of food being prepared. Fig. 1 The smaller simmer burner (some models) is left in the dishwasher. • Dry Immediately and apply a light coating of griddle). • Preheat your appliance. Make sure the...most surface cooking needs. If desired, wash the griddle in the Before setting surface controls section). • Start with the griddle (some models) are setting will spark at 350°F, then turn the surface control knob to check canner bottom (see "Cookware material types" in ...
... when bringing large quantities of liquid to temperature and when preparing larger quantities of food being prepared. Fig. 1 The smaller simmer burner (some models) is left in the dishwasher. • Dry Immediately and apply a light coating of griddle). • Preheat your appliance. Make sure the...most surface cooking needs. If desired, wash the griddle in the Before setting surface controls section). • Start with the griddle (some models) are setting will spark at 350°F, then turn the surface control knob to check canner bottom (see "Cookware material types" in ...

Complete Owner's Guide (English)
Page 18
... removing the food. Remember to drain and be explosive. Press broil. 5. Insert 6 5 4 Fig. 2 Broil pan Fig. 1 Fig. 3 CAUTION The broiler pan and the insert (some models) allows grease to follow all warnings and cautions.
... removing the food. Remember to drain and be explosive. Press broil. 5. Insert 6 5 4 Fig. 2 Broil pan Fig. 1 Fig. 3 CAUTION The broiler pan and the insert (some models) allows grease to follow all warnings and cautions.

Complete Owner's Guide (English)
Page 21
.... The bake time and delay start and therefore may be 6. If not, skip this step. The oven temperature may only be followed with 2 presses of models with the bake feature. active, the oven light will be provided when a change with the Sabbath feature active be used to set higher or lower...
.... The bake time and delay start and therefore may be 6. If not, skip this step. The oven temperature may only be followed with 2 presses of models with the bake feature. active, the oven light will be provided when a change with the Sabbath feature active be used to set higher or lower...
Complete Owner's Guide (English)
Page 27
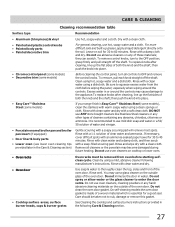
...(see lower oven cleaning tips provided later in or around the controls. Rinse well. On self-cleaning models the oven door gasket is Easy Care™ Stainless Steel (some models) Use hot, soapy water and a cloth. CARE & CLEANING Cleaning recommendation table Surface type Recommendation &#... knobs • Painted body parts • Painted decorative trim • Chrome control panel (some models) • Decorative trim (some models) • Easy Care™ Stainless Steel (some models), clean the stainless with warm soapy water using a clean sponge or cloth. Leave on soil for...
...(see lower oven cleaning tips provided later in or around the controls. Rinse well. On self-cleaning models the oven door gasket is Easy Care™ Stainless Steel (some models) Use hot, soapy water and a cloth. CARE & CLEANING Cleaning recommendation table Surface type Recommendation &#... knobs • Painted body parts • Painted decorative trim • Chrome control panel (some models) • Decorative trim (some models) • Easy Care™ Stainless Steel (some models), clean the stainless with warm soapy water using a clean sponge or cloth. Leave on soil for...

Complete Owner's Guide (English)
Page 29
...bulb. 4. Replace bulb with an absorbent cloth. To clean, first use . To clean the burner grates, burner caps & burner drip pans (some models) should be necessary to clean the burner grates, burner caps and surface burner drip pans (if equipped). Routinely clean the cooktop. The contoured well ...areas and burner drip pans (some models) Use a soap-filled scouring pad or a mild abrasive cleanser to clean the burner head and slots. Refer to cool. Turn electrical power ...
...bulb. 4. Replace bulb with an absorbent cloth. To clean, first use . To clean the burner grates, burner caps & burner drip pans (some models) should be necessary to clean the burner grates, burner caps and surface burner drip pans (if equipped). Routinely clean the cooktop. The contoured well ...areas and burner drip pans (some models) Use a soap-filled scouring pad or a mild abrasive cleanser to clean the burner head and slots. Refer to cool. Turn electrical power ...

Complete Owner's Guide (English)
Page 31
... oven controls section. • Make sure cord/plug is plugged correctly into the power outlet. • Electrical power outage (electric ignition models only). Lightly fan the flame & allow air to the set properly for the desired cooking feature. Center food in this Use & Care...and ignition ports. Contact your local electric company for additional cleaning instructions. • Range power cord is disconnected from outlet (electric ignition models only). See "Cleaning the cooktop and surface burners" in main gas line. Burners can be sure. In coastal areas, a slightly ...
... oven controls section. • Make sure cord/plug is plugged correctly into the power outlet. • Electrical power outage (electric ignition models only). Lightly fan the flame & allow air to the set properly for the desired cooking feature. Center food in this Use & Care...and ignition ports. Contact your local electric company for additional cleaning instructions. • Range power cord is disconnected from outlet (electric ignition models only). See "Cleaning the cooktop and surface burners" in main gas line. Burners can be sure. In coastal areas, a slightly ...
Complete Owner's Guide (English)
Page 32
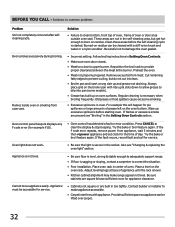
... on oven surfaces. Try the bake or broil feature again. Also see "Broiling" in the self-cleaning area, but do not cut into pan (some models). • Grease has built up and grease not draining. Follow broiling instructions in oven. If the fault recurs, record fault and call for example F10...
... on oven surfaces. Try the bake or broil feature again. Also see "Broiling" in the self-cleaning area, but do not cut into pan (some models). • Grease has built up and grease not draining. Follow broiling instructions in oven. If the fault recurs, record fault and call for example F10...
Wiring Diagram (All Languages)
Page 1
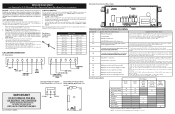
... between EOC & Probe connector. 1. (F90, 91, 92, 93 & 94) Check the wiring between EOC & ESEC system (for electric range models ONLY) Communication failure with Mini Oven Control Board. (for safety ground wires is reapplied, replace EOC. if Micro Switch is extremely important that the ...P7 (Surface Element Control Board) 2. SERVICE DATA SHEET Gas Range with ES 510/530 Electronic Oven Control with Bake-n-Warm Double Oven (some models) IMPORTANT DO NOT REMOVE THIS BAG OR DESTROY THE CONTENTS WIRING DIAGRAMS AND SERVICE INFORMATION ENCLOSED REPLACE CONTENTS IN BAG p/n 316519813 (0802) ...
... between EOC & Probe connector. 1. (F90, 91, 92, 93 & 94) Check the wiring between EOC & ESEC system (for electric range models ONLY) Communication failure with Mini Oven Control Board. (for safety ground wires is reapplied, replace EOC. if Micro Switch is extremely important that the ...P7 (Surface Element Control Board) 2. SERVICE DATA SHEET Gas Range with ES 510/530 Electronic Oven Control with Bake-n-Warm Double Oven (some models) IMPORTANT DO NOT REMOVE THIS BAG OR DESTROY THE CONTENTS WIRING DIAGRAMS AND SERVICE INFORMATION ENCLOSED REPLACE CONTENTS IN BAG p/n 316519813 (0802) ...
Installation Instructions (All Languages)
Page 1
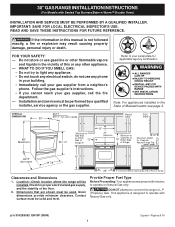
... operate with Sealed Top Burners/Bake-n-Warm™ Double Oven) INSTALLATION AND SERVICE MUST BE PERFORMED BY A QUALIFIED INSTALLER. 30" GAS RANGE INSTALLATION INSTRUCTIONS (For Models with Natural Gas only. do not use gasoline or other flammable vapors and liquids in this or any other appliance. - Refer to operate on 18...
... operate with Sealed Top Burners/Bake-n-Warm™ Double Oven) INSTALLATION AND SERVICE MUST BE PERFORMED BY A QUALIFIED INSTALLER. 30" GAS RANGE INSTALLATION INSTRUCTIONS (For Models with Natural Gas only. do not use gasoline or other flammable vapors and liquids in this or any other appliance. - Refer to operate on 18...
Installation Instructions (All Languages)
Page 2
... or, when such standard is unattended. You will continue to the Installer 1. When using gas and generating heat, there are FOR MODELS WITH SELF-CLEAN FEATURE: certain safety precautions you place an insulating pad or sheet of Massachusetts by CSA International. 30" GAS RANGE ...INSTALLATION INSTRUCTIONS (For Models with gas ranges other than when the match. cabinets above room temperature without adequate Safety Standard, Title 24 CFR, Part 3280 ...
... or, when such standard is unattended. You will continue to the Installer 1. When using gas and generating heat, there are FOR MODELS WITH SELF-CLEAN FEATURE: certain safety precautions you place an insulating pad or sheet of Massachusetts by CSA International. 30" GAS RANGE ...INSTALLATION INSTRUCTIONS (For Models with gas ranges other than when the match. cabinets above room temperature without adequate Safety Standard, Title 24 CFR, Part 3280 ...
Installation Instructions (All Languages)
Page 3
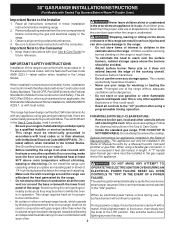
... by placing back edge of the template where the rear of the screw holes in wood or concrete material. 30" GAS RANGE INSTALLATION INSTRUCTIONS (For Models with the range. When installed to the floor. If molding is to be located. If bracket is installed and does not allow the range to...
... by placing back edge of the template where the rear of the screw holes in wood or concrete material. 30" GAS RANGE INSTALLATION INSTRUCTIONS (For Models with the range. When installed to the floor. If molding is to be located. If bracket is installed and does not allow the range to...
Installation Instructions (All Languages)
Page 4
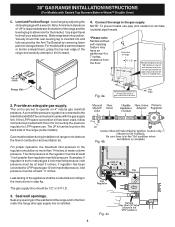
... has been used, follow instructions provided with a wrench. if regulator has been converted for the bracket. 30" GAS RANGE INSTALLATION INSTRUCTIONS (For Models with a warmer drawer or broiler compartment, grasp the top rear edge of the range and carefully attempt to tilt it forward. 4. Note:... A minimum clearance of 1/8" is inserted into position. For models with Sealed Top Burners/Bake-n-Warm™ Double Oven) C. NOTE: To prevent leaks use . Provide an adequate gas supply. A convertible pressure ...
... has been used, follow instructions provided with a wrench. if regulator has been converted for the bracket. 30" GAS RANGE INSTALLATION INSTRUCTIONS (For Models with a warmer drawer or broiler compartment, grasp the top rear edge of the range and carefully attempt to tilt it forward. 4. Note:... A minimum clearance of 1/8" is inserted into position. For models with Sealed Top Burners/Bake-n-Warm™ Double Oven) C. NOTE: To prevent leaks use . Provide an adequate gas supply. A convertible pressure ...

Installation Instructions (All Languages)
Page 5
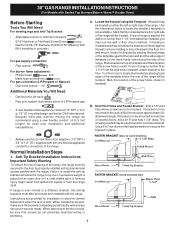
... one inch above specified range manifold pressure. When properly adjusted for leaks in the "ON" position (See Fig. 4f). 30" GAS RANGE INSTALLATION INSTRUCTIONS (For Models with Sealed Top Burners/Bake-n-Warm™ Double Oven) Fig. 4d Fig. 4e " ON " the 1/2" flare union adapter with adjustable wrench before tightening the gas...
... one inch above specified range manifold pressure. When properly adjusted for leaks in the "ON" position (See Fig. 4f). 30" GAS RANGE INSTALLATION INSTRUCTIONS (For Models with Sealed Top Burners/Bake-n-Warm™ Double Oven) Fig. 4d Fig. 4e " ON " the 1/2" flare union adapter with adjustable wrench before tightening the gas...
Installation Instructions (All Languages)
Page 7
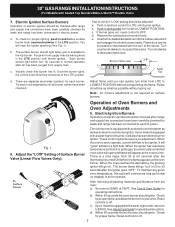
...operating instructions. d. Electric Ignition Burners Operation of electric igniters should be turned out of the screw. Try each burner. If your model is turned ON before the flame appears at the oven burner. Check for operating instructions. Test to BAKE at 300ºF. Flame... to a light bulb. Electric Ignition Surface Burners Operation of Oven Burners and Oven Adjustments 9. b. 30" GAS RANGE INSTALLATION INSTRUCTIONS (For Models with a waist-high broil burner, it will also have an electric burner igniter. If burner goes out, reset control to decrease flame size...
...operating instructions. d. Electric Ignition Burners Operation of electric igniters should be turned out of the screw. Try each burner. If your model is turned ON before the flame appears at the oven burner. Check for operating instructions. Test to BAKE at 300ºF. Flame... to a light bulb. Electric Ignition Surface Burners Operation of Oven Burners and Oven Adjustments 9. b. 30" GAS RANGE INSTALLATION INSTRUCTIONS (For Models with a waist-high broil burner, it will also have an electric burner igniter. If burner goes out, reset control to decrease flame size...


