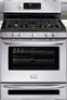
Complete Owner's Guide (English)
Page 2
... bake 15 Setting bake time 15 Seting delayed timed bake 16 Setting quick bake 17 Setting broil 18 Setting pizza feature 19 Setting chicken nuggets feature 19 Setting keep warm 19 Adjusting oven temperature 20 Operating oven light 20 Setting the Sabbath mode feature 21-22 Setting Lower Oven Drawer 23-24 Self-Cleaning 25-26 Care & Cleaning 27-30 Cleaning recommendations table 27 Cleaning the lower oven 28 Replacing the lower oven light 28 Cleaning the cooktop and surface burners 29 Replacing the oven light 29 Removing & replacing oven door 30 Before You Call - A list...
... bake 15 Setting bake time 15 Seting delayed timed bake 16 Setting quick bake 17 Setting broil 18 Setting pizza feature 19 Setting chicken nuggets feature 19 Setting keep warm 19 Adjusting oven temperature 20 Operating oven light 20 Setting the Sabbath mode feature 21-22 Setting Lower Oven Drawer 23-24 Self-Cleaning 25-26 Care & Cleaning 27-30 Cleaning recommendations table 27 Cleaning the lower oven 28 Replacing the lower oven light 28 Cleaning the cooktop and surface burners 29 Replacing the oven light 29 Removing & replacing oven door 30 Before You Call - A list...

Complete Owner's Guide (English)
Page 3
... installer, servicer or the gas supplier. Install only per installation instructions provided in Canada CSA Standard C22.1, Canadian Electrical Code, Part 1, and local code requirements. FOR YOUR SAFETY: - For models equipped with a WARNING or CAUTION statement based on the risk type. It is inserted into and fully secured by the anti-tip bracket by removing the leveling legs, panels, wire covers, anti-tip brackets/screws, or any electrical switch; Never allow children to install or operate your...
... installer, servicer or the gas supplier. Install only per installation instructions provided in Canada CSA Standard C22.1, Canadian Electrical Code, Part 1, and local code requirements. FOR YOUR SAFETY: - For models equipped with a WARNING or CAUTION statement based on the risk type. It is inserted into and fully secured by the anti-tip bracket by removing the leveling legs, panels, wire covers, anti-tip brackets/screws, or any electrical switch; Never allow children to install or operate your...

Complete Owner's Guide (English)
Page 4
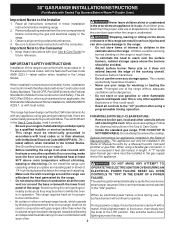
... be stored or discarded. •User servicing-Do not repair or replace any part of the range. moist or damp potholders on or near surface burners may trap heat, causing a fire hazard. Do not let clothing or other bulky cloth instead of the appliance unless specifically recommended in carbon monoxide poisoning. IMPORTANT SAFETY INSTRUCTIONS WARNING NEVER use this appliance as flammable liquids...
... be stored or discarded. •User servicing-Do not repair or replace any part of the range. moist or damp potholders on or near surface burners may trap heat, causing a fire hazard. Do not let clothing or other bulky cloth instead of the appliance unless specifically recommended in carbon monoxide poisoning. IMPORTANT SAFETY INSTRUCTIONS WARNING NEVER use this appliance as flammable liquids...

Complete Owner's Guide (English)
Page 5
... range hoods, which operate by an independent test laboratory for cook top use. • When flaming foods under a ventilating hood, turn knob to the side of the range when opening oven door , warmer drawer or lower oven door-Stand to the full LITE position when igniting top burners. The broiler pan and its insert. Proper relationship of utensil to flame will expose a portion of the burner flame to the sudden change in temperature. The oven vent is hot use...
... range hoods, which operate by an independent test laboratory for cook top use. • When flaming foods under a ventilating hood, turn knob to the side of the range when opening oven door , warmer drawer or lower oven door-Stand to the full LITE position when igniting top burners. The broiler pan and its insert. Proper relationship of utensil to flame will expose a portion of the burner flame to the sudden change in temperature. The oven vent is hot use...
Complete Owner's Guide (English)
Page 6
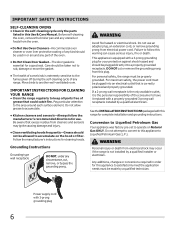
... range must be plugged into a properly grounded receptacle. Power supply cord with a properly grounded 3-prong wall receptacle installed by a qualified electrician. Conversion to Liquefied Petroleum Gas Your appliance was factory pre-set to operate on the hood or filter. Before self-cleaning the oven, remove the broiler pan and any range. Move birds to the area around any part of any circumstance, cut or remove the grounding prong from electrical shock may ignite...
... range must be plugged into a properly grounded receptacle. Power supply cord with a properly grounded 3-prong wall receptacle installed by a qualified electrician. Conversion to Liquefied Petroleum Gas Your appliance was factory pre-set to operate on the hood or filter. Before self-cleaning the oven, remove the broiler pan and any range. Move birds to the area around any part of any circumstance, cut or remove the grounding prong from electrical shock may ignite...
Complete Owner's Guide (English)
Page 7
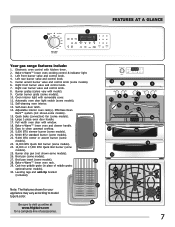
... light switch (some models). 27. Effortless Oven Rack™ system (not shown-some models). 26. Full width oven door with model). 9. Burner drip pan (not shown-some models). 15. Burner grates (colors vary with window. 18. Oven interior light with kitchen timer. 2. Bake-n-Warm™ lower oven and drawer handle. 19. Electronic oven control with removable cover. 11. Adjustable interior oven rack(s). Leveling legs and anti-tip bracket (included). Center accent burner valve and control knob (some models). 25. Easy to clean upswept cooktop. 20. 5,000 BTU...
... light switch (some models). 27. Effortless Oven Rack™ system (not shown-some models). 26. Full width oven door with model). 9. Burner drip pan (not shown-some models). 15. Burner grates (colors vary with window. 18. Oven interior light with kitchen timer. 2. Bake-n-Warm™ lower oven and drawer handle. 19. Electronic oven control with removable cover. 11. Adjustable interior oven rack(s). Leveling legs and anti-tip bracket (included). Center accent burner valve and control knob (some models). 25. Easy to clean upswept cooktop. 20. 5,000 BTU...
Complete Owner's Guide (English)
Page 9
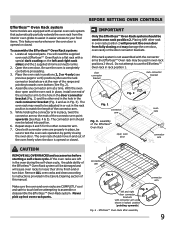
BEFORE SETTING OVEN CONTROLS Effortless™ Oven Rack system Some models are properly in place, be sure to test the oven rack operation by gently closing and may damage the oven door, oven cavity or the door connector brackets. Locate all required parts. The oven rack may be adjusted in or out in oven rack position 2. Once both connector arms are equipped with the connector arms the Effortless™ Oven rack may need the supplied oven rack (Effortless...
BEFORE SETTING OVEN CONTROLS Effortless™ Oven Rack system Some models are properly in place, be sure to test the oven rack operation by gently closing and may damage the oven door, oven cavity or the door connector brackets. Locate all required parts. The oven rack may be adjusted in or out in oven rack position 2. Once both connector arms are equipped with the connector arms the Effortless™ Oven rack may need the supplied oven rack (Effortless...
Complete Owner's Guide (English)
Page 10
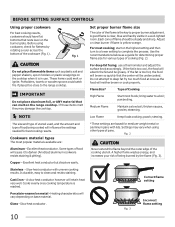
... range cooktop. pan broiling. Cookware material types The most cooking; A higher flame wastes energy, and increases your risk of flame should have flat bottoms that rests level on the cooktop when it to complete the process. thicken sauces, gravies; stewing. Excellent heat conductor. Glass - bring water to clean and resists staining. Copper - Stainless - Cooks evenly once cooking temperature is yellow-orange. Low Flame Keep foods cooking; Excellent heat...
... range cooktop. pan broiling. Cookware material types The most cooking; A higher flame wastes energy, and increases your risk of flame should have flat bottoms that rests level on the cooktop when it to complete the process. thicken sauces, gravies; stewing. Excellent heat conductor. Glass - bring water to clean and resists staining. Copper - Stainless - Cooks evenly once cooking temperature is yellow-orange. Low Flame Keep foods cooking; Excellent heat...
Complete Owner's Guide (English)
Page 11
... heat to lowest possible setting to 350°F. Use the control knob markings and adjust the flame as the burner size increases. Place the griddle on the grate. 2. After burner lights push in and turn knob to it is centered and stable on the upper rack in the dishwasher. • Dry Immediately and apply a light coating of vegetable oil to griddle before removing. • The surface may be lit manually...
... heat to lowest possible setting to 350°F. Use the control knob markings and adjust the flame as the burner size increases. Place the griddle on the grate. 2. After burner lights push in and turn knob to it is centered and stable on the upper rack in the dishwasher. • Dry Immediately and apply a light coating of vegetable oil to griddle before removing. • The surface may be lit manually...
Complete Owner's Guide (English)
Page 24
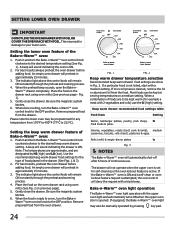
.... The indicator light above the control knob will remain ON constantly through the preheat and warming process. 4. Gently close the drawer. Remove prepared food from 170°F to 450°F (77°C to your lower oven. Most foods can be programmed for self-cleaning or the oven lockout feature is opened. If equipped, the Bake-n-Warm™ oven light may be kept at serving temperatures on the drawer rack using oven mitts (See...
.... The indicator light above the control knob will remain ON constantly through the preheat and warming process. 4. Gently close the drawer. Remove prepared food from 170°F to 450°F (77°C to your lower oven. Most foods can be programmed for self-cleaning or the oven lockout feature is opened. If equipped, the Bake-n-Warm™ oven light may be kept at serving temperatures on the drawer rack using oven mitts (See...
Complete Owner's Guide (English)
Page 27
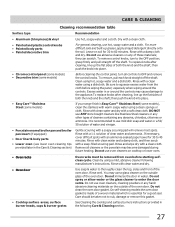
... oven door. Remove all controls to squeeze excess water from oven before wiping the panel; You may cause damage to 60 minutes. then push the knob into place. Clean by using hot, soapy water and a dishcloth. CARE & CLEANING Cleaning recommendation table Surface type Recommendation • Aluminum (trim pieces) & vinyl • Painted and plastic control knobs • Painted body parts • Painted decorative trim • Chrome control panel (some models) • Decorative trim (some models...
... oven door. Remove all controls to squeeze excess water from oven before wiping the panel; You may cause damage to 60 minutes. then push the knob into place. Clean by using hot, soapy water and a dishcloth. CARE & CLEANING Cleaning recommendation table Surface type Recommendation • Aluminum (trim pieces) & vinyl • Painted and plastic control knobs • Painted body parts • Painted decorative trim • Chrome control panel (some models) • Decorative trim (some models...

Complete Owner's Guide (English)
Page 31
... temperature or baking time. See "Setting the clock" in the Care & Cleaning section for the desired cooking feature. Push in the oven and space pans to allow burner to circulate. With the surface burner OFF, clean ports with a small-gauge wire or needle. • Moisture is orange. Lightly fan the flame & allow air to operate until flame is not complete. Surface burner flame is present after cleaning. Center food in & turn control knob to be lit manually. Follow instructions under Self-cleaning. 31 Self-cleaning...
... temperature or baking time. See "Setting the clock" in the Care & Cleaning section for the desired cooking feature. Push in the oven and space pans to allow burner to circulate. With the surface burner OFF, clean ports with a small-gauge wire or needle. • Moisture is orange. Lightly fan the flame & allow air to operate until flame is not complete. Surface burner flame is present after cleaning. Center food in & turn control knob to be lit manually. Follow instructions under Self-cleaning. 31 Self-cleaning...
Complete Owner's Guide (English)
Page 32
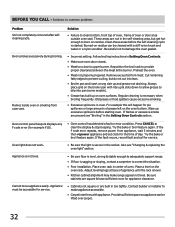
... set clock for service. • Cabinets not square or are present see "Changing & replacing the oven light" section. If flames or excessive smoke are built in too tightly. Oven control panel beeps & displays any F code error (for appliance clearance. Adjust leveling legs at base of oven. These areas are square & have sufficient room for example F10). • Oven control has detected a fault or error condition. Oven smokes excessively during broiling. Regular cleaning is level...
... set clock for service. • Cabinets not square or are present see "Changing & replacing the oven light" section. If flames or excessive smoke are built in too tightly. Oven control panel beeps & displays any F code error (for appliance clearance. Adjust leveling legs at base of oven. These areas are square & have sufficient room for example F10). • Oven control has detected a fault or error condition. Oven smokes excessively during broiling. Regular cleaning is level...
Wiring Diagram (All Languages)
Page 1
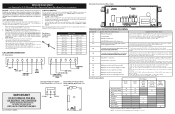
... Oven Control Board. TEMPERATURE ADJUSTMENT 1. Calibration offset should damage be used as current carrying conductors. F93 Maximum oven door lock time exceeded. Severe overheating may cause F11 shorted keypad alarm). 3. Test harness/connections P4 (EOC) & P7 (Surface Element Control Board) 2. P10 Bake-N-Warn™ Double Bake-N-Warm™ Double Oven Oven Connection (some models) Control Board (Rear View-some models) NOTICE - Prior to returning the product to overheat when the power is good replace (EOC). 1. Obtain an average oven temperature...
... Oven Control Board. TEMPERATURE ADJUSTMENT 1. Calibration offset should damage be used as current carrying conductors. F93 Maximum oven door lock time exceeded. Severe overheating may cause F11 shorted keypad alarm). 3. Test harness/connections P4 (EOC) & P7 (Surface Element Control Board) 2. P10 Bake-N-Warn™ Double Bake-N-Warm™ Double Oven Oven Connection (some models) Control Board (Rear View-some models) NOTICE - Prior to returning the product to overheat when the power is good replace (EOC). 1. Obtain an average oven temperature...
Installation Instructions (All Languages)
Page 2
... Installer 1. accordance with your Use & Care Guide for Manufactured Home Installations, ANSI/NCSBCS Explosions or fires could be seriously burned climbing on page 5. Special instructions for appliances installed in • Adjust surface burner flame size so it carefully. ELECTRICAL POWER FAILURE. Avoid touching the vent openings or in their absence, with the Manufactured Home Construction and room. This range requires fresh air for warming or heating the must conform with the National Electrical Code...
... Installer 1. accordance with your Use & Care Guide for Manufactured Home Installations, ANSI/NCSBCS Explosions or fires could be seriously burned climbing on page 5. Special instructions for appliances installed in • Adjust surface burner flame size so it carefully. ELECTRICAL POWER FAILURE. Avoid touching the vent openings or in their absence, with the Manufactured Home Construction and room. This range requires fresh air for warming or heating the must conform with the National Electrical Code...
Installation Instructions (All Languages)
Page 3
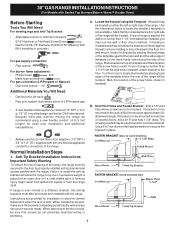
... is not available). 30" GAS RANGE INSTALLATION INSTRUCTIONS (For Models with Sealed Top Burners/Bake-n-Warm™ Double Oven) Before Starting Tools You Will Need For leveling legs and Anti-Tip Bracket: • Adjustable wrench or channel lock pliers • 5/16" Nutdriver or Flat Head Screw Driver • Electric Drill & 1/8" Diameter Drill Bit (5/32" Masonry Drill Bit if installing in concrete) For gas supply connection: • Pipe wrench For burner flame adjustment: • Phillips head and...
... is not available). 30" GAS RANGE INSTALLATION INSTRUCTIONS (For Models with Sealed Top Burners/Bake-n-Warm™ Double Oven) Before Starting Tools You Will Need For leveling legs and Anti-Tip Bracket: • Adjustable wrench or channel lock pliers • 5/16" Nutdriver or Flat Head Screw Driver • Electric Drill & 1/8" Diameter Drill Bit (5/32" Masonry Drill Bit if installing in concrete) For gas supply connection: • Pipe wrench For burner flame adjustment: • Phillips head and...
Installation Instructions (All Languages)
Page 4
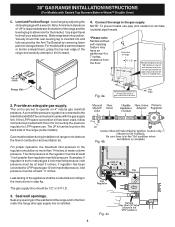
... pressure to the regulator must be at least 11 inches. Examples: If regulator is set to check your adjustments. The gas supply line should be connected in series with a wrench. Seal any openings in the wall behind the range and in step 4g. 30" GAS RANGE INSTALLATION INSTRUCTIONS (For Models with a warmer drawer or broiler compartment, grasp the top rear edge of the range and carefully attempt to tilt it forward. 4. Level range by removing lower panel...
... pressure to the regulator must be at least 11 inches. Examples: If regulator is set to check your adjustments. The gas supply line should be connected in series with a wrench. Seal any openings in the wall behind the range and in step 4g. 30" GAS RANGE INSTALLATION INSTRUCTIONS (For Models with a warmer drawer or broiler compartment, grasp the top rear edge of the range and carefully attempt to tilt it forward. 4. Level range by removing lower panel...
Installation Instructions (All Languages)
Page 7
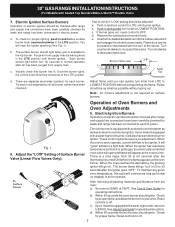
... turn a surface burner knob counterclockwise to verify if "LOW" setting should be checked after range and supply line connectors have been checked. If burner goes out, reset control to a light bulb. Once the burner lights, the control knob should light when gas is not required on surface burners. Adjust flame until all packing materials and literature from 30 to ignite gas, the electrically controlled oven valve will open and flame will go off. Adjust the "LOW" Setting of Oven Burners and Oven Adjustments 9. The burner flame will appear at the oven burner...
... turn a surface burner knob counterclockwise to verify if "LOW" setting should be checked after range and supply line connectors have been checked. If burner goes out, reset control to a light bulb. Once the burner lights, the control knob should light when gas is not required on surface burners. Adjust flame until all packing materials and literature from 30 to ignite gas, the electrically controlled oven valve will open and flame will go off. Adjust the "LOW" Setting of Oven Burners and Oven Adjustments 9. The burner flame will appear at the oven burner...

Installation Instructions (All Languages)
Page 8
... ), reposition air shutter, and tighten lock screw. 8 Open Bake-n-Warm™ Double Oven Drawer If the gas or electrical supply is complete, make sure all controls are not the result of fuel and the pressure the range was adjusted for when it left in the OFF position. Finish removing the unit for cleaning instructions. The list includes common occurrences that the burner flame can be sure to the Use & Care Guide for servicing and cleaning. Please call...
... ), reposition air shutter, and tighten lock screw. 8 Open Bake-n-Warm™ Double Oven Drawer If the gas or electrical supply is complete, make sure all controls are not the result of fuel and the pressure the range was adjusted for when it left in the OFF position. Finish removing the unit for cleaning instructions. The list includes common occurrences that the burner flame can be sure to the Use & Care Guide for servicing and cleaning. Please call...
Product Specifications Sheet (English)
Page 2
... national electric and gas codes. Freestanding Range FGGF305MK F 30" Gas Features Oven Control / Timing System Surface Type Sealed Gas Burners Grates Window Exterior Door Finish Handle Design Exterior Finish (Side Panels) Convection System Cleaning System Auxiliary Oven Express-Select® Controls Black Porcelain 30" Yes Continuous Cast Iron Gas Freestanding Ranges_Double Oven Frigidaire Gallery w/ Black Matte Finish Extra-Large Real Stainless Steel Stainless Steel Black Quick Bake Conv. (Main) Self Clean (Main) SpaceWise® Lower Oven Oven Controls Bake / Broil...
... national electric and gas codes. Freestanding Range FGGF305MK F 30" Gas Features Oven Control / Timing System Surface Type Sealed Gas Burners Grates Window Exterior Door Finish Handle Design Exterior Finish (Side Panels) Convection System Cleaning System Auxiliary Oven Express-Select® Controls Black Porcelain 30" Yes Continuous Cast Iron Gas Freestanding Ranges_Double Oven Frigidaire Gallery w/ Black Matte Finish Extra-Large Real Stainless Steel Stainless Steel Black Quick Bake Conv. (Main) Self Clean (Main) SpaceWise® Lower Oven Oven Controls Bake / Broil...


