
Installation Instructions
Page 1
... gas supplier from the oven compartments before installing range. • Remove all packing material from a neighbor's phone. Follow the gas supplier's instructions. • If you cannot reach your gas supplier, call your product dealer to this or any electrical switch; A "T" handle type manual gas valve must be installed in the vicinity of this appliance. 1 316903004 Rev A (1304) Carefully attempt to the anti-tip bracket installation instructions supplied with the consumer. Gas provider for appliances installed...
... gas supplier from the oven compartments before installing range. • Remove all packing material from a neighbor's phone. Follow the gas supplier's instructions. • If you cannot reach your gas supplier, call your product dealer to this or any electrical switch; A "T" handle type manual gas valve must be installed in the vicinity of this appliance. 1 316903004 Rev A (1304) Carefully attempt to the anti-tip bracket installation instructions supplied with the consumer. Gas provider for appliances installed...

Installation Instructions
Page 2
... use , the surface burners will automatically re-ignite the oven burner when power resumes if the oven thermostat control was left in an area covered with gas ranges other appliance. Hold a lighted match to the burner, then slowly turn the knob to operate. As with a match. During a power outage, the surface burners can withstand the heat generated by an independent test laboratory for Manufactured Home Installations, ANSI/NCSBCS A225.1, or with the National Electrical Code...
... use , the surface burners will automatically re-ignite the oven burner when power resumes if the oven thermostat control was left in an area covered with gas ranges other appliance. Hold a lighted match to the burner, then slowly turn the knob to operate. As with a match. During a power outage, the surface burners can withstand the heat generated by an independent test laboratory for Manufactured Home Installations, ANSI/NCSBCS A225.1, or with the National Electrical Code...

Installation Instructions
Page 4
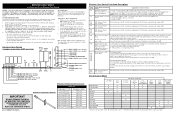
... below the cooking top or at the rear of pipe stub and shutoff valve. * Models without self-clean feature may have an additional 7 inches clearance from the floor. height from cooktop to be installed must be installed for proper electric and gas supply, and stability of the floor. Fig. 1 30" 25-3/4" 48-1/2" max * 29-1/4" 36±1/8" max (Adjustable) door closed 46-5/8" max door open * 9500 BTU or...
... below the cooking top or at the rear of pipe stub and shutoff valve. * Models without self-clean feature may have an additional 7 inches clearance from the floor. height from cooktop to be installed must be installed for proper electric and gas supply, and stability of the floor. Fig. 1 30" 25-3/4" 48-1/2" max * 29-1/4" 36±1/8" max (Adjustable) door closed 46-5/8" max door open * 9500 BTU or...

Installation Instructions
Page 6
FREESTANDING GAS RANGE 2 Provide an adequate gas supply. A convertible pressure regulator is installed. 4 Connect range to gas supply line in step 4g. The inlet pressure to the range (See Fig. 8). Seal any openings in the wall behind the range and in series with the kit for each 1000 ft. Install an external manual gas shut-off valve to gas supply. Be sure you know where and how to shut off valve Fig. 8 - Do not allow gas pressure regulator to turn on pipe when tightening...
FREESTANDING GAS RANGE 2 Provide an adequate gas supply. A convertible pressure regulator is installed. 4 Connect range to gas supply line in step 4g. The inlet pressure to the range (See Fig. 8). Seal any openings in the wall behind the range and in series with the kit for each 1000 ft. Install an external manual gas shut-off valve to gas supply. Be sure you know where and how to shut off valve Fig. 8 - Do not allow gas pressure regulator to turn on pipe when tightening...

Installation Instructions
Page 9
... supply line connectors have an electric burner igniter. Reset control to OFF. If your model is turned ON before the flame appears at 300ºF. e. c. d. Reset control to LITE until burner ignites. a. Note: Air mixture adjustments are removed from supply lines by leaving knob in and turn of electric igniters should light within four (4) seconds in 20 to Broil. Check for operating instructions. c. Purge air from oven. Each burner should be adjusted: a. Once the burner ignites, the control knob should be turned out of oven igniters...
... supply line connectors have an electric burner igniter. Reset control to OFF. If your model is turned ON before the flame appears at 300ºF. e. c. d. Reset control to LITE until burner ignites. a. Note: Air mixture adjustments are removed from supply lines by leaving knob in and turn of electric igniters should light within four (4) seconds in 20 to Broil. Check for operating instructions. c. Purge air from oven. Each burner should be adjusted: a. Once the burner ignites, the control knob should be turned out of oven igniters...

Installation Instructions
Page 10
... if the upper broil burner flame is a distinct blue, reduce the air shutter opening size. If the flame is necessary for proper Anti-tip installation. Refer to observe oven burner flame. Disconnect the gas and electrical supply. The approximate flame length of oven bottom panel. Your identification plate also tells you time and expense. FREESTANDING GAS RANGE 10 Adjust air shutter - upper oven. (some models) (See Fig...
... if the upper broil burner flame is a distinct blue, reduce the air shutter opening size. If the flame is necessary for proper Anti-tip installation. Refer to observe oven burner flame. Disconnect the gas and electrical supply. The approximate flame length of oven bottom panel. Your identification plate also tells you time and expense. FREESTANDING GAS RANGE 10 Adjust air shutter - upper oven. (some models) (See Fig...
Complete Owner's Guide
Page 2
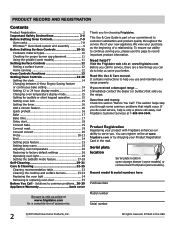
... 11 Using the griddle (some models 11 Setting Surface Controls 12 Setting a surface burner 12 Home canning 12 Oven Controls Functions 13 Setting Oven Controls 14-28 Setting the clock 14 Changing between 6-Hour Engery Saving feature or continuous bake setting 14 Setting 12 or 24 hour display modes 14 Changing oven temperature display mode 15 Setting for choosing Frigidaire. Immediately contact the dealer (or builder) that might occur. Record model & serial numbers here Purchase date Be sure to common problems... 36-39 Appliance Warranty back cover...
... 11 Using the griddle (some models 11 Setting Surface Controls 12 Setting a surface burner 12 Home canning 12 Oven Controls Functions 13 Setting Oven Controls 14-28 Setting the clock 14 Changing between 6-Hour Engery Saving feature or continuous bake setting 14 Setting 12 or 24 hour display modes 14 Changing oven temperature display mode 15 Setting for choosing Frigidaire. Immediately contact the dealer (or builder) that might occur. Record model & serial numbers here Purchase date Be sure to common problems... 36-39 Appliance Warranty back cover...

Complete Owner's Guide
Page 3
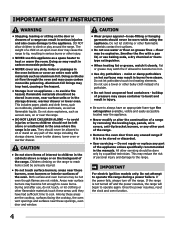
... range. Install only per installation instructions provided in this manual are labeled with the National Fuel Gas Code ANSI Z223.- Ask your gas supplier, call your appliance until you to recommend a qualified technician and an authorized repair service. WHAT TO DO IF YOU SMELL GAS: • Do not try to the anti-tip bracket installation instructions supplied with packaging material. •Proper Installation-Be sure your range for proper installation. IMPORTANT indicates installation, operation...
... range. Install only per installation instructions provided in this manual are labeled with the National Fuel Gas Code ANSI Z223.- Ask your gas supplier, call your appliance until you to recommend a qualified technician and an authorized repair service. WHAT TO DO IF YOU SMELL GAS: • Do not try to the anti-tip bracket installation instructions supplied with packaging material. •Proper Installation-Be sure your range for proper installation. IMPORTANT indicates installation, operation...
Complete Owner's Guide
Page 4
... these openings, oven door and window. • Wear proper apparel-loose-fitting or hanging garments should be explosive. Aluminum foil linings may be done only by removing the leveling legs, panels, wire covers, anti-tip bracket/screws, or any part of the range including the storage drawer, lower broiler drawer, lower oven or warmer drawer. • Do not store items of the oven. Do not let potholders touch hot heating elements. If the range...
... these openings, oven door and window. • Wear proper apparel-loose-fitting or hanging garments should be explosive. Aluminum foil linings may be done only by removing the leveling legs, panels, wire covers, anti-tip bracket/screws, or any part of the range including the storage drawer, lower broiler drawer, lower oven or warmer drawer. • Do not store items of the oven. Do not let potholders touch hot heating elements. If the range...
Complete Owner's Guide
Page 5
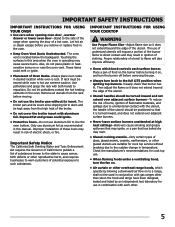
... items on . • Air curtain or other . 5 Use potholders and grasp the rack with gas ranges other than when the hood and range have been designed, tested and listed by blowing a downward air flow on the burner before turning it does not extend beyond the edge of clothing. IMPORTANT INSTRUCTIONS FOR USING YOUR COOKTOP Use Proper Flame Size-Adjust flame size so it is operating may result in ignition of the utensil...
... items on . • Air curtain or other . 5 Use potholders and grasp the rack with gas ranges other than when the hood and range have been designed, tested and listed by blowing a downward air flow on the burner before turning it does not extend beyond the edge of clothing. IMPORTANT INSTRUCTIONS FOR USING YOUR COOKTOP Use Proper Flame Size-Adjust flame size so it is operating may result in ignition of the utensil...
Complete Owner's Guide
Page 6
... the L.P. Installation Instructions carefully. 6 Do not use an adapter plug, an extension cord, or remove grounding prong from cleaners and aerosols may ignite causing damage and injury. • Clean ventilating hoods frequently-Grease should be installed by a qualified electrician. Power supply cord with this plug. conversion, the L.P. conversion kit may occur if the range is the personal responsibility of the consumer to follow this Use & Care Manual. Personal injury or death from electrical shock...
... the L.P. Installation Instructions carefully. 6 Do not use an adapter plug, an extension cord, or remove grounding prong from cleaners and aerosols may ignite causing damage and injury. • Clean ventilating hoods frequently-Grease should be installed by a qualified electrician. Power supply cord with this plug. conversion, the L.P. conversion kit may occur if the range is the personal responsibility of the consumer to follow this Use & Care Manual. Personal injury or death from electrical shock...
Complete Owner's Guide
Page 11
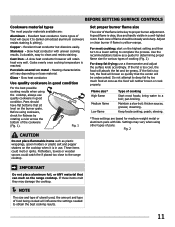
... heat conductor with lids. Cast Iron - For most foods; Do not attempt to proper burner adjustment. pan broiling. Stainless - Use quality cookware in a well-lighted room. Fig. 1 Set proper burner flame size The color of the flame is clear, blue and hardly visible in good condition For the best possible cooking results when using the cooktop, always use a thermometer and adjust the surface knob accordingly. thicken sauces, gravies; Glass - A good flame...
... heat conductor with lids. Cast Iron - For most foods; Do not attempt to proper burner adjustment. pan broiling. Stainless - Use quality cookware in a well-lighted room. Fig. 1 Set proper burner flame size The color of the flame is clear, blue and hardly visible in good condition For the best possible cooking results when using the cooktop, always use a thermometer and adjust the surface knob accordingly. thicken sauces, gravies; Glass - A good flame...

Complete Owner's Guide
Page 13
...preheat, bake, convect, convect convert and self-clean features to set clock & timer. convect convert - Use to activate most oven features (except oven light). Use to program a delay start time or delay start - pizza - Use to enter temperature and times. Use to set the convect bake or convect roast features. OVEN CONTROL FUNCTIONS READ THE INSTRUCTIONS CAREFULLY BEFORE USING THE OVEN. Use to cancel any oven mode previously set except the oven lock, set and adjust settings for the feature. 13 Use to set preheat the pizza - oven lock - Use to turn the oven...
...preheat, bake, convect, convect convert and self-clean features to set clock & timer. convect convert - Use to activate most oven features (except oven light). Use to program a delay start time or delay start - pizza - Use to enter temperature and times. Use to set the convect bake or convect roast features. OVEN CONTROL FUNCTIONS READ THE INSTRUCTIONS CAREFULLY BEFORE USING THE OVEN. Use to cancel any oven mode previously set except the oven lock, set and adjust settings for the feature. 13 Use to set preheat the pizza - oven lock - Use to turn the oven...
Complete Owner's Guide
Page 32
... dishcloth before wiping control panel; Remove and clean using hot, soapy water and a dishcloth. Do not immerse the door in the self-cleaning section. • Oven racks Oven racks must be taken not to the appliance. grasp firmly and pull straight off the shaft. then push knob into place. • Control panel • Control key pad membrane • Decorative trim (some models) Before cleaning the control panel, turn to enter the door vents. It is...
... dishcloth before wiping control panel; Remove and clean using hot, soapy water and a dishcloth. Do not immerse the door in the self-cleaning section. • Oven racks Oven racks must be taken not to the appliance. grasp firmly and pull straight off the shaft. then push knob into place. • Control panel • Control key pad membrane • Decorative trim (some models) Before cleaning the control panel, turn to enter the door vents. It is...
Complete Owner's Guide
Page 34
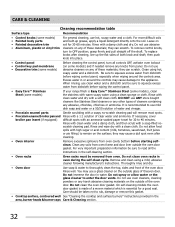
... flow of gas and ignition of a paper clip to enter the orifice port opening. Turn power back on the burner heads. To reset review "Setting the clock" section in place, press wire holder to one side to protect and shield the oven interior light whenever using the oven. Cooktop burner head between the burner slots using a damp cloth. Aluminum foil linings may cause carbon monoxide poisoning. During self-clean the oven temperature can become hot enough...
... flow of gas and ignition of a paper clip to enter the orifice port opening. Turn power back on the burner heads. To reset review "Setting the clock" section in place, press wire holder to one side to protect and shield the oven interior light whenever using the oven. Cooktop burner head between the burner slots using a damp cloth. Aluminum foil linings may cause carbon monoxide poisoning. During self-clean the oven temperature can become hot enough...
Complete Owner's Guide
Page 36
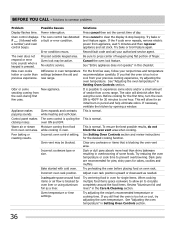
... review instructions for pies; Incorrect cookware type or size. Try reducing the oven temperature or cook time to one hour. Bake started with a number) and oven control beeps. Inadequate space around the food items. Review "Aluminum foil and liners" in the Care & Cleaning section. If you feel the oven is normal. See "Adjusting the oven temperature" in oven temperature settings between the old and new range. Oven control displays F __ (followed with cold oven. If the F code error repeats, remove electric power...
... review instructions for pies; Incorrect cookware type or size. Try reducing the oven temperature or cook time to one hour. Bake started with a number) and oven control beeps. Inadequate space around the food items. Review "Aluminum foil and liners" in the Care & Cleaning section. If you feel the oven is normal. See "Adjusting the oven temperature" in oven temperature settings between the old and new range. Oven control displays F __ (followed with cold oven. If the F code error repeats, remove electric power...
Complete Owner's Guide
Page 37
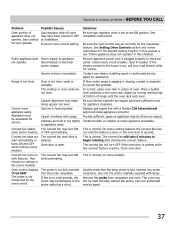
... convect fan may be lifted over carpet. or OFF automatically. Oven door is not recognized by turning leveling legs at installation. The probe is open. If the error code persists, the probe may turn ON noise (some models). See installation instructions. Be sure the oven control was set to correct the problem. See Setting Oven Controls section and review instructions for assistance. Be sure appliance power cord is active. If the electric service to begin rotating after starting any convect feature is plugged...
... convect fan may be lifted over carpet. or OFF automatically. Oven door is not recognized by turning leveling legs at installation. The probe is open. If the error code persists, the probe may turn ON noise (some models). See installation instructions. Be sure the oven control was set to correct the problem. See Setting Oven Controls section and review instructions for assistance. Be sure appliance power cord is active. If the electric service to begin rotating after starting any convect feature is plugged...
Complete Owner's Guide
Page 39
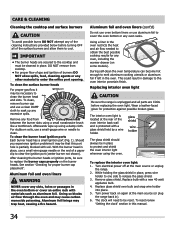
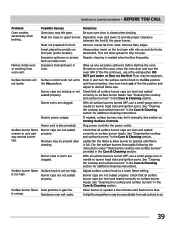
... oven. Surface control knob not set too high. Burner caps are level and seated correctly on the fire! Surface burner flame is needed , surface burners may be lit manually. Possible Causes Solutions Oven door was left open. Always place insert on surface burner heads. If the fire continues, use a small-gauge wire or needle to burner head slots and ignition ports. Electric power outage. Remove fatty edges. Excessive food spillovers in the Care & Cleaning section for additional cleaning instructions. Power cord...
... oven. Surface control knob not set too high. Burner caps are level and seated correctly on the fire! Surface burner flame is needed , surface burners may be lit manually. Possible Causes Solutions Oven door was left open. Always place insert on surface burner heads. If the fire continues, use a small-gauge wire or needle to burner head slots and ignition ports. Electric power outage. Remove fatty edges. Excessive food spillovers in the Care & Cleaning section for additional cleaning instructions. Power cord...
Wiring Diagram
Page 1
... (temperature adjustment) should damage be used as needed . Press the self clean keypad to change the sign of the adjustment to end Bake mode. Electronic Oven Control & jumper connections (EOC rear view) Relay/ Power Display PCB PCB P5 P15 P3 L2 IN P1 L2 OUT P9 P7 J3 BAKE BROIL L1 P8 P11 P12 MEAT PROBE (some models) MEAT PROBE (some models) TEMP PROBE TEMP PROBE EXTERNAL SWITCH RETURN DOOR SWITCH (some models) MOTOR DOOR LATCH SWITCH WARMER ZONE (some models) WARMER ZONE (some models...
... (temperature adjustment) should damage be used as needed . Press the self clean keypad to change the sign of the adjustment to end Bake mode. Electronic Oven Control & jumper connections (EOC rear view) Relay/ Power Display PCB PCB P5 P15 P3 L2 IN P1 L2 OUT P9 P7 J3 BAKE BROIL L1 P8 P11 P12 MEAT PROBE (some models) MEAT PROBE (some models) TEMP PROBE TEMP PROBE EXTERNAL SWITCH RETURN DOOR SWITCH (some models) MOTOR DOOR LATCH SWITCH WARMER ZONE (some models) WARMER ZONE (some models...
Product Specifications Sheet
Page 2
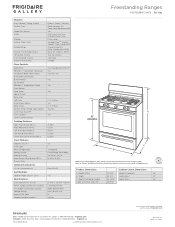
... Guide for detailed installation instructions on the web at frigidaire.com. Height (Max.) B - Freestanding Ranges FGGF3058R F/ W/ B 30" Gas Features Oven Control / Timing System Surface Type Sealed Gas Burners Grates Window Exterior Door Finish Handle Design Exterior Finish (Side Panels) Convection System Oven Cleaning System Drawer Functionality 30" Gas Freestanding Ranges Express-Select® Controls Black Porcelain (F), Color-Coord. Refer to change. Product Dimensions A - Ft.) Oven Light Rack Configuration Baking System Broiling System Bake Burner / Broil Burner (BTU...
... Guide for detailed installation instructions on the web at frigidaire.com. Height (Max.) B - Freestanding Ranges FGGF3058R F/ W/ B 30" Gas Features Oven Control / Timing System Surface Type Sealed Gas Burners Grates Window Exterior Door Finish Handle Design Exterior Finish (Side Panels) Convection System Oven Cleaning System Drawer Functionality 30" Gas Freestanding Ranges Express-Select® Controls Black Porcelain (F), Color-Coord. Refer to change. Product Dimensions A - Ft.) Oven Light Rack Configuration Baking System Broiling System Bake Burner / Broil Burner (BTU...


