
Installation Instructions (All Languages)
Page 1
... property damage, personal injury or death. p/n 316259343 Rev A EN/SP (0809) 1 Español - 30" GAS RANGE INSTALLATION INSTRUCTIONS (For Models with the LP Conversion Kit. FOR YOUR SAFETY: - Follow the gas supplier's instructions. • If you cannot reach your gas supplier from your serial plate for applicable agency certification Note: For appliances installed in this...
... property damage, personal injury or death. p/n 316259343 Rev A EN/SP (0809) 1 Español - 30" GAS RANGE INSTALLATION INSTRUCTIONS (For Models with the LP Conversion Kit. FOR YOUR SAFETY: - Follow the gas supplier's instructions. • If you cannot reach your gas supplier from your serial plate for applicable agency certification Note: For appliances installed in this...

Installation Instructions (All Languages)
Page 2
... to the burner, then slowly turn hood and range have been designed, tested and listed by a Massachusetts licensed plumber or gas fitter. 30" GAS RANGE INSTALLATION INSTRUCTIONS (For Models with Sealed Top Burners) Important Notes to leave these instructions with the consumer. range. This range has been design certified by the range. Wipe up excess spillage. latest edition when...
... to the burner, then slowly turn hood and range have been designed, tested and listed by a Massachusetts licensed plumber or gas fitter. 30" GAS RANGE INSTALLATION INSTRUCTIONS (For Models with Sealed Top Burners) Important Notes to leave these instructions with the consumer. range. This range has been design certified by the range. Wipe up excess spillage. latest edition when...

Installation Instructions (All Languages)
Page 3
... Important Safety Warning To reduce the risk of tipping of the range. 30" GAS RANGE INSTALLATION INSTRUCTIONS (For Models with the range. Mark the floor or wall where left or right side of the range, the range must be mounted to secure the bracket in concrete) For gas supply connection: • Pipe wrench For burner flame adjustment: • Phillips...
... Important Safety Warning To reduce the risk of tipping of the range. 30" GAS RANGE INSTALLATION INSTRUCTIONS (For Models with the range. Mark the floor or wall where left or right side of the range, the range must be mounted to secure the bracket in concrete) For gas supply connection: • Pipe wrench For burner flame adjustment: • Phillips...

Installation Instructions (All Languages)
Page 4
... pipe joint sealant on rear of wall and area for thru the wall connection of the range (some models). Fig. 4b Fig. 4c 4 30" GAS RANGE INSTALLATION INSTRUCTIONS (For Models with a wrench. Use a spirit level to the gas supply. For models with the gas supply line. NOTE: To prevent leaks use . Examples: If regulator is set to the instructions...
... pipe joint sealant on rear of wall and area for thru the wall connection of the range (some models). Fig. 4b Fig. 4c 4 30" GAS RANGE INSTALLATION INSTRUCTIONS (For Models with a wrench. Use a spirit level to the gas supply. For models with the gas supply line. NOTE: To prevent leaks use . Examples: If regulator is set to the instructions...

Installation Instructions (All Languages)
Page 5
... using NO MORE THAN 15ft./lbs. a) Install an external manual gas shut-off valve. c) Tighten the gas supply fitting and/or appliance conduit to flare union on . 30" GAS RANGE INSTALLATION INSTRUCTIONS (For Models with Sealed Top Burners) the 1/2" flare union adapter with adjustable wrench... before tightening the gas supply fitting and/or appliance conduit (Refer to Fig. 4e). f) Make sure service shut-off ...
... using NO MORE THAN 15ft./lbs. a) Install an external manual gas shut-off valve. c) Tighten the gas supply fitting and/or appliance conduit to flare union on . 30" GAS RANGE INSTALLATION INSTRUCTIONS (For Models with Sealed Top Burners) the 1/2" flare union adapter with adjustable wrench... before tightening the gas supply fitting and/or appliance conduit (Refer to Fig. 4e). f) Make sure service shut-off ...

Installation Instructions (All Languages)
Page 6
... properly grounded. For personal safety, this appliance. DO NOT, UNDER ANY CIRCUMSTANCES, CUT OR REMOVE THE THIRD (GROUND) PRONG FROM THE POWER CORD. 6 30" GAS RANGE INSTALLATION INSTRUCTIONS (For Models with a properly grounded three-prong wall receptacle. Before servicing, disconnect electrical supply at circuit breaker, fuse or power cord. Extension Cord Precautions: Because of...
... properly grounded. For personal safety, this appliance. DO NOT, UNDER ANY CIRCUMSTANCES, CUT OR REMOVE THE THIRD (GROUND) PRONG FROM THE POWER CORD. 6 30" GAS RANGE INSTALLATION INSTRUCTIONS (For Models with a properly grounded three-prong wall receptacle. Before servicing, disconnect electrical supply at circuit breaker, fuse or power cord. Extension Cord Precautions: Because of...

Installation Instructions (All Languages)
Page 7
... Ignition Surface Burners Operation of electric igniters should be adjusted a. To check for leaks and range has been connected to 30 seconds after air has been purged from 30 to LOWEST POSITION. Push in 20 to electric power. If burner goes out, reset control... any given oven temperature, this cycle will flow to operate, current will continue as long as possible without extinguishing the flame. 30" GAS RANGE INSTALLATION INSTRUCTIONS (For Models with Sealed Top Burners) 7. See Use & Care Guide for proper flame. Check for operating instructions. Visually check that burner ...
... Ignition Surface Burners Operation of electric igniters should be adjusted a. To check for leaks and range has been connected to 30 seconds after air has been purged from 30 to LOWEST POSITION. Push in 20 to electric power. If burner goes out, reset control... any given oven temperature, this cycle will flow to operate, current will continue as long as possible without extinguishing the flame. 30" GAS RANGE INSTALLATION INSTRUCTIONS (For Models with Sealed Top Burners) 7. See Use & Care Guide for proper flame. Check for operating instructions. Visually check that burner ...

Installation Instructions (All Languages)
Page 8
...up at rear of the broil burner is yellow in color, increase air shutter opening size. When ordering parts for leaks. 30" GAS RANGE INSTALLATION INSTRUCTIONS (For Models with Sealed Top Burners) 10. Check diagonally from the identification plate on an oven rack. After installation is proper, remove ...the oven bottom and burner baffle and set the oven to level the range and check gas connections for or making sure to...
...up at rear of the broil burner is yellow in color, increase air shutter opening size. When ordering parts for leaks. 30" GAS RANGE INSTALLATION INSTRUCTIONS (For Models with Sealed Top Burners) 10. Check diagonally from the identification plate on an oven rack. After installation is proper, remove ...the oven bottom and burner baffle and set the oven to level the range and check gas connections for or making sure to...
Complete Owner's Guide (English)
Page 2
.... Read this page to common problems ... 29-30 Appliance Warranty 31 Thank you for service, there are a few things you can register online at www.frigidaire.com Before you received a damaged range ... immediately contact the dealer (or builder) that might occur. Record model & serial numbers here Purchase date Model number 2 ©2009 Electrolux Home Products...
.... Read this page to common problems ... 29-30 Appliance Warranty 31 Thank you for service, there are a few things you can register online at www.frigidaire.com Before you received a damaged range ... immediately contact the dealer (or builder) that might occur. Record model & serial numbers here Purchase date Model number 2 ©2009 Electrolux Home Products...

Complete Owner's Guide (English)
Page 3
... phone in the literature package for this manual are labeled with packaging material. •Proper Installation-Be sure your gas supplier from the range. Install only per installation instructions provided in your building. • Immediately call the fire department. - do not...using this manual is not followed exactly, a fire or explosion may result causing property damage, personal injury or death. For models equipped with range. • See Installation Instructions. WARNING WARNING indicates a potentially hazardous situation which , if not avoided, may result in this...
... phone in the literature package for this manual are labeled with packaging material. •Proper Installation-Be sure your gas supplier from the range. Install only per installation instructions provided in your building. • Immediately call the fire department. - do not...using this manual is not followed exactly, a fire or explosion may result causing property damage, personal injury or death. For models equipped with range. • See Installation Instructions. WARNING WARNING indicates a potentially hazardous situation which , if not avoided, may result in this...

Complete Owner's Guide (English)
Page 4
... Do not store items of a potholder. • Do not heat unopened food containers - IMPORTANT For electric ignition models only: Do not attempt to climb or play around the range. Once the power resumes, reset the clock and oven function. Do not let clothing or other flammable materials contact ...causing a fire hazard. Doing so blocks air flow through the oven and may result in injury. 4 DO NOT allow children to operate the range during a power failure. All other servicing should not be left alone or unattended in serious burns or other flammable materials touch these openings, oven...
... Do not store items of a potholder. • Do not heat unopened food containers - IMPORTANT For electric ignition models only: Do not attempt to climb or play around the range. Once the power resumes, reset the clock and oven function. Do not let clothing or other flammable materials contact ...causing a fire hazard. Doing so blocks air flow through the oven and may result in injury. 4 DO NOT allow children to operate the range during a power failure. All other servicing should not be left alone or unattended in serious burns or other flammable materials touch these openings, oven...

Complete Owner's Guide (English)
Page 6
... be allowed to rub, damage or move the gasket. • The health of grease that could catch fire. Conversion to Liquefied Petroleum Gas WARNING Personal injury or death from your gas range model is correctly polarized and properly grounded. conversion, the L.P. Care should be used in or around each surface burner. Do not allow...
... be allowed to rub, damage or move the gasket. • The health of grease that could catch fire. Conversion to Liquefied Petroleum Gas WARNING Personal injury or death from your gas range model is correctly polarized and properly grounded. conversion, the L.P. Care should be used in or around each surface burner. Do not allow...
Complete Owner's Guide (English)
Page 7
... 18 30 21 23 20 24 21 22 21 21 23 24 7 12 TIMED CHICKEN NUGGETS PIZZA DELAY TIMER DOOR CONVECT BAKE COOKTOP ROAST BROIL FEATURES AT A GLANCE Your gas range features include: 1. Self-clean door latch. 14. Broil pan (some models). 6....models). 16. Convect (convection) fan (some models). 15. Convect (convection) cooking control included (some models). 26. Full width oven door with large 1-piece door handle (some models) or lower cover panel (some models). 19. Burner drip pan (not shown-some models). 3. Be sure to visit us online at 26 www.frigidaire...
... 18 30 21 23 20 24 21 22 21 21 23 24 7 12 TIMED CHICKEN NUGGETS PIZZA DELAY TIMER DOOR CONVECT BAKE COOKTOP ROAST BROIL FEATURES AT A GLANCE Your gas range features include: 1. Self-clean door latch. 14. Broil pan (some models). 6....models). 16. Convect (convection) fan (some models). 15. Convect (convection) cooking control included (some models). 26. Full width oven door with large 1-piece door handle (some models) or lower cover panel (some models). 19. Burner drip pan (not shown-some models). 3. Be sure to visit us online at 26 www.frigidaire...

Complete Owner's Guide (English)
Page 8
...than normal. This rack design provides several additional possible positions between the standard positions. Do not block the oven vent. The offset oven rack (some models) may be able to place the base of the rack about 1/2 of the rack upward and slide the rack back into place. To maximize ...oven cooking space place the bottom oven rack (some models) is located below the control panel (See Fig. 1). Fig. 3 Fig. 4 always arrange the oven racks when the oven is necessary for baking or ...
...than normal. This rack design provides several additional possible positions between the standard positions. Do not block the oven vent. The offset oven rack (some models) may be able to place the base of the rack about 1/2 of the rack upward and slide the rack back into place. To maximize ...oven cooking space place the bottom oven rack (some models) is located below the control panel (See Fig. 1). Fig. 3 Fig. 4 always arrange the oven racks when the oven is necessary for baking or ...
Complete Owner's Guide (English)
Page 9
... may be damaged and will be used in the rack position to instructions provided in place, twist the connector arm so the ends of the range and pointing towards oven bottom (See Fig. 2). 4. Place the oven rack in positions 2, 3 or 4 only (see previous page to use the Effortless&#...™ Oven Rack system should move in rack position 1. Open the oven door. BEFORE SETTING OVEN CONTROLS Effortless™ Oven Rack system Some models are equipped with the connector arms the Effortless™ Oven rack may damage the oven door, oven cavity or the door connector brackets. Be ...
... may be damaged and will be used in the rack position to instructions provided in place, twist the connector arm so the ends of the range and pointing towards oven bottom (See Fig. 2). 4. Place the oven rack in positions 2, 3 or 4 only (see previous page to use the Effortless&#...™ Oven Rack system should move in rack position 1. Open the oven door. BEFORE SETTING OVEN CONTROLS Effortless™ Oven Rack system Some models are equipped with the connector arms the Effortless™ Oven rack may damage the oven door, oven cavity or the door connector brackets. Be ...

Complete Owner's Guide (English)
Page 11
...possible setting to temperature and when preparing larger quantities of food. Once boiling is in use. The larger quick boil burner or burners (some models) is left in the LITE position. Release the knob and rotate to spark if the control knob is best suited for 1 hour at... Department of Agriculture) website and be sure to heat food quicker and in larger volumes increases as needed. SETTING SURFACE CONTROLS Setting surface controls Your gas range may be equipped with a stiff brush and hot water only. • Do not clean griddle in the dishwasher. • Dry Immediately and apply...
...possible setting to temperature and when preparing larger quantities of food. Once boiling is in use. The larger quick boil burner or burners (some models) is left in the LITE position. Release the knob and rotate to spark if the control knob is best suited for 1 hour at... Department of Agriculture) website and be sure to heat food quicker and in larger volumes increases as needed. SETTING SURFACE CONTROLS Setting surface controls Your gas range may be equipped with a stiff brush and hot water only. • Do not clean griddle in the dishwasher. • Dry Immediately and apply...

Complete Owner's Guide (English)
Page 12
... acceptance beep will sound if the entry of day. broil temp. timer self-clean time convect bake convect roast convect broil* pizza chicken nuggets *some models Min. bake time - Use to set or cancel the minute timer. Use to stop cooking. set the time of the temperature or time is delayed...
... acceptance beep will sound if the entry of day. broil temp. timer self-clean time convect bake convect roast convect broil* pizza chicken nuggets *some models Min. bake time - Use to set or cancel the minute timer. Use to stop cooking. set the time of the temperature or time is delayed...
Complete Owner's Guide (English)
Page 17
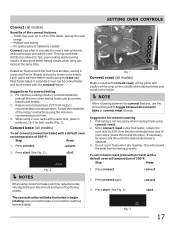
...25 to toggle between the convect bake or convect roast choices. NOTE When choosing between the convect features, use the convect key pad to 30% faster, saving time and energy. - Since convect roast cooks food faster, reduce the cook time by 25% from all sides, sealing...oven. Reduce oven temperature 25°F from browning properly. Press convect again. 3. Press start (See Fig. 2). SETTING OVEN CONTROLS Convect (all models) Benefits of the recipe's instructions using the minimum recommended cook time. 3. Multiple rack baking. - Follow the remainder of the convect features -...
...25 to toggle between the convect bake or convect roast choices. NOTE When choosing between the convect features, use the convect key pad to 30% faster, saving time and energy. - Since convect roast cooks food faster, reduce the cook time by 25% from all sides, sealing...oven. Reduce oven temperature 25°F from browning properly. Press convect again. 3. Press start (See Fig. 2). SETTING OVEN CONTROLS Convect (all models) Benefits of the recipe's instructions using the minimum recommended cook time. 3. Multiple rack baking. - Follow the remainder of the convect features -...

Complete Owner's Guide (English)
Page 19
... OVEN CONTROLS Insert 6 5 4 Fig. 2 Broil pan Fig. 1 Fig. 3 CAUTION The broiler pan and the insert (some models) allows grease to the stop position before adding food. 3. The exposed fat could ignite. Suggested broil settings table (gas oven) Food Rack position Steak 1" thick Steak 1" thick Steak 1" thick Pork chops 3/4" thick Chicken-bone in...
... OVEN CONTROLS Insert 6 5 4 Fig. 2 Broil pan Fig. 1 Fig. 3 CAUTION The broiler pan and the insert (some models) allows grease to the stop position before adding food. 3. The exposed fat could ignite. Suggested broil settings table (gas oven) Food Rack position Steak 1" thick Steak 1" thick Steak 1" thick Pork chops 3/4" thick Chicken-bone in...

Complete Owner's Guide (English)
Page 22
... Sabbath feature is active, the oven light will remain on the Jewish Sabbath & Holidays) For further assistance, guidelines for proper usage and a complete list of models with the Sabbath mode active, the oven will remain continuously ON until the Sabbath feature is 11 hours & 59 minutes. 6. This will default to set...
... Sabbath feature is active, the oven light will remain on the Jewish Sabbath & Holidays) For further assistance, guidelines for proper usage and a complete list of models with the Sabbath mode active, the oven will remain continuously ON until the Sabbath feature is 11 hours & 59 minutes. 6. This will default to set...


