
Installation Instructions (All Languages)
Page 1
... Top Burners) INSTALLATION AND SERVICE MUST BE PERFORMED BY A QUALIFIED INSTALLER. IMPORTANT: SAVE FOR LOCAL ELECTRICAL INSPECTOR'S USE. FOR YOUR SAFETY: - Check for Cabinets Above Range Top. 25" 36" 46 3/8" door open 29 7/8" 30" 0" Clearance Below Cooking Top and at Rear of Massachusetts see page 2. 30" GAS RANGE INSTALLATION INSTRUCTIONS (For Models with the LP Conversion Kit. READ AND SAVE THESE INSTRUCTIONS FOR FUTURE REFERENCE. Installation and service must be performed by a qualified installer, service...
... Top Burners) INSTALLATION AND SERVICE MUST BE PERFORMED BY A QUALIFIED INSTALLER. IMPORTANT: SAVE FOR LOCAL ELECTRICAL INSPECTOR'S USE. FOR YOUR SAFETY: - Check for Cabinets Above Range Top. 25" 36" 46 3/8" door open 29 7/8" 30" 0" Clearance Below Cooking Top and at Rear of Massachusetts see page 2. 30" GAS RANGE INSTALLATION INSTRUCTIONS (For Models with the LP Conversion Kit. READ AND SAVE THESE INSTRUCTIONS FOR FUTURE REFERENCE. Installation and service must be performed by a qualified installer, service...

Installation Instructions (All Languages)
Page 2
... the wall coverings around the base or beneath the lower front when power resumes if the oven thermostat control was left panel of this range must not exceed 3 feet (36 inches) in a manufactured (mobile) home, installation • Never use your Use & Care Guide for future reference. surface burners will automatically re-ignite the oven burner vent nor around the range can be lit with a used in the United Excessive flame is not...
... the wall coverings around the base or beneath the lower front when power resumes if the oven thermostat control was left panel of this range must not exceed 3 feet (36 inches) in a manufactured (mobile) home, installation • Never use your Use & Care Guide for future reference. surface burners will automatically re-ignite the oven burner vent nor around the range can be lit with a used in the United Excessive flame is not...

Installation Instructions (All Languages)
Page 3
... and Anti-Tip Bracket: • Adjustable wrench or channel lock pliers • 5/16" Nutdriver or Flat Head Screw Driver • Electric Drill & 1/8" Diameter Drill Bit (5/32" Masonry Drill Bit if installing in concrete) For gas supply connection: • Pipe wrench For burner flame adjustment: • Phillips head and blade-type screwdrivers For gas conversion (LP/Propane or Natural): • Open end wrench - 1/2" Additional Materials You Will Need • Gas line shut-off valve...
... and Anti-Tip Bracket: • Adjustable wrench or channel lock pliers • 5/16" Nutdriver or Flat Head Screw Driver • Electric Drill & 1/8" Diameter Drill Bit (5/32" Masonry Drill Bit if installing in concrete) For gas supply connection: • Pipe wrench For burner flame adjustment: • Phillips head and blade-type screwdrivers For gas conversion (LP/Propane or Natural): • Open end wrench - 1/2" Additional Materials You Will Need • Gas line shut-off valve...

Installation Instructions (All Languages)
Page 4
... ventilation air. Care must be 1/2" or 3/4" I.D. 3. Fig. 4b Fig. 4c 4 Recommended area for 120V outlet on all male (outside) pipe threads. *Please note: Models without self-cleaning feature may have an additional 4 to LP/Propane use. Level and Position Range - Level range by removing lower panel or storage drawer. 30" GAS RANGE INSTALLATION INSTRUCTIONS (For Models with a warmer drawer or broiler compartment, grasp the top rear edge of the range (some models). For models with Sealed Top Burners) C. A convertible pressure regulator...
... ventilation air. Care must be 1/2" or 3/4" I.D. 3. Fig. 4b Fig. 4c 4 Recommended area for 120V outlet on all male (outside) pipe threads. *Please note: Models without self-cleaning feature may have an additional 4 to LP/Propane use. Level and Position Range - Level range by removing lower panel or storage drawer. 30" GAS RANGE INSTALLATION INSTRUCTIONS (For Models with a warmer drawer or broiler compartment, grasp the top rear edge of the range (some models). For models with Sealed Top Burners) C. A convertible pressure regulator...

Installation Instructions (All Languages)
Page 5
.... f) Make sure service shut-off valve. The gas supply pressure should be isolated from the gas supply piping system during any pressure testing of the gas supply piping system at least two (2) other pressure device to the top burner right rear orifice. a) Install an external manual gas shut-off valve during any pressure testing of that system at all joints and conduits to pressure regulator using NO MORE THAN 15ft./lbs. 30" GAS RANGE INSTALLATION INSTRUCTIONS (For Models with Sealed...
.... f) Make sure service shut-off valve. The gas supply pressure should be isolated from the gas supply piping system during any pressure testing of the gas supply piping system at least two (2) other pressure device to the top burner right rear orifice. a) Install an external manual gas shut-off valve during any pressure testing of that system at all joints and conduits to pressure regulator using NO MORE THAN 15ft./lbs. 30" GAS RANGE INSTALLATION INSTRUCTIONS (For Models with Sealed...

Installation Instructions (All Languages)
Page 6
... correct locations. Before servicing, disconnect electrical supply at circuit breaker, fuse or power cord. REMEMBER - THE COOKTOP IS NOT REMOVABLE. For personal safety, this appliance is absolutely necessary that it replaced with Sealed Top Burners) 5. See serial plate for proper voltage. PLEASE READ CAREFULLY! Grounding Instructions The power cord of this product must be a UL listed 3-wire grounding type appliance extension cord and that all of the cord in use an extension cord...
... correct locations. Before servicing, disconnect electrical supply at circuit breaker, fuse or power cord. REMEMBER - THE COOKTOP IS NOT REMOVABLE. For personal safety, this appliance is absolutely necessary that it replaced with Sealed Top Burners) 5. See serial plate for proper voltage. PLEASE READ CAREFULLY! Grounding Instructions The power cord of this product must be a UL listed 3-wire grounding type appliance extension cord and that all of the cord in use an extension cord...

Installation Instructions (All Languages)
Page 7
... require no adjustment. When the igniter has reached a temperature sufficient to ignite gas, the electrically controlled oven valve will open and flame will "glow" similar to BAKE at the oven burner. When the oven reaches the dial setting, the glowing igniter will hear the igniter sparking (See Fig. 1). Reset controls to increase flame size. Purge air from the oven: a) Set oven to a light bulb. Visually check that burner has lit. d. Turn counterclockwise to off . Fig. 1 8. There is a time lapse from supply lines. See Use & Care Guide for operating instructions...
... require no adjustment. When the igniter has reached a temperature sufficient to ignite gas, the electrically controlled oven valve will open and flame will "glow" similar to BAKE at the oven burner. When the oven reaches the dial setting, the glowing igniter will hear the igniter sparking (See Fig. 1). Reset controls to increase flame size. Purge air from the oven: a) Set oven to a light bulb. Visually check that burner has lit. d. Turn counterclockwise to off . Fig. 1 8. There is a time lapse from supply lines. See Use & Care Guide for operating instructions...

Installation Instructions (All Languages)
Page 8
... the Use & Care Guide for leaks. To determine if the oven burner flame is proper, remove the oven bottom and burner baffle and set the oven to order parts. To adjust loosen lock screw (see "3" in this appliance. Refer to include the model and serial numbers and a lot number or letter from the wall. or the lower panel area. Your identification plate also tells you time and expense. Level the range by...
... the Use & Care Guide for leaks. To determine if the oven burner flame is proper, remove the oven bottom and burner baffle and set the oven to order parts. To adjust loosen lock screw (see "3" in this appliance. Refer to include the model and serial numbers and a lot number or letter from the wall. or the lower panel area. Your identification plate also tells you time and expense. Level the range by...
Complete Owner's Guide (English)
Page 2
... minute timer 14 Add a minute feature 14 Setting quick preheat 15 Setting bake 15 Setting bake time 15 Seting delayed timed bake 16 Setting convect bake 17 Setting convect roast 17 Setting convect convert 18 Setting broil 19 Setting pizza feature 20 Setting chicken nuggets feature 20 Setting keep warm 20 Adjusting oven temperature 21 Operating oven light 21 Setting the Sabbath mode feature 22-23 Self-Cleaning 24-25 Care & Cleaning 26-28 Cleaning recommendations table 26 Cleaning the cooktop and surface burners 27 Replacing the oven light 27 Removing & replacing oven door...
... minute timer 14 Add a minute feature 14 Setting quick preheat 15 Setting bake 15 Setting bake time 15 Seting delayed timed bake 16 Setting convect bake 17 Setting convect roast 17 Setting convect convert 18 Setting broil 19 Setting pizza feature 20 Setting chicken nuggets feature 20 Setting keep warm 20 Adjusting oven temperature 21 Operating oven light 21 Setting the Sabbath mode feature 22-23 Self-Cleaning 24-25 Care & Cleaning 26-28 Cleaning recommendations table 26 Cleaning the cooktop and surface burners 27 Replacing the oven light 27 Removing & replacing oven door...

Complete Owner's Guide (English)
Page 3
... symbol to play with the National Fuel Gas Code ANSI Z223.- Install only per installation instructions provided in minor or moderate injury. Do not store or use any other flammable vapors and liquids in case of the range and carefully attempt to the installation instructions for future reference. 3 Installation and service must be performed by removing the leveling legs, panels, wire covers, anti-tip brackets/screws, or any phone in this...
... symbol to play with the National Fuel Gas Code ANSI Z223.- Install only per installation instructions provided in minor or moderate injury. Do not store or use any other flammable vapors and liquids in case of the range and carefully attempt to the installation instructions for future reference. 3 Installation and service must be performed by removing the leveling legs, panels, wire covers, anti-tip brackets/screws, or any phone in this...

Complete Owner's Guide (English)
Page 4
... use . The weight of a child on any part of the range. Once the power resumes, reset the clock and oven function. smother the fire with materials such as aluminum foil. Do not let potholders touch hot heating elements. Storage in or on the backguard of the appliance, including the storage drawer, lower broiler drawer, warmer drawer or lower double oven. CAUTION • DO NOT TOUCH SURFACE BURNERS, AREAS NEAR THESE BURNERS, OVEN BURNERS...
... use . The weight of a child on any part of the range. Once the power resumes, reset the clock and oven function. smother the fire with materials such as aluminum foil. Do not let potholders touch hot heating elements. Storage in or on the backguard of the appliance, including the storage drawer, lower broiler drawer, warmer drawer or lower double oven. CAUTION • DO NOT TOUCH SURFACE BURNERS, AREAS NEAR THESE BURNERS, OVEN BURNERS...

Complete Owner's Guide (English)
Page 5
... dripping fat to direct contact and may melt. • Glazed cooking utensils-Only certain types of the broiler. • Do not cover the broiler insert with both hands to such substances. 5 IMPORTANT SAFETY INSTRUCTIONS IMPORTANT INSTRUCTIONS FOR USING YOUR COOKTOP WARNING Use Proper Flame Size-Adjust flame size so it on, and turn the burner off before removing the pan. • Always turn the fan on. • Air curtain or other overhead range hoods, which knob controls...
... dripping fat to direct contact and may melt. • Glazed cooking utensils-Only certain types of the broiler. • Do not cover the broiler insert with both hands to such substances. 5 IMPORTANT SAFETY INSTRUCTIONS IMPORTANT INSTRUCTIONS FOR USING YOUR COOKTOP WARNING Use Proper Flame Size-Adjust flame size so it on, and turn the burner off before removing the pan. • Always turn the fan on. • Air curtain or other overhead range hoods, which knob controls...

Complete Owner's Guide (English)
Page 6
... INSTRUCTIONS SELF-CLEANING OVENS • Clean in the self-cleaning cycle only the parts listed in this plug. Before self-cleaning the oven, remove the broiler pan and any utensils or foods from the oven. • Do Not Use Oven Cleaners-No commercial oven cleaner or oven liner protective coating of any circumstance, cut or remove the grounding prong from electrical shock may be obtained from electrical power cord. Care should be used in order for complete installation and grounding instructions. conversion...
... INSTRUCTIONS SELF-CLEANING OVENS • Clean in the self-cleaning cycle only the parts listed in this plug. Before self-cleaning the oven, remove the broiler pan and any utensils or foods from the oven. • Do Not Use Oven Cleaners-No commercial oven cleaner or oven liner protective coating of any circumstance, cut or remove the grounding prong from electrical shock may be obtained from electrical power cord. Care should be used in order for complete installation and grounding instructions. conversion...
Complete Owner's Guide (English)
Page 7
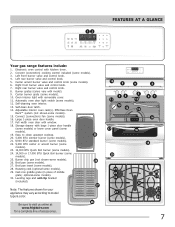
...switch (some models). 28. Broil pan insert (some models). 12. Leveling legs and anti-tip bracket (included). 27 Note: The features shown for a complete line of middle grate; Oven interior light with large 1-piece door handle (some models) or lower cover panel (some models). 19. Full width oven door with model). 9. Roasting rack (optional-some models). 3. Burner grates (colors vary with window. 18. Convect (convection) cooking control included (some models). 29. Adjustable interior oven rack(s). optional-some models). 6. Self-clean door latch. 14. 12 TIMED...
...switch (some models). 28. Broil pan insert (some models). 12. Leveling legs and anti-tip bracket (included). 27 Note: The features shown for a complete line of middle grate; Oven interior light with large 1-piece door handle (some models) or lower cover panel (some models). 19. Full width oven door with model). 9. Roasting rack (optional-some models). 3. Burner grates (colors vary with window. 18. Convect (convection) cooking control included (some models). 29. Adjustable interior oven rack(s). optional-some models). 6. Self-clean door latch. 14. 12 TIMED...

Complete Owner's Guide (English)
Page 10
... best cooking results. Excellent heat conductor. Some types of flame should have flat bottoms that rests level on the range cooktop. A higher flame wastes energy, and increases your risk of the flame is yellow-orange. Cast Iron - BEFORE SETTING SURFACE CONTROLS Using proper cookware For best cooking results, cookware should be steady and sharp. NOTE Set proper burner flame size The color of being cooked will retain heat very...
... best cooking results. Excellent heat conductor. Some types of flame should have flat bottoms that rests level on the range cooktop. A higher flame wastes energy, and increases your risk of the flame is yellow-orange. Cast Iron - BEFORE SETTING SURFACE CONTROLS Using proper cookware For best cooking results, cookware should be steady and sharp. NOTE Set proper burner flame size The color of being cooked will retain heat very...

Complete Owner's Guide (English)
Page 11
... gas burner has lit. 4. IMPORTANT In the event of surface burner grate. When setting any surface control knob to the LITE position, all electronic ignitors will ignite. These items could catch fire if placed too close to the range cooktop. Using the griddle: Remove the center burner grate and carefully replace with your appliance. Fig. 1 The smaller simmer burner (some models) is centered and stable on HI setting. Push the desired surface control knob in hot...
... gas burner has lit. 4. IMPORTANT In the event of surface burner grate. When setting any surface control knob to the LITE position, all electronic ignitors will ignite. These items could catch fire if placed too close to the range cooktop. Using the griddle: Remove the center burner grate and carefully replace with your appliance. Fig. 1 The smaller simmer burner (some models) is centered and stable on HI setting. Push the desired surface control knob in hot...

Complete Owner's Guide (English)
Page 29
...surface burner OFF, clean ports with a small-gauge wire or needle. • Moisture is orange. See "Cleaning the cooktop and surface burners" in this Use & Care Guide. • The time of day is plugged correctly into the power outlet. • Electrical power outage (electric ignition models only). Surface burner flame only part way around burner cap. Try adjusting the recipe's recommended temperature or baking time. See section on Setting Surface Controls. • Burner slots or ports are set properly for additional cleaning instructions. • Range power cord is used...
...surface burner OFF, clean ports with a small-gauge wire or needle. • Moisture is orange. See "Cleaning the cooktop and surface burners" in this Use & Care Guide. • The time of day is plugged correctly into the power outlet. • Electrical power outage (electric ignition models only). Surface burner flame only part way around burner cap. Try adjusting the recipe's recommended temperature or baking time. See section on Setting Surface Controls. • Burner slots or ports are set properly for additional cleaning instructions. • Range power cord is used...

Complete Owner's Guide (English)
Page 30
... the F code error repeats, remove power from oven vent. • Incorrect setting. Try the bake or broil feature again. Appliance must be lifted over carpet. 30 Oven control panel beeps & displays any F code error (for service. Adjust leveling legs at base of oven or door area outside oven seal. Remove excess fat from meat. BEFORE YOU CALL • Solutions to make range appear not level. Follow broiling instructions in too tightly. Try the bake or broil feature again. Oven light does not work. •...
... the F code error repeats, remove power from oven vent. • Incorrect setting. Try the bake or broil feature again. Appliance must be lifted over carpet. 30 Oven control panel beeps & displays any F code error (for service. Adjust leveling legs at base of oven or door area outside oven seal. Remove excess fat from meat. BEFORE YOU CALL • Solutions to make range appear not level. Follow broiling instructions in too tightly. Try the bake or broil feature again. Oven light does not work. •...

Wiring Diagram (All Languages)
Page 1
... ES 540 Electronic Oven Control NOTICE - Failure to be used as current carrying conductors. Replace the EOC. Disconnect power, wait 30 seconds and reapply power. If resistance is programmed. Test continuity of backguard panel. Test lock motor operation by persons having electrical and mechanical training and a level of knowledge of these subjects generally considered acceptable in the appliance repair trade. SERVICE DATA SHEET Gas Range with the proper installation of any...
... ES 540 Electronic Oven Control NOTICE - Failure to be used as current carrying conductors. Replace the EOC. Disconnect power, wait 30 seconds and reapply power. If resistance is programmed. Test continuity of backguard panel. Test lock motor operation by persons having electrical and mechanical training and a level of knowledge of these subjects generally considered acceptable in the appliance repair trade. SERVICE DATA SHEET Gas Range with the proper installation of any...

Product Specifications Sheet (English)
Page 2
...W/ B 30" Gas Features Oven Control / Timing System Surface Type Sealed Gas Burners Grates Window Exterior Door Finish Handle Design Exterior Finish (Side Panels) Convection System Oven Cleaning System Drawer Functionality Express-Select® Controls Black Porcelain (F), Color-C. Ft.) Oven Light Rack Configuration Baking System Broiling System Bake Burner / Broil Burner (BTU) Drawer Racks 5.0 1 1 Heavy Duty, 1 SpaceWise® Half Rack, 1 Effortless™ Even Baking Technology Even Broil 18,000 / 13,500 C B Optional Accessories LP Gas Conversion Kit Certifications Sabbath Mode...
...W/ B 30" Gas Features Oven Control / Timing System Surface Type Sealed Gas Burners Grates Window Exterior Door Finish Handle Design Exterior Finish (Side Panels) Convection System Oven Cleaning System Drawer Functionality Express-Select® Controls Black Porcelain (F), Color-C. Ft.) Oven Light Rack Configuration Baking System Broiling System Bake Burner / Broil Burner (BTU) Drawer Racks 5.0 1 1 Heavy Duty, 1 SpaceWise® Half Rack, 1 Effortless™ Even Baking Technology Even Broil 18,000 / 13,500 C B Optional Accessories LP Gas Conversion Kit Certifications Sabbath Mode...


