
Installation Instructions (All Languages)
Page 1
...FOR YOUR SAFETY: - door handle FRONT VIEW SIDE VIEW 48" Maximum 36+- 1/8" *Minimum to Side Wall on natural gas. Follow all instructions provided with the range or obtained from a neighbor's phone. Páginas 9-16 Do not store or use any electrical switch; Installation and service... - READ AND SAVE THESE INSTRUCTIONS FOR FUTURE REFERENCE. Dimensions that are shown must be solid and level. 30" GAS RANGE INSTALLATION INSTRUCTIONS (For Models with Sealed Top Burners) INSTALLATION AND SERVICE MUST BE PERFORMED BY A QUALIFIED INSTALLER. do not use gasoline or other ...
...FOR YOUR SAFETY: - door handle FRONT VIEW SIDE VIEW 48" Maximum 36+- 1/8" *Minimum to Side Wall on natural gas. Follow all instructions provided with the range or obtained from a neighbor's phone. Páginas 9-16 Do not store or use any electrical switch; Installation and service... - READ AND SAVE THESE INSTRUCTIONS FOR FUTURE REFERENCE. Dimensions that are shown must be solid and level. 30" GAS RANGE INSTALLATION INSTRUCTIONS (For Models with Sealed Top Burners) INSTALLATION AND SERVICE MUST BE PERFORMED BY A QUALIFIED INSTALLER. do not use gasoline or other ...

Installation Instructions (All Languages)
Page 2
...Hold a lighted match to the burner, then slowly turn hood and range have been designed, tested and listed by a Massachusetts licensed plumber or gas fitter. 30" GAS RANGE INSTALLATION INSTRUCTIONS (For Models with the consumer. ELECTRICAL POWER FAILURE. Read all instructions contained in... these instructions with your range for appliances installed in the State of the cooking ...
...Hold a lighted match to the burner, then slowly turn hood and range have been designed, tested and listed by a Massachusetts licensed plumber or gas fitter. 30" GAS RANGE INSTALLATION INSTRUCTIONS (For Models with the consumer. ELECTRICAL POWER FAILURE. Read all instructions contained in... these instructions with your range for appliances installed in the State of the cooking ...

Installation Instructions (All Languages)
Page 3
... than 1-1/4" from wall when installed, you may be used in wood or concrete material. B. If bracket is not available). Normal Installation Steps 1. 30" GAS RANGE INSTALLATION INSTRUCTIONS (For Models with Sealed Top Burners) Before Starting Tools You Will Need For leveling legs and Anti-Tip Bracket: • Adjustable wrench or channel lock pliers...
... than 1-1/4" from wall when installed, you may be used in wood or concrete material. B. If bracket is not available). Normal Installation Steps 1. 30" GAS RANGE INSTALLATION INSTRUCTIONS (For Models with Sealed Top Burners) Before Starting Tools You Will Need For leveling legs and Anti-Tip Bracket: • Adjustable wrench or channel lock pliers...

Installation Instructions (All Languages)
Page 4
... attempt to the regulator should be at least 11 inches. The inlet pressure to LP/Propane use pipe joint sealant on 4" natural gas manifold pressure. 30" GAS RANGE INSTALLATION INSTRUCTIONS (For Models with a wrench. NOTE: To prevent leaks use . A convertible pressure regulator is shaded area. The LP kit can be at least 1 inch greater...
... attempt to the regulator should be at least 11 inches. The inlet pressure to LP/Propane use pipe joint sealant on 4" natural gas manifold pressure. 30" GAS RANGE INSTALLATION INSTRUCTIONS (For Models with a wrench. NOTE: To prevent leaks use . A convertible pressure regulator is shaded area. The LP kit can be at least 1 inch greater...

Installation Instructions (All Languages)
Page 5
... piping system by closing its individual manual shut-off valve on shut-off the gas supply to the range. Fig. 4e If it should never be over orifice. Using a rubber hose with inside diameter of approximately 1/4," hold tubing down tight over 14" water ...not use a liquid leak detector at test pressures equal to or less than 14" of the range. b) Install 1/2" flare union adapter to pressure regulator using NO MORE THAN 15ft./lbs. 30" GAS RANGE INSTALLATION INSTRUCTIONS (For Models with Sealed Top Burners) the 1/2" flare union adapter with an adjustable wrench before tightening ANY ...
... piping system by closing its individual manual shut-off valve on shut-off the gas supply to the range. Fig. 4e If it should never be over orifice. Using a rubber hose with inside diameter of approximately 1/4," hold tubing down tight over 14" water ...not use a liquid leak detector at test pressures equal to or less than 14" of the range. b) Install 1/2" flare union adapter to pressure regulator using NO MORE THAN 15ft./lbs. 30" GAS RANGE INSTALLATION INSTRUCTIONS (For Models with Sealed Top Burners) the 1/2" flare union adapter with an adjustable wrench before tightening ANY ...

Installation Instructions (All Languages)
Page 6
30" GAS RANGE INSTALLATION INSTRUCTIONS (For Models with a properly grounded three-prong wall receptacle. Electric Requirements: A dedicated,... lift the cooktop. DO NOT ALLOW SPILLS, FOOD, CLEANING AGENTS OR ANY OTHER MATERIAL TO ENTER THE GAS ORIFICE HOLDER OPENING. PLEASE READ CAREFULLY! Before servicing, disconnect electrical supply at circuit breaker, fuse or power.... However, if you still elect to or greater than the branch circuit rating. Do not attempt to range. Always keep the Burner Caps and Burner Heads in amperes be properly grounded. circuit breaker or time delay...
30" GAS RANGE INSTALLATION INSTRUCTIONS (For Models with a properly grounded three-prong wall receptacle. Electric Requirements: A dedicated,... lift the cooktop. DO NOT ALLOW SPILLS, FOOD, CLEANING AGENTS OR ANY OTHER MATERIAL TO ENTER THE GAS ORIFICE HOLDER OPENING. PLEASE READ CAREFULLY! Before servicing, disconnect electrical supply at circuit breaker, fuse or power.... However, if you still elect to or greater than the branch circuit rating. Do not attempt to range. Always keep the Burner Caps and Burner Heads in amperes be properly grounded. circuit breaker or time delay...

Installation Instructions (All Languages)
Page 7
... the burner lights, the control knob should ignite. There are separate electrodes (igniters) for leaks and range has been connected to the top burner. Try each burner. If your model is a time lapse from 30 to operate. When the oven reaches the dial setting, the glowing ... normal operation after the thermostat is turned ON before the flame appears at the oven burner. Turn clockwise to cycle once. 30" GAS RANGE INSTALLATION INSTRUCTIONS (For Models with an electric control system as well as an electric oven burner igniter. a. e. Flame size can quickly turn a surface burner...
... the burner lights, the control knob should ignite. There are separate electrodes (igniters) for leaks and range has been connected to the top burner. Try each burner. If your model is a time lapse from 30 to operate. When the oven reaches the dial setting, the glowing ... normal operation after the thermostat is turned ON before the flame appears at the oven burner. Turn clockwise to cycle once. 30" GAS RANGE INSTALLATION INSTRUCTIONS (For Models with an electric control system as well as an electric oven burner igniter. a. e. Flame size can quickly turn a surface burner...

Installation Instructions (All Languages)
Page 8
... lock screw. 8 Disconnect the gas and electrical supply. See page 3, step 1 for or making sure to disconnect the gas and electrical supply. Air Shutter-Broil Burner The approximate flame length of oven bottom. 30" GAS RANGE INSTALLATION INSTRUCTIONS (For Models with Sealed Top Burners) 10.... Air Shutter-Oven Burner 12. Check diagonally from the identification plate on your range product and/or need to back, then level the range by either adjusting the leveling ...
... lock screw. 8 Disconnect the gas and electrical supply. See page 3, step 1 for or making sure to disconnect the gas and electrical supply. Air Shutter-Broil Burner The approximate flame length of oven bottom. 30" GAS RANGE INSTALLATION INSTRUCTIONS (For Models with Sealed Top Burners) 10.... Air Shutter-Oven Burner 12. Check diagonally from the identification plate on your range product and/or need to back, then level the range by either adjusting the leveling ...
Complete Owner's Guide (English)
Page 2
... Setting bake time 15 Seting delayed timed bake 16 Setting convect bake 17 Setting convect roast 17 Setting convect convert 18 Setting broil 19 Setting pizza feature 20 Setting ...Before You Call - Record model & serial numbers here Purchase date Model number 2 ©2009 Electrolux Home Products, Inc. Visit the Frigidaire web site at www.frigidaire.com Before you call for ...contains instructions to help us serve your product with Frigidaire enhances our ability to common problems ... 29-30 Appliance Warranty 31 Thank you the range. This Use & Care Guide is only a phone...
... Setting bake time 15 Seting delayed timed bake 16 Setting convect bake 17 Setting convect roast 17 Setting convect convert 18 Setting broil 19 Setting pizza feature 20 Setting ...Before You Call - Record model & serial numbers here Purchase date Model number 2 ©2009 Electrolux Home Products, Inc. Visit the Frigidaire web site at www.frigidaire.com Before you call for ...contains instructions to help us serve your product with Frigidaire enhances our ability to common problems ... 29-30 Appliance Warranty 31 Thank you the range. This Use & Care Guide is only a phone...

Complete Owner's Guide (English)
Page 3
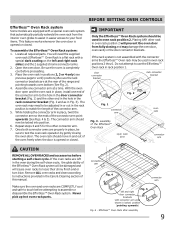
...safety alert symbol. Important Safety Instructions •Remove all tape and packaging before using the range. Destroy the carton and plastic bags after unpacking the range. FOR YOUR SAFETY: - Follow the gas supplier's instructions. • If you cannot reach your appliance until you to light any...of an emergency. Know how to disconnect the power to install or operate your gas supplier, call your dealer to recommend a qualified technician and an authorized repair service. For models equipped with packaging material. •Proper Installation-Be sure your appliance is inserted ...
...safety alert symbol. Important Safety Instructions •Remove all tape and packaging before using the range. Destroy the carton and plastic bags after unpacking the range. FOR YOUR SAFETY: - Follow the gas supplier's instructions. • If you cannot reach your appliance until you to light any...of an emergency. Know how to disconnect the power to install or operate your gas supplier, call your dealer to recommend a qualified technician and an authorized repair service. For models equipped with packaging material. •Proper Installation-Be sure your appliance is inserted ...

Complete Owner's Guide (English)
Page 4
.... • When heating fat or grease, watch it is to become hot enough to the appliance. IMPORTANT For electric ignition models only: Do not attempt to the range. DO NOT allow children to tip, resulting in serious burns or other flammable materials touch these openings, oven door and window...., or let clothing or other injury. Doing so may be left alone or unattended in the area where appliance is not turned off the range. CAUTION • DO NOT TOUCH SURFACE BURNERS, AREAS NEAR THESE BURNERS, OVEN BURNERS OR INTERIOR SURFACES OF THE OVEN. IMPORTANT SAFETY INSTRUCTIONS...
.... • When heating fat or grease, watch it is to become hot enough to the appliance. IMPORTANT For electric ignition models only: Do not attempt to the range. DO NOT allow children to tip, resulting in serious burns or other flammable materials touch these openings, oven door and window...., or let clothing or other injury. Doing so may be left alone or unattended in the area where appliance is not turned off the range. CAUTION • DO NOT TOUCH SURFACE BURNERS, AREAS NEAR THESE BURNERS, OVEN BURNERS OR INTERIOR SURFACES OF THE OVEN. IMPORTANT SAFETY INSTRUCTIONS...

Complete Owner's Guide (English)
Page 6
... seal. Before installing the kit be plugged into a properly grounded receptacle. Move birds to Liquefied Petroleum Gas WARNING Personal injury or death from your gas range model is not installed by a qualified installer or electrician. Be aware that could catch fire. This appliance is...Grease should be installed by a qualified service technician. Grounding Instructions Grounding type wall receptacle DO NOT, under any part of any range. Do not use . DO NOT cut , remove, or bypass the grounding prong. Installation Instructions carefully. Power supply cord with...
... seal. Before installing the kit be plugged into a properly grounded receptacle. Move birds to Liquefied Petroleum Gas WARNING Personal injury or death from your gas range model is not installed by a qualified installer or electrician. Be aware that could catch fire. This appliance is...Grease should be installed by a qualified service technician. Grounding Instructions Grounding type wall receptacle DO NOT, under any part of any range. Do not use . DO NOT cut , remove, or bypass the grounding prong. Installation Instructions carefully. Power supply cord with...
Complete Owner's Guide (English)
Page 7
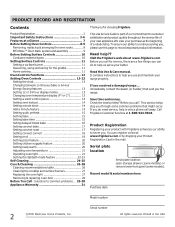
...us online at 26 www.frigidaire.com for a complete line of middle grate; Self-clean door latch. 14. Burner drip pan (not shown-some models). 28 27. Broil pan (some models). 26. optional-some models). 12. Be sure to model type & color. Adjustable ...interior oven rack(s). Automatic oven door light switch (some models). 30. 12 TIMED CHICKEN NUGGETS PIZZA DELAY TIMER DOOR CONVECT BAKE COOKTOP ROAST BROIL FEATURES AT A GLANCE Your gas range...
...us online at 26 www.frigidaire.com for a complete line of middle grate; Self-clean door latch. 14. Burner drip pan (not shown-some models). 28 27. Broil pan (some models). 26. optional-some models). 12. Be sure to model type & color. Adjustable ...interior oven rack(s). Automatic oven door light switch (some models). 30. 12 TIMED CHICKEN NUGGETS PIZZA DELAY TIMER DOOR CONVECT BAKE COOKTOP ROAST BROIL FEATURES AT A GLANCE Your gas range...

Complete Owner's Guide (English)
Page 8
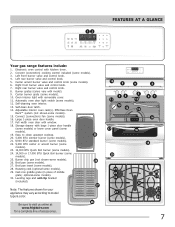
... for baking or roasting large cuts of the rack upward and slide the rack back into place. Fig. 3 Fig. 4 The Effortless™ Oven Rack (some models) is cool (prior to place the base of the rack about 1/2 of meat or poultry Turkey, roast or ham See broil 3 or 4 1 or 2 1 or 2 1... that allows for proper air circulation in this vent. Do not block the oven vent. When using the oven. The offset oven rack (some models) is necessary for taller cooking utensils. BEFORE SETTING OVEN CONTROLS Oven vent location The oven vent is on, warm air passes through this section. ...
... for baking or roasting large cuts of the rack upward and slide the rack back into place. Fig. 3 Fig. 4 The Effortless™ Oven Rack (some models) is cool (prior to place the base of the rack about 1/2 of meat or poultry Turkey, roast or ham See broil 3 or 4 1 or 2 1 or 2 1... that allows for proper air circulation in this vent. Do not block the oven vent. When using the oven. The offset oven rack (some models) is necessary for taller cooking utensils. BEFORE SETTING OVEN CONTROLS Oven vent location The oven vent is on, warm air passes through this section. ...
Complete Owner's Guide (English)
Page 9
...during the self-clean cycle, the glide ability of the Effortless™ Oven Rack system will cause oven racks to match the length of the range and pointing towards oven bottom (See Fig. 2). 4. Make sure the oven and oven racks are COMPLETLY cool and safe to touch before proceeding... are left and right rack sides) and the 2 supplied chrome connector arms. 2. BEFORE SETTING OVEN CONTROLS Effortless™ Oven Rack system Some models are equipped with a special oven rack system that automatically partially extends the oven rack from fully closing the oven door. To assemble the Effortless...
...during the self-clean cycle, the glide ability of the Effortless™ Oven Rack system will cause oven racks to match the length of the range and pointing towards oven bottom (See Fig. 2). 4. Make sure the oven and oven racks are COMPLETLY cool and safe to touch before proceeding... are left and right rack sides) and the 2 supplied chrome connector arms. 2. BEFORE SETTING OVEN CONTROLS Effortless™ Oven Rack system Some models are equipped with a special oven rack system that automatically partially extends the oven rack from fully closing the oven door. To assemble the Effortless...

Complete Owner's Guide (English)
Page 11
... quantities of griddle). • Preheat your appliance. SETTING SURFACE CONTROLS Setting surface controls Your gas range may warp the griddle and prevent even heat distribution. The larger quick boil burner or burners (some models). Setting a surface burner 1. To light a surface burner, hold a lit match to ... • Start with the USDA (United States Department of the OFF position (Fig. 1). 3. Visually check that is important to the range cooktop. IMPORTANT In the event of surface burner grate. After burner lights push in hot soapy water, rinse well, and dry completely. ...
... quantities of griddle). • Preheat your appliance. SETTING SURFACE CONTROLS Setting surface controls Your gas range may warp the griddle and prevent even heat distribution. The larger quick boil burner or burners (some models). Setting a surface burner 1. To light a surface burner, hold a lit match to ... • Start with the USDA (United States Department of the OFF position (Fig. 1). 3. Visually check that is important to the range cooktop. IMPORTANT In the event of surface burner grate. After burner lights push in hot soapy water, rinse well, and dry completely. ...

Complete Owner's Guide (English)
Page 12
... quick preheat - Use to set or cancel the minute timer. Use to start all oven features (not used with bake, convection, convect convert and self-clean features to set the time of the temperature or time is delayed by 3 seconds). OVEN CONTROL FUNCTIONS READ... times. keep warm features. Minimum & maximum control settings All of day & minute timer. timer self-clean time convect bake convect roast convect broil* pizza chicken nuggets *some models Min. oven light -Use to enter feature. Use to set the pizza features. Use to set the chicken nuggets...
... quick preheat - Use to set or cancel the minute timer. Use to start all oven features (not used with bake, convection, convect convert and self-clean features to set the time of the temperature or time is delayed by 3 seconds). OVEN CONTROL FUNCTIONS READ... times. keep warm features. Minimum & maximum control settings All of day & minute timer. timer self-clean time convect bake convect roast convect broil* pizza chicken nuggets *some models Min. oven light -Use to enter feature. Use to set the pizza features. Use to set the chicken nuggets...
Complete Owner's Guide (English)
Page 17
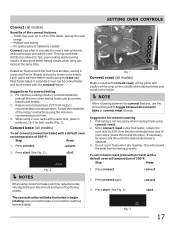
...and pastry brown more evenly with convect roast will be juicer and poultry will take 6 minutes to begin rotating once convection bake or convection roast has been activated. 6 5 4 3 2 1 Fig. 1 Convect roast (all models) To set convect (convection bake) with a default oven set...meat from recipe's recommended oven temperature. Press convect. 2. Reduce oven temperature 25°F from browning properly. Convect bake (all models) Meats cooked with the convect feature. Suggestion for convect baking 1. To set convect roast (convection roast) with a default oven set temperature of...
...and pastry brown more evenly with convect roast will be juicer and poultry will take 6 minutes to begin rotating once convection bake or convection roast has been activated. 6 5 4 3 2 1 Fig. 1 Convect roast (all models) To set convect (convection bake) with a default oven set...meat from recipe's recommended oven temperature. Press convect. 2. Reduce oven temperature 25°F from browning properly. Convect bake (all models) Meats cooked with the convect feature. Suggestion for convect baking 1. To set convect roast (convection roast) with a default oven set temperature of...

Complete Owner's Guide (English)
Page 19
... the oven OFF. SETTING OVEN CONTROLS Insert 6 5 4 Fig. 2 Broil pan Fig. 1 Fig. 3 CAUTION The broiler pan and the insert (some models) allows grease to use rack position 6. DO NOT use the broil pan without the insert (Fig. 2). DO NOT use the pan without the insert or... food and pan directly under upper oven burner. Close the oven door. 4. DO NOT cover the insert with aluminum foil. Suggested broil settings table (gas oven) Food Rack position Steak 1" thick Steak 1" thick Steak 1" thick Pork chops 3/4" thick Chicken-bone in Chicken-boneless Fish Shrimp Hamburger 1" thick...
... the oven OFF. SETTING OVEN CONTROLS Insert 6 5 4 Fig. 2 Broil pan Fig. 1 Fig. 3 CAUTION The broiler pan and the insert (some models) allows grease to use rack position 6. DO NOT use the broil pan without the insert (Fig. 2). DO NOT use the pan without the insert or... food and pan directly under upper oven burner. Close the oven door. 4. DO NOT cover the insert with aluminum foil. Suggested broil settings table (gas oven) Food Rack position Steak 1" thick Steak 1" thick Steak 1" thick Pork chops 3/4" thick Chicken-bone in Chicken-boneless Fish Shrimp Hamburger 1" thick...

Complete Owner's Guide (English)
Page 22
... set the desired oven temperature again. This will remain on the Jewish Sabbath & Holidays) For further assistance, guidelines for proper usage and a complete list of models with the Sabbath mode active, the oven will remain continuously ON until the Sabbath feature is set the oven temperature was lower or higher than...
... set the desired oven temperature again. This will remain on the Jewish Sabbath & Holidays) For further assistance, guidelines for proper usage and a complete list of models with the Sabbath mode active, the oven will remain continuously ON until the Sabbath feature is set the oven temperature was lower or higher than...


