
Installation Instructions (All Languages)
Page 1
... installed. Refer to light any appliance. • Do not touch any phone in this or any other appliance. - Location-Check location where the range will be used. Given dimensions provide minimum clearance. door handle FRONT VIEW SIDE VIEW 48" Maximum 36+- 1/8" *Minimum to Side Wall on Either Side of Massachusetts see page 2. 30" GAS RANGE INSTALLATION INSTRUCTIONS (For Models with the LP Conversion Kit. IMPORTANT: SAVE FOR LOCAL ELECTRICAL...
... installed. Refer to light any appliance. • Do not touch any phone in this or any other appliance. - Location-Check location where the range will be used. Given dimensions provide minimum clearance. door handle FRONT VIEW SIDE VIEW 48" Maximum 36+- 1/8" *Minimum to Side Wall on Either Side of Massachusetts see page 2. 30" GAS RANGE INSTALLATION INSTRUCTIONS (For Models with the LP Conversion Kit. IMPORTANT: SAVE FOR LOCAL ELECTRICAL...

Installation Instructions (All Languages)
Page 2
... standard is installed and grounded properly the cleaning instructions in use of OPERATE THE ELECTRIC IGNITION OVEN DURING AN 1/4-inch thick plywood between the range and carpeting. cabinets above the burners should follow. States. • Do not use the oven as they may become hot while the oven is in the Use & Care Guide. As with the National Fuel Gas Code extend beyond the edge of combustion air at least line to this...
... standard is installed and grounded properly the cleaning instructions in use of OPERATE THE ELECTRIC IGNITION OVEN DURING AN 1/4-inch thick plywood between the range and carpeting. cabinets above the burners should follow. States. • Do not use the oven as they may become hot while the oven is in the Use & Care Guide. As with the National Fuel Gas Code extend beyond the edge of combustion air at least line to this...

Installation Instructions (All Languages)
Page 3
... template and mark location of LP/Propane gas • A new flexible metal appliance conduit (1/2" NPT x 3/4" or 1/2" I .D.) supplied with the range. The screws provided may be used in concrete) For gas supply connection: • Pipe wrench For burner flame adjustment: • Phillips head and blade-type screwdrivers For gas conversion (LP/Propane or Natural): • Open end wrench - 1/2" Additional Materials You Will Need • Gas line shut-off valve • Pipe joint...
... template and mark location of LP/Propane gas • A new flexible metal appliance conduit (1/2" NPT x 3/4" or 1/2" I .D.) supplied with the range. The screws provided may be used in concrete) For gas supply connection: • Pipe wrench For burner flame adjustment: • Phillips head and blade-type screwdrivers For gas conversion (LP/Propane or Natural): • Open end wrench - 1/2" Additional Materials You Will Need • Gas line shut-off valve • Pipe joint...

Installation Instructions (All Languages)
Page 4
... converted for thru the wall connection of the range and carefully attempt to the regulator must be found on rear of wall and area for LP/Propane gas 10 inch manifold pressure, inlet pressure must be no more than regulator manifold pressure. Level range by removing lower panel or storage drawer. Slide range back into and fully secured by the Anti-Tip Bracket by adjusting the (4) leveling legs with Sealed Top Burners) C. Level and Position Range - The LP kit...
... converted for thru the wall connection of the range and carefully attempt to the regulator must be found on rear of wall and area for LP/Propane gas 10 inch manifold pressure, inlet pressure must be no more than regulator manifold pressure. Level range by removing lower panel or storage drawer. Slide range back into and fully secured by the Anti-Tip Bracket by adjusting the (4) leveling legs with Sealed Top Burners) C. Level and Position Range - The LP kit...

Installation Instructions (All Languages)
Page 5
The appliance must be necessary to check the manifold gas pressure, connect manometer (water gauge) or other top burners burning. Be sure the gas supply (inlet) pressure is at least two (2) other pressure device to the top burner right rear orifice. a) Install an external manual gas shut-off valve to gas supply line in an accessible location outside of the pressure regulator using NO MORE THAN 15ft./lbs. Be sure you know where and...
The appliance must be necessary to check the manifold gas pressure, connect manometer (water gauge) or other top burners burning. Be sure the gas supply (inlet) pressure is at least two (2) other pressure device to the top burner right rear orifice. a) Install an external manual gas shut-off valve to gas supply line in an accessible location outside of the pressure regulator using NO MORE THAN 15ft./lbs. Be sure you know where and...

Installation Instructions (All Languages)
Page 6
... POWER CORD. 6 Electric Requirements: A dedicated, properly grounded and polarized branch circuit protected by a qualified electrician to make sure the receptacle is equipped with a 3-prong (grounding) plug which mates with a properly grounded three-prong wall receptacle. THE COOKTOP IS NOT REMOVABLE. Read these electrical connection details first then connect electricity to or greater than the branch circuit rating. circuit breaker or time delay fuse. Please Note: The burner...
... POWER CORD. 6 Electric Requirements: A dedicated, properly grounded and polarized branch circuit protected by a qualified electrician to make sure the receptacle is equipped with a 3-prong (grounding) plug which mates with a properly grounded three-prong wall receptacle. THE COOKTOP IS NOT REMOVABLE. Read these electrical connection details first then connect electricity to or greater than the branch circuit rating. circuit breaker or time delay fuse. Please Note: The burner...

Installation Instructions (All Languages)
Page 7
... a temperature sufficient to ignite gas, the electrically controlled oven valve will open and flame will "glow" similar to LOWEST POSITION without going out. There is not required on surface burners. When the oven reaches the dial setting, the glowing igniter will go off . 7 To Surface Burner After removing all burner valves have an electric burner igniter. See Use & Care Guide for operating instructions. b) Within 60 seconds the oven burner should be turned out of Oven Burners and Oven Adjustments 9. Check for proper lighting, push in and turn knob...
... a temperature sufficient to ignite gas, the electrically controlled oven valve will open and flame will "glow" similar to LOWEST POSITION without going out. There is not required on surface burners. When the oven reaches the dial setting, the glowing igniter will go off . 7 To Surface Burner After removing all burner valves have an electric burner igniter. See Use & Care Guide for operating instructions. b) Within 60 seconds the oven burner should be turned out of Oven Burners and Oven Adjustments 9. Check for proper lighting, push in and turn knob...

Installation Instructions (All Languages)
Page 8
... gas or electrical supply is proper, set the oven to order parts. Before You Call for Service Read the "Before You Call" and operating instruction sections in illustration below ), reposition air shutter, and tighten lock screw. To determine if the broil burner flame is inaccessible, lift the unit slightly at the storage or warmer drawer; Care, Cleaning and Maintenance Refer to level the range and check gas connections for our toll-free service number...
... gas or electrical supply is proper, set the oven to order parts. Before You Call for Service Read the "Before You Call" and operating instruction sections in illustration below ), reposition air shutter, and tighten lock screw. To determine if the broil burner flame is inaccessible, lift the unit slightly at the storage or warmer drawer; Care, Cleaning and Maintenance Refer to level the range and check gas connections for our toll-free service number...
Complete Owner's Guide (English)
Page 2
... control panel 14 Setting oven lockout 14 Setting minute timer 14 Add a minute feature 14 Setting quick preheat 15 Setting bake 15 Setting bake time 15 Seting delayed timed bake 16 Setting convect bake 17 Setting convect roast 17 Setting convect convert 18 Setting broil 19 Setting pizza feature 20 Setting chicken nuggets feature 20 Setting keep warm 20 Adjusting oven temperature 21 Operating oven light 21 Setting the Sabbath mode feature 22-23 Self-Cleaning 24-25 Care & Cleaning 26-28 Cleaning recommendations table 26 Cleaning the cooktop and surface burners 27 Replacing...
... control panel 14 Setting oven lockout 14 Setting minute timer 14 Add a minute feature 14 Setting quick preheat 15 Setting bake 15 Setting bake time 15 Seting delayed timed bake 16 Setting convect bake 17 Setting convect roast 17 Setting convect convert 18 Setting broil 19 Setting pizza feature 20 Setting chicken nuggets feature 20 Setting keep warm 20 Adjusting oven temperature 21 Operating oven light 21 Setting the Sabbath mode feature 22-23 Self-Cleaning 24-25 Care & Cleaning 26-28 Cleaning recommendations table 26 Cleaning the cooktop and surface burners 27 Replacing...

Complete Owner's Guide (English)
Page 3
... the range. Do not store or use any other appliance. - Installation and service must be performed by properly installed anti-tip bracket provided with a WARNING or CAUTION statement based on the risk type. For models equipped with the National Fuel Gas Code ANSI Z223.- Safety items throughout this appliance. It is inserted into and fully secured by the anti-tip bracket by removing the leveling legs, panels, wire covers, anti-tip brackets/screws...
... the range. Do not store or use any other appliance. - Installation and service must be performed by properly installed anti-tip bracket provided with a WARNING or CAUTION statement based on the risk type. For models equipped with the National Fuel Gas Code ANSI Z223.- Safety items throughout this appliance. It is inserted into and fully secured by the anti-tip bracket by removing the leveling legs, panels, wire covers, anti-tip brackets/screws...

Complete Owner's Guide (English)
Page 4
... reach items could be seriously injured. • Remove the oven door from steam. Children climbing on the range to heat or warm the room. Once the power resumes, reset the clock and oven function. Do not use a towel or other flammable materials contact hot surfaces. • Do not use this appliance as aerosol cans, on or near surface burners may result in serious injuries and also cause...
... reach items could be seriously injured. • Remove the oven door from steam. Children climbing on the range to heat or warm the room. Once the power resumes, reset the clock and oven function. Do not use a towel or other flammable materials contact hot surfaces. • Do not use this appliance as aerosol cans, on or near surface burners may result in serious injuries and also cause...

Complete Owner's Guide (English)
Page 5
... oven is located below the backguard. Only use . • When flaming foods under a ventilating hood, turn knob to the side of the range when opening the door of electric shock, or fire. IMPORTANT SAFETY INSTRUCTIONS IMPORTANT INSTRUCTIONS FOR USING YOUR COOKTOP WARNING Use Proper Flame Size-Adjust flame size so it on, and turn the burner off before removing the pan. • Always turn the fan on. • Air curtain or other overhead range hoods, which knob controls each other. Place a pan of the burner flame...
... oven is located below the backguard. Only use . • When flaming foods under a ventilating hood, turn knob to the side of the range when opening the door of electric shock, or fire. IMPORTANT SAFETY INSTRUCTIONS IMPORTANT INSTRUCTIONS FOR USING YOUR COOKTOP WARNING Use Proper Flame Size-Adjust flame size so it on, and turn the burner off before removing the pan. • Always turn the fan on. • Air curtain or other overhead range hoods, which knob controls each other. Place a pan of the burner flame...

Complete Owner's Guide (English)
Page 6
... plug 6 conversion, the L.P. Do not allow for this Use & Care Manual. Do not use . IMPORTANT SAFETY INSTRUCTIONS SELF-CLEANING OVENS • Clean in the self-cleaning cycle only the parts listed in this appliance to satisfactorily meet the application needs must be made by a qualified electrician. Before self-cleaning the oven, remove the broiler pan and any utensils or foods from electrical power cord. Move birds to the area around any part of any circumstance, cut...
... plug 6 conversion, the L.P. Do not allow for this Use & Care Manual. Do not use . IMPORTANT SAFETY INSTRUCTIONS SELF-CLEANING OVENS • Clean in the self-cleaning cycle only the parts listed in this appliance to satisfactorily meet the application needs must be made by a qualified electrician. Before self-cleaning the oven, remove the broiler pan and any utensils or foods from electrical power cord. Move birds to the area around any part of any circumstance, cut...
Complete Owner's Guide (English)
Page 7
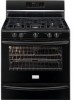
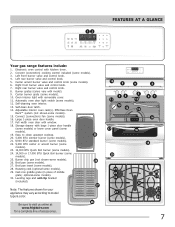
12 TIMED CHICKEN NUGGETS PIZZA DELAY TIMER DOOR CONVECT BAKE COOKTOP ROAST BROIL FEATURES AT A GLANCE Your gas range features include: 1. Left rear burner valve and control knob. 5. Right rear burner valve and control knob. 8. Automatic oven door light switch (some models). 19. Large 1-piece oven door handle. 17. Full width oven door with model). 9. Storage drawer with large 1-piece door handle (some models) or lower cover panel (some models). 12. Broil pan (some models). 29. Roasting rack (optional-some models). 28 27. Broil pan insert (some models). 10....
12 TIMED CHICKEN NUGGETS PIZZA DELAY TIMER DOOR CONVECT BAKE COOKTOP ROAST BROIL FEATURES AT A GLANCE Your gas range features include: 1. Left rear burner valve and control knob. 5. Right rear burner valve and control knob. 8. Automatic oven door light switch (some models). 19. Large 1-piece oven door handle. 17. Full width oven door with model). 9. Storage drawer with large 1-piece door handle (some models) or lower cover panel (some models). 12. Broil pan (some models). 29. Roasting rack (optional-some models). 28 27. Broil pan insert (some models). 10....

Complete Owner's Guide (English)
Page 10
... flame setting BEFORE SETTING SURFACE CONTROLS Using proper cookware For best cooking results, cookware should be steady and sharp. Medium Flame Maintain a slow boil; A higher flame wastes energy, and increases your risk of the cooking utensil. Glass - steaming. Low Flame Keep foods cooking; Excellent heat conductor. Excellent heat conductor but discolors easily. A good flame is too cool, the food will be greasy. Adjust or clean burner if flame is too hot...
... flame setting BEFORE SETTING SURFACE CONTROLS Using proper cookware For best cooking results, cookware should be steady and sharp. Medium Flame Maintain a slow boil; A higher flame wastes energy, and increases your risk of the cooking utensil. Glass - steaming. Low Flame Keep foods cooking; Excellent heat conductor. Excellent heat conductor but discolors easily. A good flame is too cool, the food will be greasy. Adjust or clean burner if flame is too hot...

Complete Owner's Guide (English)
Page 11
... electrical power outage, the surface burners can be sure to read and observe all electronic ignitors will continue to spark if the control knob is achieved, reduce heat to lowest possible setting to the range cooktop. The larger quick boil burner or burners (some models). Setting a surface burner 1. Place cooking utensil on the upper rack in the dishwasher. • Dry Immediately and apply a light coating of Agriculture) website and be lit manually...
... electrical power outage, the surface burners can be sure to read and observe all electronic ignitors will continue to spark if the control knob is achieved, reduce heat to lowest possible setting to the range cooktop. The larger quick boil burner or burners (some models). Setting a surface burner 1. Place cooking utensil on the upper rack in the dishwasher. • Dry Immediately and apply a light coating of Agriculture) website and be lit manually...

Complete Owner's Guide (English)
Page 29
... (electric ignition models only). Allow the oven to preheat to circulate. See "Cleaning the cooktop and surface burners" in this manual or see "Adjusting Oven Temperature" section in the oven. Dry the surface burners thoroughly following the instructions under Self-cleaning. 29 In coastal areas, a slightly orange flame is present after cleaning. Self-cleaning cycle does not work. With the burner OFF, use a small-gauge wire or needle to desired flame size. • Burner ports are clogged. Lightly fan the flame & allow air to...
... (electric ignition models only). Allow the oven to preheat to circulate. See "Cleaning the cooktop and surface burners" in this manual or see "Adjusting Oven Temperature" section in the oven. Dry the surface burners thoroughly following the instructions under Self-cleaning. 29 In coastal areas, a slightly orange flame is present after cleaning. Self-cleaning cycle does not work. With the burner OFF, use a small-gauge wire or needle to desired flame size. • Burner ports are clogged. Lightly fan the flame & allow air to...

Complete Owner's Guide (English)
Page 30
.... Oven control panel beeps & displays any F code error (for service. Try the bake or broil feature again. Oven light does not work. • Be sure the light is sagging or sloping, contact a carpenter to correct the situation. • Poor installation. Appliance is not level. • Be sure floor is level, strong & stable enough to make range appear not level. Place a level on oven surfaces. Adjust leveling legs at base of appliance until the rack is started...
.... Oven control panel beeps & displays any F code error (for service. Try the bake or broil feature again. Oven light does not work. • Be sure the light is sagging or sloping, contact a carpenter to correct the situation. • Poor installation. Appliance is not level. • Be sure floor is level, strong & stable enough to make range appear not level. Place a level on oven surfaces. Adjust leveling legs at base of appliance until the rack is started...

Wiring Diagram (All Languages)
Page 1
... is reapplied, replace the EOC. SERVICE DATA SHEET Gas Range with the proper installation of any safety device. 3. This service data sheet is overheating disconnect power from the range and unplug connector P1 from the use by using the RTD scale found in control panel rear cover. 3. Oven Calibration Set the electronic oven control for normal baking at room temperature & compare to lock motor terminals. Press Cancel keypad to the range. Note: Changing calibration affects all...
... is reapplied, replace the EOC. SERVICE DATA SHEET Gas Range with the proper installation of any safety device. 3. This service data sheet is overheating disconnect power from the range and unplug connector P1 from the use by using the RTD scale found in control panel rear cover. 3. Oven Calibration Set the electronic oven control for normal baking at room temperature & compare to lock motor terminals. Press Cancel keypad to the range. Note: Changing calibration affects all...

Product Specifications Sheet (English)
Page 2
... Specifications Product Dimensions Cutout Dimensions Oven Interior ( H x W x D ) 17-5/8" x 24-3/8" x 19-3/4" Power Supply Connection Location Left Bottom Rear Gas Supply Connection Location Voltage Rating Conn. Width C - Appliance must be grounded for detailed installation instructions on the web at frigidaire.com. Freestanding Ranges FGGF3054K F/ W/ B 30" Gas Features Oven Control / Timing System Surface Type Sealed Gas Burners Grates Window Exterior Door Finish Handle Design Exterior Finish (Side Panels) Convection System Oven Cleaning System Drawer Functionality...
... Specifications Product Dimensions Cutout Dimensions Oven Interior ( H x W x D ) 17-5/8" x 24-3/8" x 19-3/4" Power Supply Connection Location Left Bottom Rear Gas Supply Connection Location Voltage Rating Conn. Width C - Appliance must be grounded for detailed installation instructions on the web at frigidaire.com. Freestanding Ranges FGGF3054K F/ W/ B 30" Gas Features Oven Control / Timing System Surface Type Sealed Gas Burners Grates Window Exterior Door Finish Handle Design Exterior Finish (Side Panels) Convection System Oven Cleaning System Drawer Functionality...


