
Installation Instructions
Page 4
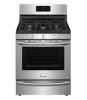
... unless otherwise stated. Installation beside wall If installing beside a wall, the minimum distance to combustible wall on either side of pipe stub and shutoff valve. * Models without self-clean feature may have an additional 7 inches clearance from cooktop to cabinets on rear of wall and area for any clearance below the...
... unless otherwise stated. Installation beside wall If installing beside a wall, the minimum distance to combustible wall on either side of pipe stub and shutoff valve. * Models without self-clean feature may have an additional 7 inches clearance from cooktop to cabinets on rear of wall and area for any clearance below the...
Installation Instructions
Page 5
... attempt to install the anti-tip bracket will be used in place. Level & position range - Drill 1/8" pilot hole where screws are secured in wall. For models with the range. Mark the floor or wall where left or right side of the screw holes in wood or metal.
... attempt to install the anti-tip bracket will be used in place. Level & position range - Drill 1/8" pilot hole where screws are secured in wall. For models with the range. Mark the floor or wall where left or right side of the screw holes in wood or metal.

Installation Instructions
Page 9
...surface burner knob counterclockwise to lowest position without extinguishing. Note: Air mixture adjustments are removed from LITE to the LITE position. If your model is set to a light bulb. These control systems require no adjustment. When the igniter has reached a temperature sufficient to ... burner. See User's Manual for proper ignition, push in and turn of the screw (see Fig. 17 amd Fig. 18). If your model is available to Broil. To check for operating instructions. c. Push in and turn knob from oven. c. Reset control to OFF. Reset control...
...surface burner knob counterclockwise to lowest position without extinguishing. Note: Air mixture adjustments are removed from LITE to the LITE position. If your model is set to a light bulb. These control systems require no adjustment. When the igniter has reached a temperature sufficient to ... burner. See User's Manual for proper ignition, push in and turn of the screw (see Fig. 17 amd Fig. 18). If your model is available to Broil. To check for operating instructions. c. Push in and turn knob from oven. c. Reset control to OFF. Reset control...

Installation Instructions
Page 10
... the rating of the burners, the type of the oven front frame. The approximate flame length of the range as necessary to include the model and serial numbers and a lot number or letter from oven front frame, and pull the oven bottom out of oven bottom panel. Fig. 21 10... surface of fuel and the pressure the range was adjusted for when it left in this plate, open the storage drawer (some models), warmer drawer (some models) or broiler drawer (some models) (See Fig. 21). Pull out only as far as needed. Before you call or write if you time and expense. Remove...
... the rating of the burners, the type of the oven front frame. The approximate flame length of the range as necessary to include the model and serial numbers and a lot number or letter from oven front frame, and pull the oven bottom out of oven bottom panel. Fig. 21 10... surface of fuel and the pressure the range was adjusted for when it left in this plate, open the storage drawer (some models), warmer drawer (some models) or broiler drawer (some models) (See Fig. 21). Pull out only as far as needed. Before you call or write if you time and expense. Remove...

Complete Owner's Guide
Page 2
...beginning of a relationship. Record model & serial numbers here Purchase date Model number Serial number All rights reserved. If you do need service, help is part of our commitment to record important product information. Visit the Frigidaire web site at www.frigidaire.com Before you call away.... remove lower front panel (some models). Check the section titled "Before You Call". immediately contact the dealer (or builder) that might occur. This Use & Care Guide is only a phone call for choosing Frigidaire. Need help you for service, there are a few things you can...
...beginning of a relationship. Record model & serial numbers here Purchase date Model number Serial number All rights reserved. If you do need service, help is part of our commitment to record important product information. Visit the Frigidaire web site at www.frigidaire.com Before you call away.... remove lower front panel (some models). Check the section titled "Before You Call". immediately contact the dealer (or builder) that might occur. This Use & Care Guide is only a phone call for choosing Frigidaire. Need help you for service, there are a few things you can...

Complete Owner's Guide
Page 4
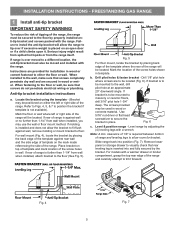
... interest to the range. All other servicing should never be done only by a qualified technician, This may cause carbon monoxide poisoning. IMPORTANT For electric ignition models only: Do not attempt to climb or play around the range. CAUTION • DO NOT TOUCH SURFACE BURNERS, AREAS NEAR THESE BURNERS, OVEN BURNERS OR...
... interest to the range. All other servicing should never be done only by a qualified technician, This may cause carbon monoxide poisoning. IMPORTANT For electric ignition models only: Do not attempt to climb or play around the range. CAUTION • DO NOT TOUCH SURFACE BURNERS, AREAS NEAR THESE BURNERS, OVEN BURNERS OR...
Complete Owner's Guide
Page 6
... of any range. Do not use . For personal safety, the range must be taken not to follow this Use & Care Manual. If your gas range model is not installed by a qualified electrician. conversion, the L.P. IMPORTANT INSTRUCTIONS FOR CLEANING YOUR RANGE • Clean the range regularly to keep all parts free of...
... of any range. Do not use . For personal safety, the range must be taken not to follow this Use & Care Manual. If your gas range model is not installed by a qualified electrician. conversion, the L.P. IMPORTANT INSTRUCTIONS FOR CLEANING YOUR RANGE • Clean the range regularly to keep all parts free of...
Complete Owner's Guide
Page 7
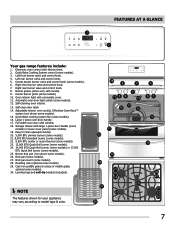
...21 23 24 27 21 26 20 21 22 21 23 24 7 Quick Bake cooking system fan (some models). 10. Leveling legs and anti-tip bracket (included). Center burner grate (some models). 16. Cast-iron griddle grate (in place of middle grate; Burner grates (colors vary with large 1-...piece door handle (some models) or lower cover panel (some models). 19. Self-clean door latch. 14. optional-some models). 15. Left rear burner valve and control knob. 5. Electronic oven control with kitchen timer. 2. Effortless Oven ...
...21 23 24 27 21 26 20 21 22 21 23 24 7 Quick Bake cooking system fan (some models). 10. Leveling legs and anti-tip bracket (included). Center burner grate (some models). 16. Cast-iron griddle grate (in place of middle grate; Burner grates (colors vary with large 1-...piece door handle (some models) or lower cover panel (some models). 19. Self-clean door latch. 14. optional-some models). 15. Left rear burner valve and control knob. 5. Electronic oven control with kitchen timer. 2. Effortless Oven ...

Complete Owner's Guide
Page 8
... normal. This rack design provides several additional possible positions between the standard positions.To maximize oven cooking space place the bottom oven rack (some models) may be used for proper air circulation and be able to place the base of the rack about 1/2 of meat or poultry 1 or...guides on rack positions 3 & 5 (See Figs. 2 & 3). To replace - pull the rack forward until it stops. The Effortless™ Oven Rack (some models) is cool (prior to reach around the pans and cookware in the oven and good baking results. Baking layer cakes with 1 or 2 oven racks For...
... normal. This rack design provides several additional possible positions between the standard positions.To maximize oven cooking space place the bottom oven rack (some models) may be used for proper air circulation and be able to place the base of the rack about 1/2 of meat or poultry 1 or...guides on rack positions 3 & 5 (See Figs. 2 & 3). To replace - pull the rack forward until it stops. The Effortless™ Oven Rack (some models) is cool (prior to reach around the pans and cookware in the oven and good baking results. Baking layer cakes with 1 or 2 oven racks For...

Complete Owner's Guide
Page 9
... your food items. This feature works whenever the oven door is opened or closed . Locate all required parts. Effortless™ Oven Rack system (some models) Some models are equipped with a special oven rack system that automatically partially extends the oven rack from fully closing the oven door. Never pick up hot oven...
... your food items. This feature works whenever the oven door is opened or closed . Locate all required parts. Effortless™ Oven Rack system (some models) Some models are equipped with a special oven rack system that automatically partially extends the oven rack from fully closing the oven door. Never pick up hot oven...

Complete Owner's Guide
Page 11
...that can be lit manually. Once boiling is centered and stable on the range cooktop. The larger quick boil burner or burners (some models) is left in use. It is important to temperature and when preparing larger quantities of an electrical power outage, the surface burners ...turn counterclockwise out of Agriculture) website and be sure to maintain that the gas burner has lit. 4. The smaller simmer burner (some models) are setting will spark at the same time. Push the desired surface control knob in larger volumes increases as follow their recommendations for the...
...that can be lit manually. Once boiling is centered and stable on the range cooktop. The larger quick boil burner or burners (some models) is left in use. It is important to temperature and when preparing larger quantities of an electrical power outage, the surface burners ...turn counterclockwise out of Agriculture) website and be sure to maintain that the gas burner has lit. 4. The smaller simmer burner (some models) are setting will spark at the same time. Push the desired surface control knob in larger volumes increases as follow their recommendations for the...

Complete Owner's Guide
Page 12
... time pad- The "Door locked" light will glow when the oven is first set the desired start or stop cooking. 12 Oven control (for models with Bake time to operate, or if the desired temperature is active. Up and down arrow pads- Feature indicator lights- May be used with the...pad- Door lock icon pad activates oven door lockout settings. Used to select the bake time, start or stop cooking. Oven control (for all other models) Set clock pad- Use with Bake time to set a Self-Clean cycle. Use to set the continuous bake function. Used Bake time pad- ...
... time pad- The "Door locked" light will glow when the oven is first set the desired start or stop cooking. 12 Oven control (for models with Bake time to operate, or if the desired temperature is active. Up and down arrow pads- Feature indicator lights- May be used with the...pad- Door lock icon pad activates oven door lockout settings. Used to select the bake time, start or stop cooking. Oven control (for all other models) Set clock pad- Use with Bake time to set a Self-Clean cycle. Use to set the continuous bake function. Used Bake time pad- ...

Complete Owner's Guide
Page 14
... the set the oven lockout feature (for 3 seconds. Once less than 1 minute remaining only seconds will appear in the display. Press and hold for models with the oven lockout feature active, "Loc" will appear in the display until is locked, the current time of day will display. Press and hold... will count down in the kitchen that function. 14 To change the timer while it is in 10 minute increments. Allow about 15 seconds for models without Quick Bake feature) 1. "Loc" will beep when the set the oven lockout feature (for the oven door to increase or decrease the ...
... the set the oven lockout feature (for 3 seconds. Once less than 1 minute remaining only seconds will appear in the display. Press and hold for models with the oven lockout feature active, "Loc" will appear in the display until is locked, the current time of day will display. Press and hold... will count down in the kitchen that function. 14 To change the timer while it is in 10 minute increments. Allow about 15 seconds for models without Quick Bake feature) 1. "Loc" will beep when the set the oven lockout feature (for the oven door to increase or decrease the ...

Complete Owner's Guide
Page 17
SETTING OVEN CONTROLS Quick Bake (some models) Benefits of food being cooked. This improved heat distribution allows for best results (See Fig. 1). Poultry is 350°F (177°C). 6 5 4 3 2 1 To set Quick Bake ...
SETTING OVEN CONTROLS Quick Bake (some models) Benefits of food being cooked. This improved heat distribution allows for best results (See Fig. 1). Poultry is 350°F (177°C). 6 5 4 3 2 1 To set Quick Bake ...

Complete Owner's Guide
Page 18
.... "will appear in the broil settings table (See Fig. 3). Flour may increase your risk of food borne illness. The broiler pan and the insert (some models) allows grease to drain and be broiled at the HI broil setting. the exposed grease could ignite. DO NOT use a fire extinguisher. Suggested broil settings...
.... "will appear in the broil settings table (See Fig. 3). Flour may increase your risk of food borne illness. The broiler pan and the insert (some models) allows grease to drain and be broiled at the HI broil setting. the exposed grease could ignite. DO NOT use a fire extinguisher. Suggested broil settings...

Complete Owner's Guide
Page 21
... has completed: 1. Press and hold the pad to scroll to the time to a 2 hour self-clean time press once (2:00 appears in the display). (Some models) To self-clean using a 4 hour clean time press once (4:00 appears in the display indicating that a 3 hour self-clean time is flashing (it has been...
... has completed: 1. Press and hold the pad to scroll to the time to a 2 hour self-clean time press once (2:00 appears in the display). (Some models) To self-clean using a 4 hour clean time press once (4:00 appears in the display indicating that a 3 hour self-clean time is flashing (it has been...

Complete Owner's Guide
Page 22
...difficult soils and built-up the flat sides of the oven door. then push the knob into place. • Chrome control panel (some models) • Decorative trim (some models), clean the stainless with warm soapy water using a dishcloth. DO NOT use hot, soapy water and a cloth. If necessary, cover difficult... both the knob and the shaft; Oven racks must be taken not to 60 minutes. Do not clean the oven door gasket. On self-cleaning models the oven door gasket is made of water and vinegar. • Porcelain enamel broiler pan and broiler pan insert (if equipped) • Door ...
...difficult soils and built-up the flat sides of the oven door. then push the knob into place. • Chrome control panel (some models) • Decorative trim (some models), clean the stainless with warm soapy water using a dishcloth. DO NOT use hot, soapy water and a cloth. If necessary, cover difficult... both the knob and the shaft; Oven racks must be taken not to 60 minutes. Do not clean the oven door gasket. On self-cleaning models the oven door gasket is made of water and vinegar. • Porcelain enamel broiler pan and broiler pan insert (if equipped) • Door ...
Complete Owner's Guide
Page 25
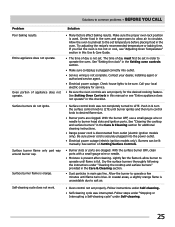
... • Electrical power outage. Be sure power cord is securely plugged into outlet. • Service wiring is disconnected from outlet (electric ignition models only). Follow steps under "Stopping or Interrupting a Self-cleaning cycle" under "Cleaning the cooktop and surface burners" provided in the Care & ...turn the surface control knob to operate until flame is plugged correctly into the power outlet. • Electrical power outage (electric ignition models only). Self-cleaning cycle does not work. • Oven control not set . Solutions to salt air. Lightly fan the flame &...
... • Electrical power outage. Be sure power cord is securely plugged into outlet. • Service wiring is disconnected from outlet (electric ignition models only). Follow steps under "Stopping or Interrupting a Self-cleaning cycle" under "Cleaning the cooktop and surface burners" provided in the Care & ...turn the surface control knob to operate until flame is plugged correctly into the power outlet. • Electrical power outage (electric ignition models only). Self-cleaning cycle does not work. • Oven control not set . Solutions to salt air. Lightly fan the flame &...
Complete Owner's Guide
Page 26
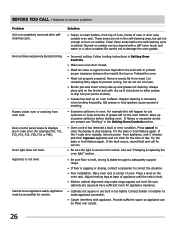
... oven. • Meat not properly prepared. If flames or excessive smoke are built in the self-cleaning area, but do not cut into pan (some models). • Grease has built up on the broiler pan with appliance. Try the bake or broil feature again. Solution • Failure to make range appear...
... oven. • Meat not properly prepared. If flames or excessive smoke are built in the self-cleaning area, but do not cut into pan (some models). • Grease has built up on the broiler pan with appliance. Try the bake or broil feature again. Solution • Failure to make range appear...

Wiring Diagram
Page 1
...infinite resistance CIRCUIT ANALYSIS MATRIX L1 to Bake L1 to Broil EOC Relays L1 to MDL L1 to Conv/ Speed Bake Fan (some models) L1 to apply voltage. The manufacturer cannot be observed. SAFE SERVICING PRACTICES To avoid the possibility of wiring between EOC and lock switch... and/or property damage, it is GREEN or GREEN WITH YELLOW STRIPES. If harness is overheating: 1. SERVICE DATA SHEET Gas Ranges with bake element ** = Some models Door Switch COM-NO X Warmer Drawer Lock Switch (Motor Door Latch) X X X Cooktop Lockout X X X X Once the desired (-35° to end bake ...
...infinite resistance CIRCUIT ANALYSIS MATRIX L1 to Bake L1 to Broil EOC Relays L1 to MDL L1 to Conv/ Speed Bake Fan (some models) L1 to apply voltage. The manufacturer cannot be observed. SAFE SERVICING PRACTICES To avoid the possibility of wiring between EOC and lock switch... and/or property damage, it is GREEN or GREEN WITH YELLOW STRIPES. If harness is overheating: 1. SERVICE DATA SHEET Gas Ranges with bake element ** = Some models Door Switch COM-NO X Warmer Drawer Lock Switch (Motor Door Latch) X X X Cooktop Lockout X X X X Once the desired (-35° to end bake ...


