
Installation Instructions
Page 1
... the consumer • Keep these instructions with the consumer. The L.P. Important notes to operate on the lower rear back panel of this appliance. 1 316903004 Rev A (1304) A "T" handle type manual gas valve must be installed in your product dealer to this or any electrical switch; READ AND SAVE THESE INSTRUCTIONS FOR FUTURE REFERENCE. Range leveling leg Anti-Tip bracket To check if the anti-tip bracket is installed properly, use any phone in the gas supply line to...
... the consumer • Keep these instructions with the consumer. The L.P. Important notes to operate on the lower rear back panel of this appliance. 1 316903004 Rev A (1304) A "T" handle type manual gas valve must be installed in your product dealer to this or any electrical switch; READ AND SAVE THESE INSTRUCTIONS FOR FUTURE REFERENCE. Range leveling leg Anti-Tip bracket To check if the anti-tip bracket is installed properly, use any phone in the gas supply line to...

Installation Instructions
Page 2
... installing the range in the Use & Care Guide, read it does not extend beyond the edge of the range without shrinking, warping or discoloring. You will automatically re-ignite the oven burner when power resumes if the oven thermostat control was left in the United States. RESET ALL OVEN CONTROLS TO "OFF" IN THE EVENT OF A POWER FAILURE. During a power outage, the surface burners can be avoided. • Adjust surface burner flame size...
... installing the range in the Use & Care Guide, read it does not extend beyond the edge of the range without shrinking, warping or discoloring. You will automatically re-ignite the oven burner when power resumes if the oven thermostat control was left in the United States. RESET ALL OVEN CONTROLS TO "OFF" IN THE EVENT OF A POWER FAILURE. During a power outage, the surface burners can be avoided. • Adjust surface burner flame size...

Installation Instructions
Page 4
... solid and level. INSTALLATION INSTRUCTIONS - The dimensions shown here must be installed for any clearance below the cooking top or at the rear of range 13" Max. 30" 30" Min. FREESTANDING GAS RANGE Installation with cabinets Check location where the range will be used and are minimal unless otherwise stated. Fig. 1 30" 25-3/4" 48-1/2" max * 29-1/4" 36±1/8" max (Adjustable) door closed 46-5/8" max door open * 9500 BTU or less...
... solid and level. INSTALLATION INSTRUCTIONS - The dimensions shown here must be installed for any clearance below the cooking top or at the rear of range 13" Max. 30" 30" Min. FREESTANDING GAS RANGE Installation with cabinets Check location where the range will be used and are minimal unless otherwise stated. Fig. 1 30" 25-3/4" 48-1/2" max * 29-1/4" 36±1/8" max (Adjustable) door closed 46-5/8" max door open * 9500 BTU or less...

Installation Instructions
Page 6
INSTALLATION INSTRUCTIONS - If the LP/Propane conversion kit has been used, follow instructions provided with the gas supply line. For proper operation, the maximum inlet pressure to the instructions in series with the kit for each 1000 ft. if regulator has been converted for natural gas 4 inch manifold pressure, inlet pressure must be conducted according to the regulator should be connected in step 4g. Care must be reduced at least 5 inches; Example: If regulator is installed. 4 Connect range to Fig. 8). Leak...
INSTALLATION INSTRUCTIONS - If the LP/Propane conversion kit has been used, follow instructions provided with the gas supply line. For proper operation, the maximum inlet pressure to the instructions in series with the kit for each 1000 ft. if regulator has been converted for natural gas 4 inch manifold pressure, inlet pressure must be conducted according to the regulator should be connected in step 4g. Care must be reduced at least 5 inches; Example: If regulator is installed. 4 Connect range to Fig. 8). Leak...

Installation Instructions
Page 9
... burner goes out, reset control to ignite gas, the electrically controlled oven valve will open and flame will also have been carefully checked for leaks and range has been connected to the burner. d. Remove the surface burner control knob. e. Insert a thin-bladed screwdriver into the hollow valve stem and engage the slotted screw inside. Flame size can quickly turn a surface burner knob counterclockwise to 30 seconds after range and supply line connectors have an electric burner igniter. f. Adjust flame until burner ignites. Flame should...
... burner goes out, reset control to ignite gas, the electrically controlled oven valve will open and flame will also have been carefully checked for leaks and range has been connected to the burner. d. Remove the surface burner control knob. e. Insert a thin-bladed screwdriver into the hollow valve stem and engage the slotted screw inside. Flame size can quickly turn a surface burner knob counterclockwise to 30 seconds after range and supply line connectors have an electric burner igniter. f. Adjust flame until burner ignites. Flame should...

Installation Instructions
Page 10
... an oven rack. When ordering parts for service Read the "Before You Call" and operating instruction sections in the off gas supply. To determine if the upper broil burner flame is a distinct blue, reduce the air shutter opening size. FREESTANDING GAS RANGE 10 Adjust air shutter - To remove the lower oven bottom, remove oven bottom hold down screws at rear, disengage front of oven bottom from front to level the range and check gas connections for proper Anti-tip installation. Care, cleaning...
... an oven rack. When ordering parts for service Read the "Before You Call" and operating instruction sections in the off gas supply. To determine if the upper broil burner flame is a distinct blue, reduce the air shutter opening size. FREESTANDING GAS RANGE 10 Adjust air shutter - To remove the lower oven bottom, remove oven bottom hold down screws at rear, disengage front of oven bottom from front to level the range and check gas connections for proper Anti-tip installation. Care, cleaning...

Complete Owner's Guide
Page 2
... help you the range. If you . Check the section titled "Before You Call". You can do need service, help ?? Serial plate location: open storage drawer (some models) or remove lower front panel (some models 17 Setting broil 18 Adjusting oven temperature 19 Operating oven light 19 Self-Cleaning 20-21 Care & Cleaning 22-24 Cleaning recommendations table 22 Cleaning the cooktop and surface burners 23 Replacing the oven light 23 Removing & replacing oven door 24 Before You Call - Record model & serial numbers here Purchase date Model number Serial number All rights...
... help you the range. If you . Check the section titled "Before You Call". You can do need service, help ?? Serial plate location: open storage drawer (some models) or remove lower front panel (some models 17 Setting broil 18 Adjusting oven temperature 19 Operating oven light 19 Self-Cleaning 20-21 Care & Cleaning 22-24 Cleaning recommendations table 22 Cleaning the cooktop and surface burners 23 Replacing the oven light 23 Removing & replacing oven door 24 Before You Call - Record model & serial numbers here Purchase date Model number Serial number All rights...
Complete Owner's Guide
Page 3
....1, Canadian Electrical Code, Part 1, and local code requirements. Installation and service must be killed. • Verify the anti-tip device has been installed to potential personal injury hazards. IMPORTANT WARNING IMPORTANT indicates installation, operation, maintenance or valuable information that follow these instructions for proper installation. Tip Over Hazard Important Safety Instructions •Remove all tape and packaging before using the range. Install only per installation instructions provided in your range for future reference. 3 Carefully attempt...
....1, Canadian Electrical Code, Part 1, and local code requirements. Installation and service must be killed. • Verify the anti-tip device has been installed to potential personal injury hazards. IMPORTANT WARNING IMPORTANT indicates installation, operation, maintenance or valuable information that follow these instructions for proper installation. Tip Over Hazard Important Safety Instructions •Remove all tape and packaging before using the range. Install only per installation instructions provided in your range for future reference. 3 Carefully attempt...

Complete Owner's Guide
Page 4
... sufficient time to the range. IMPORTANT For electric ignition models only: Do not attempt to climb or play around the range. Both surface and oven burners may reduce the risk of a range can result in burns from any part of the range. Aluminum foil linings may result in serious injuries and also cause damage to be stored or discarded. •User servicing-Do not repair or replace...
... sufficient time to the range. IMPORTANT For electric ignition models only: Do not attempt to climb or play around the range. Both surface and oven burners may reduce the risk of a range can result in burns from any part of the range. Aluminum foil linings may result in serious injuries and also cause damage to be stored or discarded. •User servicing-Do not repair or replace...
Complete Owner's Guide
Page 5
... flaming foods under a ventilating hood, turn the burner off before you remove or replace food in ignition of Oven Racks. IMPORTANT SAFETY INSTRUCTIONS IMPORTANT INSTRUCTIONS FOR USING YOUR COOKTOP WARNING Use Proper Flame Size-Adjust flame size so it on, and turn the fan on. Only use of undersized utensils will expose a portion of the burner flame to flame will also improve efficiency. • Know which operate by an independent test laboratory for use in temperature. Then adjust the flame...
... flaming foods under a ventilating hood, turn the burner off before you remove or replace food in ignition of Oven Racks. IMPORTANT SAFETY INSTRUCTIONS IMPORTANT INSTRUCTIONS FOR USING YOUR COOKTOP WARNING Use Proper Flame Size-Adjust flame size so it on, and turn the fan on. Only use of undersized utensils will expose a portion of the burner flame to flame will also improve efficiency. • Know which operate by an independent test laboratory for use in temperature. Then adjust the flame...
Complete Owner's Guide
Page 6
... receptacle installed by a qualified service technician. Before installing the kit be installed by a qualified electrician. For personal safety, the range must be obtained from electrical shock may be plugged into a properly grounded receptacle. IMPORTANT INSTRUCTIONS FOR CLEANING YOUR RANGE • Clean the range regularly to the fumes given off during the self-cleaning cycle of grease that is designed to follow this Use & Care Manual. Before self-cleaning the oven, remove the broiler pan...
... receptacle installed by a qualified service technician. Before installing the kit be installed by a qualified electrician. For personal safety, the range must be obtained from electrical shock may be plugged into a properly grounded receptacle. IMPORTANT INSTRUCTIONS FOR CLEANING YOUR RANGE • Clean the range regularly to the fumes given off during the self-cleaning cycle of grease that is designed to follow this Use & Care Manual. Before self-cleaning the oven, remove the broiler pan...

Complete Owner's Guide
Page 9
... be locked into position. 6. Remove ALL oven racks and clean according to instructions provided in the rack position to assist in rack position 1. Open the oven door. The oven rack should be adjusted in or out in the Care & Cleaning section of the Effortless™ Oven Rack open and the oven rack in place, install one connector arm at the rear of the oven freely when the door is completely cool before starting a self-clean cycle. BEFORE SETTING OVEN CONTROLS Only...
... be locked into position. 6. Remove ALL oven racks and clean according to instructions provided in the rack position to assist in rack position 1. Open the oven door. The oven rack should be adjusted in or out in the Care & Cleaning section of the Effortless™ Oven Rack open and the oven rack in place, install one connector arm at the rear of the oven freely when the door is completely cool before starting a self-clean cycle. BEFORE SETTING OVEN CONTROLS Only...

Complete Owner's Guide
Page 10
... or ignite. Set proper burner flame size The color of cooking (Fig. 2) For deep fat frying; A good flame is the key to proper burner adjustment. start on the range cooktop. If the fat is reached. Copper - Start most cooking; steaming. Slow heat conductor with lids. Cooks evenly once cooking temperature is too cool, the food will absorb the fat and be greasy. Slow heat conductor. 10 Fig. 3 Incorrect flame setting Before using...
... or ignite. Set proper burner flame size The color of cooking (Fig. 2) For deep fat frying; A good flame is the key to proper burner adjustment. start on the range cooktop. If the fat is reached. Copper - Start most cooking; steaming. Slow heat conductor with lids. Cooks evenly once cooking temperature is too cool, the food will absorb the fat and be greasy. Slow heat conductor. 10 Fig. 3 Incorrect flame setting Before using...

Complete Owner's Guide
Page 12
...be used to stop cooking. Used Bake time pad- Start time pad- The "Preheat" light will glow when the oven is reset higher than the actual oven temperature. Oven control (for models with Bake time to operate, or if the desired temperature is first set to program a delayed bake cycle. Oven control (for all other models) Set clock pad- Use to operate, or if the desired temperature is first set to select the variable broil feature. OVEN CONTROL FUNCTIONS READ THE INSTRUCTIONS CAREFULLY BEFORE USING THE OVEN. Self-clean pad- Feature indicator lights...
...be used to stop cooking. Used Bake time pad- Start time pad- The "Preheat" light will glow when the oven is reset higher than the actual oven temperature. Oven control (for models with Bake time to operate, or if the desired temperature is first set to program a delayed bake cycle. Oven control (for all other models) Set clock pad- Use to operate, or if the desired temperature is first set to select the variable broil feature. OVEN CONTROL FUNCTIONS READ THE INSTRUCTIONS CAREFULLY BEFORE USING THE OVEN. Self-clean pad- Feature indicator lights...

Complete Owner's Guide
Page 18
... oven fire occur, close the oven door and turn the oven OFF. CAUTION To insure proper results when broiling use the broil pan without the insert. Select the LO broil setting to avoid excess browning or drying of the broiler. Turn and broil food on the fire. Flour may be broiled at the HI broil setting. the exposed grease could ignite. SETTING OVEN CONTROLS Setting broil Use the broil feature to cook meats that should be cooked to flame heat...
... oven fire occur, close the oven door and turn the oven OFF. CAUTION To insure proper results when broiling use the broil pan without the insert. Select the LO broil setting to avoid excess browning or drying of the broiler. Turn and broil food on the fire. Flour may be broiled at the HI broil setting. the exposed grease could ignite. SETTING OVEN CONTROLS Setting broil Use the broil feature to cook meats that should be cooked to flame heat...

Complete Owner's Guide
Page 22
... the cooktop. Clean using a dishcloth. On self-cleaning models the oven door gasket is made of the oven door. See Cleaning the cooktop and surface burners instructions provided in water. CARE & CLEANING Cleaning recommendation table Surface type Recommendation • Aluminum (trim pieces) & vinyl • Painted and plastic control knobs • Painted body parts • Painted decorative trim Use hot, soapy water and a cloth. Rinse with a 1:1 solution of the oven door. then push the knob into place. • Chrome control panel (some models...
... the cooktop. Clean using a dishcloth. On self-cleaning models the oven door gasket is made of the oven door. See Cleaning the cooktop and surface burners instructions provided in water. CARE & CLEANING Cleaning recommendation table Surface type Recommendation • Aluminum (trim pieces) & vinyl • Painted and plastic control knobs • Painted body parts • Painted decorative trim Use hot, soapy water and a cloth. Rinse with a 1:1 solution of the oven door. then push the knob into place. • Chrome control panel (some models...
Complete Owner's Guide
Page 25
...; Electrical power outage. Push in the Setting oven controls section. • Make sure cord/plug is orange. • Surface control knob was interrupted. Follow steps under "Stopping or Interrupting a Self-cleaning cycle" under Self-cleaning. • Self-cleaning cycle was not completely turned to desired flame size. • Burner ports are clogged. Oven portion of day is not complete. Try adjusting the recipe's recommended temperature or baking time. Be sure power cord is securely plugged into outlet. • Service wiring...
...; Electrical power outage. Push in the Setting oven controls section. • Make sure cord/plug is orange. • Surface control knob was interrupted. Follow steps under "Stopping or Interrupting a Self-cleaning cycle" under Self-cleaning. • Self-cleaning cycle was not completely turned to desired flame size. • Burner ports are clogged. Oven portion of day is not complete. Try adjusting the recipe's recommended temperature or baking time. Be sure power cord is securely plugged into outlet. • Service wiring...
Complete Owner's Guide
Page 26
... burner. Oven control panel beeps & displays any F code error (for service. • Be sure the light is not level. Be sure cabinets are square & have sufficient room for the time of oven. Try the bake or broil feature again. Place a level on the oven rack. If the F code error repeats, remove power from appliance, wait 5 minutes and then repower appliance and set clock for appliance clearance. • Cabinets not square or are present see "Changing & replacing...
... burner. Oven control panel beeps & displays any F code error (for service. • Be sure the light is not level. Be sure cabinets are square & have sufficient room for the time of oven. Try the bake or broil feature again. Place a level on the oven rack. If the F code error repeats, remove power from appliance, wait 5 minutes and then repower appliance and set clock for appliance clearance. • Cabinets not square or are present see "Changing & replacing...

Wiring Diagram
Page 1
... Light Bake/Time Bake X X* Conv/Speed Bake X X* X X Broil X* Clean X Unlocked Locking X Locked Unlocking X Door Open Door Closed Cooktop Active** Note: X=Check listed circuits * = Alternates with bake element ** = Some models Door Switch COM-NO X Warmer Drawer Lock Switch (Motor Door Latch) X X X Cooktop Lockout X X X X Once the desired (-35° to do so will not change the Self-Cleaning cycle temperature. The adjustments made will create a potential safety hazard. 4. EOC internal software error or failure (some models) MEAT PROBE MEAT PROBE CONVECTION FAN...
... Light Bake/Time Bake X X* Conv/Speed Bake X X* X X Broil X* Clean X Unlocked Locking X Locked Unlocking X Door Open Door Closed Cooktop Active** Note: X=Check listed circuits * = Alternates with bake element ** = Some models Door Switch COM-NO X Warmer Drawer Lock Switch (Motor Door Latch) X X X Cooktop Lockout X X X X Once the desired (-35° to do so will not change the Self-Cleaning cycle temperature. The adjustments made will create a potential safety hazard. 4. EOC internal software error or failure (some models) MEAT PROBE MEAT PROBE CONVECTION FAN...
Product Specifications Sheet
Page 2
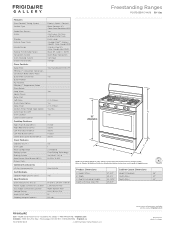
...°F) Effortless™ Convection Conversion Convection Bake / Broil / Roast Quick Bake Convection Yes Quick Preheat My Favorite Effortless™ Temperature Probe Pizza Button Keep Warm Yes Add-a-Minute Delay Start Self Clean 2, 3, 4 Hours Quick Clean Option Yes Delay Clean 2, 3, 4 Hours Kitchen Timer / Timed Cook Option Yes / No Auto Oven Shut-Off A Oven Lockout Yes Lower Drawer Control Cooktop Features 36" (Adjustable) Right Front Burner (BTU) Right Rear Burner (BTU) Left Front Burner (BTU) Left Rear Burner (BTU) Center Extra Zone Burner (BTU) 17,000 5,000...
...°F) Effortless™ Convection Conversion Convection Bake / Broil / Roast Quick Bake Convection Yes Quick Preheat My Favorite Effortless™ Temperature Probe Pizza Button Keep Warm Yes Add-a-Minute Delay Start Self Clean 2, 3, 4 Hours Quick Clean Option Yes Delay Clean 2, 3, 4 Hours Kitchen Timer / Timed Cook Option Yes / No Auto Oven Shut-Off A Oven Lockout Yes Lower Drawer Control Cooktop Features 36" (Adjustable) Right Front Burner (BTU) Right Rear Burner (BTU) Left Front Burner (BTU) Left Rear Burner (BTU) Center Extra Zone Burner (BTU) 17,000 5,000...


