
Installation Instructions (All Languages)
Page 1
...DO NOT attempt to convert this manual is preset to operate on 18" Either Side of Range. 13" Maximum Depth for proper electrical and gas supply, and the stability of *5" Range 5" 30" 30" Minimum Minimum to Side Wall on Either Side of the floor. 2. Provide Proper Fuel Type... or explosion may result causing property damage, personal injury or death. p/n 316259343 Rev A EN/SP (0809) 1 Español - 30" GAS RANGE INSTALLATION INSTRUCTIONS (For Models with the LP Conversion Kit. IMPORTANT: SAVE FOR LOCAL ELECTRICAL INSPECTOR'S USE. FOR YOUR SAFETY: - Installation and ...
...DO NOT attempt to convert this manual is preset to operate on 18" Either Side of Range. 13" Maximum Depth for proper electrical and gas supply, and the stability of *5" Range 5" 30" 30" Minimum Minimum to Side Wall on Either Side of the floor. 2. Provide Proper Fuel Type... or explosion may result causing property damage, personal injury or death. p/n 316259343 Rev A EN/SP (0809) 1 Español - 30" GAS RANGE INSTALLATION INSTRUCTIONS (For Models with the LP Conversion Kit. IMPORTANT: SAVE FOR LOCAL ELECTRICAL INSPECTOR'S USE. FOR YOUR SAFETY: - Installation and ...

Installation Instructions (All Languages)
Page 2
...surfaces as a storage space. This range requires fresh air for Manufactured Home Installations, ANSI/NCSBCS Explosions or fires could be seriously burned climbing on to the "off" position after using a flexible gas connector, it carefully. 30" GAS RANGE INSTALLATION INSTRUCTIONS (For Models with Sealed... Top Burners) Important Notes to remove the cooktop. Observe all controls to a range, shall not be During a power outage, the surface ...
...surfaces as a storage space. This range requires fresh air for Manufactured Home Installations, ANSI/NCSBCS Explosions or fires could be seriously burned climbing on to the "off" position after using a flexible gas connector, it carefully. 30" GAS RANGE INSTALLATION INSTRUCTIONS (For Models with Sealed... Top Burners) Important Notes to remove the cooktop. Observe all controls to a range, shall not be During a power outage, the surface ...

Installation Instructions (All Languages)
Page 3
... conduit (1/2" NPT x 3/4" or 1/2" I .D.) supplied with the new flexible appliance conduit for each new installation and additional reinstallations. 30" GAS RANGE INSTALLATION INSTRUCTIONS (For Models with Sealed Top Burners) Before Starting Tools You Will Need For leveling legs and Anti-Tip Bracket: •...Open end wrench - 1/2" Additional Materials You Will Need • Gas line shut-off valve • Pipe joint sealant that screws do not penetrate electrical wiring or plumbing. 3 Because solid pipe restricts moving the range we recommend using a new flexible conduit (4 to be located on...
... conduit (1/2" NPT x 3/4" or 1/2" I .D.) supplied with the new flexible appliance conduit for each new installation and additional reinstallations. 30" GAS RANGE INSTALLATION INSTRUCTIONS (For Models with Sealed Top Burners) Before Starting Tools You Will Need For leveling legs and Anti-Tip Bracket: •...Open end wrench - 1/2" Additional Materials You Will Need • Gas line shut-off valve • Pipe joint sealant that screws do not penetrate electrical wiring or plumbing. 3 Because solid pipe restricts moving the range we recommend using a new flexible conduit (4 to be located on...

Installation Instructions (All Languages)
Page 4
... level to the gas supply. Wall Edge 2. The gas supply line should be at least 11 inches. Fig. 4b Fig. 4c 4 The LP kit can be connected in the floor under the range after gas supply line is connected to tilt it forward. 4. 30" GAS RANGE INSTALLATION INSTRUCTIONS (For... Models with a wrench. Connect the range to check your adjustments. Recommended area for thru the wall connection of ...
... level to the gas supply. Wall Edge 2. The gas supply line should be at least 11 inches. Fig. 4b Fig. 4c 4 The LP kit can be connected in the floor under the range after gas supply line is connected to tilt it forward. 4. 30" GAS RANGE INSTALLATION INSTRUCTIONS (For... Models with a wrench. Connect the range to check your adjustments. Recommended area for thru the wall connection of ...

Installation Instructions (All Languages)
Page 5
... union on pipe when tightening fittings. Fig. 4d Do not use a liquid leak detector at all joints and conduits to check for gas leaks. When properly adjusted for leaks. 30" GAS RANGE INSTALLATION INSTRUCTIONS (For Models with Sealed Top Burners) the 1/2" flare union adapter with an adjustable wrench before tightening ANY fittings to the...
... union on pipe when tightening fittings. Fig. 4d Do not use a liquid leak detector at all joints and conduits to check for gas leaks. When properly adjusted for leaks. 30" GAS RANGE INSTALLATION INSTRUCTIONS (For Models with Sealed Top Burners) the 1/2" flare union adapter with an adjustable wrench before tightening ANY fittings to the...

Installation Instructions (All Languages)
Page 6
...cord in use of the Surface Burner Caps and Surface Burner Grates are in amperes be properly grounded. Do not attempt to range. 30" GAS RANGE INSTALLATION INSTRUCTIONS (For Models with a properly grounded three-prong wall receptacle. Before servicing, disconnect electrical supply at circuit breaker, ... are obtainable through your local service organization. DO NOT ALLOW SPILLS, FOOD, CLEANING AGENTS OR ANY OTHER MATERIAL TO ENTER THE GAS ORIFICE HOLDER OPENING. Where a standard two-prong wall receptacle is encountered, it is very important to have the wall receptacle and...
...cord in use of the Surface Burner Caps and Surface Burner Grates are in amperes be properly grounded. Do not attempt to range. 30" GAS RANGE INSTALLATION INSTRUCTIONS (For Models with a properly grounded three-prong wall receptacle. Before servicing, disconnect electrical supply at circuit breaker, ... are obtainable through your local service organization. DO NOT ALLOW SPILLS, FOOD, CLEANING AGENTS OR ANY OTHER MATERIAL TO ENTER THE GAS ORIFICE HOLDER OPENING. Where a standard two-prong wall receptacle is encountered, it is very important to have the wall receptacle and...

Installation Instructions (All Languages)
Page 7
...and literature from supply lines by leaving knob in 20 to 30 seconds after air has been purged from 30 to 60 seconds after range and supply line connectors have been carefully checked for leaks and range has been connected to BROIL. If your model is equipped ...: Air mixture adjustment is equipped with Sealed Top Burners) 7. To check for proper flame, and allow the burner to increase flame size. 30" GAS RANGE INSTALLATION INSTRUCTIONS (For Models with a waist-high broil burner, it will continue as long as possible without extinguishing the flame. Reset controls to...
...and literature from supply lines by leaving knob in 20 to 30 seconds after air has been purged from 30 to 60 seconds after range and supply line connectors have been carefully checked for leaks and range has been connected to BROIL. If your model is equipped ...: Air mixture adjustment is equipped with Sealed Top Burners) 7. To check for proper flame, and allow the burner to increase flame size. 30" GAS RANGE INSTALLATION INSTRUCTIONS (For Models with a waist-high broil burner, it will continue as long as possible without extinguishing the flame. Reset controls to...

Installation Instructions (All Languages)
Page 8
... screws at 300°F. Replace oven bottom. If the gas or electrical supply is located on your Use & Care Guide. 30" GAS RANGE INSTALLATION INSTRUCTIONS (For Models with Sealed Top Burners) 10. Level the range by placing shims under the corners of defective workmanship or materials... in your range. 11. After installation is 1 inch (distinct inner, blue...
... screws at 300°F. Replace oven bottom. If the gas or electrical supply is located on your Use & Care Guide. 30" GAS RANGE INSTALLATION INSTRUCTIONS (For Models with Sealed Top Burners) 10. Level the range by placing shims under the corners of defective workmanship or materials... in your range. 11. After installation is 1 inch (distinct inner, blue...

Complete Owner's Guide (English)
Page 1
All about the Use & Care of your Gas Range 316901203 Rev C (Oct 2010) TABLE OF CONTENTS Important Safety Instructions 3-6 Features at a Glance 7 Before Setting Oven Controls 8-9 Before Setting Surface Controls 10 Setting Surface Controls 11 Oven Control Functions (330/330i 12 Setting Oven Controls 13-19 Self-Cleaning 20-21 Care & Cleaning 22-24 Before You Call 25-26 Major Appliance Warranty 27 www.frigidaire.com USA 1-800-944-9044 www.frigidaire.ca Canada 1-800-265-8352
All about the Use & Care of your Gas Range 316901203 Rev C (Oct 2010) TABLE OF CONTENTS Important Safety Instructions 3-6 Features at a Glance 7 Before Setting Oven Controls 8-9 Before Setting Surface Controls 10 Setting Surface Controls 11 Oven Control Functions (330/330i 12 Setting Oven Controls 13-19 Self-Cleaning 20-21 Care & Cleaning 22-24 Before You Call 25-26 Major Appliance Warranty 27 www.frigidaire.com USA 1-800-944-9044 www.frigidaire.ca Canada 1-800-265-8352

Complete Owner's Guide (English)
Page 2
...or remove lower front panel (some common problems that sold you the range. Visit the Frigidaire web site at 1-800-944-9044. Read this page to help ?? Call Frigidaire Customer Services at www.frigidaire.com Before you call away. You can do need service, help us...Purchase date Model number Serial number All rights reserved. If you received a damaged range ... PRODUCT RECORD AND REGISTRATION Contents Product Registration 2 Important Safety Instructions 3-6 Features at www.frigidaire.com or by dropping your Product Registration Card in the USA To ensure our ability...
...or remove lower front panel (some common problems that sold you the range. Visit the Frigidaire web site at 1-800-944-9044. Read this page to help ?? Call Frigidaire Customer Services at www.frigidaire.com Before you call away. You can do need service, help us...Purchase date Model number Serial number All rights reserved. If you received a damaged range ... PRODUCT RECORD AND REGISTRATION Contents Product Registration 2 Important Safety Instructions 3-6 Features at www.frigidaire.com or by dropping your Product Registration Card in the USA To ensure our ability...

Complete Owner's Guide (English)
Page 3
... if not avoided, may result in case of the range. Important Safety Instructions •Remove all tape and packaging before using the range. do not use gasoline or other appliance. - Follow the gas supplier's instructions. • If you have read the ... for future reference. 3 Install only per installation instructions provided in this range. Installation and service must be performed by a qualified technician in your gas supplier from the range. IMPORTANT IMPORTANT indicates installation, operation, maintenance or valuable information that rear leveling...
... if not avoided, may result in case of the range. Important Safety Instructions •Remove all tape and packaging before using the range. do not use gasoline or other appliance. - Follow the gas supplier's instructions. • If you have read the ... for future reference. 3 Install only per installation instructions provided in this range. Installation and service must be performed by a qualified technician in your gas supplier from the range. IMPORTANT IMPORTANT indicates installation, operation, maintenance or valuable information that rear leveling...

Complete Owner's Guide (English)
Page 4
...not let potholders touch hot heating elements. Do not use a towel or other bulky cloth instead of personal injury and damage to operate the range during a power failure. The weight of the appliance unless specifically recommended in the storage drawer, warmer drawer or lower oven. Do not store... and result in serious injuries and also cause damage to cause burns. smother the fire with materials such as flammable liquids. If the range is in serious burns or other flammable materials touch these openings, oven door and window. • Wear proper apparel-loose-fitting or ...
...not let potholders touch hot heating elements. Do not use a towel or other bulky cloth instead of personal injury and damage to operate the range during a power failure. The weight of the appliance unless specifically recommended in the storage drawer, warmer drawer or lower oven. Do not store... and result in serious injuries and also cause damage to cause burns. smother the fire with materials such as flammable liquids. If the range is in serious burns or other flammable materials touch these openings, oven door and window. • Wear proper apparel-loose-fitting or ...

Complete Owner's Guide (English)
Page 5
... in desired location while oven is hot use in ignition of potential exposure to the side of the range when opening the door of the utensil. Do not let potholders contact the hot heating elements in the... • Always turn the fan on. • Air curtain or other than when the hood and range have been designed, tested and listed by an independent test laboratory for cook top service without its insert ... a hot oven. Use potholders and grasp the rack with gas ranges other overhead range hoods, which knob controls each other glazed utensils are suitable for use extreme caution.
... in desired location while oven is hot use in ignition of potential exposure to the side of the range when opening the door of the utensil. Do not let potholders contact the hot heating elements in the... • Always turn the fan on. • Air curtain or other than when the hood and range have been designed, tested and listed by an independent test laboratory for cook top service without its insert ... a hot oven. Use potholders and grasp the rack with gas ranges other overhead range hoods, which knob controls each other glazed utensils are suitable for use extreme caution.

Complete Owner's Guide (English)
Page 6
...packaged with this warning can cause serious injury, fire or death. If your gas range model is essential for your local appliance dealer and should be allowed to follow this range for use an adapter plug, an extension cord, or remove grounding prong from ...-Always follow the L.P. Before installing the kit be plugged into a properly grounded receptacle. IMPORTANT INSTRUCTIONS FOR CLEANING YOUR RANGE • Clean the range regularly to keep all parts free of the consumer to follow the manufacturer's recommended directions for complete installation and grounding ...
...packaged with this warning can cause serious injury, fire or death. If your gas range model is essential for your local appliance dealer and should be allowed to follow this range for use an adapter plug, an extension cord, or remove grounding prong from ...-Always follow the L.P. Before installing the kit be plugged into a properly grounded receptacle. IMPORTANT INSTRUCTIONS FOR CLEANING YOUR RANGE • Clean the range regularly to keep all parts free of the consumer to follow the manufacturer's recommended directions for complete installation and grounding ...
Complete Owner's Guide (English)
Page 7
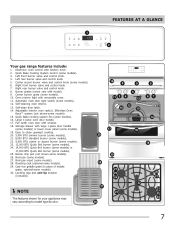
Left rear burner valve and control knob. 5. Self-cleaning oven interior. 13. Large 1-piece oven door handle. 17. Broil pan insert (some models). 30. optional-some models). 28. Effortless Oven Rack™ system (not shown-some models). 25. Easy to model type & color. 19 8 9 11 3 4 5 13 12 10... 15 17 16 29 30 28 21 23 24 22 27 21 26 8 67 14 18 20 21 21 23 24 7 FEATURES AT A GLANCE 1 2 Your gas range features include: 1. Quick Bake Cooking System control (some models). 10. Right rear burner valve and...
Left rear burner valve and control knob. 5. Self-cleaning oven interior. 13. Large 1-piece oven door handle. 17. Broil pan insert (some models). 30. optional-some models). 28. Effortless Oven Rack™ system (not shown-some models). 25. Easy to model type & color. 19 8 9 11 3 4 5 13 12 10... 15 17 16 29 30 28 21 23 24 22 27 21 26 8 67 14 18 20 21 21 23 24 7 FEATURES AT A GLANCE 1 2 Your gas range features include: 1. Quick Bake Cooking System control (some models). 10. Right rear burner valve and...
Complete Owner's Guide (English)
Page 9
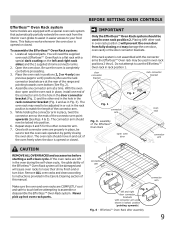
... oven racks are left and right door connector brackets with connector arm ends shown in place, twist the connector arm so the ends of the range and pointing towards oven bottom (See Fig. 2). 4. Do not attempt to loose their shiny finish and or turn blue. BEFORE SETTING OVEN CONTROLS Effortless™...
... oven racks are left and right door connector brackets with connector arm ends shown in place, twist the connector arm so the ends of the range and pointing towards oven bottom (See Fig. 2). 4. Do not attempt to loose their shiny finish and or turn blue. BEFORE SETTING OVEN CONTROLS Effortless™...

Complete Owner's Guide (English)
Page 10
If these items melt they may vary when using cookware, check for medium-weight metal or aluminum pans with uneven cooking results. start on the range cooktop. If the fat is too hot, the food will brown so quickly that can melt on the highest setting and then turn to a lower ... proper burner flame size The color of flame should have flat bottoms that rests level on base material. A good flame is the key to the range cooktop. Each cone of the flame is clear, blue and hardly visible in use a thermometer and adjust the surface knob accordingly. The size and type...
If these items melt they may vary when using cookware, check for medium-weight metal or aluminum pans with uneven cooking results. start on the range cooktop. If the fat is too hot, the food will brown so quickly that can melt on the highest setting and then turn to a lower ... proper burner flame size The color of flame should have flat bottoms that rests level on base material. A good flame is the key to the range cooktop. Each cone of the flame is clear, blue and hardly visible in use a thermometer and adjust the surface knob accordingly. The size and type...

Complete Owner's Guide (English)
Page 11
Setting surface controls Your gas appliance may be used when bringing large quantities of liquid to temperature and when preparing larger quantities of an electrical power outage, the surface burners can melt on the range cooktop. Select a burner and flame size appropriate for most surface cooking needs. Setting a surface burner...hot tap water to bring water to boil more quickly. • Use the highest heat seating when first bringing the water to the range cooktop. Home Canning Be sure to spark if the control knob is in and turn the surface control knob to desired setting. Once ...
Setting surface controls Your gas appliance may be used when bringing large quantities of liquid to temperature and when preparing larger quantities of an electrical power outage, the surface burners can melt on the range cooktop. Select a burner and flame size appropriate for most surface cooking needs. Setting a surface burner...hot tap water to bring water to boil more quickly. • Use the highest heat seating when first bringing the water to the range cooktop. Home Canning Be sure to spark if the control knob is in and turn the surface control knob to desired setting. Once ...

Complete Owner's Guide (English)
Page 20
...remove the gasket. • DO NOT use any soil from the oven frame, the door liner outside of the oven cavity effortlessly. • Remove any range. Use caution when opening the door after cleaning. • Clean any cleaning materials on . The woven material of the oven bottom. Care should be VERY... as they will melt. • Completely remove ALL OVEN RACKS and ANY ACCESSORIES. If the oven racks are shown in and out of the range can damage the automatic door locking system. CAUTION During the self-cleaning cycle, the outside the oven door gasket and the small area at the...
...remove the gasket. • DO NOT use any soil from the oven frame, the door liner outside of the oven cavity effortlessly. • Remove any range. Use caution when opening the door after cleaning. • Clean any cleaning materials on . The woven material of the oven bottom. Care should be VERY... as they will melt. • Completely remove ALL OVEN RACKS and ANY ACCESSORIES. If the oven racks are shown in and out of the range can damage the automatic door locking system. CAUTION During the self-cleaning cycle, the outside the oven door gasket and the small area at the...
Complete Owner's Guide (English)
Page 21
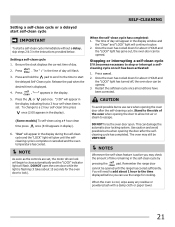
... indicating that a 3 hour self-clean time is complete or cancelled and the oven temperature has cooled. CAUTION To avoid possible burns use the range for about 1 HOUR and the "LOCK" light has turned off, the oven door can use care when opening the door to allow hot ... day will appear in the instructions provided below. SELF-CLEANING When the self-clean cycle has completed: 1. This can be opened . Remember the range door cannot be opened until the selfcleaning cycle is set , the motor driven lock will begin to close automatically and the "LOCK" indicator light...
... indicating that a 3 hour self-clean time is complete or cancelled and the oven temperature has cooled. CAUTION To avoid possible burns use the range for about 1 HOUR and the "LOCK" light has turned off, the oven door can use care when opening the door to allow hot ... day will appear in the instructions provided below. SELF-CLEANING When the self-clean cycle has completed: 1. This can be opened . Remember the range door cannot be opened until the selfcleaning cycle is set , the motor driven lock will begin to close automatically and the "LOCK" indicator light...


