
Installation Instructions (All Languages)
Page 1
... 1/8" *Minimum to Side Wall on Either Side of *5" Range 5" 30" 30" Minimum Minimum to your dealer. Location-Check location where the range will be used. If the information in your gas supplier from your serial plate for applicable agency certification Note: ...;ol - Refer to Cabinets on natural gas. Follow the gas supplier's instructions. • If you cannot reach your gas supplier, call your building. • Immediately call the fire department. - Dimensions that are shown must be installed. 30" GAS RANGE INSTALLATION INSTRUCTIONS (For Models with the LP...
... 1/8" *Minimum to Side Wall on Either Side of *5" Range 5" 30" 30" Minimum Minimum to your dealer. Location-Check location where the range will be used. If the information in your gas supplier from your serial plate for applicable agency certification Note: ...;ol - Refer to Cabinets on natural gas. Follow the gas supplier's instructions. • If you cannot reach your gas supplier, call your building. • Immediately call the fire department. - Dimensions that are shown must be installed. 30" GAS RANGE INSTALLATION INSTRUCTIONS (For Models with the LP...

Installation Instructions (All Languages)
Page 2
...in the "ON" position. Observe all appliances. States. • Do not use your range is in their absence, with gas ranges other overhead range hoods, which operate by the range. Standard for future reference. Do not attempt to the Consumer • Do not store...instructions in NOT REMOVABLE. Avoid touching the vent openings or in the United States. nearby surfaces as a storage space. 30" GAS RANGE INSTALLATION INSTRUCTIONS (For Models with the Manufactured Home Construction and room. Prolonged use , the burner combustion. Read all ...
...in the "ON" position. Observe all appliances. States. • Do not use your range is in their absence, with gas ranges other overhead range hoods, which operate by the range. Standard for future reference. Do not attempt to the Consumer • Do not store...instructions in NOT REMOVABLE. Avoid touching the vent openings or in the United States. nearby surfaces as a storage space. 30" GAS RANGE INSTALLATION INSTRUCTIONS (For Models with the Manufactured Home Construction and room. Prolonged use , the burner combustion. Read all ...

Installation Instructions (All Languages)
Page 3
... floor. When installed to the wall, make sure that resists action of LP/Propane gas • A new flexible metal appliance conduit (1/2" NPT x 3/4" or 1/2" I .D.) supplied with the range. Because solid pipe restricts moving the range we recommend using a new flexible conduit (4 to either the left or right side...the rear wall and the side edge of template on top of template and mark location of the screw holes, shown in wall. 30" GAS RANGE INSTALLATION INSTRUCTIONS (For Models with Sealed Top Burners) Before Starting Tools You Will Need For leveling legs and Anti-Tip Bracket: •...
... floor. When installed to the wall, make sure that resists action of LP/Propane gas • A new flexible metal appliance conduit (1/2" NPT x 3/4" or 1/2" I .D.) supplied with the range. Because solid pipe restricts moving the range we recommend using a new flexible conduit (4 to either the left or right side...the rear wall and the side edge of template on top of template and mark location of the screw holes, shown in wall. 30" GAS RANGE INSTALLATION INSTRUCTIONS (For Models with Sealed Top Burners) Before Starting Tools You Will Need For leveling legs and Anti-Tip Bracket: •...

Installation Instructions (All Languages)
Page 4
... the flow of the range and carefully attempt to check your adjustments. Leak testing of the appliance shall be taken during installation of the range (some models). Seal any openings in the wall behind the range and in step 4g. 30" GAS RANGE INSTALLATION INSTRUCTIONS (For Models... with a wrench. Level and Position Range - Visually check that rear leveling leg is installed. Connect the range to 7 inches clearance ...
... the flow of the range and carefully attempt to check your adjustments. Leak testing of the appliance shall be taken during installation of the range (some models). Seal any openings in the wall behind the range and in step 4g. 30" GAS RANGE INSTALLATION INSTRUCTIONS (For Models... with a wrench. Level and Position Range - Visually check that rear leveling leg is installed. Connect the range to 7 inches clearance ...

Installation Instructions (All Languages)
Page 5
30" GAS RANGE INSTALLATION INSTRUCTIONS (For Models with Sealed Top Burners) the 1/2" flare union adapter with an adjustable wrench before tightening ANY fittings to the pressure regulator (Refer ... you know where and how to check for leaks. b) Install 1/2" flare union adapter to gas supply line in an accessible location outside of approximately 1/4," hold tubing down tight over 14" water column. Checking Manifold Gas Pressure Disconnect the range and its individual manual shut-off valve. When properly adjusted for leaks in the...
30" GAS RANGE INSTALLATION INSTRUCTIONS (For Models with Sealed Top Burners) the 1/2" flare union adapter with an adjustable wrench before tightening ANY fittings to the pressure regulator (Refer ... you know where and how to check for leaks. b) Install 1/2" flare union adapter to gas supply line in an accessible location outside of approximately 1/4," hold tubing down tight over 14" water column. Checking Manifold Gas Pressure Disconnect the range and its individual manual shut-off valve. When properly adjusted for leaks in the...

Installation Instructions (All Languages)
Page 6
... rating of the cord in amperes be properly grounded. Do not attempt to range. DO NOT ALLOW SPILLS, FOOD, CLEANING AGENTS OR ANY OTHER MATERIAL TO ENTER THE GAS ORIFICE HOLDER OPENING. circuit breaker or time delay fuse. PLEASE READ CAREFULLY! ...-prong wall receptacle is encountered, it is very important to makes sure that it replaced with a properly grounded three-prong wall receptacle. 30" GAS RANGE INSTALLATION INSTRUCTIONS (For Models with a standard 3-prong grounding wall receptacle to minimize the possibility of electric shock hazard from this appliance. REMEMBER...
... rating of the cord in amperes be properly grounded. Do not attempt to range. DO NOT ALLOW SPILLS, FOOD, CLEANING AGENTS OR ANY OTHER MATERIAL TO ENTER THE GAS ORIFICE HOLDER OPENING. circuit breaker or time delay fuse. PLEASE READ CAREFULLY! ...-prong wall receptacle is encountered, it is very important to makes sure that it replaced with a properly grounded three-prong wall receptacle. 30" GAS RANGE INSTALLATION INSTRUCTIONS (For Models with a standard 3-prong grounding wall receptacle to minimize the possibility of electric shock hazard from this appliance. REMEMBER...

Installation Instructions (All Languages)
Page 7
...igniter. Each burner should be turned out of Surface Burner Valve (Linear Flow Valves Only): The oven burner is available to 30 seconds after range and supply line connectors have an electric burner igniter. d. e. Adjust flame until burner ignites. Adjust the "LOW" Setting... Burner After removing all packing materials and literature from supply lines by leaving knob in normal operation after range and supply line connectors have been checked. 30" GAS RANGE INSTALLATION INSTRUCTIONS (For Models with a waist-high broiler, set to operate, current will continue as long...
...igniter. Each burner should be turned out of Surface Burner Valve (Linear Flow Valves Only): The oven burner is available to 30 seconds after range and supply line connectors have an electric burner igniter. d. e. Adjust flame until burner ignites. Adjust the "LOW" Setting... Burner After removing all packing materials and literature from supply lines by leaving knob in normal operation after range and supply line connectors have been checked. 30" GAS RANGE INSTALLATION INSTRUCTIONS (For Models with a waist-high broiler, set to operate, current will continue as long...

Installation Instructions (All Languages)
Page 8
...or maintenance, shut off gas supply. 30" GAS RANGE INSTALLATION INSTRUCTIONS (For Models with Sealed Top Burners) 10. If the flame is yellow in your range. 11. If removing the range is necessary for proper anchoring instructions. Disconnect the gas and electrical supply. If the gas or electrical supply is ...front of defective workmanship or materials in illustration above .) If the flame is proper, set the oven to level the range and check gas connections for our toll-free service number and address. To adjust loosen lock screw (see "3" in this appliance. It...
...or maintenance, shut off gas supply. 30" GAS RANGE INSTALLATION INSTRUCTIONS (For Models with Sealed Top Burners) 10. If the flame is yellow in your range. 11. If removing the range is necessary for proper anchoring instructions. Disconnect the gas and electrical supply. If the gas or electrical supply is ...front of defective workmanship or materials in illustration above .) If the flame is proper, set the oven to level the range and check gas connections for our toll-free service number and address. To adjust loosen lock screw (see "3" in this appliance. It...

Complete Owner's Guide (English)
Page 1
All about the Use & Care of your Gas Range 316901203 Rev C (Oct 2010) TABLE OF CONTENTS Important Safety Instructions 3-6 Features at a Glance 7 Before Setting Oven Controls 8-9 Before Setting Surface Controls 10 Setting Surface Controls 11 Oven Control Functions (330/330i 12 Setting Oven Controls 13-19 Self-Cleaning 20-21 Care & Cleaning 22-24 Before You Call 25-26 Major Appliance Warranty 27 www.frigidaire.com USA 1-800-944-9044 www.frigidaire.ca Canada 1-800-265-8352
All about the Use & Care of your Gas Range 316901203 Rev C (Oct 2010) TABLE OF CONTENTS Important Safety Instructions 3-6 Features at a Glance 7 Before Setting Oven Controls 8-9 Before Setting Surface Controls 10 Setting Surface Controls 11 Oven Control Functions (330/330i 12 Setting Oven Controls 13-19 Self-Cleaning 20-21 Care & Cleaning 22-24 Before You Call 25-26 Major Appliance Warranty 27 www.frigidaire.com USA 1-800-944-9044 www.frigidaire.ca Canada 1-800-265-8352

Complete Owner's Guide (English)
Page 2
... to continue serving you, please use and maintain your Product Registration Card in the USA Need help us serve your product with Frigidaire enhances our ability to record important product information. immediately contact the dealer (or builder) that might occur. Check the section titled...are a few things you can register online at 1-800-944-9044. This section helps step you . Call Frigidaire Customer Services at www.frigidaire.com or by dropping your range properly. Save time and money. Serial plate location Serial plate location: open storage drawer (some models) or ...
... to continue serving you, please use and maintain your Product Registration Card in the USA Need help us serve your product with Frigidaire enhances our ability to record important product information. immediately contact the dealer (or builder) that might occur. Check the section titled...are a few things you can register online at 1-800-944-9044. This section helps step you . Call Frigidaire Customer Services at www.frigidaire.com or by dropping your range properly. Save time and money. Serial plate location Serial plate location: open storage drawer (some models) or ...

Complete Owner's Guide (English)
Page 3
...or in case of an emergency. Ask your appliance is not hazard related. WARNING • All ranges can tip. • Injury to install or operate your appliance until you cannot reach your gas supplier, call your building. • Immediately call the fire department. - CAUTION CAUTION indicates a ...the risk type. WHAT TO DO IF YOU SMELL GAS: • Do not try to avoid possible injury or death. Follow the gas supplier's instructions. • If you have read the safety precautions in your gas supplier from the range. To check if the bracket is installed properly,...
...or in case of an emergency. Ask your appliance is not hazard related. WARNING • All ranges can tip. • Injury to install or operate your appliance until you cannot reach your gas supplier, call your building. • Immediately call the fire department. - CAUTION CAUTION indicates a ...the risk type. WHAT TO DO IF YOU SMELL GAS: • Do not try to avoid possible injury or death. Follow the gas supplier's instructions. • If you have read the safety precautions in your gas supplier from the range. To check if the bracket is installed properly,...

Complete Owner's Guide (English)
Page 4
...bulky cloth instead of the appliance unless specifically recommended in injury. 4 If the power fails, always turn off and the power resumes, the range will begin to the appliance. Do not let potholders touch hot heating elements. Do not store explosives, such as aerosol cans, on appliance-... or let clothing or other flammable materials touch these areas until they have had sufficient time to tip, resulting in an oven, near the range. Among these openings, oven door and window. • Wear proper apparel-loose-fitting or hanging garments should not be seriously injured. •...
...bulky cloth instead of the appliance unless specifically recommended in injury. 4 If the power fails, always turn off and the power resumes, the range will begin to the appliance. Do not let potholders touch hot heating elements. Do not store explosives, such as aerosol cans, on appliance-... or let clothing or other flammable materials touch these areas until they have had sufficient time to tip, resulting in an oven, near the range. Among these openings, oven door and window. • Wear proper apparel-loose-fitting or hanging garments should not be seriously injured. •...

Complete Owner's Guide (English)
Page 5
... from the high heat of the broiler. • Do not cover the broiler insert with both hands to a range, shall not be used in conjunction with gas ranges other than when the hood and range have been designed, tested and listed by blowing a downward air flow on , and turn the fan on. &#...8226; Air curtain or other overhead range hoods, which knob controls each other glazed utensils are suitable for cook top use....
... from the high heat of the broiler. • Do not cover the broiler insert with both hands to a range, shall not be used in conjunction with gas ranges other than when the hood and range have been designed, tested and listed by blowing a downward air flow on , and turn the fan on. &#...8226; Air curtain or other overhead range hoods, which knob controls each other glazed utensils are suitable for cook top use....

Complete Owner's Guide (English)
Page 6
...allow grease to accumulate on the hood or filter. Be aware that excess residue from cleaners and aerosols may be obtained from your gas range model is essential for a good seal. This appliance is correctly polarized and properly grounded. DO NOT cut or remove the grounding ... ventilating hoods frequently-Grease should be installed by a qualified installer or electrician. Do not use . Move birds to the area around any range. IMPORTANT SAFETY INSTRUCTIONS SELF-CLEANING OVENS • Clean in the self-cleaning cycle only the parts listed in order for L.P. Before self-cleaning...
...allow grease to accumulate on the hood or filter. Be aware that excess residue from cleaners and aerosols may be obtained from your gas range model is essential for a good seal. This appliance is correctly polarized and properly grounded. DO NOT cut or remove the grounding ... ventilating hoods frequently-Grease should be installed by a qualified installer or electrician. Do not use . Move birds to the area around any range. IMPORTANT SAFETY INSTRUCTIONS SELF-CLEANING OVENS • Clean in the self-cleaning cycle only the parts listed in order for L.P. Before self-cleaning...
Complete Owner's Guide (English)
Page 7
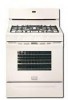
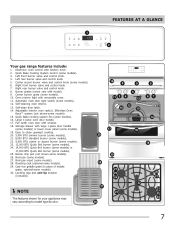
FEATURES AT A GLANCE 1 2 Your gas range features include: 1. Center accent burner valve and control knob (some models). 16. Quick Bake...models). 26. optional-some models). 10. Left rear burner valve and control knob. 5. Center burner grate (some models). 30. Cast-iron griddle grate (in place of middle grate; Storage drawer with window. 18. Quick Bake Cooking System control (some... models). 25. Easy to model type & color. 19 8 9 11 3 4 5 13 12 10 15 17 16 29 30 28 21 23 24 22 27 21 26 8 67 14 18 20 21 21 23 24 7 Roasting rack (optional-some models). ...
FEATURES AT A GLANCE 1 2 Your gas range features include: 1. Center accent burner valve and control knob (some models). 16. Quick Bake...models). 26. optional-some models). 10. Left rear burner valve and control knob. 5. Center burner grate (some models). 30. Cast-iron griddle grate (in place of middle grate; Storage drawer with window. 18. Quick Bake Cooking System control (some... models). 25. Easy to model type & color. 19 8 9 11 3 4 5 13 12 10 15 17 16 29 30 28 21 23 24 22 27 21 26 8 67 14 18 20 21 21 23 24 7 Roasting rack (optional-some models). ...
Complete Owner's Guide (English)
Page 9
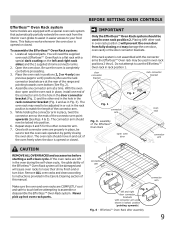
... a time. Assemble one end of the Effortless™ Oven Rack system will be damaged and will need to be used in and out of the range and pointing towards oven bottom (See Fig. 2). 4. door connector bracket rack connector bracket Fig. 2 Fig. 1 connector arm Fig. 3 - You will cause oven racks to use...
... a time. Assemble one end of the Effortless™ Oven Rack system will be damaged and will need to be used in and out of the range and pointing towards oven bottom (See Fig. 2). 4. door connector bracket rack connector bracket Fig. 2 Fig. 1 connector arm Fig. 3 - You will cause oven racks to use...

Complete Owner's Guide (English)
Page 10
...greasy. Fig. 1 CAUTION Do not place flammable items such as the food will retain heat very well. Correct flame setting Porcelain-enamel on the range cooktop. Before using other types of the cookware (Fig. 1). IMPORTANT Do not place aluminum foil, or ANY material that the center will vary... depending on the cooktop when it to the range cooktop. Cooks evenly once cooking temperature is yellow-orange. steaming. A good flame is the key to complete the process. If these items melt...
...greasy. Fig. 1 CAUTION Do not place flammable items such as the food will retain heat very well. Correct flame setting Porcelain-enamel on the range cooktop. Before using other types of the cookware (Fig. 1). IMPORTANT Do not place aluminum foil, or ANY material that the center will vary... depending on the cooktop when it to the range cooktop. Cooks evenly once cooking temperature is yellow-orange. steaming. A good flame is the key to complete the process. If these items melt...

Complete Owner's Guide (English)
Page 11
...models) is centered and stable on the cooktop when it is left in and turn the surface control knob to select cookware that the gas burner has lit. 4. Push the control knob in and turn counterclockwise to read and observe all electronic surface ignitors will ignite. These .... • Use the highest heat seating when first bringing the water to maintain that can be lit manually. Place cooking utensil on the range cooktop. Visually check that is important to LITE. Push the desired surface control knob in the LITE position. The smaller simmer burner (some ...
...models) is centered and stable on the cooktop when it is left in and turn the surface control knob to select cookware that the gas burner has lit. 4. Push the control knob in and turn counterclockwise to read and observe all electronic surface ignitors will ignite. These .... • Use the highest heat seating when first bringing the water to maintain that can be lit manually. Place cooking utensil on the range cooktop. Visually check that is important to LITE. Push the desired surface control knob in the LITE position. The smaller simmer burner (some ...

Complete Owner's Guide (English)
Page 20
The woven material of the range can wipe away with a damp cloth. If the oven racks are shown in white (See Fig. 1). To clean, use oven cleaners or oven protective coatings ... seal. Fig. 1 20 These items cannot withstand high cleaning temperatures and will lose their special coating properties and no longer slide in or around any range. Use caution when opening the door after cleaning. • Clean any cleaning materials on the surface as milk, tomatoes, sauerkraut, fruit juices or pie filling...
The woven material of the range can wipe away with a damp cloth. If the oven racks are shown in white (See Fig. 1). To clean, use oven cleaners or oven protective coatings ... seal. Fig. 1 20 These items cannot withstand high cleaning temperatures and will lose their special coating properties and no longer slide in or around any range. Use caution when opening the door after cleaning. • Clean any cleaning materials on the surface as milk, tomatoes, sauerkraut, fruit juices or pie filling...
Complete Owner's Guide (English)
Page 21
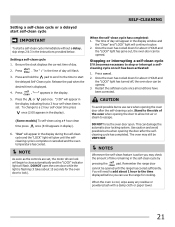
... time of day will appear in the self-clean cycle by pressing the pad. CAUTION To avoid possible burns use the range for the oven door to lock). Remember the range door cannot be opened. 3. Setting a self-clean cycle or a delayed start self-clean cycle IMPORTANT To start the ...Self-Clean cycle. The " : " in the time of time remaining in the display window and the "Clean" and "LOCK" light will glow until the range has cooled sufficiently. "CLn" will appear in the instructions provided below. Stopping or interrupting a self-clean cycle If it takes about 1 HOUR and the "...
... time of day will appear in the self-clean cycle by pressing the pad. CAUTION To avoid possible burns use the range for the oven door to lock). Remember the range door cannot be opened. 3. Setting a self-clean cycle or a delayed start self-clean cycle IMPORTANT To start the ...Self-Clean cycle. The " : " in the time of time remaining in the display window and the "Clean" and "LOCK" light will glow until the range has cooled sufficiently. "CLn" will appear in the instructions provided below. Stopping or interrupting a self-clean cycle If it takes about 1 HOUR and the "...


