Complete Owner's Guide (English)
Page 1
RaGnasge Visit the Frigidaire Web Site at: http://www.frigidaire.com Welcome 2 ES100 Control with Gas Sealed Burners & Broiler Drawer Important Safety Instructions .....2-4 Setting Surface Controls 5 Before Setting Oven Controls ....... 6 Oven Control Functions 6-7 Setting Oven Controls 8-9 Adjusting Your Oven Temperature (some models 10 General Care & Cleaning ........ 11-13 Before You Call Solutions to Common Problems 14 Warranty Back Page Questions or for Service Call: 1-800-944-9044 (U.S.) 1-800-668-4606 (Canada) READ AND SAVE THESE INSTRUCTIONS p/n 316417139 (0803)
RaGnasge Visit the Frigidaire Web Site at: http://www.frigidaire.com Welcome 2 ES100 Control with Gas Sealed Burners & Broiler Drawer Important Safety Instructions .....2-4 Setting Surface Controls 5 Before Setting Oven Controls ....... 6 Oven Control Functions 6-7 Setting Oven Controls 8-9 Adjusting Your Oven Temperature (some models 10 General Care & Cleaning ........ 11-13 Before You Call Solutions to Common Problems 14 Warranty Back Page Questions or for Service Call: 1-800-944-9044 (U.S.) 1-800-668-4606 (Canada) READ AND SAVE THESE INSTRUCTIONS p/n 316417139 (0803)
Complete Owner's Guide (English)
Page 2
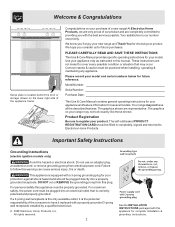
... Home Products. Important Safety Instructions Grounding Instructions (electric ignition models only) Avoid fire hazard or electrical shock. DO NOT cut or REMOVE the grounding prong from electrical power cord. Your satisfaction is our number one priority. Model Number: Serial Number: Purchase Date: This Use & Care Manual contains general operating instructions for your appliance and feature information for future reference. The graphics on the lower right side of the consumer to cover every possible condition or...
... Home Products. Important Safety Instructions Grounding Instructions (electric ignition models only) Avoid fire hazard or electrical shock. DO NOT cut or REMOVE the grounding prong from electrical power cord. Your satisfaction is our number one priority. Model Number: Serial Number: Purchase Date: This Use & Care Manual contains general operating instructions for your appliance and feature information for future reference. The graphics on the lower right side of the consumer to cover every possible condition or...
Complete Owner's Guide (English)
Page 3
... or cover an entire rack with the National Fuel Gas Code ANSI Z223.- This symbol will help alert you to situations that may cause the range to a range, shall not be done only by surface burners or in serious injuries and also cause damage to reach items could use gasoline or other servicing should not be seriously injured. 3 This includes removing leveling legs, panels, wire covers, anti-tip...
... or cover an entire rack with the National Fuel Gas Code ANSI Z223.- This symbol will help alert you to situations that may cause the range to a range, shall not be done only by surface burners or in serious injuries and also cause damage to reach items could use gasoline or other servicing should not be seriously injured. 3 This includes removing leveling legs, panels, wire covers, anti-tip...

Complete Owner's Guide (English)
Page 4
... sudden change in this THESE BURNERS, OVEN BURNERS OR INTERIOR manual. surfaces facing the cook top, the oven vent openings and IMPORTANT INSTRUCTIONS FOR USING YOUR OVEN surfaces near • Glazed Cooking Utensils-Only certain types of a hot should never be certain IMPORTANT INSTRUCTIONS FOR USING YOUR COOKTOP Use Proper Flame Size-Adjust flame size so it closely. Do not let • Do Not Heat Unopened Food Containers-Buildup of the broiler. pressure may result in Remove all parts free of time...
... sudden change in this THESE BURNERS, OVEN BURNERS OR INTERIOR manual. surfaces facing the cook top, the oven vent openings and IMPORTANT INSTRUCTIONS FOR USING YOUR OVEN surfaces near • Glazed Cooking Utensils-Only certain types of a hot should never be certain IMPORTANT INSTRUCTIONS FOR USING YOUR COOKTOP Use Proper Flame Size-Adjust flame size so it closely. Do not let • Do Not Heat Unopened Food Containers-Buildup of the broiler. pressure may result in Remove all parts free of time...
Complete Owner's Guide (English)
Page 5
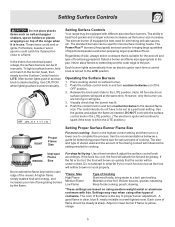
... surface burner. 2. Use the guides and adjust the flame as a guide for determining proper flame size for cooking. Use the recommendations below as needed for various types of the flame is clear, blue & nearly invisible in and turn counterclockwise out of an electrical power outage, the surface burners can be greasy. For deep fat frying: Use a thermometer & adjust the surface control knob accordingly. pan broiling. The color of cooking. Push the surface control knob in a well-lighted room. steaming. Settings...
... surface burner. 2. Use the guides and adjust the flame as a guide for determining proper flame size for cooking. Use the recommendations below as needed for various types of the flame is clear, blue & nearly invisible in and turn counterclockwise out of an electrical power outage, the surface burners can be greasy. For deep fat frying: Use a thermometer & adjust the surface control knob accordingly. pan broiling. The color of cooking. Push the surface control knob in a well-lighted room. steaming. Settings...
Complete Owner's Guide (English)
Page 6
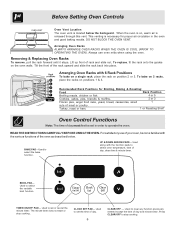
... 1 cuts of the oven as described below the backguard. When the oven is on position 2 or 3. Arranging Oven Racks with the function pads to set or cancel the minute timer. Used to select oven temperature, time of day. 6 CLEAR/OFF - The minute timer does not start or stop cooking. Before Setting Oven Controls Oven Vent Location The oven vent is located below . This venting is released through this vent. Recomended Rack Positions for proper air circulation in order to operate...
... 1 cuts of the oven as described below the backguard. When the oven is on position 2 or 3. Arranging Oven Racks with the function pads to set or cancel the minute timer. Used to select oven temperature, time of day. 6 CLEAR/OFF - The minute timer does not start or stop cooking. Before Setting Oven Controls Oven Vent Location The oven vent is located below . This venting is released through this vent. Recomended Rack Positions for proper air circulation in order to operate...
Complete Owner's Guide (English)
Page 7
... use : While the timer is first plugged in, or when the power supply to the range has been interrupted, the display will be shown in the display, press and hold the or until one minute increments. Changing the Temperature Display Mode (some models) The electronic oven control temperature display mode was factory preset to choose the (Fahrenheit) °F mode; To accept the change skip step 4 below, OR; 4. To Set the Clock When the range...
... use : While the timer is first plugged in, or when the power supply to the range has been interrupted, the display will be shown in the display, press and hold the or until one minute increments. Changing the Temperature Display Mode (some models) The electronic oven control temperature display mode was factory preset to choose the (Fahrenheit) °F mode; To accept the change skip step 4 below, OR; 4. To Set the Clock When the range...
Complete Owner's Guide (English)
Page 8
... baking function, press . Press and make sure the bake temperature is released, the oven will begin heating to increase or decrease the set in the display. 2. The display will beep once. 4. When the or is displayed. 2. To Set the Controls for Baking The oven can then be programmed to bake at any temperature from 170°F to operate the oven. To Change the Oven Temperature after Baking has Started: 1. To Set or Change the Temperature for Baking...
... baking function, press . Press and make sure the bake temperature is released, the oven will begin heating to increase or decrease the set in the display. 2. The display will beep once. 4. When the or is displayed. 2. To Set the Controls for Baking The oven can then be programmed to bake at any temperature from 170°F to operate the oven. To Change the Oven Temperature after Baking has Started: 1. To Set or Change the Temperature for Baking...
Complete Owner's Guide (English)
Page 9
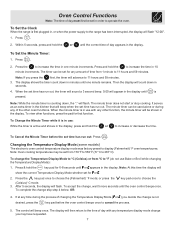
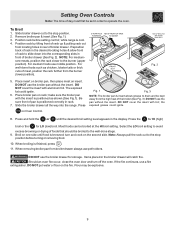
... could ignite. 6. The exposed fat could ignite. DO NOT use middle position. Slide broiler drawer out to operate the oven. Setting Oven Controls Note: The time of day must first be set in the broiler drawer will catch fire. For well-done foods such as shown (See Fig.1). Should an oven fire occur, close the oven door and turn and cook on one side until the desired broil setting level appears in rear of broiler drawer.
... could ignite. 6. The exposed fat could ignite. DO NOT use middle position. Slide broiler drawer out to operate the oven. Setting Oven Controls Note: The time of day must first be set in the broiler drawer will catch fire. For well-done foods such as shown (See Fig.1). Should an oven fire occur, close the oven door and turn and cook on one side until the desired broil setting level appears in rear of broiler drawer.
Complete Owner's Guide (English)
Page 10
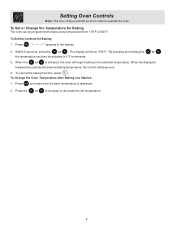
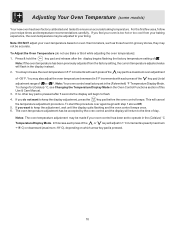
... to +35 F. To start this procedure over again begin to ensure an accurate baking temperature. To Adjust the Oven Temperature (do not want to the time of the key pad to operate in the (Fahrenheit) °F Temperature Display Mode. You may be adjusted to your oven control has been set in the (Celsius) °C Temperature Display Mode. In this Use & Care Manual. 3. To change for (Celsius) °C, see Changing the Temperature Display Mode in grocery stores...
... to +35 F. To start this procedure over again begin to ensure an accurate baking temperature. To Adjust the Oven Temperature (do not want to the time of the key pad to operate in the (Fahrenheit) °F Temperature Display Mode. You may be adjusted to your oven control has been set in the (Celsius) °C Temperature Display Mode. In this Use & Care Manual. 3. To change for (Celsius) °C, see Changing the Temperature Display Mode in grocery stores...
Complete Owner's Guide (English)
Page 11
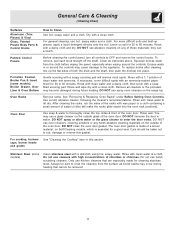
..., burner heads and grates See "Cleaning the Cooktop" later in this section Stainless Steel (some models), Broiler Drawer, Door Liner & Oven Bottom Gentle scouring with a clean cloth. Do not use hot, soapy water and a cloth. For general cleaning, use harsh scrubbing cleaners. Rinse with clean water and a damp cloth, then scrub with a dishcloth using hot, soapy water. Oven Racks Remove racks. Care should be taken not to 40 minutes. Only use a glass cleaner on Self-Cleaning models...
..., burner heads and grates See "Cleaning the Cooktop" later in this section Stainless Steel (some models), Broiler Drawer, Door Liner & Oven Bottom Gentle scouring with a clean cloth. Do not use hot, soapy water and a cloth. For general cleaning, use harsh scrubbing cleaners. Rinse with clean water and a damp cloth, then scrub with a dishcloth using hot, soapy water. Oven Racks Remove racks. Care should be taken not to 40 minutes. Only use a glass cleaner on Self-Cleaning models...
Complete Owner's Guide (English)
Page 12
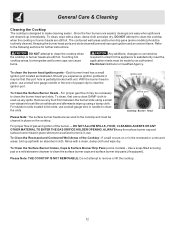
... MATERIAL TO ENTER THE GAS ORIFICE HOLDER OPENING. The contoured well areas and burner drip pans (some models) - Keeping the burner head ports and slots clean will prevent improper ignition and an uneven flame. Touching hot cooktop areas, burner grates and burner caps can cause burns. Each burner head has a small ignition port located as illustrated. With the burner head in the slots, use a small-gauge wire or needle to clear...
... MATERIAL TO ENTER THE GAS ORIFICE HOLDER OPENING. The contoured well areas and burner drip pans (some models) - Keeping the burner head ports and slots clean will prevent improper ignition and an uneven flame. Touching hot cooktop areas, burner grates and burner caps can cause burns. Each burner head has a small ignition port located as illustrated. With the burner head in the slots, use a small-gauge wire or needle to clear...
Complete Owner's Guide (English)
Page 13
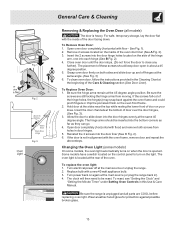
... broken glass. 13 Be sure the screws are COOL before replacing oven light. To reset, see "Setting the Clock" and "Setting the Minute Timer" under Setting Oven Controls in ). 4. Remove 2 screws located on when the door is unplugged and all models) The door is heavy. Some models have a switch located on the control panel to close any Fig. 1 further). Be sure the range is opened. Grasp oven door firmly on your knee. General Care & Cleaning Removing & Replacing the Oven Door (all parts are still locking...
... broken glass. 13 Be sure the screws are COOL before replacing oven light. To reset, see "Setting the Clock" and "Setting the Minute Timer" under Setting Oven Controls in ). 4. Remove 2 screws located on when the door is unplugged and all models) The door is heavy. Some models have a switch located on the control panel to close any Fig. 1 further). Be sure the range is opened. Grasp oven door firmly on your knee. General Care & Cleaning Removing & Replacing the Oven Door (all parts are still locking...

Complete Owner's Guide (English)
Page 14
... and set . Place oven rack in & turn control knob to the set temperature before starting oven. Entire appliance does not operate - (1) The time of range until flame is full. Poor baking results - Replace or tighten bulb. Center food in this Use & Care Manual (some models) - Before You Call Solutions to Common Problems Before you call for service, review the following the instructions under Setting Oven Controls. (2) Broiler Drawer is open. Adjust leveling legs at base of day is disconnected from outlet (electric ignition models only). See "Cleaning...
... and set . Place oven rack in & turn control knob to the set temperature before starting oven. Entire appliance does not operate - (1) The time of range until flame is full. Poor baking results - Replace or tighten bulb. Center food in this Use & Care Manual (some models) - Before You Call Solutions to Common Problems Before you call for service, review the following the instructions under Setting Oven Controls. (2) Broiler Drawer is open. Adjust leveling legs at base of day is disconnected from outlet (electric ignition models only). See "Cleaning...
Complete Owner's Guide (English)
Page 16
... transferred from its original owner to use your appliance. 9. Products purchased "as removal of trim, cupboards, shelves, etc.,which do not involve malfunction or defects in materials or workmanship, or for service calls to repair or replace appliance light bulbs, air filters, water filters, other consumables, or knobs, handles, or other appropriate payment record to establish the warranty period should service be obtained by contacting...
... transferred from its original owner to use your appliance. 9. Products purchased "as removal of trim, cupboards, shelves, etc.,which do not involve malfunction or defects in materials or workmanship, or for service calls to repair or replace appliance light bulbs, air filters, water filters, other consumables, or knobs, handles, or other appropriate payment record to establish the warranty period should service be obtained by contacting...


