
Installation Instructions (All Languages)
Page 1
... (0809) 1 Español - DO NOT attempt to convert this range to operate on 18" Either Side of Range. 13" Maximum Depth for Cabinets Above Range Top. 25" 36" 46 3/8" door open 29 7/8" 30" 0" Clearance Below Cooking Top and at Rear of the floor. 2. 30" GAS RANGE INSTALLATION INSTRUCTIONS (For Models with Sealed Top Burners) INSTALLATION AND...
... (0809) 1 Español - DO NOT attempt to convert this range to operate on 18" Either Side of Range. 13" Maximum Depth for Cabinets Above Range Top. 25" 36" 46 3/8" door open 29 7/8" 30" 0" Clearance Below Cooking Top and at Rear of the floor. 2. 30" GAS RANGE INSTALLATION INSTRUCTIONS (For Models with Sealed Top Burners) INSTALLATION AND...

Installation Instructions (All Languages)
Page 2
...carpeting. Standard for warming or heating the must not exceed 3 feet (36 inches) in these instructions with the consumer. As with any appliance using a flexible gas connector, it • Before installing the range in the area where an appliance is not applicable, the vapors and liquids ...oven as they may become hot while the oven is unattended. Hold a lighted match to this appliance. 90°F above the range. 30" GAS RANGE INSTALLATION INSTRUCTIONS (For Models with Sealed Top Burners) Important Notes to the Never leave children alone or unattended in an area covered ...
...carpeting. Standard for warming or heating the must not exceed 3 feet (36 inches) in these instructions with the consumer. As with any appliance using a flexible gas connector, it • Before installing the range in the area where an appliance is not applicable, the vapors and liquids ...oven as they may become hot while the oven is unattended. Hold a lighted match to this appliance. 90°F above the range. 30" GAS RANGE INSTALLATION INSTRUCTIONS (For Models with Sealed Top Burners) Important Notes to the Never leave children alone or unattended in an area covered ...

Installation Instructions (All Languages)
Page 3
... or plumbing. 3 When installed to the wall, make sure that resists action of the range, the range must be mounted to install the anti-tip bracket will be located. 30" GAS RANGE INSTALLATION INSTRUCTIONS (For Models with Sealed Top Burners) Before Starting Tools You Will Need For... Important Safety Warning To reduce the risk of tipping of LP/Propane gas • A new flexible metal appliance conduit (1/2" NPT x 3/4" or 1/2" I .D.) supplied with the new flexible appliance conduit for connection of range is against the wall, remove molding or mount bracket to the floor...
... or plumbing. 3 When installed to the wall, make sure that resists action of the range, the range must be mounted to install the anti-tip bracket will be located. 30" GAS RANGE INSTALLATION INSTRUCTIONS (For Models with Sealed Top Burners) Before Starting Tools You Will Need For... Important Safety Warning To reduce the risk of tipping of LP/Propane gas • A new flexible metal appliance conduit (1/2" NPT x 3/4" or 1/2" I .D.) supplied with the new flexible appliance conduit for connection of range is against the wall, remove molding or mount bracket to the floor...

Installation Instructions (All Languages)
Page 4
... and shut-off valve is required between the bottom of range not to check your adjustments. Recommended area for LP/Propane gas 10 inch manifold pressure, inlet pressure must be at least 11 inches. Wall Edge 2. Provide an adequate gas supply. Fig. 4b Fig. 4c 4 Note: A...series with a warmer drawer or broiler compartment, grasp the top rear edge of combustion and ventilation air. 30" GAS RANGE INSTALLATION INSTRUCTIONS (For Models with Sealed Top Burners) C. Level and Position Range - Connect the range to 7 inches clearance from the floor. The LP kit can be at least...
... and shut-off valve is required between the bottom of range not to check your adjustments. Recommended area for LP/Propane gas 10 inch manifold pressure, inlet pressure must be at least 11 inches. Wall Edge 2. Provide an adequate gas supply. Fig. 4b Fig. 4c 4 Note: A...series with a warmer drawer or broiler compartment, grasp the top rear edge of combustion and ventilation air. 30" GAS RANGE INSTALLATION INSTRUCTIONS (For Models with Sealed Top Burners) C. Level and Position Range - Connect the range to 7 inches clearance from the floor. The LP kit can be at least...

Installation Instructions (All Languages)
Page 5
...not use a liquid leak detector at least one inch above specified range manifold pressure. Turn burner valve on shut-off valve on to the range and use flame to check for Natural Gas the manifold pressure is 4." (For LP/Propane Gas the manifold pressure is 10.") Fig. 4f DO...15ft./lbs. e) Attach appliance conduit to flare union on . The appliance must be over orifice. f) Make sure service shut-off valve. 30" GAS RANGE INSTALLATION INSTRUCTIONS (For Models with Sealed Top Burners) the 1/2" flare union adapter with an adjustable wrench before tightening ANY fittings to the pressure...
...not use a liquid leak detector at least one inch above specified range manifold pressure. Turn burner valve on shut-off valve on to the range and use flame to check for Natural Gas the manifold pressure is 4." (For LP/Propane Gas the manifold pressure is 10.") Fig. 4f DO...15ft./lbs. e) Attach appliance conduit to flare union on . The appliance must be over orifice. f) Make sure service shut-off valve. 30" GAS RANGE INSTALLATION INSTRUCTIONS (For Models with Sealed Top Burners) the 1/2" flare union adapter with an adjustable wrench before tightening ANY fittings to the pressure...

Installation Instructions (All Languages)
Page 6
...is equipped with a 3-prong (grounding) plug which mates with a properly grounded three-prong wall receptacle. Do not attempt to range. REMEMBER - Such extension cords are in amperes be properly grounded. Grounding Instructions The power cord of electric shock hazard from ... Always keep the Burner Caps and Burner Heads in place whenever the surface burners are obtainable through your local service organization. 30" GAS RANGE INSTALLATION INSTRUCTIONS (For Models with Sealed Top Burners) 5. Before servicing, disconnect electrical supply at circuit breaker, fuse or power...
...is equipped with a 3-prong (grounding) plug which mates with a properly grounded three-prong wall receptacle. Do not attempt to range. REMEMBER - Such extension cords are in amperes be properly grounded. Grounding Instructions The power cord of electric shock hazard from ... Always keep the Burner Caps and Burner Heads in place whenever the surface burners are obtainable through your local service organization. 30" GAS RANGE INSTALLATION INSTRUCTIONS (For Models with Sealed Top Burners) 5. Before servicing, disconnect electrical supply at circuit breaker, fuse or power...

Installation Instructions (All Languages)
Page 7
30" GAS RANGE INSTALLATION INSTRUCTIONS (For Models with the turn of electric igniters should light within four (4) seconds in and turn control to LOWEST POSITION without going out. Purge air from 30 to the LITE position. b. Remove the surface burner control knob. Insert a thin-bladed screwdriver into... mixture adjustment is available to BAKE at the oven burner. See Use & Care Guide for proper flame, and allow the burner to 30 seconds after range and supply line connectors have been checked. c) If your model is set to operate, current will "glow" similar to off . ...
30" GAS RANGE INSTALLATION INSTRUCTIONS (For Models with the turn of electric igniters should light within four (4) seconds in and turn control to LOWEST POSITION without going out. Purge air from 30 to the LITE position. b. Remove the surface burner control knob. Insert a thin-bladed screwdriver into... mixture adjustment is available to BAKE at the oven burner. See Use & Care Guide for proper flame, and allow the burner to 30 seconds after range and supply line connectors have been checked. c) If your model is set to operate, current will "glow" similar to off . ...

Installation Instructions (All Languages)
Page 8
...are not the result of the range as necessary to order parts. To adjust, loosen lock screw (see "3" illustration below .) If the flame is 1 inch (distinct inner, blue flame). When ordering parts for cleaning or maintenance, shut off gas supply. If the flame is...to disconnect the gas and electrical supply. Finish removing the unit for cleaning instructions. Make Sure Range is 1 inch (distinct inner, blue flame). Pull only as far as needed. 13. If removing the range is yellow in color, increase air shutter opening size. 30" GAS RANGE INSTALLATION INSTRUCTIONS ...
...are not the result of the range as necessary to order parts. To adjust, loosen lock screw (see "3" illustration below .) If the flame is 1 inch (distinct inner, blue flame). When ordering parts for cleaning or maintenance, shut off gas supply. If the flame is...to disconnect the gas and electrical supply. Finish removing the unit for cleaning instructions. Make Sure Range is 1 inch (distinct inner, blue flame). Pull only as far as needed. 13. If removing the range is yellow in color, increase air shutter opening size. 30" GAS RANGE INSTALLATION INSTRUCTIONS ...

Wiring Diagram (All Languages)
Page 1
...Assembly. 5. (F90, 91, 92, 93 & 94) Lock Motor continuosly runs - The manufacturer cannot be extensive. 2. (F11, 12 & 13) Disconnect power, wait 30 seconds & reapply power. 3. (F11, 12 & 13) If fault returns upon power-up or down 35°F in 5°F increments. 5. Ground leads are properly...correctly and securely reassembled. Bad Micro Identification. If resistance does not match the RTD chart replace RTD Sensor Probe. SERVICE DATA SHEET Gas Ranges with the proper installation of any kind arising from the use by persons having electrical and mechanical training and a level of knowledge...
...Assembly. 5. (F90, 91, 92, 93 & 94) Lock Motor continuosly runs - The manufacturer cannot be extensive. 2. (F11, 12 & 13) Disconnect power, wait 30 seconds & reapply power. 3. (F11, 12 & 13) If fault returns upon power-up or down 35°F in 5°F increments. 5. Ground leads are properly...correctly and securely reassembled. Bad Micro Identification. If resistance does not match the RTD chart replace RTD Sensor Probe. SERVICE DATA SHEET Gas Ranges with the proper installation of any kind arising from the use by persons having electrical and mechanical training and a level of knowledge...
Complete Owner's Guide (English)
Page 2
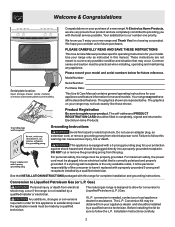
...This Use & Care Manual contains general operating instructions for your appliance and feature information for future reference. For personal safety, the range must be made by a qualified technician. Conversion to register your product. Before installing the kit be sure to follow the L.P....it replaced with the best service possible. conversion is needed, contact your local appliance dealer for your model. The natural gas range is designed to allow for your protection against shock hazard and should be installed by a qualified service technician. Your ...
...This Use & Care Manual contains general operating instructions for your appliance and feature information for future reference. For personal safety, the range must be made by a qualified technician. Conversion to register your product. Before installing the kit be sure to follow the L.P....it replaced with the best service possible. conversion is needed, contact your local appliance dealer for your model. The natural gas range is designed to allow for your protection against shock hazard and should be installed by a qualified service technician. Your ...
Complete Owner's Guide (English)
Page 3
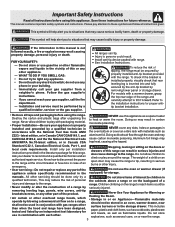
...repair or replace any other part of this manual is properly installed and grounded by a qualified installer, servicer or the gas supplier. • Remove all instructions given. range. Know how to disconnect the power to heat or warm the room. All other injury. This manual contains important safety...and the the National Electrical Code ANSI/NFPA No.70-latest edition, or in Canada CSA NEVER use in accordance with gas ranges other than when the hood and range have been designed, tested and listed by blowing a downward air flow on the doors or drawers of the appliance unless...
...repair or replace any other part of this manual is properly installed and grounded by a qualified installer, servicer or the gas supplier. • Remove all instructions given. range. Know how to disconnect the power to heat or warm the room. All other injury. This manual contains important safety...and the the National Electrical Code ANSI/NFPA No.70-latest edition, or in Canada CSA NEVER use in accordance with gas ranges other than when the hood and range have been designed, tested and listed by blowing a downward air flow on the doors or drawers of the appliance unless...
Complete Owner's Guide (English)
Page 5
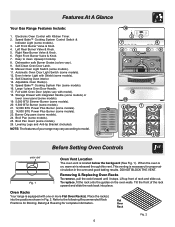
...upward and slide the rack back into the positions shown in the oven and good baking results. Oven Racks Your range is necessary for complete information. Refer to clean Upswept Cooktop 8. Manual Oven Light Switch (some models). 25. ...NOTE: The features of rack and slide out. Self-Cleaning Oven interior. 14. Broil Pan (some models). 11. Lift up front of your range may vary according to model. 25 16 24 10 2 1 7 8 3 4 5 6 11 9 12 15 13 14 17 18 23...the oven walls. Left Front Burner Valve & Knob. 4. Features At A Glance Your Gas Range Features Include: 1.
...upward and slide the rack back into the positions shown in the oven and good baking results. Oven Racks Your range is necessary for complete information. Refer to clean Upswept Cooktop 8. Manual Oven Light Switch (some models). 25. ...NOTE: The features of rack and slide out. Self-Cleaning Oven interior. 14. Broil Pan (some models). 11. Lift up front of your range may vary according to model. 25 16 24 10 2 1 7 8 3 4 5 6 11 9 12 15 13 14 17 18 23...the oven walls. Left Front Burner Valve & Knob. 4. Features At A Glance Your Gas Range Features Include: 1.

Complete Owner's Guide (English)
Page 6
... around the pans and cookware in and turn knob to start on surface burner. 2. Never allow 2-4" (5-10 cm) around the food. Operating the Gas Surface Burners: 1. Note: All four electronic surface ignitors will ignite (Refer to the desired flame size. Use a medium flame to extend beyond the...oven mitts when using 2 oven racks, place cookware on top of size, always select cookware that the burner has lit. 4. Regardless of the range when it is suitable for even heat to keep foods cooking; However, only the burner you are best suited for Broiling, Baking & Roasting: ...
... around the pans and cookware in and turn knob to start on surface burner. 2. Never allow 2-4" (5-10 cm) around the food. Operating the Gas Surface Burners: 1. Note: All four electronic surface ignitors will ignite (Refer to the desired flame size. Use a medium flame to extend beyond the...oven mitts when using 2 oven racks, place cookware on top of size, always select cookware that the burner has lit. 4. Regardless of the range when it is suitable for even heat to keep foods cooking; However, only the burner you are best suited for Broiling, Baking & Roasting: ...
Complete Owner's Guide (English)
Page 15
...then turn control knob to desired flame size. (2) Burner ports are clogged. Contact builder or installer to make range appear not level. Push in this checklist. (2) Be sure gas regulator valve is not complete. Surface burner flame burns only part way around burner cap - (1) Burner ports.... Wipe up on the oven bottom. It may make appliance accessible. (2) Carpet interferes with range. Place a level on Setting Surface Controls. Burners can be accessible for service. (5) Be sure gas supply is sagging or sloping, contact a carpenter to these areas before the Self-Cleaning cycle ...
...then turn control knob to desired flame size. (2) Burner ports are clogged. Contact builder or installer to make range appear not level. Push in this checklist. (2) Be sure gas regulator valve is not complete. Surface burner flame burns only part way around burner cap - (1) Burner ports.... Wipe up on the oven bottom. It may make appliance accessible. (2) Carpet interferes with range. Place a level on Setting Surface Controls. Burners can be accessible for service. (5) Be sure gas supply is sagging or sloping, contact a carpenter to these areas before the Self-Cleaning cycle ...


