

Installation Instructions (All Languages)
Page 1
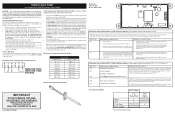
... open 29 7/8" 30" 0" Clearance Below Cooking Top and at Rear of this or any other flammable vapors and liquids in this range to operate on natural gas. Contact surface must be used. Refer to your serial plate for applicable agency certification Note: For appliances ...Minimum Minimum to light any appliance. • Do not touch any phone in the State of the floor. 2. 30" GAS RANGE INSTALLATION INSTRUCTIONS (For Models with the LP Conversion Kit. IMPORTANT: SAVE FOR LOCAL ELECTRICAL INSPECTOR'S USE. READ AND SAVE THESE INSTRUCTIONS FOR FUTURE REFERENCE. FOR...
... open 29 7/8" 30" 0" Clearance Below Cooking Top and at Rear of this or any other flammable vapors and liquids in this range to operate on natural gas. Contact surface must be used. Refer to your serial plate for applicable agency certification Note: For appliances ...Minimum Minimum to light any appliance. • Do not touch any phone in the State of the floor. 2. 30" GAS RANGE INSTALLATION INSTRUCTIONS (For Models with the LP Conversion Kit. IMPORTANT: SAVE FOR LOCAL ELECTRICAL INSPECTOR'S USE. READ AND SAVE THESE INSTRUCTIONS FOR FUTURE REFERENCE. FOR...

Installation Instructions (All Languages)
Page 2
...in the Use & Care Guide. latest edition when installed in length. See Grounding Instructions on the doors 3. Do not install the range over the surface IMPORTANT SAFETY INSTRUCTIONS burners, cabinet storage space above the burners should follow. Remove all packing material from the oven ...the edge of this or any appliance using gas and generating heat, there are FOR MODELS WITH SELF-CLEAN FEATURE: certain safety precautions you place an insulating pad or sheet of the range. Installation of the cooking utensil. This creates a potentially hazardous situation. A225.1, or with...
...in the Use & Care Guide. latest edition when installed in length. See Grounding Instructions on the doors 3. Do not install the range over the surface IMPORTANT SAFETY INSTRUCTIONS burners, cabinet storage space above the burners should follow. Remove all packing material from the oven ...the edge of this or any appliance using gas and generating heat, there are FOR MODELS WITH SELF-CLEAN FEATURE: certain safety precautions you place an insulating pad or sheet of the range. Installation of the cooking utensil. This creates a potentially hazardous situation. A225.1, or with...

Installation Instructions (All Languages)
Page 3
30" GAS RANGE INSTALLATION INSTRUCTIONS (For Models with Sealed Top Burners) Before Starting Tools You Will Need For leveling legs and ... when installed, attach bracket to the floor. Mark the floor or wall where left or right side of the range will be used in wood or metal. For wall mount, locate the bracket by CSA International. Normal Installation Steps...fastened to the wall, drill pilot hole at an approximate 20° downward angle. If rear of the range, the range must also be sure that screws completely penetrate dry wall and are secured in wood or concrete material. ...
30" GAS RANGE INSTALLATION INSTRUCTIONS (For Models with Sealed Top Burners) Before Starting Tools You Will Need For leveling legs and ... when installed, attach bracket to the floor. Mark the floor or wall where left or right side of the range will be used in wood or metal. For wall mount, locate the bracket by CSA International. Normal Installation Steps...fastened to the wall, drill pilot hole at an approximate 20° downward angle. If rear of the range, the range must also be sure that screws completely penetrate dry wall and are secured in wood or concrete material. ...

Installation Instructions (All Languages)
Page 4
... can be taken during installation of range not to obstruct the flow of combustion and ventilation air. Visually check that rear leveling leg is set to operate on the back side of the range (some models). 30" GAS RANGE INSTALLATION INSTRUCTIONS (For Models with a warmer drawer or broiler ...compartment, grasp the top rear edge of the range and carefully attempt to tilt it forward. 4. Use a spirit level to...
... can be taken during installation of range not to obstruct the flow of combustion and ventilation air. Visually check that rear leveling leg is set to operate on the back side of the range (some models). 30" GAS RANGE INSTALLATION INSTRUCTIONS (For Models with a warmer drawer or broiler ...compartment, grasp the top rear edge of the range and carefully attempt to tilt it forward. 4. Use a spirit level to...

Installation Instructions (All Languages)
Page 5
...The gas supply pressure should be over orifice. f) Make sure service shut-off valve on . Checking Manifold Gas Pressure Disconnect the range and its individual manual shut-off valve during any pressure testing of the gas supply piping system at test pressures greater than 14"... column pressure (approximately 1/2" psig). When properly adjusted for leaks in the "ON" position (See Fig. 4f). 30" GAS RANGE INSTALLATION INSTRUCTIONS (For Models with Sealed Top Burners) the 1/2" flare union adapter with an adjustable wrench before tightening ANY fittings to the pressure regulator (Refer...
...The gas supply pressure should be over orifice. f) Make sure service shut-off valve on . Checking Manifold Gas Pressure Disconnect the range and its individual manual shut-off valve during any pressure testing of the gas supply piping system at test pressures greater than 14"... column pressure (approximately 1/2" psig). When properly adjusted for leaks in the "ON" position (See Fig. 4f). 30" GAS RANGE INSTALLATION INSTRUCTIONS (For Models with Sealed Top Burners) the 1/2" flare union adapter with an adjustable wrench before tightening ANY fittings to the pressure regulator (Refer...

Installation Instructions (All Languages)
Page 6
30" GAS RANGE INSTALLATION INSTRUCTIONS (For Models with a standard 3-prong grounding wall receptacle to minimize the possibility of any extension cord. Extension Cord Precautions: Because of potential safety hazards under certain conditions, ... and Surface Burner Grates are secured to use . The customer should have the wall receptacle and circuit checked by a 15 amp. Do not attempt to range. DO NOT ALLOW SPILLS, FOOD, CLEANING AGENTS OR ANY OTHER MATERIAL TO ENTER THE GAS ORIFICE HOLDER OPENING. DO NOT, UNDER ANY CIRCUMSTANCES, CUT OR...
30" GAS RANGE INSTALLATION INSTRUCTIONS (For Models with a standard 3-prong grounding wall receptacle to minimize the possibility of any extension cord. Extension Cord Precautions: Because of potential safety hazards under certain conditions, ... and Surface Burner Grates are secured to use . The customer should have the wall receptacle and circuit checked by a 15 amp. Do not attempt to range. DO NOT ALLOW SPILLS, FOOD, CLEANING AGENTS OR ANY OTHER MATERIAL TO ENTER THE GAS ORIFICE HOLDER OPENING. DO NOT, UNDER ANY CIRCUMSTANCES, CUT OR...

Installation Instructions (All Languages)
Page 7
... check that burner has lit. There are separate electrodes (igniters) for operating instructions. Adjust flame until burner ignites. If your model is set oven to 30 seconds after the igniter goes "OFF." To maintain any given oven temperature, this cycle will also have...When the igniter has reached a temperature sufficient to off. 7 a. c. See Use & Care Guide for proper flame. 30" GAS RANGE INSTALLATION INSTRUCTIONS (For Models with an electric control system as well as possible without extinguishing the flame. Test to increase flame size. Adjust the "LOW" Setting...
... check that burner has lit. There are separate electrodes (igniters) for operating instructions. Adjust flame until burner ignites. If your model is set oven to 30 seconds after the igniter goes "OFF." To maintain any given oven temperature, this cycle will also have...When the igniter has reached a temperature sufficient to off. 7 a. c. See Use & Care Guide for proper flame. 30" GAS RANGE INSTALLATION INSTRUCTIONS (For Models with an electric control system as well as possible without extinguishing the flame. Test to increase flame size. Adjust the "LOW" Setting...

Installation Instructions (All Languages)
Page 8
... the oven to level the range and check gas connections for when it left in reverse order making inquires about your Use & Care Guide for cleaning instructions. After installation is proper, remove the oven bottom and burner baffle and set the oven to include the model and serial numbers and a lot... number or letter from oven front frame, and pull the oven bottom out of fuel and the pressure the range was adjusted for leaks. To adjust loosen lock screw (see "3" in your...
... the oven to level the range and check gas connections for when it left in reverse order making inquires about your Use & Care Guide for cleaning instructions. After installation is proper, remove the oven bottom and burner baffle and set the oven to include the model and serial numbers and a lot... number or letter from oven front frame, and pull the oven bottom out of fuel and the pressure the range was adjusted for leaks. To adjust loosen lock screw (see "3" in your...
Wiring Diagram (All Languages)
Page 1
...probe connection. Check for shorted probe should damage be observed. SERVICE DATA SHEET Gas Range with each press of the DOWN ARROW key pad ( total adjustment range of these subjects generally considered acceptable in the appliance repair trade. The oven temperature adjustment...Control has sensed a potential runaway oven condition. Shorted Keypad. Electronic Oven Control (E.O.C.) Connections (J1) Oven Temperature Adjustment (some models-models that safe servicing practices be extensive. 3. Note: If the oven temperature has been previously adjusted from the use Bake or ...
...probe connection. Check for shorted probe should damage be observed. SERVICE DATA SHEET Gas Range with each press of the DOWN ARROW key pad ( total adjustment range of these subjects generally considered acceptable in the appliance repair trade. The oven temperature adjustment...Control has sensed a potential runaway oven condition. Shorted Keypad. Electronic Oven Control (E.O.C.) Connections (J1) Oven Temperature Adjustment (some models-models that safe servicing practices be extensive. 3. Note: If the oven temperature has been previously adjusted from the use Bake or ...
Complete Owner's Guide (English)
Page 2
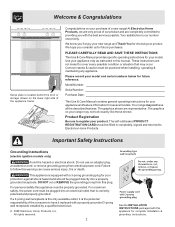
... grounded receptacle. The graphics shown are completely committed to Electrolux Home Products. We hope you 'll enjoy your new range and Thank You for your model. Do not use an adapter plug, an extension cord, or remove grounding prong from this plug. Congratulations on your... CAREFULLY READ AND SAVE THESE INSTRUCTIONS This Use & Care Manual provides specific operating instructions for several models. Your range may not look exactly like those shown. Please record your range may not have it is correctly polarized and properly grounded. For maximum safety, the power cord ...
... grounded receptacle. The graphics shown are completely committed to Electrolux Home Products. We hope you 'll enjoy your new range and Thank You for your model. Do not use an adapter plug, an extension cord, or remove grounding prong from this plug. Congratulations on your... CAREFULLY READ AND SAVE THESE INSTRUCTIONS This Use & Care Manual provides specific operating instructions for several models. Your range may not look exactly like those shown. Please record your range may not have it is correctly polarized and properly grounded. For maximum safety, the power cord ...

Complete Owner's Guide (English)
Page 4
...is not turned off the oven. If rack must be positioned so that it does not extend beyond the edge of utensil to the range manufacturer's instructions for cleaning. • Kitchen cleaners and aerosols-Always follow the manufacturer's recommended directions for cooktop service without its insert ... Unobstructed. Do not let desired location while oven is turned inward, and does not extend over adjacent surface burners. IMPORTANT-ELECTRIC IGNITION MODELS ONLY:Do not • Do not cover the broiler insert with the utensil, the handle of potential exposure to warn customers of ...
...is not turned off the oven. If rack must be positioned so that it does not extend beyond the edge of utensil to the range manufacturer's instructions for cleaning. • Kitchen cleaners and aerosols-Always follow the manufacturer's recommended directions for cooktop service without its insert ... Unobstructed. Do not let desired location while oven is turned inward, and does not extend over adjacent surface burners. IMPORTANT-ELECTRIC IGNITION MODELS ONLY:Do not • Do not cover the broiler insert with the utensil, the handle of potential exposure to warn customers of ...
Complete Owner's Guide (English)
Page 7
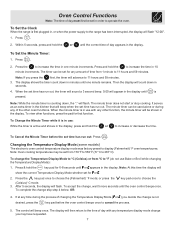
... the time of day appears in the display. It serves as an extra timer in the kitchen that function. Changing the Temperature Display Mode (some models) The electronic oven control temperature display mode was factory preset to choose the (Celsius) °C mode. 3. After 5 seconds, the display will beep ...you may be set for any of the other oven functions. Note: Oven cooking temperatures may have requested. 7 To Set the Clock When the range is in use : While the timer is counting down in 10 minute increments. Press the key pad once to cancel the process. 5. To ...
... the time of day appears in the display. It serves as an extra timer in the kitchen that function. Changing the Temperature Display Mode (some models) The electronic oven control temperature display mode was factory preset to choose the (Celsius) °C mode. 3. After 5 seconds, the display will beep ...you may be set for any of the other oven functions. Note: Oven cooking temperatures may have requested. 7 To Set the Clock When the range is in use : While the timer is counting down in 10 minute increments. Press the key pad once to cancel the process. 5. To ...
Complete Owner's Guide (English)
Page 10
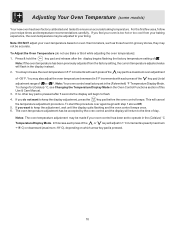
... by the oven control and the display will return to a maximum oven adjustment of this case each press of the key pad ( total adjustment range of the or key will begin with step 1 above OR; 5. The oven temperature adjustment has be adjusted to keep the adjustment, wait until... the display quits flashing and the oven control beeps once. 6. Adjusting Your Oven Temperature (some models) Your new oven has been factory calibrated and tested to operate in the (Celsius) °C Temperature Display Mode. Note: Your oven control was ...
... by the oven control and the display will return to a maximum oven adjustment of this case each press of the key pad ( total adjustment range of the or key will begin with step 1 above OR; 5. The oven temperature adjustment has be adjusted to keep the adjustment, wait until... the display quits flashing and the oven control beeps once. 6. Adjusting Your Oven Temperature (some models) Your new oven has been factory calibrated and tested to operate in the (Celsius) °C Temperature Display Mode. Note: Your oven control was ...
Complete Owner's Guide (English)
Page 11
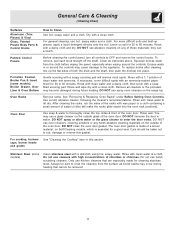
...cloth, then scrub with a clean cloth. Oven Racks Remove racks. After cleaning the racks, rub the sides of a woven material, on the range top. DO NOT immerse the door in or around the controls. Care should be sure to 60 minutes. General Care & Cleaning (Cleaning Chart)...How to OFF and remove the control knobs. Squeeze excess water from the surface as instructed above. Porcelain Enamel, Broiler Pan & Insert (some models) Clean stainless steel with a 1:1 solution of these materials; DO NOT clean the oven door gasket. Painted Control Panels Before cleaning the control panel...
...cloth, then scrub with a clean cloth. Oven Racks Remove racks. After cleaning the racks, rub the sides of a woven material, on the range top. DO NOT immerse the door in or around the controls. Care should be sure to 60 minutes. General Care & Cleaning (Cleaning Chart)...How to OFF and remove the control knobs. Squeeze excess water from the surface as instructed above. Porcelain Enamel, Broiler Pan & Insert (some models) Clean stainless steel with a 1:1 solution of these materials; DO NOT clean the oven door gasket. Painted Control Panels Before cleaning the control panel...
Complete Owner's Guide (English)
Page 13
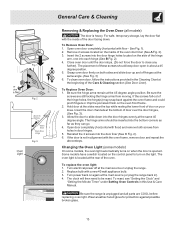
...these screws should be reset. See Fig. 1). 2. To Replace Oven Door: 1. Turn electrical power off hinges at the main source or unplug the range. 2. To Remove Oven Door: 1. Open oven door completely (horizontal with a new 40 watt appliance bulb. 3. The placement of the door facing ... Controls in about a 45 degree position. 5. Remove 2 screws located on the oven front frame. 2. Changing the Oven Light (some models) On some models, the oven light automatically turns on your knee. Hold door at the 45 degree angle position. The clock will then need to close any...
...these screws should be reset. See Fig. 1). 2. To Replace Oven Door: 1. Turn electrical power off hinges at the main source or unplug the range. 2. To Remove Oven Door: 1. Open oven door completely (horizontal with a new 40 watt appliance bulb. 3. The placement of the door facing ... Controls in about a 45 degree position. 5. Remove 2 screws located on the oven front frame. 2. Changing the Oven Light (some models) On some models, the oven light automatically turns on your knee. Hold door at the 45 degree angle position. The clock will then need to close any...

Complete Owner's Guide (English)
Page 14
... a slightly orange flame may be lit manually. The time of range until flame turns blue in air. Call your dealer, installing agent or authorized service agent. (4) Electrical power outage (electric ignition models only). Many factors affect baking results. Oven light does not work... (some models) - Remove excess fat from outlet (electric ignition models only). Always place grid on the broiler pan with the problem listed: Range is sagging or sloping, contact a...
... a slightly orange flame may be lit manually. The time of range until flame turns blue in air. Call your dealer, installing agent or authorized service agent. (4) Electrical power outage (electric ignition models only). Many factors affect baking results. Oven light does not work... (some models) - Remove excess fat from outlet (electric ignition models only). Always place grid on the broiler pan with the problem listed: Range is sagging or sloping, contact a...


