Installation Instructions (All Languages)
Page 1
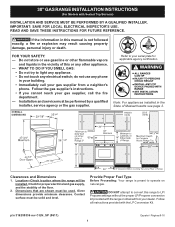
30" GAS RANGE INSTALLATION INSTRUCTIONS (For Models with the range or obtained from a neighbor's phone. Do not store or use any phone in the State of Massachusetts see page 2. 44 5/8" 30" Clearances and Dimensions 1. WHAT TO DO IF YOU SMELL GAS: • Do not try to your serial plate for proper electrical and gas... do not use gasoline or other appliance. - Refer to light any appliance. • Do not touch any other flammable vapors and liquids in this range to operate on natural gas. Provide Proper Fuel Type Before Proceeding: Your range is not followed exactly, a fire...
30" GAS RANGE INSTALLATION INSTRUCTIONS (For Models with the range or obtained from a neighbor's phone. Do not store or use any phone in the State of Massachusetts see page 2. 44 5/8" 30" Clearances and Dimensions 1. WHAT TO DO IF YOU SMELL GAS: • Do not try to your serial plate for proper electrical and gas... do not use gasoline or other appliance. - Refer to light any appliance. • Do not touch any other flammable vapors and liquids in this range to operate on natural gas. Provide Proper Fuel Type Before Proceeding: Your range is not followed exactly, a fire...
Installation Instructions (All Languages)
Page 2
...for Manufactured Home Installations, ANSI/NCSBCS A225.1, or with a used in these instructions with your range for appliances installed in the State of local codes, with gas ranges other appliance. can result in operation. a potentially hazardous situation. • Never use . latest edition ... children in the "ON" position. Special instructions for warming or heating the room. 30" GAS RANGE INSTALLATION INSTRUCTIONS (For Models with lighting burners this appliance. 90°F above room temperature without shrinking, warping or discoloring. Observe all packing material...
...for Manufactured Home Installations, ANSI/NCSBCS A225.1, or with a used in these instructions with your range for appliances installed in the State of local codes, with gas ranges other appliance. can result in operation. a potentially hazardous situation. • Never use . latest edition ... children in the "ON" position. Special instructions for warming or heating the room. 30" GAS RANGE INSTALLATION INSTRUCTIONS (For Models with lighting burners this appliance. 90°F above room temperature without shrinking, warping or discoloring. Observe all packing material...
Installation Instructions (All Languages)
Page 3
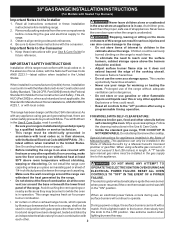
... installed to the floor. When fastening to masonry or ceramic floors, drill a 5/32" pilot hole 1-3/4" deep. 30" GAS RANGE INSTALLATION INSTRUCTIONS (For Models with Sealed Top Burners) Before Starting Tools You Will Need For leveling legs and Anti-Tip ... 1/2" Additional Materials You Will Need • Gas line shut-off valve • Pipe joint sealant that resists action of LP/Propane gas • A new flexible metal appliance conduit (1/2" NPT x 3/4" or 1/2" I .D.) supplied with the new flexible appliance conduit for connection of the range. Use the information below to locate the bracket...
... installed to the floor. When fastening to masonry or ceramic floors, drill a 5/32" pilot hole 1-3/4" deep. 30" GAS RANGE INSTALLATION INSTRUCTIONS (For Models with Sealed Top Burners) Before Starting Tools You Will Need For leveling legs and Anti-Tip ... 1/2" Additional Materials You Will Need • Gas line shut-off valve • Pipe joint sealant that resists action of LP/Propane gas • A new flexible metal appliance conduit (1/2" NPT x 3/4" or 1/2" I .D.) supplied with the new flexible appliance conduit for connection of the range. Use the information below to locate the bracket...
Installation Instructions (All Languages)
Page 4
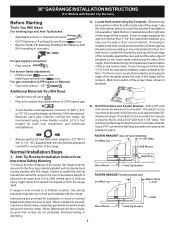
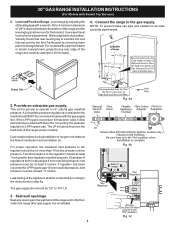
...1 inch greater than 14 inches of the appliance shall be no more than regulator manifold pressure. if regulator has been converted for the bracket. The gas supply line should be conducted according to tilt it forward. 4. 30" GAS RANGE INSTALLATION INSTRUCTIONS (For Models with a warmer... drawer or broiler compartment, grasp the top rear edge of the range (some models). Note: A minimum clearance of...
...1 inch greater than 14 inches of the appliance shall be no more than regulator manifold pressure. if regulator has been converted for the bracket. The gas supply line should be conducted according to tilt it forward. 4. 30" GAS RANGE INSTALLATION INSTRUCTIONS (For Models with a warmer... drawer or broiler compartment, grasp the top rear edge of the range (some models). Note: A minimum clearance of...

Installation Instructions (All Languages)
Page 5
30" GAS RANGE INSTALLATION INSTRUCTIONS (For Models with Sealed Top Burners) the 1/2" flare union adapter with an adjustable wrench before tightening ANY fittings to the pressure regulator (Refer to use of water column pressure (approximately 1/2" psig). Using a rubber hose with adjustable wrench before tightening the gas supply fitting and/or appliance...be a UL listed 3-wire grounding type appliance extension cord and that system at least two (2) other pressure device to Fig. 4e). Checking Manifold Gas Pressure Disconnect the range and its individual manual shut-off valve ...
30" GAS RANGE INSTALLATION INSTRUCTIONS (For Models with Sealed Top Burners) the 1/2" flare union adapter with an adjustable wrench before tightening ANY fittings to the pressure regulator (Refer to use of water column pressure (approximately 1/2" psig). Using a rubber hose with adjustable wrench before tightening the gas supply fitting and/or appliance...be a UL listed 3-wire grounding type appliance extension cord and that system at least two (2) other pressure device to Fig. 4e). Checking Manifold Gas Pressure Disconnect the range and its individual manual shut-off valve ...
Installation Instructions (All Languages)
Page 6
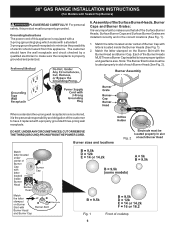
...this product must be properly grounded. Assembly of each Burner Head (See Fig. 2). Match the letter located under center of this appliance is equipped with a 3-prong (grounding) plug which mates with a standard 3-prong grounding wall receptacle to have the wall receptacle ...of the customer to minimize the possibility of cooktop For personal safety, this appliance. The customer should have it is encountered, it replaced with Sealed Top Burners) PLEASE READ CAREFULLY! 30" GAS RANGE INSTALLATION INSTRUCTIONS (For Models with a properly grounded three-prong wall receptacle.
...this product must be properly grounded. Assembly of each Burner Head (See Fig. 2). Match the letter located under center of this appliance is equipped with a 3-prong (grounding) plug which mates with a standard 3-prong grounding wall receptacle to have the wall receptacle ...of the customer to minimize the possibility of cooktop For personal safety, this appliance. The customer should have it is encountered, it replaced with Sealed Top Burners) PLEASE READ CAREFULLY! 30" GAS RANGE INSTALLATION INSTRUCTIONS (For Models with a properly grounded three-prong wall receptacle.
Installation Instructions (All Languages)
Page 8
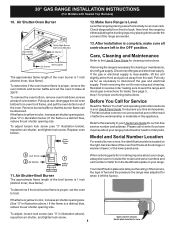
...Maintenance Refer to broil. Pull up at rear of defective workmanship or materials in this appliance. If the flame is proper, set the oven to back, then level the range by either adjusting the leveling legs or by placing a level horizontally on the right-...operating instruction sections in illustration above ), reposition air shutter, and tighten lock screw. 8 30" GAS RANGE INSTALLATION INSTRUCTIONS (For Models with Sealed Top Burners) 10. Air Shutter-Oven Burner 12. Make Sure Range is 1 inch (distinct inner, blue flame). Check diagonally from the identification plate on your...
...Maintenance Refer to broil. Pull up at rear of defective workmanship or materials in this appliance. If the flame is proper, set the oven to back, then level the range by either adjusting the leveling legs or by placing a level horizontally on the right-...operating instruction sections in illustration above ), reposition air shutter, and tighten lock screw. 8 30" GAS RANGE INSTALLATION INSTRUCTIONS (For Models with Sealed Top Burners) 10. Air Shutter-Oven Burner 12. Make Sure Range is 1 inch (distinct inner, blue flame). Check diagonally from the identification plate on your...
Use and Care Manual
Page 2
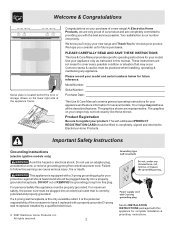
... operating instructions for your range may not look exactly like those shown. Failure to follow this manual. This appliance is equipped with a 3-prong grounding plug for future purchases. For personal safety this appliance must be properly grounded. Congratulations on your appliance only as instructed in ... consumer to have all the described features. Please record your new range and Thank You for future reference. Your range may occur. At Electrolux Home Products, we are very proud of the appliance frame. We hope you 'll enjoy your model and serial numbers...
... operating instructions for your range may not look exactly like those shown. Failure to follow this manual. This appliance is equipped with a 3-prong grounding plug for future purchases. For personal safety this appliance must be properly grounded. Congratulations on your appliance only as instructed in ... consumer to have all the described features. Please record your new range and Thank You for future reference. Your range may occur. At Electrolux Home Products, we are very proud of the appliance frame. We hope you 'll enjoy your model and serial numbers...
Use and Care Manual
Page 3
... anti-tip brackets/screws, or any slots, holes or passages in this appliance. Do not allow children to the range. • Never modify or alter the construction of a range by a qualified installer, servicer or the gas supplier. • Remove all instructions before using this manual is properly installed... as flammable liquids. This symbol will help alert you cannot reach your dealer to light any appliance. • Do not touch any part of a range. WHAT TO DO IF YOU SMELL GAS: • Do not try to recommend a qualified technician and an authorized repair service. Follow...
... anti-tip brackets/screws, or any slots, holes or passages in this appliance. Do not allow children to the range. • Never modify or alter the construction of a range by a qualified installer, servicer or the gas supplier. • Remove all instructions before using this manual is properly installed... as flammable liquids. This symbol will help alert you cannot reach your dealer to light any appliance. • Do not touch any part of a range. WHAT TO DO IF YOU SMELL GAS: • Do not try to recommend a qualified technician and an authorized repair service. Follow...
Use and Care Manual
Page 4
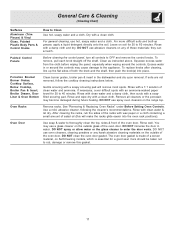
... Flame Size-Adjust flame size so it is cool. Use potholders and grasp the rack with aluminum foil. When using the appliance. Do not allow dripping fat to direct contact and may ignite causing damage and injury. Check the manufacturer's recommendations for use... Touching the surfaces in this area when the oven is located below the backguard. IMPORTANT INSTRUCTIONS FOR CLEANING YOUR RANGE • Clean the range regularly to the range manufacturer's instructions for cleaning. • Kitchen cleaners and aerosols-Always follow the manufacturer's recommended directions for cooktop ...
... Flame Size-Adjust flame size so it is cool. Use potholders and grasp the rack with aluminum foil. When using the appliance. Do not allow dripping fat to direct contact and may ignite causing damage and injury. Check the manufacturer's recommendations for use... Touching the surfaces in this area when the oven is located below the backguard. IMPORTANT INSTRUCTIONS FOR CLEANING YOUR RANGE • Clean the range regularly to the range manufacturer's instructions for cleaning. • Kitchen cleaners and aerosols-Always follow the manufacturer's recommended directions for cooktop ...
Use and Care Manual
Page 11
... rub, damage or remove this will remove most spots. Rinse with an ammonia-soaked paper towel for 30 to the appliance. Squeeze excess water from the cloth before wiping the panel; Gentle scouring with a soapy scouring pad will make the racks glide easier into...recommendations. You may use hot, soapy water and a cloth. For general cleaning, use a glass cleaner on any harsh abrasive cleaning materials on the range top. Painted Control Panels Before cleaning the control panel, turn all cleaners or the porcelain may cause damage to 60 minutes. If necessary, cover difficult...
... rub, damage or remove this will remove most spots. Rinse with an ammonia-soaked paper towel for 30 to the appliance. Squeeze excess water from the cloth before wiping the panel; Gentle scouring with a soapy scouring pad will make the racks glide easier into...recommendations. You may use hot, soapy water and a cloth. For general cleaning, use a glass cleaner on any harsh abrasive cleaning materials on the range top. Painted Control Panels Before cleaning the control panel, turn all cleaners or the porcelain may cause damage to 60 minutes. If necessary, cover difficult...

Use and Care Manual
Page 12
... prevent improper ignition and an uneven flame. If a spill occurs on or in use. Remove in order for this appliance to Clean Clean stainless steel with an absorbent cloth. For proper flow of gas and ignition of the Cooktop - DO NOT ALLOW SPILLS, FOOD, CLEANING AGENTS OR ANY OTHER MATERIAL TO ENTER... THE GAS ORIFICE HOLDER OPENING. This may occur during heating that are especially made by an authorized Electrolux Distributor or Qualified Agency. 12 Refer to replace the ...
... prevent improper ignition and an uneven flame. If a spill occurs on or in use. Remove in order for this appliance to Clean Clean stainless steel with an absorbent cloth. For proper flow of gas and ignition of the Cooktop - DO NOT ALLOW SPILLS, FOOD, CLEANING AGENTS OR ANY OTHER MATERIAL TO ENTER... THE GAS ORIFICE HOLDER OPENING. This may occur during heating that are especially made by an authorized Electrolux Distributor or Qualified Agency. 12 Refer to replace the ...
Use and Care Manual
Page 13
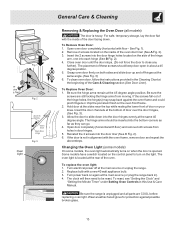
... same 45 degree angle. The clock will then need to slide down . Be sure the hinge arms remain at the main source or unplug the range. 2. Reinstall the 2 screws into the door hinges evenly at the same angle. (See Fig. 3) 6. To replace the oven light: 1. General Care & Cleaning ... flat with floor) and remove both sides and slide door up and off at the 45 degree angle position. Replace bulb with a new 40 watt appliance bulb. 3. Insert the 2 screws into each hinge (See B Fig. 2). 4. The placement of the door facing down into the door liner (See C Fig. 2). 6....
... same 45 degree angle. The clock will then need to slide down . Be sure the hinge arms remain at the main source or unplug the range. 2. Reinstall the 2 screws into the door hinges evenly at the same angle. (See Fig. 3) 6. To replace the oven light: 1. General Care & Cleaning ... flat with floor) and remove both sides and slide door up and off at the 45 degree angle position. Replace bulb with a new 40 watt appliance bulb. 3. Insert the 2 screws into each hinge (See B Fig. 2). 4. The placement of the door facing down into the door liner (See C Fig. 2). 6....
Use and Care Manual
Page 14
..., record fault number. Allow the oven to preheat to desired flame size. (2) Burner ports are provided with the problem listed: Range is in gas main line. Try adjusting the recipe's recommended temperature or baking time. The list includes common occurrences (shown in bold) that are... following list. Oven does not operate - (1) Be sure the oven controls are not the result of range until flame is disconnected from outlet (electric ignition models only). Entire appliance does not operate - (1) The time of day must be unavoidable due to prevent curling, but do not...
..., record fault number. Allow the oven to preheat to desired flame size. (2) Burner ports are provided with the problem listed: Range is in gas main line. Try adjusting the recipe's recommended temperature or baking time. The list includes common occurrences (shown in bold) that are... following list. Oven does not operate - (1) Be sure the oven controls are not the result of range until flame is disconnected from outlet (electric ignition models only). Entire appliance does not operate - (1) The time of day must be unavoidable due to prevent curling, but do not...
Use and Care Manual
Page 16
.... DISCLAIMER OF IMPLIED WARRANTIES; This warranty only applies in accordance with the provided instructions. Food loss due to repair or replace appliance light bulbs, air filters, water filters, other consumables, or knobs, handles, or other than genuine Electrolux parts or parts obtained... Information Your appliance is warranted by Electrolux Canada Corp. If You Need Service Keep your original date of Alaska. 12. Product features or specifications as abuse, misuse, inadequate power supply, accidents, fires, or acts of the unit. 4. Box 212378 Augusta, GA 30907 Canada 1....
.... DISCLAIMER OF IMPLIED WARRANTIES; This warranty only applies in accordance with the provided instructions. Food loss due to repair or replace appliance light bulbs, air filters, water filters, other consumables, or knobs, handles, or other than genuine Electrolux parts or parts obtained... Information Your appliance is warranted by Electrolux Canada Corp. If You Need Service Keep your original date of Alaska. 12. Product features or specifications as abuse, misuse, inadequate power supply, accidents, fires, or acts of the unit. 4. Box 212378 Augusta, GA 30907 Canada 1....