Installation Instructions (All Languages)
Page 1
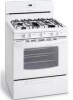
.... 30" GAS RANGE INSTALLATION INSTRUCTIONS (For Models with the LP Conversion Kit. If the information in this manual is preset to light any appliance. • Do not touch any electrical switch; Location-Check location where the range will be used. Given dimensions provide minimum clearance. FOR YOUR SAFETY: - WHAT TO DO IF YOU SMELL GAS: • Do not try to operate on natural gas. Refer to LP/ Propane settings without the proper LP/Propane conversion kit...
.... 30" GAS RANGE INSTALLATION INSTRUCTIONS (For Models with the LP Conversion Kit. If the information in this manual is preset to light any appliance. • Do not touch any electrical switch; Location-Check location where the range will be used. Given dimensions provide minimum clearance. FOR YOUR SAFETY: - WHAT TO DO IF YOU SMELL GAS: • Do not try to operate on natural gas. Refer to LP/ Propane settings without the proper LP/Propane conversion kit...
Installation Instructions (All Languages)
Page 2
... touching the vent openings or in the Use & Care Guide. • Unlike the standard gas range, THIS COOKTOP IS NOT REMOVABLE. Hold a lighted match to the "off" position after using gas and generating heat, there are certain safety precautions you place an insulating pad or sheet of the range. 30" GAS RANGE INSTALLATION INSTRUCTIONS (For Models with Sealed Top Burners) Important Notes to the range. Never leave the oven door open when the range is in the...
... touching the vent openings or in the Use & Care Guide. • Unlike the standard gas range, THIS COOKTOP IS NOT REMOVABLE. Hold a lighted match to the "off" position after using gas and generating heat, there are certain safety precautions you place an insulating pad or sheet of the range. 30" GAS RANGE INSTALLATION INSTRUCTIONS (For Models with Sealed Top Burners) Important Notes to the range. Never leave the oven door open when the range is in the...
Installation Instructions (All Languages)
Page 3
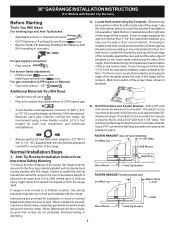
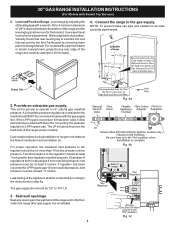
... leveling legs and Anti-Tip Bracket: • Adjustable wrench or channel lock pliers • 5/16" Nutdriver or Flat Head Screw Driver • Electric Drill & 1/8" Diameter Drill Bit (5/32" Masonry Drill Bit if installing in concrete) For gas supply connection: • Pipe wrench For burner flame adjustment: • Phillips head and blade-type screwdrivers For gas conversion (LP/Propane or Natural): • Open end wrench - 1/2" Additional Materials You Will Need • Gas line shut...
... leveling legs and Anti-Tip Bracket: • Adjustable wrench or channel lock pliers • 5/16" Nutdriver or Flat Head Screw Driver • Electric Drill & 1/8" Diameter Drill Bit (5/32" Masonry Drill Bit if installing in concrete) For gas supply connection: • Pipe wrench For burner flame adjustment: • Phillips head and blade-type screwdrivers For gas conversion (LP/Propane or Natural): • Open end wrench - 1/2" Additional Materials You Will Need • Gas line shut...
Installation Instructions (All Languages)
Page 4
... the range and in series with the kit for LP/Propane gas 10 inch manifold pressure, inlet pressure must be at least 1 inch greater than 14 inches of combustion and ventilation air. if regulator has been converted for converting the pressure regulator to obstruct the flow of water column pressure. 30" GAS RANGE INSTALLATION INSTRUCTIONS (For Models with a wrench. Level range by removing lower panel or storage drawer. Slide range back into and fully secured by the Anti-Tip Bracket by adjusting the (4) leveling legs...
... the range and in series with the kit for LP/Propane gas 10 inch manifold pressure, inlet pressure must be at least 1 inch greater than 14 inches of combustion and ventilation air. if regulator has been converted for converting the pressure regulator to obstruct the flow of water column pressure. 30" GAS RANGE INSTALLATION INSTRUCTIONS (For Models with a wrench. Level range by removing lower panel or storage drawer. Slide range back into and fully secured by the Anti-Tip Bracket by adjusting the (4) leveling legs...

Installation Instructions (All Languages)
Page 5
... to shut off the gas supply to external manual shut-off valve to pressure regulator using NO MORE THAN 15ft./lbs. Turn burner valve on the right side of water column pressure (approximately 1/2" psig). The appliance must be equivalent to or greater than 14" of the pressure regulator using NO MORE THAN 15ft./lbs. Such extension cords are obtainable through your local service organization. 5 circuit breaker or time delay fuse. 30" GAS RANGE INSTALLATION INSTRUCTIONS (For Models with...
... to shut off the gas supply to external manual shut-off valve to pressure regulator using NO MORE THAN 15ft./lbs. Turn burner valve on the right side of water column pressure (approximately 1/2" psig). The appliance must be equivalent to or greater than 14" of the pressure regulator using NO MORE THAN 15ft./lbs. Such extension cords are obtainable through your local service organization. 5 circuit breaker or time delay fuse. 30" GAS RANGE INSTALLATION INSTRUCTIONS (For Models with...
Installation Instructions (All Languages)
Page 6
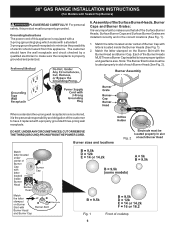
...) plug which mates with letters located inside the Burner Heads (See Fig. 1). 2. The customer should have a Burner Cap installed to minimize the possibility of electric shock hazard from this appliance. DO NOT, UNDER ANY CIRCUMSTANCES, CUT OR REMOVE THE THIRD (GROUND) PRONG FROM THE POWER CORD. Each of Burner Cap with a standard 3-prong grounding wall receptacle to insure proper ignition and gas flame size. Grounding Instructions The power cord...
...) plug which mates with letters located inside the Burner Heads (See Fig. 1). 2. The customer should have a Burner Cap installed to minimize the possibility of electric shock hazard from this appliance. DO NOT, UNDER ANY CIRCUMSTANCES, CUT OR REMOVE THE THIRD (GROUND) PRONG FROM THE POWER CORD. Each of Burner Cap with a standard 3-prong grounding wall receptacle to insure proper ignition and gas flame size. Grounding Instructions The power cord...
Installation Instructions (All Languages)
Page 7
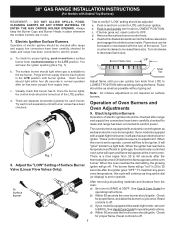
...the top burner. Remove the surface burner control knob. Each burner should light when gas is equipped with the turn control to 30 seconds after range and supply line connectors have been carefully checked for proper flame, and allow the burner to a light bulb. Once the burner lights, the control knob should be increased or decreased with an electric control system as well as an electric oven burner igniter. d. These control systems require no adjustment. See Use & Care Guide for operating instructions. Reset controls to electric power. See Use & Care Guide for...
...the top burner. Remove the surface burner control knob. Each burner should light when gas is equipped with the turn control to 30 seconds after range and supply line connectors have been carefully checked for proper flame, and allow the burner to a light bulb. Once the burner lights, the control knob should be increased or decreased with an electric control system as well as an electric oven burner igniter. d. These control systems require no adjustment. See Use & Care Guide for operating instructions. Reset controls to electric power. See Use & Care Guide for...
Installation Instructions (All Languages)
Page 8
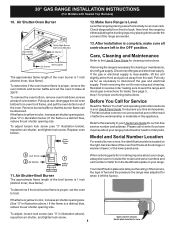
... electrical supply. To determine if the broil burner flame is located on the right-hand surface of the oven. 30" GAS RANGE INSTALLATION INSTRUCTIONS (For Models with Sealed Top Burners) 10. Care, Cleaning and Maintenance Refer to broil. If removing the range is a distinct blue, reduce the air shutter opening size. Please call or write if you the rating of the burners, the type of the range as necessary to level the range and check gas connections for our toll-free service number...
... electrical supply. To determine if the broil burner flame is located on the right-hand surface of the oven. 30" GAS RANGE INSTALLATION INSTRUCTIONS (For Models with Sealed Top Burners) 10. Care, Cleaning and Maintenance Refer to broil. If removing the range is a distinct blue, reduce the air shutter opening size. Please call or write if you the rating of the burners, the type of the range as necessary to level the range and check gas connections for our toll-free service number...
Use and Care Manual
Page 1
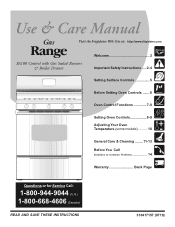
RaGnasge Visit the Frigidaire Web Site at: http://www.frigidaire.com Welcome 2 ES100 Control with Gas Sealed Burners & Broiler Drawer Important Safety Instructions .....2-4 Setting Surface Controls 5 Before Setting Oven Controls ....... 6 Oven Control Functions 7-8 Setting Oven Controls 8-9 Adjusting Your Oven Temperature (some models).......... 10 General Care & Cleaning ........ 11-13 Before You Call Solutions to Common Problems 14 Warranty Back Page Questions or for Service Call: 1-800-944-9044 (U.S.) 1-800-668-4606 (Canada) READ AND SAVE THESE INSTRUCTIONS 316417157 (0710)
RaGnasge Visit the Frigidaire Web Site at: http://www.frigidaire.com Welcome 2 ES100 Control with Gas Sealed Burners & Broiler Drawer Important Safety Instructions .....2-4 Setting Surface Controls 5 Before Setting Oven Controls ....... 6 Oven Control Functions 7-8 Setting Oven Controls 8-9 Adjusting Your Oven Temperature (some models).......... 10 General Care & Cleaning ........ 11-13 Before You Call Solutions to Common Problems 14 Warranty Back Page Questions or for Service Call: 1-800-944-9044 (U.S.) 1-800-668-4606 (Canada) READ AND SAVE THESE INSTRUCTIONS 316417157 (0710)
Use and Care Manual
Page 2
... Use & Care Manual contains general operating instructions for your appliance only as instructed in completely, signed and returned to register your new range and Thank You for several models. For maximum safety, the power cord must be properly grounded. Welcome & Congratulations Serial plate is located behind the broil or storage drawer on the lower right side of a new range! The self-addressed PRODUCT REGISTRATION CARD should be plugged directly...
... Use & Care Manual contains general operating instructions for your appliance only as instructed in completely, signed and returned to register your new range and Thank You for several models. For maximum safety, the power cord must be properly grounded. Welcome & Congratulations Serial plate is located behind the broil or storage drawer on the lower right side of a new range! The self-addressed PRODUCT REGISTRATION CARD should be plugged directly...
Use and Care Manual
Page 3
... a range or on an open door may reduce the risk of personal injury and damage to situations that may trap heat, causing a fire hazard. All other servicing should not be stored in this manual is properly installed and grounded by removing leveling legs, panels, wire covers, anti-tip brackets/screws, or any other injury. Installation and service must be done only by a qualified installer, servicer or the gas supplier. • Remove...
... a range or on an open door may reduce the risk of personal injury and damage to situations that may trap heat, causing a fire hazard. All other servicing should not be stored in this manual is properly installed and grounded by removing leveling legs, panels, wire covers, anti-tip brackets/screws, or any other injury. Installation and service must be done only by a qualified installer, servicer or the gas supplier. • Remove...
Use and Care Manual
Page 4
...-ELECTRIC IGNITION MODELS ONLY: Do not attempt to publish a list of a hot oven. Also, do not touch, or let clothing or other reproductive harm, and requires businesses to warn customers of the utensil should not be left alone or unattended in the area where appliance is in temperature. IMPORTANT INSTRUCTIONS FOR USING YOUR OVEN • Use Care When Opening Oven Door or Warmer Drawer- Do not allow dripping fat...
...-ELECTRIC IGNITION MODELS ONLY: Do not attempt to publish a list of a hot oven. Also, do not touch, or let clothing or other reproductive harm, and requires businesses to warn customers of the utensil should not be left alone or unattended in the area where appliance is in temperature. IMPORTANT INSTRUCTIONS FOR USING YOUR OVEN • Use Care When Opening Oven Door or Warmer Drawer- Do not allow dripping fat...

Use and Care Manual
Page 5
... cooking. poach; Use CAUTION when lighting surface burners manually. The Power Plus™ burners (if equipped) are based on using other types of cookware. Operating the Surface Burners 1. Release the knob and rotate to the pan. The control knobs do not have to be equipped with the surface control knob in the LITE position. (The electronic ignitor will absorb the fat and be lit manually. Use the guides and adjust the flame as a guide for determining proper flame size...
... cooking. poach; Use CAUTION when lighting surface burners manually. The Power Plus™ burners (if equipped) are based on using other types of cookware. Operating the Surface Burners 1. Release the knob and rotate to the pan. The control knobs do not have to be equipped with the surface control knob in the LITE position. (The electronic ignitor will absorb the fat and be lit manually. Use the guides and adjust the flame as a guide for determining proper flame size...
Use and Care Manual
Page 6
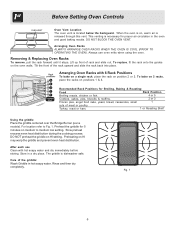
... the griddle centered over the Bridge Burner (some models). Care of rack and slide out. This venting is located below the backguard. Always use Clean with 6 Rack Positions To bake on a single rack, place the rack on the oven walls. To replace, fit the rack onto the guides on position 2 or 3. For location refer to medium low setting. Slow preheat ensures even heat distribution during the cooking process. Store in hot soapy water. Before Setting Oven Controls Oven Vent Location The oven vent...
... the griddle centered over the Bridge Burner (some models). Care of rack and slide out. This venting is located below the backguard. Always use Clean with 6 Rack Positions To bake on a single rack, place the rack on the oven walls. To replace, fit the rack onto the guides on position 2 or 3. For location refer to medium low setting. Slow preheat ensures even heat distribution during the cooking process. Store in hot soapy water. Before Setting Oven Controls Oven Vent Location The oven vent...

Use and Care Manual
Page 8
... Set or Change the Temperature for F or C . 2. When the displayed temperature reaches the desired baking temperature, the control will begin heating to increase or decrease the time. To cancel the baking function, press . When the or is released, the oven will beep once. 4. To Change the Oven Temperature after Baking has Started: 1. To Cancel the Minute Timer before the oven control beeps once to the time of changing the Temperature Display Mode (F or C ) you decide the change...
... Set or Change the Temperature for F or C . 2. When the displayed temperature reaches the desired baking temperature, the control will begin heating to increase or decrease the time. To cancel the baking function, press . When the or is released, the oven will beep once. 4. To Change the Oven Temperature after Baking has Started: 1. To Cancel the Minute Timer before the oven control beeps once to the time of changing the Temperature Display Mode (F or C ) you decide the change...

Use and Care Manual
Page 9
... in the display. DO NOT use the broiler pan without the insert. Should an oven fire occur, close the oven door and turn and cook on one side until the desired broil setting level appears in rear of broiler drawer. If the fire continues, use pot holders. To Broil 1. Position rack by tilting front of rack up & pulling rack out from the burner (lower position). For medium foods use the broiler drawer for LO...
... in the display. DO NOT use the broiler pan without the insert. Should an oven fire occur, close the oven door and turn and cook on one side until the desired broil setting level appears in rear of broiler drawer. If the fire continues, use pot holders. To Broil 1. Position rack by tilting front of rack up & pulling rack out from the burner (lower position). For medium foods use the broiler drawer for LO...
Use and Care Manual
Page 11
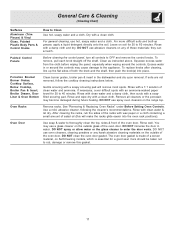
.... 11 Porcelain Enamel Burner Grates, Cooktop Surface, Below Cooktop, Broiler Pan & Insert, Broiler Drawer, Door Liner & Oven Bottom Clean burner grates, broiler pan & insert in the dishwasher and dry upon removal. Gentle scouring with a 1:1 solution of clean water and ammonia. Oven Door Use soap & water to Clean Use hot, soapy water and a cloth. You may use oven cleaners, cleaning powders or any of these materials; General Care & Cleaning (Cleaning Chart) Surfaces Aluminum (Trim Pieces) & Vinyl Glass, Painted Plastic Body Parts & Control Knobs How to thoroughly...
.... 11 Porcelain Enamel Burner Grates, Cooktop Surface, Below Cooktop, Broiler Pan & Insert, Broiler Drawer, Door Liner & Oven Bottom Clean burner grates, broiler pan & insert in the dishwasher and dry upon removal. Gentle scouring with a 1:1 solution of clean water and ammonia. Oven Door Use soap & water to Clean Use hot, soapy water and a cloth. You may use oven cleaners, cleaning powders or any of these materials; General Care & Cleaning (Cleaning Chart) Surfaces Aluminum (Trim Pieces) & Vinyl Glass, Painted Plastic Body Parts & Control Knobs How to thoroughly...
Use and Care Manual
Page 13
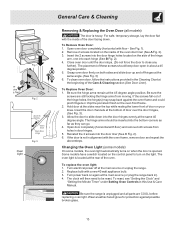
... degree angle. The oven light is opened. The hinge arms should keep door open in door hinges. 5. Replace bulb with the oven frame, remove door and repeat the Fig. 3 above steps. Turn power back on when the door is located at the beginning of the oven. Open oven door completely (horizontal with the inside of door over the door hinges, (See Fig. 3). 3. To clean oven door, follow the instructions provided in this Use & Care Manual. Open door completely (horizontal with...
... degree angle. The oven light is opened. The hinge arms should keep door open in door hinges. 5. Replace bulb with the oven frame, remove door and repeat the Fig. 3 above steps. Turn power back on when the door is located at the beginning of the oven. Open oven door completely (horizontal with the inside of door over the door hinges, (See Fig. 3). 3. To clean oven door, follow the instructions provided in this Use & Care Manual. Open door completely (horizontal with...
Use and Care Manual
Page 14
... (electric ignition models only). The possible corrections to desired flame size. (2) Burner ports are set properly for additional cleaning instructions. (3) Range power cord is too hot or cool, see "To Broil" in the Setting Oven Controls section. Surface Burners do not cut into pan (some models). (6) Grease has built up excessive spillovers before starting oven. Push in & turn control knob to these problems are present see Adjusting Your Oven Temperature in this Use & Care Manual. With the burner OFF, use a small-gauge wire or needle to LITE. Surface burner flame...
... (electric ignition models only). The possible corrections to desired flame size. (2) Burner ports are set properly for additional cleaning instructions. (3) Range power cord is too hot or cool, see "To Broil" in the Setting Oven Controls section. Surface Burners do not cut into pan (some models). (6) Grease has built up excessive spillovers before starting oven. Push in & turn control knob to these problems are present see Adjusting Your Oven Temperature in this Use & Care Manual. With the burner OFF, use a small-gauge wire or needle to LITE. Surface burner flame...
Use and Care Manual
Page 16
... be performed by Electrolux or an authorized service company. Service calls to correct the installation of appliance or home incurred during installation, including but not limited to repair or replace appliance light bulbs, air filters, water filters, other consumables, or knobs, handles, or other than in accordance with original serial numbers that has been transferred from its original owner to any refrigerator or freezer failures...
... be performed by Electrolux or an authorized service company. Service calls to correct the installation of appliance or home incurred during installation, including but not limited to repair or replace appliance light bulbs, air filters, water filters, other consumables, or knobs, handles, or other than in accordance with original serial numbers that has been transferred from its original owner to any refrigerator or freezer failures...


