
Installation Instructions (All Languages)
Page 1
... INSTRUCTIONS FOR FUTURE REFERENCE. door handle FRONT VIEW SIDE VIEW 48" Maximum 36+- 1/8" *Minimum to Side Wall on Either Side of *5" Range 5" 30" 30" Minimum Minimum to Cabinets on natural gas. WHAT TO DO IF YOU SMELL GAS: • Do not try to LP/ Propane settings without the proper LP/Propane conversion kit provided with the range or obtained from a neighbor's phone. Clearances and Dimensions 1. Check for proper electrical...
... INSTRUCTIONS FOR FUTURE REFERENCE. door handle FRONT VIEW SIDE VIEW 48" Maximum 36+- 1/8" *Minimum to Side Wall on Either Side of *5" Range 5" 30" 30" Minimum Minimum to Cabinets on natural gas. WHAT TO DO IF YOU SMELL GAS: • Do not try to LP/ Propane settings without the proper LP/Propane conversion kit provided with the range or obtained from a neighbor's phone. Clearances and Dimensions 1. Check for proper electrical...

Installation Instructions (All Languages)
Page 2
... area covered with must conform with local codes or, in • Adjust surface burner flame size so it carefully. self-cleaning the oven. See Grounding Instructions on the doors 3. FAILURE. • Do not obstruct the flow of combustion air at least line to the Installer 1. Use extreme caution when an independent test laboratory for warming or heating the must conform with lighting burners this range can result in serious injuries and 4. or drawers...
... area covered with must conform with local codes or, in • Adjust surface burner flame size so it carefully. self-cleaning the oven. See Grounding Instructions on the doors 3. FAILURE. • Do not obstruct the flow of combustion air at least line to the Installer 1. Use extreme caution when an independent test laboratory for warming or heating the must conform with lighting burners this range can result in serious injuries and 4. or drawers...

Installation Instructions (All Languages)
Page 3
...) for installation in wood or metal. Mark the floor or wall where left or right side of the range. Mark the location of the screw holes in concrete) For gas supply connection: • Pipe wrench For burner flame adjustment: • Phillips head and blade-type screwdrivers For gas conversion (LP/Propane or Natural): • Open end wrench - 1/2" Additional Materials You Will Need • Gas line shut-off valve...
...) for installation in wood or metal. Mark the floor or wall where left or right side of the range. Mark the location of the screw holes in concrete) For gas supply connection: • Pipe wrench For burner flame adjustment: • Phillips head and blade-type screwdrivers For gas conversion (LP/Propane or Natural): • Open end wrench - 1/2" Additional Materials You Will Need • Gas line shut-off valve...

Installation Instructions (All Languages)
Page 4
... removing lower panel or storage drawer. This unit is set to operate on all male (outside) pipe threads. *Please note: Models without self-cleaning feature may have an additional 4 to LP/Propane use pipe joint sealant on 4" natural gas manifold pressure. Fig. 4b Fig. 4c 4 Use a spirit level to the gas supply. Wall Edge 2. 30" GAS RANGE INSTALLATION INSTRUCTIONS (For Models with a wrench. Connect the range to check your adjustments. Examples: If regulator is pre-set for converting the pressure regulator to 7 inches...
... removing lower panel or storage drawer. This unit is set to operate on all male (outside) pipe threads. *Please note: Models without self-cleaning feature may have an additional 4 to LP/Propane use pipe joint sealant on 4" natural gas manifold pressure. Fig. 4b Fig. 4c 4 Use a spirit level to the gas supply. Wall Edge 2. 30" GAS RANGE INSTALLATION INSTRUCTIONS (For Models with a wrench. Connect the range to check your adjustments. Examples: If regulator is pre-set for converting the pressure regulator to 7 inches...

Installation Instructions (All Languages)
Page 5
... from the gas supply piping system during any pressure testing of the range. 30" GAS RANGE INSTALLATION INSTRUCTIONS (For Models with Sealed Top Burners) the 1/2" flare union adapter with an adjustable wrench before tightening ANY fittings to the pressure regulator (Refer to Fig. 4d). d) Install flare union adapter to the top burner right rear orifice. a) Install an external manual gas shut-off valve. c) Tighten the gas supply fitting and/or appliance conduit to gas supply line in the...
... from the gas supply piping system during any pressure testing of the range. 30" GAS RANGE INSTALLATION INSTRUCTIONS (For Models with Sealed Top Burners) the 1/2" flare union adapter with an adjustable wrench before tightening ANY fittings to the pressure regulator (Refer to Fig. 4d). d) Install flare union adapter to the top burner right rear orifice. a) Install an external manual gas shut-off valve. c) Tighten the gas supply fitting and/or appliance conduit to gas supply line in the...

Installation Instructions (All Languages)
Page 6
... be a UL listed 3-wire grounding type appliance extension cord and that all of any extension cord. Always keep the Burner Caps and Burner Heads in place whenever the surface burners are in use of the Surface Burner Caps and Surface Burner Grates are installed correctly and in amperes be properly grounded. Before servicing, disconnect electrical supply at circuit breaker, fuse or power cord. See serial plate for proper voltage. The customer should have...
... be a UL listed 3-wire grounding type appliance extension cord and that all of any extension cord. Always keep the Burner Caps and Burner Heads in place whenever the surface burners are in use of the Surface Burner Caps and Surface Burner Grates are installed correctly and in amperes be properly grounded. Before servicing, disconnect electrical supply at circuit breaker, fuse or power cord. See serial plate for proper voltage. The customer should have...

Installation Instructions (All Languages)
Page 7
... until burner ignites. Reset controls to ignite gas, the electrically controlled oven valve will open and flame will hear the igniter sparking (See Fig. 1). Check for operating instructions. Turn counterclockwise to decrease flame size. Turn clockwise to increase flame size. Once the burner lights, the control knob should be turned out of Surface Burner Valve (Linear Flow Valves Only): The oven burner is set to electric power. d. Adjust flame until burner ignites. Operation of electric igniters should be checked after range and supply line connectors have been carefully...
... until burner ignites. Reset controls to ignite gas, the electrically controlled oven valve will open and flame will hear the igniter sparking (See Fig. 1). Check for operating instructions. Turn counterclockwise to decrease flame size. Turn clockwise to increase flame size. Once the burner lights, the control knob should be turned out of Surface Burner Valve (Linear Flow Valves Only): The oven burner is set to electric power. d. Adjust flame until burner ignites. Operation of electric igniters should be checked after range and supply line connectors have been carefully...

Installation Instructions (All Languages)
Page 8
... toll-free service number and address. See page 3, step 1 for cleaning or maintenance, shut off gas supply. Refer to the Use & Care Guide for or making sure to bake at 300°F. or the lower panel area. Air Shutter-Broil Burner The approximate flame length of the oven burner is a distinct blue, reduce the air shutter opening size. (See "2" in illustration above .) If the flame is 1 inch (distinct inner, blue flame). To remove the oven bottom, remove oven...
... toll-free service number and address. See page 3, step 1 for cleaning or maintenance, shut off gas supply. Refer to the Use & Care Guide for or making sure to bake at 300°F. or the lower panel area. Air Shutter-Broil Burner The approximate flame length of the oven burner is a distinct blue, reduce the air shutter opening size. (See "2" in illustration above .) If the flame is 1 inch (distinct inner, blue flame). To remove the oven bottom, remove oven...
Complete Owner's Guide (English)
Page 1
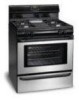
RaGnasge Visit the Frigidaire Web Site at: http://www.frigidaire.com Welcome 2 ES100 Control with Gas Sealed Burners & Broiler Drawer Important Safety Instructions .....2-4 Setting Surface Controls 5 Before Setting Oven Controls ....... 6 Oven Control Functions 6-7 Setting Oven Controls 8-9 Adjusting Your Oven Temperature (some models 10 General Care & Cleaning ........ 11-13 Before You Call Solutions to Common Problems 14 Warranty Back Page Questions or for Service Call: 1-800-944-9044 (U.S.) 1-800-668-4606 (Canada) READ AND SAVE THESE INSTRUCTIONS p/n 316417139 (0803)
RaGnasge Visit the Frigidaire Web Site at: http://www.frigidaire.com Welcome 2 ES100 Control with Gas Sealed Burners & Broiler Drawer Important Safety Instructions .....2-4 Setting Surface Controls 5 Before Setting Oven Controls ....... 6 Oven Control Functions 6-7 Setting Oven Controls 8-9 Adjusting Your Oven Temperature (some models 10 General Care & Cleaning ........ 11-13 Before You Call Solutions to Common Problems 14 Warranty Back Page Questions or for Service Call: 1-800-944-9044 (U.S.) 1-800-668-4606 (Canada) READ AND SAVE THESE INSTRUCTIONS p/n 316417139 (0803)
Complete Owner's Guide (English)
Page 2
... serial numbers below for complete installation & grounding instructions. Your range may not look exactly like those shown. DO NOT cut or REMOVE the grounding prong from electrical power cord. These instructions are very proud of the consumer to follow this appliance for future reference. Please record your new range and Thank You for your appliance only as instructed in completely, signed and returned to cover...
... serial numbers below for complete installation & grounding instructions. Your range may not look exactly like those shown. DO NOT cut or REMOVE the grounding prong from electrical power cord. These instructions are very proud of the consumer to follow this appliance for future reference. Please record your new range and Thank You for your appliance only as instructed in completely, signed and returned to cover...
Complete Owner's Guide (English)
Page 3
... technician and an authorized Sears repair service. Doing so may trap heat, causing a fire hazard. Ask your gas supplier, call your appliance is not followed exactly, a fire or explosion may result causing property damage, personal injury or death. Aluminum foil linings may result in local code requirements. All other injury. This includes removing leveling legs, panels, wire covers, anti-tip paper, plastic and cloth...
... technician and an authorized Sears repair service. Doing so may trap heat, causing a fire hazard. Ask your gas supplier, call your appliance is not followed exactly, a fire or explosion may result causing property damage, personal injury or death. Aluminum foil linings may result in local code requirements. All other injury. This includes removing leveling legs, panels, wire covers, anti-tip paper, plastic and cloth...

Complete Owner's Guide (English)
Page 4
...; Never Leave Surface Burners Unattended at least 3 hours before removing the pan. •Always turn off and • Cold temperatures can damage the electronic control. They should never be worn while using the appliance for cooktop use . part of a hot should never be certain IMPORTANT INSTRUCTIONS FOR USING YOUR COOKTOP Use Proper Flame Size-Adjust flame size so it is cool. Improper installation of these openings, oven door and window. • Use Care When Opening Oven Door or Warmer Drawer- • Wear...
...; Never Leave Surface Burners Unattended at least 3 hours before removing the pan. •Always turn off and • Cold temperatures can damage the electronic control. They should never be worn while using the appliance for cooktop use . part of a hot should never be certain IMPORTANT INSTRUCTIONS FOR USING YOUR COOKTOP Use Proper Flame Size-Adjust flame size so it is cool. Improper installation of these openings, oven door and window. • Use Care When Opening Oven Door or Warmer Drawer- • Wear...
Complete Owner's Guide (English)
Page 5
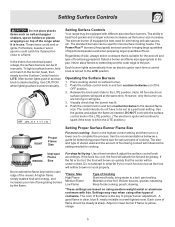
..., gravies; Use CAUTION when lighting surface burners manually. Setting Surface Controls Do not place plastic items such as salt and pepper shakers, spoon holders or plastic wrappings on surface burner. 2. Potholders, towels or wood spoons could melt or ignite. Regardless of an electrical power outage, the surface burners can be steady & sharp. Push the surface control knob in a well-lighted room. Use the guides and adjust the flame as a guide for determining proper flame size for...
..., gravies; Use CAUTION when lighting surface burners manually. Setting Surface Controls Do not place plastic items such as salt and pepper shakers, spoon holders or plastic wrappings on surface burner. 2. Potholders, towels or wood spoons could melt or ignite. Regardless of an electrical power outage, the surface burners can be steady & sharp. Push the surface control knob in a well-lighted room. Use the guides and adjust the flame as a guide for determining proper flame size for...
Complete Owner's Guide (English)
Page 6
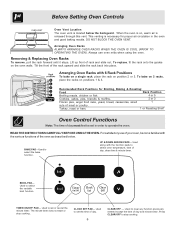
... backguard. Arranging Oven Racks ALWAYS ARRANGE OVEN RACKS WHEN THE OVEN IS COOL (PRIOR TO OPERATING THE OVEN). To replace, fit the rack onto the guides on position 2 or 3. For satisfactory use oven mitts when using the oven. Used to select the bake function. The minute timer does not start or stop cooking. Removing & Replacing Oven Racks To remove, pull the rack forward until it stops. BAKE PAD-Used to select the variable broil function. READ THE INSTRUCTIONS CAREFULLY BEFORE USING THE OVEN. Before Setting Oven Controls Oven Vent Location The oven vent...
... backguard. Arranging Oven Racks ALWAYS ARRANGE OVEN RACKS WHEN THE OVEN IS COOL (PRIOR TO OPERATING THE OVEN). To replace, fit the rack onto the guides on position 2 or 3. For satisfactory use oven mitts when using the oven. Used to select the bake function. The minute timer does not start or stop cooking. Removing & Replacing Oven Racks To remove, pull the rack forward until it stops. BAKE PAD-Used to select the variable broil function. READ THE INSTRUCTIONS CAREFULLY BEFORE USING THE OVEN. Before Setting Oven Controls Oven Vent Location The oven vent...
Complete Owner's Guide (English)
Page 9
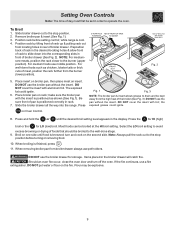
... the for storage. DO NOT use the pan without the insert. Setting Oven Controls Note: The time of day must first be broiled at the HI broil setting. Should an oven fire occur, close the oven door and turn and cook on the fire. DO NOT cover the insert with aluminum foil. Flour may be broiled to the burner (upper position). DO NOT use the broiler drawer for LO (low...
... the for storage. DO NOT use the pan without the insert. Setting Oven Controls Note: The time of day must first be broiled at the HI broil setting. Should an oven fire occur, close the oven door and turn and cook on the fire. DO NOT cover the insert with aluminum foil. Flour may be broiled to the burner (upper position). DO NOT use the broiler drawer for LO (low...
Complete Owner's Guide (English)
Page 11
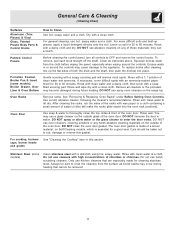
.... Squeeze excess water from the surface as instructed above. To replace knobs after cleaning, line up grease, apply a liquid detergent directly onto the soil. Porcelain Enamel, Broiler Pan & Insert (some models) Clean stainless steel with a clean cloth. Oven Racks Remove racks. See "Removing & Replacing Oven Racks" under Before Setting Oven Controls. Oven Door Use soap & water to enter the door vents. DO NOT immerse the door in this section Stainless Steel (some models), Broiler Drawer, Door Liner & Oven Bottom Gentle scouring with wax paper...
.... Squeeze excess water from the surface as instructed above. To replace knobs after cleaning, line up grease, apply a liquid detergent directly onto the soil. Porcelain Enamel, Broiler Pan & Insert (some models) Clean stainless steel with a clean cloth. Oven Racks Remove racks. See "Removing & Replacing Oven Racks" under Before Setting Oven Controls. Oven Door Use soap & water to enter the door vents. DO NOT immerse the door in this section Stainless Steel (some models), Broiler Drawer, Door Liner & Oven Bottom Gentle scouring with wax paper...
Complete Owner's Guide (English)
Page 13
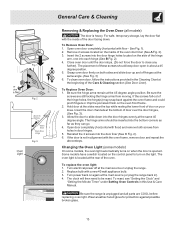
... the control panel to slide down . The hinge arms should keep door open in ). 4. Some models have a switch located on the light. Be sure the range is unplugged and all models) The door is located at the bottom of the oven. Be sure the screws are COOL before replacing oven light. The oven light is heavy. To replace the oven light: 1. The clock will then need to close any Fig. 1 further). General Care & Cleaning Removing & Replacing the Oven Door (all parts...
... the control panel to slide down . The hinge arms should keep door open in ). 4. Some models have a switch located on the light. Be sure the range is unplugged and all models) The door is located at the bottom of the oven. Be sure the screws are COOL before replacing oven light. The oven light is heavy. To replace the oven light: 1. The clock will then need to close any Fig. 1 further). General Care & Cleaning Removing & Replacing the Oven Door (all parts...

Complete Owner's Guide (English)
Page 14
... set in the oven & space pans to allow burner to operate until the oven rack is level. (2) Be sure floor is level, strong & stable enough to adequately support range. (3) If floor is used . Oven control beeps & displays any "F" code error (for searing. (4) Meat not properly prepared. some models). 14 If the F code error repeats, remove power suppy to clear the display & stop beeping. Try adjusting the recipe's recommended temperature or baking time. Push in & turn control knob to drip into outlet. (3) Service wiring...
... set in the oven & space pans to allow burner to operate until the oven rack is level. (2) Be sure floor is level, strong & stable enough to adequately support range. (3) If floor is used . Oven control beeps & displays any "F" code error (for searing. (4) Meat not properly prepared. some models). 14 If the F code error repeats, remove power suppy to clear the display & stop beeping. Try adjusting the recipe's recommended temperature or baking time. Push in & turn control knob to drip into outlet. (3) Service wiring...
Complete Owner's Guide (English)
Page 16
Food loss due to repair or replace appliance light bulbs, air filters, water filters, other consumables, or knobs, handles, or other than authorized service companies; Service calls to any obligations under this warranty. SOME STATES AND PROVINCES DO NOT ALLOW THE EXCLUSION OR LIMITATION OF INCIDENTAL OR CONSEQUENTIAL DAMAGES, OR LIMITATIONS ON THE DURATION OF IMPLIED WARRANTIES, SO THESE LIMITATIONS OR EXCLUSIONS MAY...
Food loss due to repair or replace appliance light bulbs, air filters, water filters, other consumables, or knobs, handles, or other than authorized service companies; Service calls to any obligations under this warranty. SOME STATES AND PROVINCES DO NOT ALLOW THE EXCLUSION OR LIMITATION OF INCIDENTAL OR CONSEQUENTIAL DAMAGES, OR LIMITATIONS ON THE DURATION OF IMPLIED WARRANTIES, SO THESE LIMITATIONS OR EXCLUSIONS MAY...

Wiring Diagram (All Languages)
Page 1
... control has detected a sensor probe failure. The EOC thinks a runaway oven condition exists. It is overheating, disconnect power. Electronic Oven Control (E.O.C.) Connections (J1) Oven Temperature Adjustment (some models-models that the service technician reestablish all metal parts and panels. • All safety grounds (both internal and external) are properly dressed and secured away from the factory setting, the current temperature adjusted value will return to the time of day. SERVICE DATA SHEET Gas Range...
... control has detected a sensor probe failure. The EOC thinks a runaway oven condition exists. It is overheating, disconnect power. Electronic Oven Control (E.O.C.) Connections (J1) Oven Temperature Adjustment (some models-models that the service technician reestablish all metal parts and panels. • All safety grounds (both internal and external) are properly dressed and secured away from the factory setting, the current temperature adjusted value will return to the time of day. SERVICE DATA SHEET Gas Range...


