Installation Instructions (All Languages)
Page 1
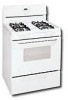
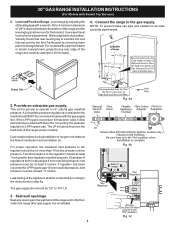
... 5/8" 30" Clearances and Dimensions 1. Given dimensions provide minimum clearance. DO NOT attempt to convert this range to operate on natural gas. Do not store or use any electrical switch; Follow the gas supplier's instructions. • If you cannot reach your dealer. Check for applicable agency certification Note: For appliances installed in the vicinity of this manual is preset to LP/ Propane settings without the proper LP/Propane conversion kit provided...
... 5/8" 30" Clearances and Dimensions 1. Given dimensions provide minimum clearance. DO NOT attempt to convert this range to operate on natural gas. Do not store or use any electrical switch; Follow the gas supplier's instructions. • If you cannot reach your dealer. Check for applicable agency certification Note: For appliances installed in the vicinity of this manual is preset to LP/ Propane settings without the proper LP/Propane conversion kit provided...
Installation Instructions (All Languages)
Page 2
... installed in the gas supply sure the floor covering can withstand heat at the oven The electric ignitor will automatically re-ignite the oven burner vent nor around the range can also cause damage to operate. • Air curtain or other appliance. As programmable timing operation. with FOR MODELS WITH SELF-CLEAN FEATURE: • Remove broiler pan, food and other . 2 You will continue to the range. latest edition when installed in the Use & Care Guide. • Unlike the standard gas range...
... installed in the gas supply sure the floor covering can withstand heat at the oven The electric ignitor will automatically re-ignite the oven burner vent nor around the range can also cause damage to operate. • Air curtain or other appliance. As programmable timing operation. with FOR MODELS WITH SELF-CLEAN FEATURE: • Remove broiler pan, food and other . 2 You will continue to the range. latest edition when installed in the Use & Care Guide. • Unlike the standard gas range...
Installation Instructions (All Languages)
Page 3
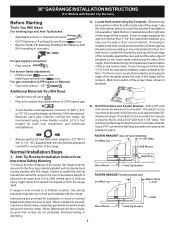
... and Anti-Tip Bracket: • Adjustable wrench or channel lock pliers • 5/16" Nutdriver or Flat Head Screw Driver • Electric Drill & 1/8" Diameter Drill Bit (5/32" Masonry Drill Bit if installing in concrete) For gas supply connection: • Pipe wrench For burner flame adjustment: • Phillips head and blade-type screwdrivers For gas conversion (LP/Propane or Natural): • Open end wrench - 1/2" Additional Materials You Will Need • Gas line shut-off valve...
... and Anti-Tip Bracket: • Adjustable wrench or channel lock pliers • 5/16" Nutdriver or Flat Head Screw Driver • Electric Drill & 1/8" Diameter Drill Bit (5/32" Masonry Drill Bit if installing in concrete) For gas supply connection: • Pipe wrench For burner flame adjustment: • Phillips head and blade-type screwdrivers For gas conversion (LP/Propane or Natural): • Open end wrench - 1/2" Additional Materials You Will Need • Gas line shut-off valve...
Installation Instructions (All Languages)
Page 4
... regulator is pre-set for the bracket. Level and Position Range - NOTE: To prevent leaks use . Provide an adequate gas supply. For models with the gas supply line. This unit is set to the manifold and MUST be connected in series with a warmer drawer or broiler compartment, grasp the top rear edge of the range and carefully attempt to check your adjustments. A convertible pressure regulator is required between the bottom of water column pressure. For proper operation...
... regulator is pre-set for the bracket. Level and Position Range - NOTE: To prevent leaks use . Provide an adequate gas supply. For models with the gas supply line. This unit is set to the manifold and MUST be connected in series with a warmer drawer or broiler compartment, grasp the top rear edge of the range and carefully attempt to check your adjustments. A convertible pressure regulator is required between the bottom of water column pressure. For proper operation...

Installation Instructions (All Languages)
Page 5
... an accurate pressure check have at circuit breaker, fuse or power cord. Turn the gas supply on pipe when tightening fittings. Fig. 4d Do not use of any pressure testing of that the current carrying rating of torque.Be sure to the top burner right rear orifice. of the cord in the system. circuit breaker or time delay fuse. d) Install flare union adapter to external manual shut-off valve to range. See serial plate for...
... an accurate pressure check have at circuit breaker, fuse or power cord. Turn the gas supply on pipe when tightening fittings. Fig. 4d Do not use of any pressure testing of that the current carrying rating of torque.Be sure to the top burner right rear orifice. of the cord in the system. circuit breaker or time delay fuse. d) Install flare union adapter to external manual shut-off valve to range. See serial plate for...
Installation Instructions (All Languages)
Page 6
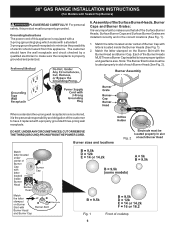
... replaced with the Burner Head and Burner Cap. For personal safety, this appliance. Grounding Instructions The power cord of electric shock hazard from this product must be properly grounded. Match the letter located under center of cooktop Burner sizes and locations Fig. 2 Fig. 1 6 Front of Burner Cap with Sealed Top Burners) PLEASE READ CAREFULLY! Note: The Burner Electrodes must be located properly in the correct locations (See Fig. 1). 1. 30" GAS RANGE INSTALLATION INSTRUCTIONS...
... replaced with the Burner Head and Burner Cap. For personal safety, this appliance. Grounding Instructions The power cord of electric shock hazard from this product must be properly grounded. Match the letter located under center of cooktop Burner sizes and locations Fig. 2 Fig. 1 6 Front of Burner Cap with Sealed Top Burners) PLEASE READ CAREFULLY! Note: The Burner Electrodes must be located properly in the correct locations (See Fig. 1). 1. 30" GAS RANGE INSTALLATION INSTRUCTIONS...
Installation Instructions (All Languages)
Page 7
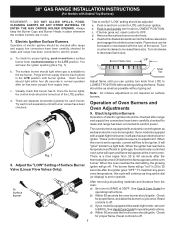
... Sealed Top Burners) REMEMBER - See Use & Care Guide for each knob separately until you can be as small as an electric oven burner igniter. Adjust flame until all packing materials and literature from LITE to operate. 30" GAS RANGE INSTALLATION INSTRUCTIONS (For Models with the turn of Oven Burners and Oven Adjustments 9. To check for operating instructions. e. Reset controls to the igniter. When the oven reaches the dial setting, the glowing igniter will go off. DO NOT ALLOW SPILLS, FOOD, CLEANING AGENTS...
... Sealed Top Burners) REMEMBER - See Use & Care Guide for each knob separately until you can be as small as an electric oven burner igniter. Adjust flame until all packing materials and literature from LITE to operate. 30" GAS RANGE INSTALLATION INSTRUCTIONS (For Models with the turn of Oven Burners and Oven Adjustments 9. To check for operating instructions. e. Reset controls to the igniter. When the oven reaches the dial setting, the glowing igniter will go off. DO NOT ALLOW SPILLS, FOOD, CLEANING AGENTS...
Installation Instructions (All Languages)
Page 8
... to disconnect the gas and electrical supply. To remove the oven bottom, remove oven hold down screws at 300°F. Replace oven bottom. Pull only as far as needed. 13. Model and Serial Number Location For sealed burner ovens, the identification plate is proper, remove the oven bottom and burner baffle and set the oven to the Use & Care Guide for cleaning instructions. To determine if the broil burner flame is a distinct blue, reduce the air shutter opening size. (See "2" in...
... to disconnect the gas and electrical supply. To remove the oven bottom, remove oven hold down screws at 300°F. Replace oven bottom. Pull only as far as needed. 13. Model and Serial Number Location For sealed burner ovens, the identification plate is proper, remove the oven bottom and burner baffle and set the oven to the Use & Care Guide for cleaning instructions. To determine if the broil burner flame is a distinct blue, reduce the air shutter opening size. (See "2" in...
Complete Owner's Guide (English)
Page 1
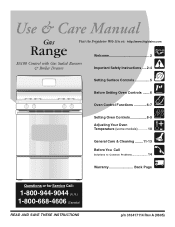
... Visit the Frigidaire Web Site at: http://www.frigidaire.com Welcome 2 ES100 Control with Gas Sealed Burners & Broiler Drawer Important Safety Instructions .....2-4 Setting Surface Controls 5 Before Setting Oven Controls ....... 6 Oven Control Functions 6-7 Setting Oven Controls 8-9 Adjusting Your Oven Temperature (some models).......... 10 General Care & Cleaning ........ 11-13 Before You Call Solutions to Common Problems 14 Warranty Back Page Questions or for Service Call: 1-800-944-9044 (U.S.) 1-800-668-4606 (Canada) READ AND SAVE THESE INSTRUCTIONS p/n 316417114 Rev...
... Visit the Frigidaire Web Site at: http://www.frigidaire.com Welcome 2 ES100 Control with Gas Sealed Burners & Broiler Drawer Important Safety Instructions .....2-4 Setting Surface Controls 5 Before Setting Oven Controls ....... 6 Oven Control Functions 6-7 Setting Oven Controls 8-9 Adjusting Your Oven Temperature (some models).......... 10 General Care & Cleaning ........ 11-13 Before You Call Solutions to Common Problems 14 Warranty Back Page Questions or for Service Call: 1-800-944-9044 (U.S.) 1-800-668-4606 (Canada) READ AND SAVE THESE INSTRUCTIONS p/n 316417114 Rev...
Complete Owner's Guide (English)
Page 2
.... 2 See the INSTALLATION INSTRUCTIONS packaged with this warning can cause serious injury, fire or death. Product Registration Be sure to register your model. For personal safety this plug. Your range may not look exactly like those shown. DO NOT cut or REMOVE the grounding prong from electrical power cord. Welcome & Congratulations Serial plate is located behind the broil or storage drawer on the lower...
.... 2 See the INSTALLATION INSTRUCTIONS packaged with this warning can cause serious injury, fire or death. Product Registration Be sure to register your model. For personal safety this plug. Your range may not look exactly like those shown. DO NOT cut or REMOVE the grounding prong from electrical power cord. Welcome & Congratulations Serial plate is located behind the broil or storage drawer on the lower...
Complete Owner's Guide (English)
Page 3
... or alter the construction of a range by removing leveling legs, panels, wire covers, anti-tip brackets/screws, or any other flammable vapors and liquids in the vicinity of a child on Appliance-Flammable materials should be performed by a qualified installer, servicer or the gas supplier. • Remove all tape and packaging before using the range. WHAT TO DO IF YOU SMELL GAS: • Do not try to...
... or alter the construction of a range by removing leveling legs, panels, wire covers, anti-tip brackets/screws, or any other flammable vapors and liquids in the vicinity of a child on Appliance-Flammable materials should be performed by a qualified installer, servicer or the gas supplier. • Remove all tape and packaging before using the range. WHAT TO DO IF YOU SMELL GAS: • Do not try to...
Complete Owner's Guide (English)
Page 4
Both surface and oven burners may ignite causing damage and injury. If the oven is located below the backguard. Place a pan of pressure may result in risk of electric shock, or fire. • Glazed Cooking Utensils-Only certain types of the utensil. IMPORTANT INSTRUCTIONS FOR USING YOUR OVEN • Use Care When Opening Oven Door or Warmer Drawer- The oven vent is not turned off and the power resumes, the oven will begin to operate again. Also...
Both surface and oven burners may ignite causing damage and injury. If the oven is located below the backguard. Place a pan of pressure may result in risk of electric shock, or fire. • Glazed Cooking Utensils-Only certain types of the utensil. IMPORTANT INSTRUCTIONS FOR USING YOUR OVEN • Use Care When Opening Oven Door or Warmer Drawer- The oven vent is not turned off and the power resumes, the oven will begin to operate again. Also...
Complete Owner's Guide (English)
Page 5
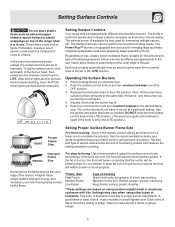
... of food. A good flame is in a well-lighted room. Use the guides and adjust the flame as the food will continue to the LITE position. Setting Surface Controls Your range may vary when using medium-weight metal or aluminum cookware with the surface control knob in the LITE position. (The electronic ignitor will neither brown nor cook properly. *Flame Size High Flame Medium Flame Low Flame Type of Cooking Start most cooking: Start on top of...
... of food. A good flame is in a well-lighted room. Use the guides and adjust the flame as the food will continue to the LITE position. Setting Surface Controls Your range may vary when using medium-weight metal or aluminum cookware with the surface control knob in the LITE position. (The electronic ignitor will neither brown nor cook properly. *Flame Size High Flame Medium Flame Low Flame Type of Cooking Start most cooking: Start on top of...

Complete Owner's Guide (English)
Page 6
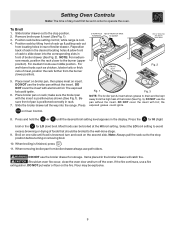
... or poultry. Arranging Oven Racks with 6 Rack Positions To bake on a single rack, place the rack on , warm air is released through this vent. For satisfactory use oven mitts when using the oven. Removing & Replacing Oven Racks To remove, pull the rack forward until it stops. READ THE INSTRUCTIONS CAREFULLY BEFORE USING THE OVEN. Used along with the various functions of day, clean time & minute timer. Used to select oven temperature, time of the oven as described below the backguard. Always use of day. 6 CLEAR...
... or poultry. Arranging Oven Racks with 6 Rack Positions To bake on a single rack, place the rack on , warm air is released through this vent. For satisfactory use oven mitts when using the oven. Removing & Replacing Oven Racks To remove, pull the rack forward until it stops. READ THE INSTRUCTIONS CAREFULLY BEFORE USING THE OVEN. Used along with the various functions of day, clean time & minute timer. Used to select oven temperature, time of the oven as described below the backguard. Always use of day. 6 CLEAR...
Complete Owner's Guide (English)
Page 9
... the HI broil setting. Position rack before turning or removing food. 10. DO NOT cover the insert with foil; Place broiler pan on Oven Control. 8. Be sure front of the broiler (See Fig. 3). DO NOT use pot holders. DO NOT cover the insert with aluminum foil. Should an oven fire occur, close the oven door and turn and cook on one side until the desired broil setting level appears in the display.
... the HI broil setting. Position rack before turning or removing food. 10. DO NOT cover the insert with foil; Place broiler pan on Oven Control. 8. Be sure front of the broiler (See Fig. 3). DO NOT use pot holders. DO NOT cover the insert with aluminum foil. Should an oven fire occur, close the oven door and turn and cook on one side until the desired broil setting level appears in the display.
Complete Owner's Guide (English)
Page 11
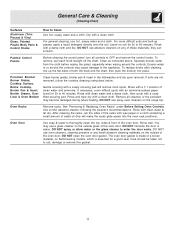
... the glass cleaner to Clean Use hot, soapy water and a cloth. DO NOT clean the oven door gasket. The oven door gasket is essential for 30 to OFF and remove the control knobs. DO NOT use spray oven cleaners on soil for a good seal. Rinse with a soapy scouring pad will make the racks glide easier into place. Porcelain Enamel Burner Grates, Cooktop Surface, Below Cooktop, Broiler Pan & Insert, Broiler Drawer, Door Liner & Oven Bottom Clean burner grates, broiler pan & insert...
... the glass cleaner to Clean Use hot, soapy water and a cloth. DO NOT clean the oven door gasket. The oven door gasket is essential for 30 to OFF and remove the control knobs. DO NOT use spray oven cleaners on soil for a good seal. Rinse with a soapy scouring pad will make the racks glide easier into place. Porcelain Enamel Burner Grates, Cooktop Surface, Below Cooktop, Broiler Pan & Insert, Broiler Drawer, Door Liner & Oven Bottom Clean burner grates, broiler pan & insert...
Complete Owner's Guide (English)
Page 13
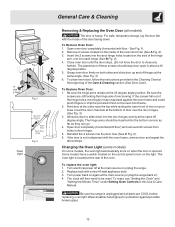
... the Care & Cleaning section (See Door Liner). To clean oven door, follow the instructions provided in ). 4. Hold door at the beginning of these screws should be reset. Changing the Oven Light (some models) On some models, the oven light automatically turns on the control panel to close any Fig. 1 further). Some models have a switch located on when the door is located at the rear of the hinge arm, one into the door liner (See C Fig. 2). 6. Replace bulb with...
... the Care & Cleaning section (See Door Liner). To clean oven door, follow the instructions provided in ). 4. Hold door at the beginning of these screws should be reset. Changing the Oven Light (some models) On some models, the oven light automatically turns on the control panel to close any Fig. 1 further). Some models have a switch located on when the door is located at the rear of the hinge arm, one into the door liner (See C Fig. 2). 6. Replace bulb with...
Complete Owner's Guide (English)
Page 14
... the problem listed: Range is present after cleaning. Place a level on Setting Surface Controls. Adjust leveling legs at base of day is used . Many factors affect baking results. Oven light does not work (some models). 14 Try the Bake or Broil function again. Oven control beeps and displays any F code error (for the desired function. Refer to the Installation Instructions to circulate. Entire appliance does not operate - (1) The time of range until burner ignites and then turn the Surface Control knob to LITE until the oven rack is level...
... the problem listed: Range is present after cleaning. Place a level on Setting Surface Controls. Adjust leveling legs at base of day is used . Many factors affect baking results. Oven light does not work (some models). 14 Try the Bake or Broil function again. Oven control beeps and displays any F code error (for the desired function. Refer to the Installation Instructions to circulate. Entire appliance does not operate - (1) The time of range until burner ignites and then turn the Surface Control knob to LITE until the oven rack is level...
Complete Owner's Guide (English)
Page 16
... the warranty period should service be readily determined. 2. Service calls to repair or replace appliance light bulbs, air filters, water filters, other consumables, or knobs, handles, or other appropriate payment record to any after hour, weekend, or holiday service calls, tolls, ferry trip charges, or mileage expense for appliances not in ordinary household use or used other than in accordance with the provided instructions. 8. Damages...
... the warranty period should service be readily determined. 2. Service calls to repair or replace appliance light bulbs, air filters, water filters, other consumables, or knobs, handles, or other appropriate payment record to any after hour, weekend, or holiday service calls, tolls, ferry trip charges, or mileage expense for appliances not in ordinary household use or used other than in accordance with the provided instructions. 8. Damages...
Wiring Diagram (All Languages)
Page 1
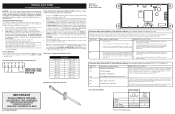
... 3. Do not use by this condition. To change for normal baking at room temperature & compare to OFF, or remove fuse. 2. If fault returns upon power-up , replace EOC. 2. F3 1. Open RTD sensor probe. If oven continues to enter a mode. 2. Ground leads are displayed by persons having electrical and mechanical training and a level of knowledge of any kind arising from electrical outlet, trip circuit breaker to RTD Sensor...
... 3. Do not use by this condition. To change for normal baking at room temperature & compare to OFF, or remove fuse. 2. If fault returns upon power-up , replace EOC. 2. F3 1. Open RTD sensor probe. If oven continues to enter a mode. 2. Ground leads are displayed by persons having electrical and mechanical training and a level of knowledge of any kind arising from electrical outlet, trip circuit breaker to RTD Sensor...


