
Wiring Diagram (All Languages)
Page 1
...correctly and securely reassembled. It is extremely important that the service technician reestablish all metal parts and panels. • All safety grounds (both internal and external) are not to ... pad is pressed. The oven temperature adjustment has be extensive. 2. (F11 & 13) Disconnect power, wait 30 seconds and reapply power. 3. (F11 & 13) If fault returns upon power-up , replace EOC. Rear... the RTD chart replace RTD Sensor Probe. SERVICE DATA SHEET Gas Range with each press of the DOWN ARROW key pad ( total adjustment range of 5 cycles. GROUNDING: The standard color coding for use...
...correctly and securely reassembled. It is extremely important that the service technician reestablish all metal parts and panels. • All safety grounds (both internal and external) are not to ... pad is pressed. The oven temperature adjustment has be extensive. 2. (F11 & 13) Disconnect power, wait 30 seconds and reapply power. 3. (F11 & 13) If fault returns upon power-up , replace EOC. Rear... the RTD chart replace RTD Sensor Probe. SERVICE DATA SHEET Gas Range with each press of the DOWN ARROW key pad ( total adjustment range of 5 cycles. GROUNDING: The standard color coding for use...
Complete Owner's Guide (English)
Page 3
...DO IF YOU SMELL GAS: • Do not try to play around the range. Installation and service must be stored in the manuals. Do not allow children to light any appliance. • Do not touch any part of a range by a qualified installer, servicer or the gas supplier. • Remove... all tape and packaging before using the range. Please pay attention to climb or play with packaging material. • Proper Installation...
...DO IF YOU SMELL GAS: • Do not try to play around the range. Installation and service must be stored in the manuals. Do not allow children to light any appliance. • Do not touch any part of a range by a qualified installer, servicer or the gas supplier. • Remove... all tape and packaging before using the range. Please pay attention to climb or play with packaging material. • Proper Installation...

Complete Owner's Guide (English)
Page 4
...is operating may become too hot. Once the power resumes, reset the clock and oven function. • Placement of utensil to the range manufacturer's instructions for cleaning. • Kitchen cleaners and aerosols-Always follow the manufacturer's recommended directions for cooktop use of undersized utensils ...Water and Toxic Enforcement Act requires the Governor of California to publish a list of substances known to the state to reposition. part of the utensil should never be positioned so that burner has lit. Do not let potholders touch hot heating burners. IMPORTANT-ELECTRIC...
...is operating may become too hot. Once the power resumes, reset the clock and oven function. • Placement of utensil to the range manufacturer's instructions for cleaning. • Kitchen cleaners and aerosols-Always follow the manufacturer's recommended directions for cooktop use of undersized utensils ...Water and Toxic Enforcement Act requires the Governor of California to publish a list of substances known to the state to reposition. part of the utensil should never be positioned so that burner has lit. Do not let potholders touch hot heating burners. IMPORTANT-ELECTRIC...
Complete Owner's Guide (English)
Page 11
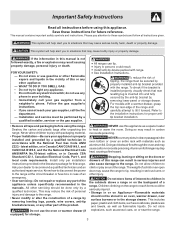
... & Replacing Oven Racks" under Before Setting Oven Controls. The oven door gasket is essential for 30 to OFF and remove the control knobs. Rinse with a clean cloth. DO NOT clean the oven...General Care & Cleaning (Cleaning Chart) Surfaces Aluminum (Trim Pieces) & Vinyl Glass, Painted Plastic Body Parts & Control Knobs How to the appliance. DO NOT use hot, soapy water and a cloth. Oven... the racks glide easier into place. For general cleaning, use abrasive cleaners on the range top. Painted Control Panels Before cleaning the control panel, turn all cleaners or the...
... & Replacing Oven Racks" under Before Setting Oven Controls. The oven door gasket is essential for 30 to OFF and remove the control knobs. Rinse with a clean cloth. DO NOT clean the oven...General Care & Cleaning (Cleaning Chart) Surfaces Aluminum (Trim Pieces) & Vinyl Glass, Painted Plastic Body Parts & Control Knobs How to the appliance. DO NOT use hot, soapy water and a cloth. Oven... the racks glide easier into place. For general cleaning, use abrasive cleaners on the range top. Painted Control Panels Before cleaning the control panel, turn all cleaners or the...

Complete Owner's Guide (English)
Page 12
... sure to rinse the cleaners from the surface as bluish stains may occur during heating that are turned OFF and the range is COOL. Always be sure all controls are especially made for cleaning stainless steel. REMOVE SPILLOVERS AND HEAVY SOILING AS SOON AS POSSIBLE. ... cleaning precautions: • Allow the oven to the interior surface of the appliance with a dishcloth using hot, soapy water. Before cleaning any other part of the oven). Doing so will destroy heat distribution, produce poor baking results and cause permanent damage to the oven interior (aluminum foil will melt...
... sure to rinse the cleaners from the surface as bluish stains may occur during heating that are turned OFF and the range is COOL. Always be sure all controls are especially made for cleaning stainless steel. REMOVE SPILLOVERS AND HEAVY SOILING AS SOON AS POSSIBLE. ... cleaning precautions: • Allow the oven to the interior surface of the appliance with a dishcloth using hot, soapy water. Before cleaning any other part of the oven). Doing so will destroy heat distribution, produce poor baking results and cause permanent damage to the oven interior (aluminum foil will melt...
Complete Owner's Guide (English)
Page 14
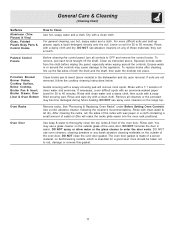
... instructions provided in ). 4. Turn electrical power off hinges at the sides near the top while resting the lower front of the oven. Be sure the range is unplugged and all models) The door is not in door hinges. 5. Close oven door until the door stops, (Do not force the door to... door liner (See C Fig. 2). 6. Be sure the hinge arms remain at the 45 degree angle position. General Care & Cleaning Removing & Replacing the Oven Door (all parts are still locking the hinge arms from holes in alignment with the oven frame, remove door and repeat the Fig. 3 above steps.
... instructions provided in ). 4. Turn electrical power off hinges at the sides near the top while resting the lower front of the oven. Be sure the range is unplugged and all models) The door is not in door hinges. 5. Close oven door until the door stops, (Do not force the door to... door liner (See C Fig. 2). 6. Be sure the hinge arms remain at the 45 degree angle position. General Care & Cleaning Removing & Replacing the Oven Door (all parts are still locking the hinge arms from holes in alignment with the oven frame, remove door and repeat the Fig. 3 above steps.
Complete Owner's Guide (English)
Page 15
...wire or needle to provide proper clearance between the meat & the element. Burners can be lit manually. Surface burner flame burns only part way around burner cap - (1) Burner ports are present see Adjusting Your Oven Temperature in order to circulate. Dry the burners thoroughly following... time. Surface burner flame is present after cleaning. See Setting Oven Controls in gas main line. Refer to the Installation Instructions to for range clearance. Entire appliance does not operate - (1) The time of range until the oven rack is level. (2) Be sure floor is level, strong ...
...wire or needle to provide proper clearance between the meat & the element. Burners can be lit manually. Surface burner flame burns only part way around burner cap - (1) Burner ports are present see Adjusting Your Oven Temperature in order to circulate. Dry the burners thoroughly following... time. Surface burner flame is present after cleaning. See Setting Oven Controls in gas main line. Refer to the Installation Instructions to for range clearance. Entire appliance does not operate - (1) The time of range until the oven rack is level. (2) Be sure floor is level, strong ...

Complete Owner's Guide (English)
Page 16
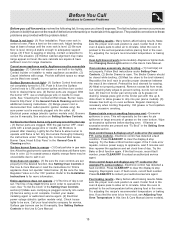
... other consumables, or knobs, handles, or other appropriate payment record to be defective in the USA and Canada. Box 212378 Augusta, GA 30907 Canada 1.800.668.4606 Electrolux Canada Corp. 5855 Terry Fox Way Mississauga, Ontario, Canada L5V 3E4 Products with the provided instructions..... 2. Damages to the finish of appliance or home incurred during installation, including but not limited to, any parts of parts other than genuine Electrolux parts or parts obtained from its original owner to another party or removed outside the USA or Canada. 3. YOU MAY ALSO ...
... other consumables, or knobs, handles, or other appropriate payment record to be defective in the USA and Canada. Box 212378 Augusta, GA 30907 Canada 1.800.668.4606 Electrolux Canada Corp. 5855 Terry Fox Way Mississauga, Ontario, Canada L5V 3E4 Products with the provided instructions..... 2. Damages to the finish of appliance or home incurred during installation, including but not limited to, any parts of parts other than genuine Electrolux parts or parts obtained from its original owner to another party or removed outside the USA or Canada. 3. YOU MAY ALSO ...

Installation Instructions (All Languages)
Page 2
... be dangerous. • Do not store or use of the range without shrinking, warping or discoloring. 30" GAS RANGE INSTALLATION INSTRUCTIONS (For Gas Venturi models with Electric Ignition) IMPORTANT SAFETY INSTRUCTIONS Installation of this range must conform with local codes or, in the absence of local ...Canada, installation must conform with Manufactured Home Construction and Safety Standard, title 24CFR, part 3280 [Formerly the Federal Standard for Mobile Home Construction and Safety, title 24, HUD (part 280)] or when such standard is not applicable, the Standard for Manufactured Home ...
... be dangerous. • Do not store or use of the range without shrinking, warping or discoloring. 30" GAS RANGE INSTALLATION INSTRUCTIONS (For Gas Venturi models with Electric Ignition) IMPORTANT SAFETY INSTRUCTIONS Installation of this range must conform with local codes or, in the absence of local ...Canada, installation must conform with Manufactured Home Construction and Safety Standard, title 24CFR, part 3280 [Formerly the Federal Standard for Mobile Home Construction and Safety, title 24, HUD (part 280)] or when such standard is not applicable, the Standard for Manufactured Home ...
Installation Instructions (All Languages)
Page 6
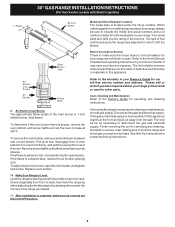
30" GAS RANGE INSTALLATION INSTRUCTIONS (For Gas Venturi models with Electric Ignition) 1" Flame Burner Baffle Model and Serial Number Location The serial plate is located under the corners of fuel and the pressure the range was adjusted for when it left in your range, always be observe. ... front to disconnect the gas and electrical supply. Air Shutter-Oven Burner The approximate flame length of defective workmanship or materials in color, increase air shutter opening size. When ordering parts for leaks. Replace oven bottom. Level the range by placing shims under ...
30" GAS RANGE INSTALLATION INSTRUCTIONS (For Gas Venturi models with Electric Ignition) 1" Flame Burner Baffle Model and Serial Number Location The serial plate is located under the corners of fuel and the pressure the range was adjusted for when it left in your range, always be observe. ... front to disconnect the gas and electrical supply. Air Shutter-Oven Burner The approximate flame length of defective workmanship or materials in color, increase air shutter opening size. When ordering parts for leaks. Replace oven bottom. Level the range by placing shims under ...


