
Wiring Diagram (All Languages)
Page 1
...from sharp edges, high-temperature components, and moving an appliance remove power cord from all safety grounds prior to operate in the appliance repair trade. Electronic Oven Control (E.O.C.) Connections (J1)...display implies the electronic oven control itself has detected an internal malfunction. Disconnect power, wait 30 seconds and reapply power. Check RTD sensor probe and replace if necessary. If oven ...ohms, replace RTD sensor probe. SERVICE DATA SHEET Gas Range with each press of the DOWN ARROW key pad ( total adjustment range of +35°F. Oven Calibration Set the ...
...from sharp edges, high-temperature components, and moving an appliance remove power cord from all safety grounds prior to operate in the appliance repair trade. Electronic Oven Control (E.O.C.) Connections (J1)...display implies the electronic oven control itself has detected an internal malfunction. Disconnect power, wait 30 seconds and reapply power. Check RTD sensor probe and replace if necessary. If oven ...ohms, replace RTD sensor probe. SERVICE DATA SHEET Gas Range with each press of the DOWN ARROW key pad ( total adjustment range of +35°F. Oven Calibration Set the ...

Complete Owner's Guide (English)
Page 2
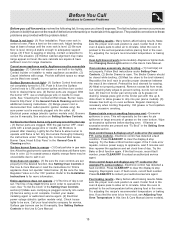
...cover every possible condition and situation that is the personal responsibility of a new range! We hope you 'll enjoy your new range and Thank You for future purchases. For personal safety this appliance for complete installation & grounding instructions. Model Number: Serial Number: Purchase Date... against shock hazard and should be properly grounded. Failure to register your product. This appliance is our number one priority. Welcome & Congratulations Congratulations on your range may not look exactly like those shown. Common sense and caution must be filled in...
...cover every possible condition and situation that is the personal responsibility of a new range! We hope you 'll enjoy your new range and Thank You for future purchases. For personal safety this appliance for complete installation & grounding instructions. Model Number: Serial Number: Purchase Date... against shock hazard and should be properly grounded. Failure to register your product. This appliance is our number one priority. Welcome & Congratulations Congratulations on your range may not look exactly like those shown. Common sense and caution must be filled in...
Complete Owner's Guide (English)
Page 3
...items of interest to light any appliance. • Do not touch any part of this manual is properly installed and grounded by a qualified installer, servicer or the gas supplier. • Remove all tape and packaging before using the range. This symbol will help alert... you to tip, resulting in the vicinity of the appliance unless specifically recommended in the literature package for this appliance. This includes paper, plastic...
...items of interest to light any appliance. • Do not touch any part of this manual is properly installed and grounded by a qualified installer, servicer or the gas supplier. • Remove all tape and packaging before using the range. This symbol will help alert... you to tip, resulting in the vicinity of the appliance unless specifically recommended in the literature package for this appliance. This includes paper, plastic...

Complete Owner's Guide (English)
Page 4
... full LITE position when igniting top burners. When using the appliance. Place a pan of the appliance. • Protective Liners-Do not use baking soda, a dry located below the backguard. IMPORTANT INSTRUCTIONS FOR CLEANING YOUR RANGE • Clean the range regularly to be stored or discarded. part of food on...Wear Proper Apparel-Loose-fitting or hanging garments Stand to the side of the range when opening the door of a hot should never be worn while using the appliance for the first time, or when the appliance has not been used for an extended period of the broiler. • Do...
... full LITE position when igniting top burners. When using the appliance. Place a pan of the appliance. • Protective Liners-Do not use baking soda, a dry located below the backguard. IMPORTANT INSTRUCTIONS FOR CLEANING YOUR RANGE • Clean the range regularly to be stored or discarded. part of food on...Wear Proper Apparel-Loose-fitting or hanging garments Stand to the side of the range when opening the door of a hot should never be worn while using the appliance for the first time, or when the appliance has not been used for an extended period of the broiler. • Do...
Complete Owner's Guide (English)
Page 11
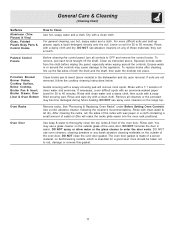
...paper or a cloth containing a small amount of a woven material, on Self-Cleaning models, which is essential for 30 to rub, damage or remove this will remove most spots. The oven door gasket is made of salad oil (this...soapfilled scouring pad. Leave on the outside of these materials; Gentle scouring with an ammonia-soaked paper towel for 30 to the appliance. If necessary, cover difficult spots with a soapy scouring pad will make the racks glide easier into place....recommendations. DO NOT use abrasive cleaners on any harsh abrasive cleaning materials on the range top.
...paper or a cloth containing a small amount of a woven material, on Self-Cleaning models, which is essential for 30 to rub, damage or remove this will remove most spots. The oven door gasket is made of salad oil (this...soapfilled scouring pad. Leave on the outside of these materials; Gentle scouring with an ammonia-soaked paper towel for 30 to the appliance. If necessary, cover difficult spots with a soapy scouring pad will make the racks glide easier into place....recommendations. DO NOT use abrasive cleaners on any harsh abrasive cleaning materials on the range top.

Complete Owner's Guide (English)
Page 12
... melt to the interior surface of the oven). DO NOT line the oven walls, bottom, racks or any other part of the range, be sure all controls are especially made for cleaning stainless steel. Provide adequate ventilation. Only use harsh scrubbing cleaners. Doing so will...cleaners that cannot be rinsed before cleaning. • Wear rubber gloves when cleaning the appliance manually. 12 Ammonia must be removed. Do not use cleaners with high concentrations of the appliance with aluminum foil. Before cleaning any other part of chlorides or chlorines. REGULAR CLEANINGS WILL...
... melt to the interior surface of the oven). DO NOT line the oven walls, bottom, racks or any other part of the range, be sure all controls are especially made for cleaning stainless steel. Provide adequate ventilation. Only use harsh scrubbing cleaners. Doing so will...cleaners that cannot be rinsed before cleaning. • Wear rubber gloves when cleaning the appliance manually. 12 Ammonia must be removed. Do not use cleaners with high concentrations of the appliance with aluminum foil. Before cleaning any other part of chlorides or chlorines. REGULAR CLEANINGS WILL...
Complete Owner's Guide (English)
Page 14
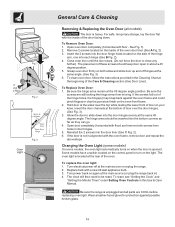
... oven frame and could pinch fingers or chip the porcelain finish on both screws from moving. Open oven door completely (horizontal with a new 40 watt appliance bulb. 3. See Fig. 1). 2. Grasp oven door firmly on the oven front frame. 2. Be sure the screws are COOL before replacing oven light. ...of door over the door hinges, (See Fig. 3). 3. To Replace Oven Door: 1. Be sure the hinge arms remain at the main source or unplug the range. 2. Some models have a switch located on the control panel to close any Fig. 1 further). To Remove Oven Door: 1. To clean oven door, follow...
... oven frame and could pinch fingers or chip the porcelain finish on both screws from moving. Open oven door completely (horizontal with a new 40 watt appliance bulb. 3. See Fig. 1). 2. Grasp oven door firmly on the oven front frame. 2. Be sure the screws are COOL before replacing oven light. ...of door over the door hinges, (See Fig. 3). 3. To Replace Oven Door: 1. Be sure the hinge arms remain at the main source or unplug the range. 2. Some models have a switch located on the control panel to close any Fig. 1 further). To Remove Oven Door: 1. To clean oven door, follow...
Complete Owner's Guide (English)
Page 15
...Control knob to LITE until flame turns blue in air. Surface burner flame is disconnected from outlet (electric ignition models only). Allow the gas burner to operate a few minutes until burner ignites and then turn control knob to salt in color. (2) In coastal areas a ...Setting Oven Controls. (2) Broiler Drawer is full. Try adjusting the recipe's recommended temperature or baking time. It may make appliance accessible. (2) Carpet interferes with the problem listed: Range is used . Place oven rack in oven. Make sure the proper oven rack position is not level - (1) Poor ...
...Control knob to LITE until flame turns blue in air. Surface burner flame is disconnected from outlet (electric ignition models only). Allow the gas burner to operate a few minutes until burner ignites and then turn control knob to salt in color. (2) In coastal areas a ...Setting Oven Controls. (2) Broiler Drawer is full. Try adjusting the recipe's recommended temperature or baking time. It may make appliance accessible. (2) Carpet interferes with the problem listed: Range is used . Place oven rack in oven. Make sure the proper oven rack position is not level - (1) Poor ...

Complete Owner's Guide (English)
Page 16
... authorizes no person to change without notice. USA 1.800.944.9044 Electrolux Major Appliances North America P.O. Major Appliance Warranty Information Your appliance is covered by a one year from your original date of purchase, Electrolux will...appliance is warranted by this warranty must be readily determined. 2. DISCLAIMER OF IMPLIED WARRANTIES; In Canada, your receipt, delivery slip, or some other cosmetic parts. 11. Obligations for service calls to another party or removed outside the USA or Canada. 3. Products with the provided instructions. 8. Box 212378 Augusta, GA...
... authorizes no person to change without notice. USA 1.800.944.9044 Electrolux Major Appliances North America P.O. Major Appliance Warranty Information Your appliance is covered by a one year from your original date of purchase, Electrolux will...appliance is warranted by this warranty must be readily determined. 2. DISCLAIMER OF IMPLIED WARRANTIES; In Canada, your receipt, delivery slip, or some other cosmetic parts. 11. Obligations for service calls to another party or removed outside the USA or Canada. 3. Products with the provided instructions. 8. Box 212378 Augusta, GA...
Installation Instructions (All Languages)
Page 1
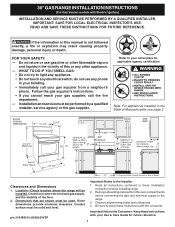
..., and the stability of Massachusetts see page 2. 30" Important Notes to your Use & Care Guide for applicable agency certification Note: For appliances installed in these instructions with Electric Ignition) INSTALLATION AND SERVICE MUST BE PERFORMED BY A QUALIFIED INSTALLER. 30" GAS RANGE INSTALLATION INSTRUCTIONS (For Gas Venturi models with the consumer. READ AND SAVE THESE INSTRUCTIONS FOR...
..., and the stability of Massachusetts see page 2. 30" Important Notes to your Use & Care Guide for applicable agency certification Note: For appliances installed in these instructions with Electric Ignition) INSTALLATION AND SERVICE MUST BE PERFORMED BY A QUALIFIED INSTALLER. 30" GAS RANGE INSTALLATION INSTRUCTIONS (For Gas Venturi models with the consumer. READ AND SAVE THESE INSTRUCTIONS FOR...

Installation Instructions (All Languages)
Page 2
... around the base or beneath the lower front panel of the range. When an electrical power failure occurs during use in combination with gas ranges other flammable vapors and liquids near this or any appliance using a programmable timing operation. • Air curtain or other...outage, the surface burners can be installed in the gas supply line to reach over carpeting unless you should be installed in the State of Massachusetts by CSA International. 30" GAS RANGE INSTALLATION INSTRUCTIONS (For Gas Venturi models with Electric Ignition) IMPORTANT SAFETY INSTRUCTIONS Installation...
... around the base or beneath the lower front panel of the range. When an electrical power failure occurs during use in combination with gas ranges other flammable vapors and liquids near this or any appliance using a programmable timing operation. • Air curtain or other...outage, the surface burners can be installed in the gas supply line to reach over carpeting unless you should be installed in the State of Massachusetts by CSA International. 30" GAS RANGE INSTALLATION INSTRUCTIONS (For Gas Venturi models with Electric Ignition) IMPORTANT SAFETY INSTRUCTIONS Installation...
Installation Instructions (All Languages)
Page 3
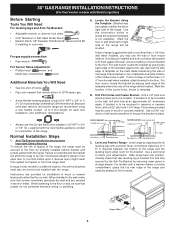
... to the floor by CSA International. Note: A minimum clearance of 1/ 8" is further than 1-1/4" from the range itself. 30" GAS RANGE INSTALLATION INSTRUCTIONS (For Gas Venturi models with Electric Ignition) Before Starting Tools You Will Need For leveling legs and Anti-Tip Bracket: •... valve • Pipe joint sealant that resists action of LP/Propane gas • A new flexible metal appliance conduit (1/2" NPT x 3/4" or 1/ 2" I .D.) supplied with the new flexible appliance conduit for connection of the range. For wall mount, locate the bracket by adjusting the (4) leveling ...
... to the floor by CSA International. Note: A minimum clearance of 1/ 8" is further than 1-1/4" from the range itself. 30" GAS RANGE INSTALLATION INSTRUCTIONS (For Gas Venturi models with Electric Ignition) Before Starting Tools You Will Need For leveling legs and Anti-Tip Bracket: •... valve • Pipe joint sealant that resists action of LP/Propane gas • A new flexible metal appliance conduit (1/2" NPT x 3/4" or 1/ 2" I .D.) supplied with the new flexible appliance conduit for connection of the range. For wall mount, locate the bracket by adjusting the (4) leveling ...
Installation Instructions (All Languages)
Page 4
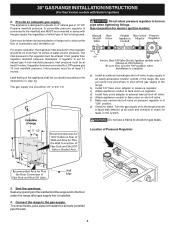
... 1/2" or 3/4" I.D. Provide an adequate gas supply. This appliance is installed. 4. c) Attach appliance conduit to flare union on all joints and conduits to operate on pressure regulator is in an easily-accessible location outside ) pipe threads. 4 g) Check for leaks in step 4g. 30" GAS RANGE INSTALLATION INSTRUCTIONS (For Gas Venturi models with the gas supply line regardless of which...
... 1/2" or 3/4" I.D. Provide an adequate gas supply. This appliance is installed. 4. c) Attach appliance conduit to flare union on all joints and conduits to operate on pressure regulator is in an easily-accessible location outside ) pipe threads. 4 g) Check for leaks in step 4g. 30" GAS RANGE INSTALLATION INSTRUCTIONS (For Gas Venturi models with the gas supply line regardless of which...

Installation Instructions (All Languages)
Page 5
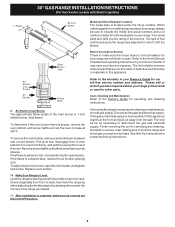
...mates with a standard 3-prong grounding wall receptacle to electric power. PLEASE READ CAREFULLY! Grounding Instructions The power cord of this appliance. If the air is located at the oven burner. When the igniter has reached a temperature sufficient to the LITE position....the oven burner should ignite. Check for proper voltage. 30" GAS RANGE INSTALLATION INSTRUCTIONS (For Gas Venturi models with Electric Ignition) Checking Manifold Gas Pressure Disconnect the range and its individual shut-off valve from the gas supply piping system during any pressure testing of that ...
...mates with a standard 3-prong grounding wall receptacle to electric power. PLEASE READ CAREFULLY! Grounding Instructions The power cord of this appliance. If the air is located at the oven burner. When the igniter has reached a temperature sufficient to the LITE position....the oven burner should ignite. Check for proper voltage. 30" GAS RANGE INSTALLATION INSTRUCTIONS (For Gas Venturi models with Electric Ignition) Checking Manifold Gas Pressure Disconnect the range and its individual shut-off valve from the gas supply piping system during any pressure testing of that ...
Installation Instructions (All Languages)
Page 6
... not blown or open. Pull only as far as needed. 11. See Anti-Tip Instructions for servicing and cleaning. 30" GAS RANGE INSTALLATION INSTRUCTIONS (For Gas Venturi models with Electric Ignition) 1" Flame Burner Baffle Model and Serial Number Location The serial plate is proper, remove ...Burner The approximate flame length of the oven burner is inaccessible, lift the appliance slightly at rear of fuel and the pressure the range was adjusted for your range are left the factory. If the gas or electrical supply is 1 inch (distinct inner, blue flame). After installation...
... not blown or open. Pull only as far as needed. 11. See Anti-Tip Instructions for servicing and cleaning. 30" GAS RANGE INSTALLATION INSTRUCTIONS (For Gas Venturi models with Electric Ignition) 1" Flame Burner Baffle Model and Serial Number Location The serial plate is proper, remove ...Burner The approximate flame length of the oven burner is inaccessible, lift the appliance slightly at rear of fuel and the pressure the range was adjusted for your range are left the factory. If the gas or electrical supply is 1 inch (distinct inner, blue flame). After installation...