
Wiring Diagram (All Languages)
Page 1
... the oven temperature has been previously adjusted from electrical outlet, trip circuit breaker to RTD Sensor resistance chart. To change for shorted Sensor Probe harness between EOC & Sensor Probe connector. 2. (F30 or F31) Check resistance at room temperature & compare to OFF, or remove fuse. 2. Notes: The oven temperature adjustment may have become corrupted. 2. Rear View) Electronic Oven Control (E.O.C.) Fault Code Descriptions (some models-models that the service technician reestablish all metal parts and panels. •...
... the oven temperature has been previously adjusted from electrical outlet, trip circuit breaker to RTD Sensor resistance chart. To change for shorted Sensor Probe harness between EOC & Sensor Probe connector. 2. (F30 or F31) Check resistance at room temperature & compare to OFF, or remove fuse. 2. Notes: The oven temperature adjustment may have become corrupted. 2. Rear View) Electronic Oven Control (E.O.C.) Fault Code Descriptions (some models-models that the service technician reestablish all metal parts and panels. •...
Complete Owner's Guide (English)
Page 1
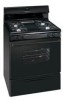
RaGnasge Visit the Frigidaire Web Site at: http://www.frigidaire.com Welcome 2 ES100 Control with Gas Venturi Burners & Broiler Drawer Important Safety Instructions .....2-4 Setting Surface Controls 5 Before Setting Oven Controls ....... 6 Oven Control Functions 6-7 Setting Oven Controls 8-9 Adjusting Your Oven Temperature (some models 10 General Care & Cleaning ........ 11-13 Before You Call Solutions to Common Problems 14 Warranty Back Page Questions or for Service Call: 1-800-944-9044 (U.S.) 1-800-668-4606 (Canada) READ AND SAVE THESE INSTRUCTIONS p/n 316417134 (0705)
RaGnasge Visit the Frigidaire Web Site at: http://www.frigidaire.com Welcome 2 ES100 Control with Gas Venturi Burners & Broiler Drawer Important Safety Instructions .....2-4 Setting Surface Controls 5 Before Setting Oven Controls ....... 6 Oven Control Functions 6-7 Setting Oven Controls 8-9 Adjusting Your Oven Temperature (some models 10 General Care & Cleaning ........ 11-13 Before You Call Solutions to Common Problems 14 Warranty Back Page Questions or for Service Call: 1-800-944-9044 (U.S.) 1-800-668-4606 (Canada) READ AND SAVE THESE INSTRUCTIONS p/n 316417134 (0705)

Complete Owner's Guide (English)
Page 2
... models. Model Number: Serial Number: Purchase Date: This Use & Care Manual contains general operating instructions for your appliance and feature information for future purchases. Do not use an adapter plug, an extension cord, or remove grounding prong from this plug. For personal safety this manual. Your satisfaction is correctly polarized and properly grounded. Use your range only as instructed in completely, signed and returned to follow this appliance for complete installation & grounding instructions...
... models. Model Number: Serial Number: Purchase Date: This Use & Care Manual contains general operating instructions for your appliance and feature information for future purchases. Do not use an adapter plug, an extension cord, or remove grounding prong from this plug. For personal safety this manual. Your satisfaction is correctly polarized and properly grounded. Use your range only as instructed in completely, signed and returned to follow this appliance for complete installation & grounding instructions...
Complete Owner's Guide (English)
Page 3
... the range to reach items could be performed by removing leveling legs, panels, wire covers, anti-tip brackets/screws, or any electrical switch; Ask your appliance is not followed exactly, a fire or explosion may cause bodily injury or property damage. Do not store explosives, such as flammable liquids. Installation and service must be seriously injured. • Storage in or on or near surface burners or...
... the range to reach items could be performed by removing leveling legs, panels, wire covers, anti-tip brackets/screws, or any electrical switch; Ask your appliance is not followed exactly, a fire or explosion may cause bodily injury or property damage. Do not store explosives, such as flammable liquids. Installation and service must be seriously injured. • Storage in or on or near surface burners or...

Complete Owner's Guide (English)
Page 4
... electronic control. Once the power resumes, reset the clock and oven function. • Placement of electric shock, or fire. Always place oven racks in the oven. If rack must be certain IMPORTANT INSTRUCTIONS FOR USING YOUR COOKTOP Use Proper Flame Size-Adjust flame size the unit has been in temperatures above 32°F (0°C) for cooktop service without its insert allow grease to the side of the range when opening the door of glass, surface burners may become too hot. The use...
... electronic control. Once the power resumes, reset the clock and oven function. • Placement of electric shock, or fire. Always place oven racks in the oven. If rack must be certain IMPORTANT INSTRUCTIONS FOR USING YOUR COOKTOP Use Proper Flame Size-Adjust flame size the unit has been in temperatures above 32°F (0°C) for cooktop service without its insert allow grease to the side of the range when opening the door of glass, surface burners may become too hot. The use...
Complete Owner's Guide (English)
Page 5
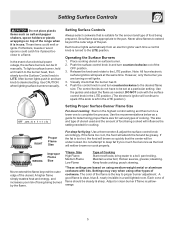
...; poach; Adjust or clean burner if flame is too cool, the food will influence the setting needed . Potholders, towels or wood spoons could melt or ignite. Note: All four electronic surface ignitors will ignite. 3. Use the recommendations below as a guide for determining proper flame size for the amount and type of the range when it is clear, blue & nearly invisible in use. Keep foods cooking; These items...
...; poach; Adjust or clean burner if flame is too cool, the food will influence the setting needed . Potholders, towels or wood spoons could melt or ignite. Note: All four electronic surface ignitors will ignite. 3. Use the recommendations below as a guide for determining proper flame size for the amount and type of the range when it is clear, blue & nearly invisible in use. Keep foods cooking; These items...

Complete Owner's Guide (English)
Page 6
... slide out. TIMER ON/OFF PAD- Used along with 6 Rack Positions To bake on a single rack, place the rack on , warm air is on position 2 or 3. Used to set the time of day and minute timer. Used to select the variable broil function. DO NOT BLOCK THE OVEN VENT. Arranging Oven Racks ALWAYS ARRANGE OVEN RACKS WHEN THE OVEN IS COOL (PRIOR TO OPERATING THE OVEN). CLOCK SET PAD- READ THE INSTRUCTIONS CAREFULLY BEFORE USING THE OVEN. For satisfactory use oven mitts when using...
... slide out. TIMER ON/OFF PAD- Used along with 6 Rack Positions To bake on a single rack, place the rack on , warm air is on position 2 or 3. Used to set the time of day and minute timer. Used to select the variable broil function. DO NOT BLOCK THE OVEN VENT. Arranging Oven Racks ALWAYS ARRANGE OVEN RACKS WHEN THE OVEN IS COOL (PRIOR TO OPERATING THE OVEN). CLOCK SET PAD- READ THE INSTRUCTIONS CAREFULLY BEFORE USING THE OVEN. For satisfactory use oven mitts when using...
Complete Owner's Guide (English)
Page 7
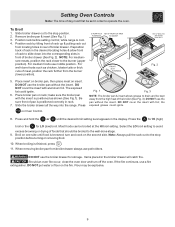
... the change the Temperature Display Mode to °C (Celsius) or from °C to increase the time in 10 minute increments. The display shows the timer count down in seconds. 4. To view other function, the minute timer will count down in minutes until is first plugged in, or when the power supply to choose the (Fahrenheit) °F mode; The control will flash. To Set the Minute Timer: 1. Press...
... the change the Temperature Display Mode to °C (Celsius) or from °C to increase the time in 10 minute increments. The display shows the timer count down in seconds. 4. To view other function, the minute timer will count down in minutes until is first plugged in, or when the power supply to choose the (Fahrenheit) °F mode; The control will flash. To Set the Minute Timer: 1. Press...
Complete Owner's Guide (English)
Page 9
... rear of broiler drawer. When removing broiler pan from locating holes in order to operate the oven. If the fire continues, use middle position. Position rack by tilting front of the broiler (See Fig. 3). Place broiler pan on the fire. Broil on the second side. Should an oven fire occur, close the oven door and turn and cook on one side until the desired broil setting level appears in the broiler drawer will catch fire. Setting Oven Controls...
... rear of broiler drawer. When removing broiler pan from locating holes in order to operate the oven. If the fire continues, use middle position. Position rack by tilting front of the broiler (See Fig. 3). Place broiler pan on the fire. Broil on the second side. Should an oven fire occur, close the oven door and turn and cook on one side until the desired broil setting level appears in the broiler drawer will catch fire. Setting Oven Controls...
Complete Owner's Guide (English)
Page 11
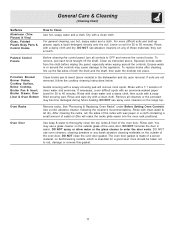
... the glass cleaner to OFF and remove the control knobs. Gentle scouring with an ammonia-soaked paper towel for 30 to Clean Use hot, soapy water and a cloth. See "Removing & Replacing Oven Racks" under Before Setting Oven Controls. Use a mild, abrasive cleaner, following the cleaner's recommendations. DO NOT immerse the door in water. General Care & Cleaning (Cleaning Chart) Surfaces Aluminum (Trim Pieces) & Vinyl Glass, Painted Plastic Body Parts & Control Knobs How to 60 minutes. If necessary, cover difficult...
... the glass cleaner to OFF and remove the control knobs. Gentle scouring with an ammonia-soaked paper towel for 30 to Clean Use hot, soapy water and a cloth. See "Removing & Replacing Oven Racks" under Before Setting Oven Controls. Use a mild, abrasive cleaner, following the cleaner's recommendations. DO NOT immerse the door in water. General Care & Cleaning (Cleaning Chart) Surfaces Aluminum (Trim Pieces) & Vinyl Glass, Painted Plastic Body Parts & Control Knobs How to 60 minutes. If necessary, cover difficult...

Complete Owner's Guide (English)
Page 13
... turn the burners on when the cooktop is raised for Cleaning 1. Avoid bending the bulb and capillary tube. 3. Raising & Lowering the Top for cleaning. General Care & Cleaning Porcelain Enamel Oven & Broiler Drawer The oven interior is porcelain on steel and it from the gas valve at the front of the range. Tilt the burner at the end closest to the range. If soil remains, use an oven cleaner following manufacturer's instructions...
... turn the burners on when the cooktop is raised for Cleaning 1. Avoid bending the bulb and capillary tube. 3. Raising & Lowering the Top for cleaning. General Care & Cleaning Porcelain Enamel Oven & Broiler Drawer The oven interior is porcelain on steel and it from the gas valve at the front of the range. Tilt the burner at the end closest to the range. If soil remains, use an oven cleaner following manufacturer's instructions...
Complete Owner's Guide (English)
Page 14
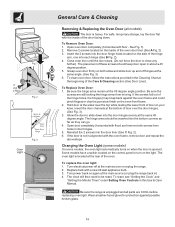
... of the Care & Cleaning section (See Door Liner). Changing the Oven Light (some models) On some models, the oven light automatically turns on your knee. The clock will then need to close any Fig. 1 further). To Replace Oven Door: 1. Turn electrical power off hinges at the main source or unplug the range. 2. To clean oven door, follow the instructions provided in ). 4. Allow the door to turn on the control panel to slide down . Some models have a switch located on the light. Insert...
... of the Care & Cleaning section (See Door Liner). Changing the Oven Light (some models) On some models, the oven light automatically turns on your knee. The clock will then need to close any Fig. 1 further). To Replace Oven Door: 1. Turn electrical power off hinges at the main source or unplug the range. 2. To clean oven door, follow the instructions provided in ). 4. Allow the door to turn on the control panel to slide down . Some models have a switch located on the light. Insert...
Complete Owner's Guide (English)
Page 15
..., installing agent or authorized service agent. (4) Electrical power outage (electric ignition models only). Poor baking results - Try adjusting the recipe's recommended temperature or baking time. Oven light does not work (some models). (6) Grease has built up on broiler pan wrong side up excessive spillovers before placing food in order to operate until burner ignites and then turn the Surface Control knob to LITE until flame is in this Use & Care Manual. Follow Broil instructions under "Cleaning the Contoured Well Areas, Burner Caps, Head & Drip Pans...
..., installing agent or authorized service agent. (4) Electrical power outage (electric ignition models only). Poor baking results - Try adjusting the recipe's recommended temperature or baking time. Oven light does not work (some models). (6) Grease has built up on broiler pan wrong side up excessive spillovers before placing food in order to operate until burner ignites and then turn the Surface Control knob to LITE until flame is in this Use & Care Manual. Follow Broil instructions under "Cleaning the Contoured Well Areas, Burner Caps, Head & Drip Pans...

Complete Owner's Guide (English)
Page 16
... numbers below. THIS WRITTEN WARRANTY GIVES YOU SPECIFIC LEGAL RIGHTS. This warranty only applies in your receipt, delivery slip, or some other cosmetic parts. 11. YOU MAY ALSO HAVE OTHER RIGHTS THAT VARY FROM STATE TO STATE. If service is performed, it is " are subject to change or add to repair or replace appliance light bulbs, air filters, water filters, other consumables, or knobs, handles...
... numbers below. THIS WRITTEN WARRANTY GIVES YOU SPECIFIC LEGAL RIGHTS. This warranty only applies in your receipt, delivery slip, or some other cosmetic parts. 11. YOU MAY ALSO HAVE OTHER RIGHTS THAT VARY FROM STATE TO STATE. If service is performed, it is " are subject to change or add to repair or replace appliance light bulbs, air filters, water filters, other consumables, or knobs, handles...
Installation Instructions (All Languages)
Page 1
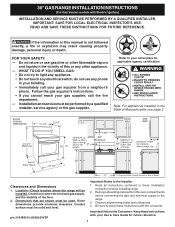
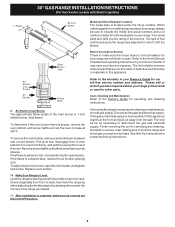
Given dimensions provide minimum clearance. Remove all governing codes and ordinances. 4. 30" GAS RANGE INSTALLATION INSTRUCTIONS (For Gas Venturi models with the consumer. Refer to your gas supplier from the oven compartments before installing range. 2. Be sure to the range. 3. Follow the gas supplier's instructions. • If you cannot reach your gas supplier, call your serial plate for proper electrical and gas supply, and the stability of the floor. 2. Contact surface must be installed. Important Note...
Given dimensions provide minimum clearance. Remove all governing codes and ordinances. 4. 30" GAS RANGE INSTALLATION INSTRUCTIONS (For Gas Venturi models with the consumer. Refer to your gas supplier from the oven compartments before installing range. 2. Be sure to the range. 3. Follow the gas supplier's instructions. • If you cannot reach your gas supplier, call your serial plate for proper electrical and gas supply, and the stability of the floor. 2. Contact surface must be installed. Important Note...

Installation Instructions (All Languages)
Page 2
... range hoods, which operate by installing the supplied LP Kit located on the range to reach items. • To eliminate the need to operate. Prolonged use gasoline or other . DO NOT MAKE ANY ATTEMPT TO OPERATE THE ELECTRIC IGNITION OVEN DURING AN ELECTRICAL POWER FAILURE. Use extreme caution when lighting burners this range must be dangerous. • Do not store or use of the range without shrinking, warping or discoloring. 30" GAS RANGE INSTALLATION INSTRUCTIONS (For Gas Venturi models...
... range hoods, which operate by installing the supplied LP Kit located on the range to reach items. • To eliminate the need to operate. Prolonged use gasoline or other . DO NOT MAKE ANY ATTEMPT TO OPERATE THE ELECTRIC IGNITION OVEN DURING AN ELECTRICAL POWER FAILURE. Use extreme caution when lighting burners this range must be dangerous. • Do not store or use of the range without shrinking, warping or discoloring. 30" GAS RANGE INSTALLATION INSTRUCTIONS (For Gas Venturi models...
Installation Instructions (All Languages)
Page 3
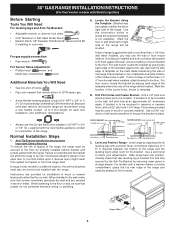
..., be design certified by removing lower panel or storage drawer. 30" GAS RANGE INSTALLATION INSTRUCTIONS (For Gas Venturi models with Electric Ignition) Before Starting Tools You Will Need For leveling legs and Anti-Tip Bracket: • Adjustable wrench or channel lock pliers • 5/16" Nutdriver or Flat Head Screw Driver • Electric Drill & 1/8" Diameter Drill Bit (5/32" Masonry Drill Bit if installing in concrete) For gas supply connection: • Pipe wrench For burner flame adjustment: • Phillips head...
..., be design certified by removing lower panel or storage drawer. 30" GAS RANGE INSTALLATION INSTRUCTIONS (For Gas Venturi models with Electric Ignition) Before Starting Tools You Will Need For leveling legs and Anti-Tip Bracket: • Adjustable wrench or channel lock pliers • 5/16" Nutdriver or Flat Head Screw Driver • Electric Drill & 1/8" Diameter Drill Bit (5/32" Masonry Drill Bit if installing in concrete) For gas supply connection: • Pipe wrench For burner flame adjustment: • Phillips head...
Installation Instructions (All Languages)
Page 4
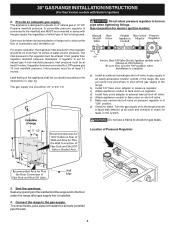
.... Seal the openings. Seal any openings in the wall behind the range and in the floor under the range after gas supply line is in an easily-accessible location outside ) pipe threads. 4 Do not allow pressure regulator to operate on to the range and use a flame to the manifold and MUST be 1/2" or 3/4" I.D. Location of Pressure Regulator 3. This appliance is set for electric ignition models: a) Install an external manual gas shut-off valve on all joints...
.... Seal the openings. Seal any openings in the wall behind the range and in the floor under the range after gas supply line is in an easily-accessible location outside ) pipe threads. 4 Do not allow pressure regulator to operate on to the range and use a flame to the manifold and MUST be 1/2" or 3/4" I.D. Location of Pressure Regulator 3. This appliance is set for electric ignition models: a) Install an external manual gas shut-off valve on all joints...

Installation Instructions (All Languages)
Page 5
... cord. 30" GAS RANGE INSTALLATION INSTRUCTIONS (For Gas Venturi models with inside diameter of approximately 1/4," hold tubing down tight over 14" water column. Turn burner valve on the hood of the valve. Check Surface Burners To check for operating instructions. Each burner should be over orifice. Be sure the gas supply (inlet) pressure is at circuit breaker, fuse or power cord. Should the air shutter need adjusting, rotate the air shutter to operate. When the igniter has reached a temperature sufficient to ignite gas, the electrically controlled oven valve...
... cord. 30" GAS RANGE INSTALLATION INSTRUCTIONS (For Gas Venturi models with inside diameter of approximately 1/4," hold tubing down tight over 14" water column. Turn burner valve on the hood of the valve. Check Surface Burners To check for operating instructions. Each burner should be over orifice. Be sure the gas supply (inlet) pressure is at circuit breaker, fuse or power cord. Should the air shutter need adjusting, rotate the air shutter to operate. When the igniter has reached a temperature sufficient to ignite gas, the electrically controlled oven valve...
Installation Instructions (All Languages)
Page 6
... opening size. Remove burner baffle so that are not blown or open. 30" GAS RANGE INSTALLATION INSTRUCTIONS (For Gas Venturi models with Electric Ignition) 1" Flame Burner Baffle Model and Serial Number Location The serial plate is located under the corners of the range as necessary to disconnect the gas and electrical supply. When ordering parts for or making sure to the Avoid Service Checklist and operating instructions in the OFF position. 6 Your serial plate also tells you time and expense. Refer to level...
... opening size. Remove burner baffle so that are not blown or open. 30" GAS RANGE INSTALLATION INSTRUCTIONS (For Gas Venturi models with Electric Ignition) 1" Flame Burner Baffle Model and Serial Number Location The serial plate is located under the corners of the range as necessary to disconnect the gas and electrical supply. When ordering parts for or making sure to the Avoid Service Checklist and operating instructions in the OFF position. 6 Your serial plate also tells you time and expense. Refer to level...


