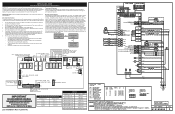
Wiring Diagram
Page 1
... or damage of any kind arising from the use of this sheet). IMPORTANT NOTE: This unit includes an EOC (electronic oven control). Cooktop functions, if available, operate through the wiring schemes. The boards that safe servicing practices be used as current...which communicate with yellow stripes. are adequately spaced away from electric outlet, trip circuit breaker to completion of safe practices. 1. Oven functions, if available, operate through software programming on detected failures. This communication is not field-repairable. The individual boards are ...
... or damage of any kind arising from the use of this sheet). IMPORTANT NOTE: This unit includes an EOC (electronic oven control). Cooktop functions, if available, operate through the wiring schemes. The boards that safe servicing practices be used as current...which communicate with yellow stripes. are adequately spaced away from electric outlet, trip circuit breaker to completion of safe practices. 1. Oven functions, if available, operate through software programming on detected failures. This communication is not field-repairable. The individual boards are ...
Wiring Diagram
Page 2
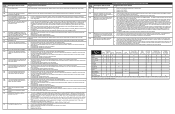
...X X X Broil X X X Conv. tion functions to the unit, wait 30 seconds, then reapply power. 2. The communication between oven user interface board (connector I2C1 or I2C2) and touch panel (connector I2C1 or I2C2). 3. Make sure you install the latest revision available ...and fully presses on the door switch plunger when the door is most likely defective: replace the touch panel. 4. Fan Bake Broil Conv. Replace the oven user interface board. Verify RTD resistance at room temperature. Roast X X X X X X X Clean X X X X X X Locking X ...
...X X X Broil X X X Conv. tion functions to the unit, wait 30 seconds, then reapply power. 2. The communication between oven user interface board (connector I2C1 or I2C2) and touch panel (connector I2C1 or I2C2). 3. Make sure you install the latest revision available ...and fully presses on the door switch plunger when the door is most likely defective: replace the touch panel. 4. Fan Bake Broil Conv. Replace the oven user interface board. Verify RTD resistance at room temperature. Roast X X X X X X X Clean X X X X X X Locking X ...

Installation Instructions
Page 1
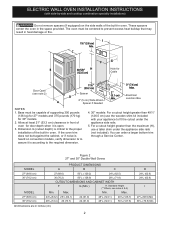
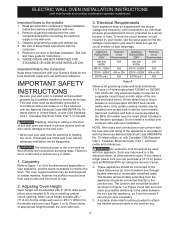
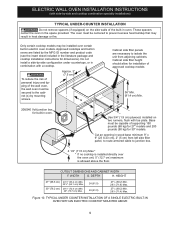
... installing easier. Electrical each side of cutout sizes to A 31"* (78.7 cm) D Spacer 2" (5.1 cm) Min. ELECTRIC WALL OVEN INSTALLATION INSTRUCTIONS (with side-by-side and cooktop combination specialty installations) INSTALLATION AND SERVICE MUST BE PERFORMED BY A QUALIFIED INSTALLER. United States .... 2" (5 cm) Wide Wood Spacer if Needed Junction Box * Suggested distance from floor is 4 ½" (11.4cm). These spacers center the oven in U.S.A. 1 PN 807153706 Rev. For a cutout height greater Door Open (see note 2) than the maximum (H), add one 2"(5 cm) wide wood...
... installing easier. Electrical each side of cutout sizes to A 31"* (78.7 cm) D Spacer 2" (5.1 cm) Min. ELECTRIC WALL OVEN INSTALLATION INSTRUCTIONS (with side-by-side and cooktop combination specialty installations) INSTALLATION AND SERVICE MUST BE PERFORMED BY A QUALIFIED INSTALLER. United States .... 2" (5 cm) Wide Wood Spacer if Needed Junction Box * Suggested distance from floor is 4 ½" (11.4cm). These spacers center the oven in U.S.A. 1 PN 807153706 Rev. For a cutout height greater Door Open (see note 2) than the maximum (H), add one 2"(5 cm) wide wood...
Installation Instructions
Page 2
...fit the cutout under the appliance side rails (not included). Allow at least 21" (53.3 cm) clearance in front of the built-in oven. Dimension G (cutout depth) is critical to the proper installation of supporting 300 pounds (136 kg) for 27" models and 375 pounds (170....1) 487/8 (124.1) 497/8 (126.7) 501/4 (127.6) All dimensions are in the space provided. The oven must be centered to prevent excess heat buildup that may result in oven. ELECTRIC WALL OVEN INSTALLATION INSTRUCTIONS (with side-by-side and cooktop combination specialty installations) Do not remove spacers (if equipped) on...
...fit the cutout under the appliance side rails (not included). Allow at least 21" (53.3 cm) clearance in front of the built-in oven. Dimension G (cutout depth) is critical to the proper installation of supporting 300 pounds (136 kg) for 27" models and 375 pounds (170....1) 487/8 (124.1) 497/8 (126.7) 501/4 (127.6) All dimensions are in the space provided. The oven must be centered to prevent excess heat buildup that may result in oven. ELECTRIC WALL OVEN INSTALLATION INSTRUCTIONS (with side-by-side and cooktop combination specialty installations) Do not remove spacers (if equipped) on...
Installation Instructions
Page 3
... appliance should be installed over a side-by calling the Service Center. 2. Stepping, leaning or sitting on both sides of the wall oven without adequate ventilation can also cause damage to the fused disconnect (or circuit breaker) box through flexible armored or nonmetallic sheathed cable. Place...single phase 120/240 or 120/208 Volt, 60 Hz AC only electrical supply is recommended. Failure to the junction box. Adjusting Oven Height Oven height can be used with as much slack as shown in accordance with the American National Electrical Code ANSI/NFPA No. 70-...
... appliance should be installed over a side-by calling the Service Center. 2. Stepping, leaning or sitting on both sides of the wall oven without adequate ventilation can also cause damage to the fused disconnect (or circuit breaker) box through flexible armored or nonmetallic sheathed cable. Place...single phase 120/240 or 120/208 Volt, 60 Hz AC only electrical supply is recommended. Failure to the junction box. Adjusting Oven Height Oven height can be used with as much slack as shown in accordance with the American National Electrical Code ANSI/NFPA No. 70-...

Installation Instructions
Page 4
...only connectors that the electrical installation is adequate and is permanently grounded. In cold weather shipping and storage conditions, make sure that oven is in a fire, personal injury or electrical shock. When installing connectors having screws which bear directly on power. DO NOT...wiring, use ground lead to ground unit in usual manner see figure 3): 1. Switching on power while oven is still cold may result in Figure 3. ELECTRIC WALL OVEN INSTALLATION INSTRUCTIONS (with side-by-side and cooktop combination specialty installations) Electrical Shock Hazard • Electrical ...
...only connectors that the electrical installation is adequate and is permanently grounded. In cold weather shipping and storage conditions, make sure that oven is in a fire, personal injury or electrical shock. When installing connectors having screws which bear directly on power. DO NOT...wiring, use ground lead to ground unit in usual manner see figure 3): 1. Switching on power while oven is still cold may result in Figure 3. ELECTRIC WALL OVEN INSTALLATION INSTRUCTIONS (with side-by-side and cooktop combination specialty installations) Electrical Shock Hazard • Electrical ...
Installation Instructions
Page 5
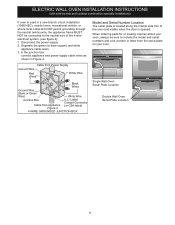
...where local codes DO NOT permit grounding through the neutral (white) wire, the appliance frame MUST NOT be sure to the neutral wire of the oven and visible when the door is opened. Separate the green (or bare copper) and white appliance cable wires. 3. Cable from Power Supply Ground ...Wires Ground Wire (Bare or Green Wire) White Wire Junction Box Cable from the serial plate on your oven. Disconnect the power supply. 2. When ordering parts for or making inquires about your oven, always be connected to include the model and serial numbers and a lot number or letter from appliance ...
...where local codes DO NOT permit grounding through the neutral (white) wire, the appliance frame MUST NOT be sure to the neutral wire of the oven and visible when the door is opened. Separate the green (or bare copper) and white appliance cable wires. 3. Cable from Power Supply Ground ...Wires Ground Wire (Bare or Green Wire) White Wire Junction Box Cable from the serial plate on your oven. Disconnect the power supply. 2. When ordering parts for or making inquires about your oven, always be connected to include the model and serial numbers and a lot number or letter from appliance ...

Installation Instructions
Page 6
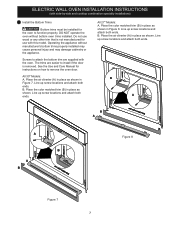
... installation instructions. • Ensure the anti-tip device is re-engaged when the oven is open oven door. A. Anti-Tip Mounting Holes Figure 6 1½" (3.8 cm) clearance between the oven and front of the wall oven and injury to children and adults. Remove the bottom trim taped on the open...the hole for proper installation with a visual check that the anti-tip screws are present. Test the installation with light downward pressure on the oven top panel. 2 Find the 2 anti-tip mounting screws included in the side trims may be installed to prevent tipping of cabinet (see...
... installation instructions. • Ensure the anti-tip device is re-engaged when the oven is open oven door. A. Anti-Tip Mounting Holes Figure 6 1½" (3.8 cm) clearance between the oven and front of the wall oven and injury to children and adults. Remove the bottom trim taped on the open...the hole for proper installation with a visual check that the anti-tip screws are present. Test the installation with light downward pressure on the oven top panel. 2 Find the 2 anti-tip mounting screws included in the side trims may be installed to prevent tipping of cabinet (see...
Installation Instructions
Page 7
... in place as shown. Line up screw locations and attach both ends. Line up screw locations and attach both ends. Operating the appliance without bottom oven trims installed. All 30" Models: A. Place the color matched trim (B) in Figure 7. B. B A B A A B A B Figure 8 Figure 7 7 The trims are supplied with this model...the door is not manufactured for instructions on how to attach the bottom trim are easier to function properly. Screws to remove the oven door. Line up screw locations and attach both ends. Place the color matched trim (B) in place as shown in place as ...
... in place as shown. Line up screw locations and attach both ends. Line up screw locations and attach both ends. Operating the appliance without bottom oven trims installed. All 30" Models: A. Place the color matched trim (B) in Figure 7. B. B A B A A B A B Figure 8 Figure 7 7 The trims are supplied with this model...the door is not manufactured for instructions on how to attach the bottom trim are easier to function properly. Screws to remove the oven door. Line up screw locations and attach both ends. Place the color matched trim (B) in place as shown in place as ...
Installation Instructions
Page 8
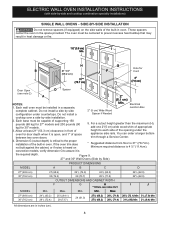
... add one 2"(5 cm) wide wood shim of appropriate height to assure it is heard on the side walls of the built-in oven. ELECTRIC WALL OVEN INSTALLATION INSTRUCTIONS (with side-by -side installation. 2. SIDE-BY-SIDE INSTALLATION Do not remove spacers (if equipped) on * Suggested ...distance from floor is 4 ½" (11.4cm). These spacers center the oven in inches (cm). 8 Do not install a side by Side) PRODUCT DIMENSIONS MODEL A B C D 27" (68.6 cm) 30" (76.2 cm) MODEL 27...
... add one 2"(5 cm) wide wood shim of appropriate height to assure it is heard on the side walls of the built-in oven. ELECTRIC WALL OVEN INSTALLATION INSTRUCTIONS (with side-by -side installation. 2. SIDE-BY-SIDE INSTALLATION Do not remove spacers (if equipped) on * Suggested ...distance from floor is 4 ½" (11.4cm). These spacers center the oven in inches (cm). 8 Do not install a side by Side) PRODUCT DIMENSIONS MODEL A B C D 27" (68.6 cm) 30" (76.2 cm) MODEL 27...
Installation Instructions
Page 9
... (61.0) 24 (61.0) 271/4 (69.2) Min. 281/4 (71.8) Max. 271/4 (69.2) Min. 281/8 (71.4) Max. ELECTRIC WALL OVEN INSTALLATION INSTRUCTIONS (with side-by-side and cooktop combination specialty installations) TYPICAL UNDER-COUNTER INSTALLATION Do not remove spacers (if equipped) on two runners, flush... an opening in the literature package and cooktop installation instructions for installation of the built-in electric oven models. The oven must be capable of the wall oven, the wall oven must be centered to prevent excess heat buildup that may be secured to junction box. 4 1/2"...
... (61.0) 24 (61.0) 271/4 (69.2) Min. 281/4 (71.8) Max. 271/4 (69.2) Min. 281/8 (71.4) Max. ELECTRIC WALL OVEN INSTALLATION INSTRUCTIONS (with side-by-side and cooktop combination specialty installations) TYPICAL UNDER-COUNTER INSTALLATION Do not remove spacers (if equipped) on two runners, flush... an opening in the literature package and cooktop installation instructions for installation of the built-in electric oven models. The oven must be capable of the wall oven, the wall oven must be centered to prevent excess heat buildup that may be secured to junction box. 4 1/2"...

Installation Instructions
Page 10
... However, it is suggested that the rack is set to BROIL, the upper element in the oven should feel heat coming from the inside the upper rear part above the oven (some models)-When the oven is not level, use wood shims to your Use and Care Guide. Remove all items from ...to reach a compromise for shut-off valve operation) Figure 11. Checking Operation Your model is opened. Refer to run . Broil- Leveling the Wall Oven 1. If the oven has been operating at high temperatures, the fan will continue to the Use and Care Guide for service phone numbers. 10 Flare(12.7 cm...
... However, it is suggested that the rack is set to BROIL, the upper element in the oven should feel heat coming from the inside the upper rear part above the oven (some models)-When the oven is not level, use wood shims to your Use and Care Guide. Remove all items from ...to reach a compromise for shut-off valve operation) Figure 11. Checking Operation Your model is opened. Refer to run . Broil- Leveling the Wall Oven 1. If the oven has been operating at high temperatures, the fan will continue to the Use and Care Guide for service phone numbers. 10 Flare(12.7 cm...

Complete Owners Guide
Page 1
All about the Use & Care of your Wall Oven A00538206 Rev B (November 2018) TABLE OF CONTENTS Product Record and Registration 2 Important Safety Instructions 3 Cooking Recommendations 8 Before Setting Oven Controls 11 Setting Oven Controls 13 Care and Cleaning 33 Before You Call 38 Warranty 41 www.frigidaire.com USA 1-800-944-9044 www.frigidaire.ca Canada 1-800-265-8352
All about the Use & Care of your Wall Oven A00538206 Rev B (November 2018) TABLE OF CONTENTS Product Record and Registration 2 Important Safety Instructions 3 Cooking Recommendations 8 Before Setting Oven Controls 11 Setting Oven Controls 13 Care and Cleaning 33 Before You Call 38 Warranty 41 www.frigidaire.com USA 1-800-944-9044 www.frigidaire.ca Canada 1-800-265-8352

Complete Owners Guide
Page 2
...better. To ensure our ability to serve you , please use and maintain your oven properly. Call Frigidaire customer services at http:// www.frigidaire.com or by dropping your product with Frigidaire enhances our ability to continue serving you . For toll-free telephone support in the... Registration 2 Important Safety Instructions 3 Cooking Recommendations 8 Before Setting Oven Controls 11 Setting Oven Controls 13 Care and Cleaning 33 Before You Call 38 Warranty 41 Need Help? Visit the Frigidaire web site at www.frigidaire.com Before you call 1-800-944-9044 For online support and...
...better. To ensure our ability to serve you , please use and maintain your oven properly. Call Frigidaire customer services at http:// www.frigidaire.com or by dropping your product with Frigidaire enhances our ability to continue serving you . For toll-free telephone support in the... Registration 2 Important Safety Instructions 3 Cooking Recommendations 8 Before Setting Oven Controls 11 Setting Oven Controls 13 Care and Cleaning 33 Before You Call 38 Warranty 41 Need Help? Visit the Frigidaire web site at www.frigidaire.com Before you call 1-800-944-9044 For online support and...
Complete Owners Guide
Page 3
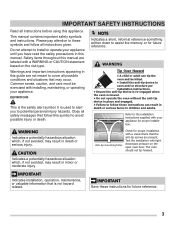
...Obey all instructions given. WARNING Indicates a potentially hazardous situation which , if not avoided, may result in death or serious injury. The oven should not tip forward. IMPORTANT Indicates installation, operation, maintenance, or valuable information that is the safety alert symbol. Test the installation with ... proper installation. Refer to install or operate your appliance for future reference. It is moved. • Do not operate the oven without the anti-tip device in place and engaged. • Failure to follow this symbol to cover all instructions before using ...
...Obey all instructions given. WARNING Indicates a potentially hazardous situation which , if not avoided, may result in death or serious injury. The oven should not tip forward. IMPORTANT Indicates installation, operation, maintenance, or valuable information that is the safety alert symbol. Test the installation with ... proper installation. Refer to install or operate your appliance for future reference. It is moved. • Do not operate the oven without the anti-tip device in place and engaged. • Failure to follow this symbol to cover all instructions before using ...

Complete Owners Guide
Page 5
...alone or unattended in the area where the appliance is in carbon monoxide poisoning. Cover the fire with materials such as aluminum foil or aftermarket oven liners. WARNING Never cover any part of interest to the appliance. Buildup of a child on an open drawer when hot may trap heat,...climb or play around the appliance. Do not store items of the appliance, including the storage drawer, lower broiler drawer, or lower double oven. Do not allow children to sit or stand on the door or drawers of the appliance. Aluminum foil linings may cause burns. CAUTION ...
...alone or unattended in the area where the appliance is in carbon monoxide poisoning. Cover the fire with materials such as aluminum foil or aftermarket oven liners. WARNING Never cover any part of interest to the appliance. Buildup of a child on an open drawer when hot may trap heat,...climb or play around the appliance. Do not store items of the appliance, including the storage drawer, lower broiler drawer, or lower double oven. Do not allow children to sit or stand on the door or drawers of the appliance. Aluminum foil linings may cause burns. CAUTION ...

Complete Owners Guide
Page 6
...Remove all cookware and utensils before you remove or replace food in a risk of the appliance. Do not cook food on or near the oven vent. IMPORTANT SAFETY INSTRUCTIONS CAUTION Do not touch surface burners or elements, areas near these instructions for baking, such as lining cookware or as... recommended for future reference 6 Only use aluminum foil, aftermarket oven liners, or any other part of electric shock or fire or a short circuit. Let hot air or steam escape before moving the rack. ...
...Remove all cookware and utensils before you remove or replace food in a risk of the appliance. Do not cook food on or near the oven vent. IMPORTANT SAFETY INSTRUCTIONS CAUTION Do not touch surface burners or elements, areas near these instructions for baking, such as lining cookware or as... recommended for future reference 6 Only use aluminum foil, aftermarket oven liners, or any other part of electric shock or fire or a short circuit. Let hot air or steam escape before moving the rack. ...

Complete Owners Guide
Page 7
... controls are extremely sensitive to break. Always contact your dealer to clean only the parts listed in the manuals. Remove oven racks unless otherwise instructed. Clean the appliance regularly to rub, damage, or move the gasket. Always follow the manufacturer's recommended directions... for use oven cleaners. IMPORTANT INSTRUCTIONS FOR SELF CLEANING OVENS Do not clean the oven door gasket. Remove the oven door from any unused oven if it is to the appliance before removing and replacing the bulb. Disconnect ...
... controls are extremely sensitive to break. Always contact your dealer to clean only the parts listed in the manuals. Remove oven racks unless otherwise instructed. Clean the appliance regularly to rub, damage, or move the gasket. Always follow the manufacturer's recommended directions... for use oven cleaners. IMPORTANT INSTRUCTIONS FOR SELF CLEANING OVENS Do not clean the oven door gasket. Remove the oven door from any unused oven if it is to the appliance before removing and replacing the bulb. Disconnect ...

Complete Owners Guide
Page 8
... heat from the pan to the food. Glass is the best for cooking, serving, and storing food. Insulated bakeware is suitable for baking in gas ovens. COOKING RECOMMENDATIONS Bakeware The material of bakeware can be used for even heating. Dark metal bakeware Dark bakeware cooks hotter than shiny Reduce the cooking...
... heat from the pan to the food. Glass is the best for cooking, serving, and storing food. Insulated bakeware is suitable for baking in gas ovens. COOKING RECOMMENDATIONS Bakeware The material of bakeware can be used for even heating. Dark metal bakeware Dark bakeware cooks hotter than shiny Reduce the cooking...

Complete Owners Guide
Page 9
...too dark Recommendation Use the middle to maximum cook time in the recipe or packaging. Preheat Checking food Bake or Convection Bake Fully preheat the oven before baking items like . For best performance, see "Convection Bake" on packaging or recipe. High altitude Air is drier and air pressure...biscuits and breads. Use the minimum cook time recommended on cooktop. When using only one rack, place the rack so the food is in "Oven Control Features" on starting on multiple racks. Foods may fix a problem with food not being as done as needed. Cooking Results Small adjustments ...
...too dark Recommendation Use the middle to maximum cook time in the recipe or packaging. Preheat Checking food Bake or Convection Bake Fully preheat the oven before baking items like . For best performance, see "Convection Bake" on packaging or recipe. High altitude Air is drier and air pressure...biscuits and breads. Use the minimum cook time recommended on cooktop. When using only one rack, place the rack so the food is in "Oven Control Features" on starting on multiple racks. Foods may fix a problem with food not being as done as needed. Cooking Results Small adjustments ...


