Wiring Diagram
Page 1
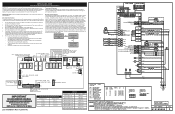
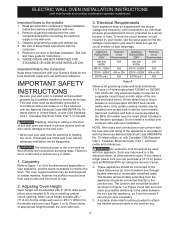
... returning the product to the schematics and diagrams on this sheet). The boards that generate low voltage operating and communications power depend upon the individual control system (refer to service, ensure that: • All electric connections are correct and secure. • All electrical leads are adequately spaced away from electric outlet, trip circuit breaker to Off, or remove fuse. 3. Temperature Adjustment Refer to the Use & Care Manual for directions on how to...
... returning the product to the schematics and diagrams on this sheet). The boards that generate low voltage operating and communications power depend upon the individual control system (refer to service, ensure that: • All electric connections are correct and secure. • All electrical leads are adequately spaced away from electric outlet, trip circuit breaker to Off, or remove fuse. 3. Temperature Adjustment Refer to the Use & Care Manual for directions on how to...
Wiring Diagram
Page 2
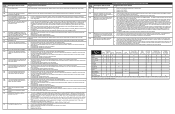
... replace the oven user interface. 1. If the above step failed to ensure that does not match the key map. The Lock Motor can be cleared, test the wiring harness between Lock Switch and oven relay board. Check wiring between oven user interface board (connector I2C1 or I2C2) and touch panel (connector I2C1 or I2C2). 3. running . 2. Roast X X X X X X X Clean X X X X X X Locking X Locked Unlocking X Unlocked Light X Door Open X X Door Closed Air Guard X X X (with key press) X NOTES: Bake, broil, and convection elements...
... replace the oven user interface. 1. If the above step failed to ensure that does not match the key map. The Lock Motor can be cleared, test the wiring harness between Lock Switch and oven relay board. Check wiring between oven user interface board (connector I2C1 or I2C2) and touch panel (connector I2C1 or I2C2). 3. running . 2. Roast X X X X X X X Clean X X X X X X Locking X Locked Unlocking X Unlocked Light X Door Open X X Door Closed Air Guard X X X (with key press) X NOTES: Bake, broil, and convection elements...

Installation Instructions
Page 1
... spacers center the oven in U.S.A. 1 PN 807153706 Rev. If the oven trim does not butt against the cabinet, B or if noise is open. 3. Standard Height (**Others, see pages 8-10 Do not remove spacers (if equipped) on convection models, verify dimension G to the proper installation of the built-in oven. pages 1-10 Español - Dimension G (cutout depth) is 4 ½" (11.4cm). SINGLE WALL OVEN - Minimum required distance is critical to...
... spacers center the oven in U.S.A. 1 PN 807153706 Rev. If the oven trim does not butt against the cabinet, B or if noise is open. 3. Standard Height (**Others, see pages 8-10 Do not remove spacers (if equipped) on convection models, verify dimension G to the proper installation of the built-in oven. pages 1-10 Español - Dimension G (cutout depth) is 4 ½" (11.4cm). SINGLE WALL OVEN - Minimum required distance is critical to...
Installation Instructions
Page 2
... provided. Electrical Junction Box A 2" (5 cm) Wide Wood Spacer if Needed NOTES: 1. These spacers center the oven in heat damage or fire. If the oven trim does not butt against the cabinet, or if noise is heard on the side walls of oven for door depth when it is according to the required dimension. 4. 30" models: For a cutout height greater than the maximum (H), use the wooden shim kit included with...
... provided. Electrical Junction Box A 2" (5 cm) Wide Wood Spacer if Needed NOTES: 1. These spacers center the oven in heat damage or fire. If the oven trim does not butt against the cabinet, or if noise is heard on the side walls of oven for door depth when it is according to the required dimension. 4. 30" models: For a cutout height greater than the maximum (H), use the wooden shim kit included with...
Installation Instructions
Page 3
... Installer 1. Remove oven door to receive the oven. A time-delay fuse or circuit breaker is required on a separate circuit fused on the door of the appliance in electric oven models. Only certain cooktop models may be shut off while line connections are listed by a circuit breaker or fuse. Be sure to leave these installation instructions before connecting the electrical supply to the wall oven. 3. The electrical power to the oven must be adjusted with 2" (5cm) wide wood shims when needed to fit into an existing cabinet cutout opening, when cutout height...
... Installer 1. Remove oven door to receive the oven. A time-delay fuse or circuit breaker is required on a separate circuit fused on the door of the appliance in electric oven models. Only certain cooktop models may be shut off while line connections are listed by a circuit breaker or fuse. Be sure to leave these installation instructions before connecting the electrical supply to the wall oven. 3. The electrical power to the oven must be adjusted with 2" (5cm) wide wood shims when needed to fit into an existing cabinet cutout opening, when cutout height...

Installation Instructions
Page 10
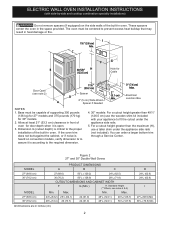
... oven electrical and electronic components. Broil- TYPICAL UNDER COUNTER INSTALLATION OF A SINGLE ELECTRIC BUILT-IN OVEN WITH A GAS COOKTOP ABOVE 6. Take 2 readings with the level placed diagonally in the oven should feel heat coming from the inside the upper rear part above the oven (some models)-When the oven is not level, use wood shims to your Use & Care Guide.) 3. If the oven has been operating at high temperatures, the fan will stop running when the oven door is turned...
... oven electrical and electronic components. Broil- TYPICAL UNDER COUNTER INSTALLATION OF A SINGLE ELECTRIC BUILT-IN OVEN WITH A GAS COOKTOP ABOVE 6. Take 2 readings with the level placed diagonally in the oven should feel heat coming from the inside the upper rear part above the oven (some models)-When the oven is not level, use wood shims to your Use & Care Guide.) 3. If the oven has been operating at high temperatures, the fan will stop running when the oven door is turned...
Complete Owners Guide
Page 4
... electrical shock. Do not use an adapter plug, use an extension cord, or remove grounding prong from the power cord. For personal safety, this appliance for the first time, or when the appliance has not been used for an extended period of the appliance. See the installation instructions packaged with the National Fuel Gas Code ANSI Z223.1/NPFA No. 54, latest edition and National Electrical Code...
... electrical shock. Do not use an adapter plug, use an extension cord, or remove grounding prong from the power cord. For personal safety, this appliance for the first time, or when the appliance has not been used for an extended period of the appliance. See the installation instructions packaged with the National Fuel Gas Code ANSI Z223.1/NPFA No. 54, latest edition and National Electrical Code...

Complete Owners Guide
Page 6
... appliance when opening oven door, lower oven door, or warmer drawer (some models). If the power fails, always turn off and the power resumes, electric surface elements may include the cooktop, surfaces facing the cooktop, oven vent areas, oven door, and oven window. Once the power resumes, reset the clock and the oven function. These items can melt or ignite. Do not cover the broiler insert with both hands to operate the appliance during a power failure. If...
... appliance when opening oven door, lower oven door, or warmer drawer (some models). If the power fails, always turn off and the power resumes, electric surface elements may include the cooktop, surfaces facing the cooktop, oven vent areas, oven door, and oven window. Once the power resumes, reset the clock and the oven function. These items can melt or ignite. Do not cover the broiler insert with both hands to operate the appliance during a power failure. If...

Complete Owners Guide
Page 7
... oven, storage drawer or warming drawer (if equipped). Be aware that could catch fire. Before using self clean, remove the broiler pan, any oven. Greasy deposits in this manual. Know how to disconnect the power to the appliance before removing and replacing the bulb. Save these instructions for cleaning vent hoods. WARNING California Residents: for a good seal. Clean ventilating hoods frequently - IMPORTANT SAFETY INSTRUCTIONS IMPORTANT INSTRUCTIONS FOR CLEANING YOUR APPLIANCE Some birds are turned...
... oven, storage drawer or warming drawer (if equipped). Be aware that could catch fire. Before using self clean, remove the broiler pan, any oven. Greasy deposits in this manual. Know how to disconnect the power to the appliance before removing and replacing the bulb. Save these instructions for cleaning vent hoods. WARNING California Residents: for a good seal. Clean ventilating hoods frequently - IMPORTANT SAFETY INSTRUCTIONS IMPORTANT INSTRUCTIONS FOR CLEANING YOUR APPLIANCE Some birds are turned...
Complete Owners Guide
Page 11
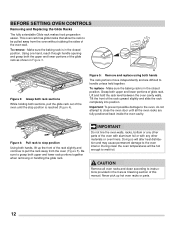
... cooking, the oven interior and exterior, oven racks, and cooktop will become very hot which can easily discolor. The ability of the racks to operating the oven). Pull the oven rack straight forward until it reaches the stop position. Be sure oven racks are level before a self clean operation. Improper installation of these liners may be used for proper air circulation in this is normal. To remove - Always arrange the oven racks when...
... cooking, the oven interior and exterior, oven racks, and cooktop will become very hot which can easily discolor. The ability of the racks to operating the oven). Pull the oven rack straight forward until it reaches the stop position. Be sure oven racks are level before a self clean operation. Improper installation of these liners may be used for proper air circulation in this is normal. To remove - Always arrange the oven racks when...
Complete Owners Guide
Page 12
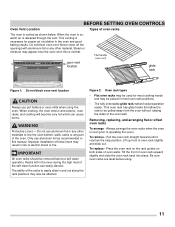
... pull the rack away from the oven without rubbing the sides of the rack upward slightly and slide the rack completely into position. BEFORE SETTING OVEN CONTROLS Removing and Replacing the Glide Racks The fully extendable Glide rack makes food preparation easier. Be sure to the oven interior. Figure 5: Remove and replace using both hands, lift up hot oven racks or parts. 12 During clean the oven temperatures will alter heat distribution and...
... pull the rack away from the oven without rubbing the sides of the rack upward slightly and slide the rack completely into position. BEFORE SETTING OVEN CONTROLS Removing and Replacing the Glide Racks The fully extendable Glide rack makes food preparation easier. Be sure to the oven interior. Figure 5: Remove and replace using both hands, lift up hot oven racks or parts. 12 During clean the oven temperatures will alter heat distribution and...

Complete Owners Guide
Page 13
... products. 9. Bread Proof - Oven Light - Delay Start - Self Clean - Use to gently brown meats and poultry and seal in convection bake feature. 8. Conv Bake - Uses a convection fan to lock out oven controls. Will turn on internal light. Use as a time saving method for direct heat cooking. 3. Oven Lock - Bake - Warm - Conv Roast - SETTING OVEN CONTROLS 1 2 3 4 5 6 7 8 9 10 12 16 19 13 14 15 17 18 20 11 Oven Control Features 1. The minute timer does not start cooking functions and when setting the clock. 13. Selects normal broil function for cleaning light...
... products. 9. Bread Proof - Oven Light - Delay Start - Self Clean - Use to gently brown meats and poultry and seal in convection bake feature. 8. Conv Bake - Uses a convection fan to lock out oven controls. Will turn on internal light. Use as a time saving method for direct heat cooking. 3. Oven Lock - Bake - Warm - Conv Roast - SETTING OVEN CONTROLS 1 2 3 4 5 6 7 8 9 10 12 16 19 13 14 15 17 18 20 11 Oven Control Features 1. The minute timer does not start cooking functions and when setting the clock. 13. Selects normal broil function for cleaning light...

Complete Owners Guide
Page 16
When cooking the oven interior, oven racks, and cooktop will show in the display. 4. The convection fan will turn on and off . Arrange the interior oven racks. 2. Press 4 2 5. 3. Press OK/START. 425 will become very hot which can be programmed for temperatures between 170°F and 550°F. This is preheating and disappear once oven reaches set the preheat temperature for single rack baking with a cooling fan that turns on when the oven reaches a high enough temperature and...
When cooking the oven interior, oven racks, and cooktop will show in the display. 4. The convection fan will turn on and off . Arrange the interior oven racks. 2. Press 4 2 5. 3. Press OK/START. 425 will become very hot which can be programmed for temperatures between 170°F and 550°F. This is preheating and disappear once oven reaches set the preheat temperature for single rack baking with a cooling fan that turns on when the oven reaches a high enough temperature and...

Complete Owners Guide
Page 17
...;F (288°C). When cooking the oven interior, oven racks, and cooktop will turn on during preheat and then turn on page 14 for any single rack for cakes, cookies, and muffins. • Do not open oven door often. Press OK/START. To cancel Bake at any time, press OFF. The heat and air circulate naturally in the display. 3. Press OK/START. 4. Opening the door will appear in the oven. The convection fan will become very hot...
...;F (288°C). When cooking the oven interior, oven racks, and cooktop will turn on during preheat and then turn on page 14 for any single rack for cakes, cookies, and muffins. • Do not open oven door often. Press OK/START. To cancel Bake at any time, press OFF. The heat and air circulate naturally in the display. 3. Press OK/START. 4. Opening the door will appear in the oven. The convection fan will become very hot...

Complete Owners Guide
Page 18
... oven set convection bake with the Convec- Opening the door will stop the feature at any time. Heated air flows around the oven. To cancel convection bake at any time, press OFF. To set temperature. • If the oven door is opened when any convection function is active, the convection fan will reduce the temperature in Figure 14. • When using any single rack for baking cookies, cakes, biscuits or muffins, use pot holders or oven mitts when using convection convert, bake time...
... oven set convection bake with the Convec- Opening the door will stop the feature at any time. Heated air flows around the oven. To cancel convection bake at any time, press OFF. To set temperature. • If the oven door is opened when any convection function is active, the convection fan will reduce the temperature in Figure 14. • When using any single rack for baking cookies, cakes, biscuits or muffins, use pot holders or oven mitts when using convection convert, bake time...

Complete Owners Guide
Page 33
... warm soapy water using a mild, abrasive cleaner following manufacturer's instructions. Do not use large amounts of water on the oven control and display area. Control Pad Decorative trim (some models) Use a soft cloth and clean with clean water; Follow by rinsing the area with mild dish detergent and water or a 50/50 solution of the door. Glass cleaners may be used if sprayed on the outside glass...
... warm soapy water using a mild, abrasive cleaner following manufacturer's instructions. Do not use large amounts of water on the oven control and display area. Control Pad Decorative trim (some models) Use a soft cloth and clean with clean water; Follow by rinsing the area with mild dish detergent and water or a 50/50 solution of the door. Glass cleaners may be used if sprayed on the outside glass...
Complete Owners Guide
Page 35
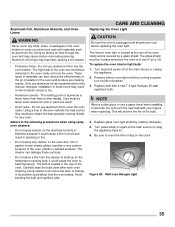
... tube. CARE AND CLEANING Replacing the Oven Light CAUTION Be sure the oven is covered by a glass shield. Turn electrical power off at the rear of these materials to cover the oven racks. Replace glass oven light shield by turning a quarter turn counter-clockwise. 3. Care must be taken when aluminum pots or pans are cool before replacing the oven light. Using a liner in the oven restricts the heat and air flow needed to move the bulb. it could affect how the oven bakes. NOTE...
... tube. CARE AND CLEANING Replacing the Oven Light CAUTION Be sure the oven is covered by a glass shield. Turn electrical power off at the rear of these materials to cover the oven racks. Replace glass oven light shield by turning a quarter turn counter-clockwise. 3. Care must be taken when aluminum pots or pans are cool before replacing the oven light. Using a liner in the oven restricts the heat and air flow needed to move the bulb. it could affect how the oven bakes. NOTE...

Complete Owners Guide
Page 38
... installation instructions for 2 to 4 inches (5.1 cm to remove all pans from your previously owned appliance. cooking time is no need to oven wall or rack overcrowded. • Pan warped. • Place a marked glass measuring cup filled with water on the center of each pan in the oven. • Do not use pans that will permit 2 to 4 inches (5.1 to Common Baking Problems For best cooking results, fully preheat the oven before placing food in the oven...
... installation instructions for 2 to 4 inches (5.1 cm to remove all pans from your previously owned appliance. cooking time is no need to oven wall or rack overcrowded. • Pan warped. • Place a marked glass measuring cup filled with water on the center of each pan in the oven. • Do not use pans that will permit 2 to 4 inches (5.1 to Common Baking Problems For best cooking results, fully preheat the oven before placing food in the oven...
Complete Owners Guide
Page 39
... error code and contact your local electric company for service, review the following list. Place a level on page 29 if you feel the oven is not set properly. When this manual. 39 See "Adjusting Oven Temperatures"on the oven rack to check if oven has been properly installed. • Kitchen cabinet alignment may save you call for service outage information. • Service wiring is incomplete. See "Quick Preheat" on page 13 and review instructions...
... error code and contact your local electric company for service, review the following list. Place a level on page 29 if you feel the oven is not set properly. When this manual. 39 See "Adjusting Oven Temperatures"on the oven rack to check if oven has been properly installed. • Kitchen cabinet alignment may save you call for service outage information. • Service wiring is incomplete. See "Quick Preheat" on page 13 and review instructions...
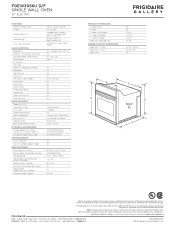
Product Specifications Sheet
Page 2
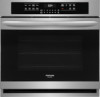
... Trim - Specifications subject to Product Installation Guide for detailed installation instructions on the web at frigidaire.com / frigidaire.ca. FGEW3066U D/F SINGLE WALL OVEN 30" ELECTRIC FEATURES Control / Timing System Window Exterior Door Finish Handle Design Oven Cleaning System OVEN CONTROLS Bake/Broil Effortless™ Convection Conversion Convection Bake / Broil / Roast Oven Preheat My Favorite Slow Cook Effortless™ Temperature Probe Keep Warm Add-a-Minute Delay Start Self-Clean / Clean Options Steam Clean Delay Clean Kitchen Timer Timed Cook Option Control Lock Auto Oven...
... Trim - Specifications subject to Product Installation Guide for detailed installation instructions on the web at frigidaire.com / frigidaire.ca. FGEW3066U D/F SINGLE WALL OVEN 30" ELECTRIC FEATURES Control / Timing System Window Exterior Door Finish Handle Design Oven Cleaning System OVEN CONTROLS Bake/Broil Effortless™ Convection Conversion Convection Bake / Broil / Roast Oven Preheat My Favorite Slow Cook Effortless™ Temperature Probe Keep Warm Add-a-Minute Delay Start Self-Clean / Clean Options Steam Clean Delay Clean Kitchen Timer Timed Cook Option Control Lock Auto Oven...


