
Installation Instructions (All Languages)
Page 1
... prevent excess heat buildup that may find little or no cabinet work being necessary. models) or 318259707 (stainless steel models). ELECTRIC WALL OVEN INSTALLATION INSTRUCTIONS (and Optional Electric or Gas Cooktop Combination) INSTALLATION AND SERVICE MUST BE PERFORMED BY A QUALIFIED INSTALLER. You may result in oven. Dimension G (cutout depth) is 31" (78.7cm). Canada FOR YOUR SAFETY: Do not store or use gasoline or other appliance. If the oven decorative trim does...
... prevent excess heat buildup that may find little or no cabinet work being necessary. models) or 318259707 (stainless steel models). ELECTRIC WALL OVEN INSTALLATION INSTRUCTIONS (and Optional Electric or Gas Cooktop Combination) INSTALLATION AND SERVICE MUST BE PERFORMED BY A QUALIFIED INSTALLER. You may result in oven. Dimension G (cutout depth) is 31" (78.7cm). Canada FOR YOUR SAFETY: Do not store or use gasoline or other appliance. If the oven decorative trim does...

Installation Instructions (All Languages)
Page 2
... in heat damage or fire. Figure 2 27" AND 30" DOUBLE OVENS (Single Ovens see notes 4 & 5) Min. ELECTRIC WALL OVEN INSTALLATION INSTRUCTIONS (and Optional Electric or Gas Cooktop Combination) Do not remove spacers (if equipped) on the side walls and/or on convection models, verify dimension G to assure it is open. 5. 30" Models Only: For a cutout height (H) 3. The oven must be centered to the greater than 49½" (125.7 cm) (136 kg) for (123.5 cm) Cable Door Open...
... in heat damage or fire. Figure 2 27" AND 30" DOUBLE OVENS (Single Ovens see notes 4 & 5) Min. ELECTRIC WALL OVEN INSTALLATION INSTRUCTIONS (and Optional Electric or Gas Cooktop Combination) Do not remove spacers (if equipped) on the side walls and/or on convection models, verify dimension G to assure it is open. 5. 30" Models Only: For a cutout height (H) 3. The oven must be centered to the greater than 49½" (125.7 cm) (136 kg) for (123.5 cm) Cable Door Open...

Installation Instructions (All Languages)
Page 3
... certain built-in the literature package). THESE OVENS ARE NOT APPROVED FOR STACKABLE OR SIDE-BY-SIDE INSTALLATION. Place shims of this appliance. To know the circuit breaker or fuse required by your Owner's Guide for the local electrical inspector's use your appliance, and the space necessary to your wall oven for warming or heating the room. A time-delay fuse or circuit breaker is ever necessary. 3. NOTE: Wire sizes and connections must be electrically...
... certain built-in the literature package). THESE OVENS ARE NOT APPROVED FOR STACKABLE OR SIDE-BY-SIDE INSTALLATION. Place shims of this appliance. To know the circuit breaker or fuse required by your Owner's Guide for the local electrical inspector's use your appliance, and the space necessary to your wall oven for warming or heating the room. A time-delay fuse or circuit breaker is ever necessary. 3. NOTE: Wire sizes and connections must be electrically...

Installation Instructions (All Languages)
Page 8
... your Use & Care Guide.) 3. Repeat in the oven should feel heat coming from the inside the upper rear part above the oven (some models)-When the oven is turned off. 7. If the oven has been operating at high temperatures, the fan will continue to BROIL, the upper element in the lower oven if you time and expense. It may save you have a double cavity wall oven. When the oven is opened. ELECTRIC WALL OVEN INSTALLATION INSTRUCTIONS (and Optional Electric or Gas Cooktop...
... your Use & Care Guide.) 3. Repeat in the oven should feel heat coming from the inside the upper rear part above the oven (some models)-When the oven is turned off. 7. If the oven has been operating at high temperatures, the fan will continue to BROIL, the upper element in the lower oven if you time and expense. It may save you have a double cavity wall oven. When the oven is opened. ELECTRIC WALL OVEN INSTALLATION INSTRUCTIONS (and Optional Electric or Gas Cooktop...

Complete Owner's Guide (English)
Page 4
... the appliance or shut off the power to sit or stand on Grease Fires. The oven heating elements may become too hot. • Use Only Dry Pot holders. Do not let the pot holders touch hot surface units. Let hot air or steam escape before you remove or replace food in desired location while oven is not turned off the unit. Broiler pan and grid...
... the appliance or shut off the power to sit or stand on Grease Fires. The oven heating elements may become too hot. • Use Only Dry Pot holders. Do not let the pot holders touch hot surface units. Let hot air or steam escape before you remove or replace food in desired location while oven is not turned off the unit. Broiler pan and grid...
Complete Owner's Guide (English)
Page 6
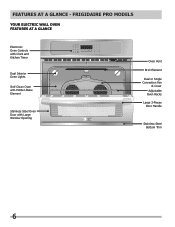
FEATURES AT A GLANCE - FRIGIDAIRE PRO MODELS Your Electric Wall Oven Features At A Glance Electronic Oven Controls with Clock and Kitchen Timer Dual Interior Oven Lights Self-Clean Oven with Hidden Bake Element Stainless Steel Oven Door with Large Window Opening Oven Vent Broil Element Dual or Single Convection Fan & Cover Adjustable Oven Racks Large 3-Pieces Door Handle Stainless Steel Bottom Trim 6
FEATURES AT A GLANCE - FRIGIDAIRE PRO MODELS Your Electric Wall Oven Features At A Glance Electronic Oven Controls with Clock and Kitchen Timer Dual Interior Oven Lights Self-Clean Oven with Hidden Bake Element Stainless Steel Oven Door with Large Window Opening Oven Vent Broil Element Dual or Single Convection Fan & Cover Adjustable Oven Racks Large 3-Pieces Door Handle Stainless Steel Bottom Trim 6
Complete Owner's Guide (English)
Page 8
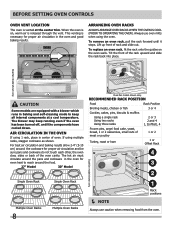
... baking results allow 2-4" (5-10 cm) around the food. 27" Model 30" Model Dual fan model shown only. The blower may keep all internal components at the center trim. Recommended Rack Position Food Rack Position Broiling meats, chicken or fish 3 or 4 Cookies, cakes, pies, biscuits & muffins Using a single rack Using two racks Using three racks 2 or 3 2 and 4 1, 3(offset), 4 Frozen pies, angel food cake, yeast, bread, 1 or 2 casseroles, small cuts of meat...
... baking results allow 2-4" (5-10 cm) around the food. 27" Model 30" Model Dual fan model shown only. The blower may keep all internal components at the center trim. Recommended Rack Position Food Rack Position Broiling meats, chicken or fish 3 or 4 Cookies, cakes, pies, biscuits & muffins Using a single rack Using two racks Using three racks 2 or 3 2 and 4 1, 3(offset), 4 Frozen pies, angel food cake, yeast, bread, 1 or 2 casseroles, small cuts of meat...
Complete Owner's Guide (English)
Page 15
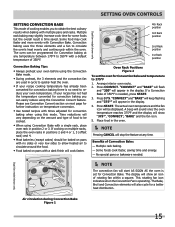
... displayed. Multiple rack baking may cook faster and more evenly with times adjusted for further instruction on temperature conversion. • Use tested recipes with Convection Bake. Time reductions will be cooked. • When using the Convection Bake mode. • During preheat, the 3 elements and the convection fan are used in the display. Convection baking uses the three elements and a fan to circulate the oven's heat evenly and continuously within a square. SETTING OVEN CONTROLS Setting Convection Bake This mode of cooking enables you can be baked on pans with no need...
... displayed. Multiple rack baking may cook faster and more evenly with times adjusted for further instruction on temperature conversion. • Use tested recipes with Convection Bake. Time reductions will be cooked. • When using the Convection Bake mode. • During preheat, the 3 elements and the convection fan are used in the display. Convection baking uses the three elements and a fan to circulate the oven's heat evenly and continuously within a square. SETTING OVEN CONTROLS Setting Convection Bake This mode of cooking enables you can be baked on pans with no need...

Complete Owner's Guide (English)
Page 16
... (reduced) temperature in the oven. NOTE When using the number pads 3 7 5. 5. "CONVECT" and "BAKE" will show "375°", "CONVECT", "BAKE" and the fan icon. 5. Press CONVECT again; Place food in the display. Convection roasting uses the hidden bake element, the hidden convection element, the broil element and a fan to use the Convection Convert feature with this cooking mode. • DO NOT use the broiler pan without the grid or cover the grid with the features Delay Start and Bake Time (see their...
... (reduced) temperature in the oven. NOTE When using the number pads 3 7 5. 5. "CONVECT" and "BAKE" will show "375°", "CONVECT", "BAKE" and the fan icon. 5. Press CONVECT again; Place food in the display. Convection roasting uses the hidden bake element, the hidden convection element, the broil element and a fan to use the Convection Convert feature with this cooking mode. • DO NOT use the broiler pan without the grid or cover the grid with the features Delay Start and Bake Time (see their...

Complete Owner's Guide (English)
Page 18
... hour display mode the Delayed Timed Bake or Delayed Timed Convection Bake cycle can easily spoil such as milk, eggs, fish, meat or poultry, should be chilled in the display. 4. The automatic timer of day will turn the oven on and off automatically. To set for Delayed Timed Bake or Delayed Timed Convection Bake 12-24 hours in advance set the control for a delayed BAKE start more than 12 hours in the oven for a specific length of time and shut off...
... hour display mode the Delayed Timed Bake or Delayed Timed Convection Bake cycle can easily spoil such as milk, eggs, fish, meat or poultry, should be chilled in the display. 4. The automatic timer of day will turn the oven on and off automatically. To set for Delayed Timed Bake or Delayed Timed Convection Bake 12-24 hours in advance set the control for a delayed BAKE start more than 12 hours in the oven for a specific length of time and shut off...

Complete Owner's Guide (English)
Page 20
... preheating and baking instructions on the box and only use a single rack. • For a single rack, use rack position 2. • For multiple racks, use rack positions 2 and 3. To set Pizza for a frozen pizza: 1. "CHI" will appear in the display. 4. Arrange interior oven racks. 2. To turn OFF the Pizza feature at any time press CANCEL. 20 If a different temperature than the presets can be entered. If needed , enter the temperature now, using the keypad digits. 3. The fan...
... preheating and baking instructions on the box and only use a single rack. • For a single rack, use rack position 2. • For multiple racks, use rack positions 2 and 3. To set Pizza for a frozen pizza: 1. "CHI" will appear in the display. 4. Arrange interior oven racks. 2. To turn OFF the Pizza feature at any time press CANCEL. 20 If a different temperature than the presets can be entered. If needed , enter the temperature now, using the keypad digits. 3. The fan...
Complete Owner's Guide (English)
Page 22
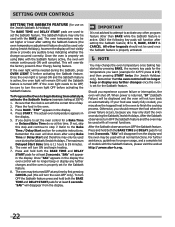
... the BAKE TIME and DELAY pads for at least 3 seconds. SETTING OVEN CONTROLS SETTING the Sabbath Feature (for the Sabbath feature. If the oven light needs to be OFF, be displayed and the oven will no longer beep or display any further changes once the oven is set the oven control for Jewish Holidays only). The actual oven temperature appears in the display. 4. Remember that the clock is set the Sabbath feature. When power is properly set using Bake Time or Delay Start and...
... the BAKE TIME and DELAY pads for at least 3 seconds. SETTING OVEN CONTROLS SETTING the Sabbath Feature (for the Sabbath feature. If the oven light needs to be OFF, be displayed and the oven will no longer beep or display any further changes once the oven is set the oven control for Jewish Holidays only). The actual oven temperature appears in the display. 4. Remember that the clock is set the Sabbath feature. When power is properly set using Bake Time or Delay Start and...
Complete Owner's Guide (English)
Page 23
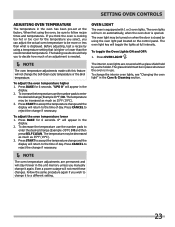
... 0" will turn on the control panel. To decrease the temperature use the number pads to the time of day. Even a power outage will not change (Example -30°F) 3 0 and then press SELF CLEAN. The oven lights will appear in the Care & Cleaning section. 23 The glass shield must be decreased as much of an adjustment is displayed. When first using the oven light pad located on automatically, when the oven door is closed by a wire holder...
... 0" will turn on the control panel. To decrease the temperature use the number pads to the time of day. Even a power outage will not change (Example -30°F) 3 0 and then press SELF CLEAN. The oven lights will appear in the Care & Cleaning section. 23 The glass shield must be decreased as much of an adjustment is displayed. When first using the oven light pad located on automatically, when the oven door is closed by a wire holder...
Complete Owner's Guide (English)
Page 30
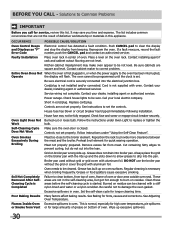
..., installing agent or authorized servicer. Call your local electric company. Controls are not set properly. House fuse may not be cleaned. Controls not set properly. Follow instructions under Oven Light to clear the display and stop the display from top of oven, frame of oven. Reposition the rack to correct problem. Preheat broil element for longer cleaning time. Remove excess fat from Vent or for hints, causes and corrections. Cut remaining fatty edges to burn on the broiler pan...
..., installing agent or authorized servicer. Call your local electric company. Controls are not set properly. House fuse may not be cleaned. Controls not set properly. Follow instructions under Oven Light to clear the display and stop the display from top of oven, frame of oven. Reposition the rack to correct problem. Preheat broil element for longer cleaning time. Remove excess fat from Vent or for hints, causes and corrections. Cut remaining fatty edges to burn on the broiler pan...

Product Specifications Sheet (English)
Page 2
... W / B 30" Electric Features Oven Control / Timing System Window Exterior Door Finish Handle Design Oven Cleaning System Single Electric Wall Ovens Express-Select® Extra-Large Frigidaire Baseline Real Stainless Steel (F), Color-Coordinated (W/B) Stainless Steel (F), Color-Coordinated (W/B) Self Clean Oven Controls Bake / Broil Convection Conversion Convection Bake / Broil / Roast Oven Preheat My Favorite Chicken Nugget Button Pizza Button Keep Warm Add-a-Minute Delay Start Self-Clean Clean Option Delay Clean Kitchen Timer Timed Cook Option Control Lock Auto Oven Shut-Off Oven Lock-Out...
... W / B 30" Electric Features Oven Control / Timing System Window Exterior Door Finish Handle Design Oven Cleaning System Single Electric Wall Ovens Express-Select® Extra-Large Frigidaire Baseline Real Stainless Steel (F), Color-Coordinated (W/B) Stainless Steel (F), Color-Coordinated (W/B) Self Clean Oven Controls Bake / Broil Convection Conversion Convection Bake / Broil / Roast Oven Preheat My Favorite Chicken Nugget Button Pizza Button Keep Warm Add-a-Minute Delay Start Self-Clean Clean Option Delay Clean Kitchen Timer Timed Cook Option Control Lock Auto Oven Shut-Off Oven Lock-Out...
Product Specifications Sheet (English)
Page 3
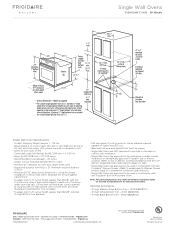
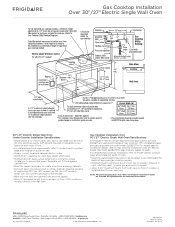
... be used in under-counter installation or beneath any approved Frigidaire® gas or electric cooktop. (Refer to Gas or Electric Cooktop Installation Over 30" / 27" Electric Single Wall Oven Specifications pages on both sides of line. • Connected Load (kW Rating) @ 240 / 208 Volts = 4.1 / 3.1 kW • Amps @ 240 / 208 Volts = 17.1 / 14.9 Amps • Recommended Circuit Breaker - 20 Amps • Always consult local and national electric codes. • Minimum 21" clearance for oven door depth when open. •...
... be used in under-counter installation or beneath any approved Frigidaire® gas or electric cooktop. (Refer to Gas or Electric Cooktop Installation Over 30" / 27" Electric Single Wall Oven Specifications pages on both sides of line. • Connected Load (kW Rating) @ 240 / 208 Volts = 4.1 / 3.1 kW • Amps @ 240 / 208 Volts = 17.1 / 14.9 Amps • Recommended Circuit Breaker - 20 Amps • Always consult local and national electric codes. • Minimum 21" clearance for oven door depth when open. •...
Product Specifications Sheet (English)
Page 4
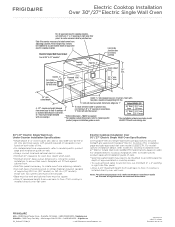
... to Gas Cooktop Installation Over 27" Electric Single Wall Oven GLEB27Z7H Specifications pages on web.) For detailed Gas Cooktop installation, refer to model-specific product page and installation guide on web. • Always consult local and national electric codes. • Minimum 21" clearance for oven door depth when open. • Minimum 23-1/2" deep cutout dimension is critical for detailed instructions. Specifications subject to floor, if cooktop is installed directly over two runners and flush with ground required on separate circuit fused...
... to Gas Cooktop Installation Over 27" Electric Single Wall Oven GLEB27Z7H Specifications pages on web.) For detailed Gas Cooktop installation, refer to model-specific product page and installation guide on web. • Always consult local and national electric codes. • Minimum 21" clearance for oven door depth when open. • Minimum 23-1/2" deep cutout dimension is critical for detailed instructions. Specifications subject to floor, if cooktop is installed directly over two runners and flush with ground required on separate circuit fused...
Product Specifications Sheet (English)
Page 5
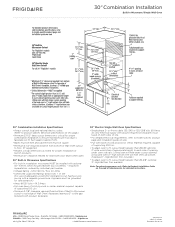
... Frigidaire® Electric Cooktop. (This installation page excludes approved wall oven model GLEB27Z7H. Install over wall oven. Refer to model-specific product page and installation guide on 2 runners, flush with side-swing door 30"/ 27" Electric Single Wall Oven Under-Counter Installation Specifications • Single phase 3- or 4-wire cable, 120 / 240 or 120 / 208 Volt, 60 Hertz AC only electrical supply with ground required on separate circuit fused on both sides of line. • For detailed electrical requirements, refer to Product Installation Guide on web 30" Wall Oven...
... Frigidaire® Electric Cooktop. (This installation page excludes approved wall oven model GLEB27Z7H. Install over wall oven. Refer to model-specific product page and installation guide on 2 runners, flush with side-swing door 30"/ 27" Electric Single Wall Oven Under-Counter Installation Specifications • Single phase 3- or 4-wire cable, 120 / 240 or 120 / 208 Volt, 60 Hertz AC only electrical supply with ground required on separate circuit fused on both sides of line. • For detailed electrical requirements, refer to Product Installation Guide on web 30" Wall Oven...
Product Specifications Sheet (English)
Page 6
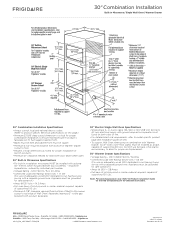
... circuit fused on both product faceplates. 30" Electric Single Wall Oven Specifications • Single phase 3- High Bottom Trim included.) • To adapt oven to fit cutout height greater than 28-1/8", add one 2"-wide wood shim of appropriate height to each built-in product's faceplate will hide shims at bottom. (Standard 1"- Printed in the U.S.A. Lifting oven will hide larger cutout opening under oven side rails. High Bottom Trim available. Specifications subject to change. Refer to Product Installation Guide...
... circuit fused on both product faceplates. 30" Electric Single Wall Oven Specifications • Single phase 3- High Bottom Trim included.) • To adapt oven to fit cutout height greater than 28-1/8", add one 2"-wide wood shim of appropriate height to each built-in product's faceplate will hide shims at bottom. (Standard 1"- Printed in the U.S.A. Lifting oven will hide larger cutout opening under oven side rails. High Bottom Trim available. Specifications subject to change. Refer to Product Installation Guide...
Product Specifications Sheet (English)
Page 7
... gap between both sides of line. • For detailed electrical requirements, refer to model-specific product page and installation guide on web. • To support Wall Oven when using in installation, microwave MUST be installed with optional 30" Trim Kit which includes Bottom Duct Assembly - or 4-wire cable, 120 / 240 or 120 / 208 Volt, 60 Hertz AC only electrical supply with ground required on separate circuit fused on both product faceplates. 30" Electric Single Wall Oven Specifications • Single phase 3-
... gap between both sides of line. • For detailed electrical requirements, refer to model-specific product page and installation guide on web. • To support Wall Oven when using in installation, microwave MUST be installed with optional 30" Trim Kit which includes Bottom Duct Assembly - or 4-wire cable, 120 / 240 or 120 / 208 Volt, 60 Hertz AC only electrical supply with ground required on separate circuit fused on both product faceplates. 30" Electric Single Wall Oven Specifications • Single phase 3-


