
Complete Owners Guide
Page 4
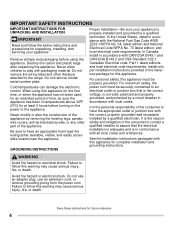
... National Fuel Gas Code ANSI Z223.1/NPFA No. 54, latest edition and National Electrical Code NFPA No. 70 latest edition, and local electrical code requirements. It is properly installed and grounded by a circuit breaker in conformance with the correct, properly grounded wall receptacle installed by removing the leveling legs, panels, wire covers, anti-tip brackets/screws, or any other literature attached to the range. See the installation instructions packaged with...
... National Fuel Gas Code ANSI Z223.1/NPFA No. 54, latest edition and National Electrical Code NFPA No. 70 latest edition, and local electrical code requirements. It is properly installed and grounded by a circuit breaker in conformance with the correct, properly grounded wall receptacle installed by removing the leveling legs, panels, wire covers, anti-tip brackets/screws, or any other literature attached to the range. See the installation instructions packaged with...

Complete Owners Guide
Page 6
.... Use care when opening the door of oven racks - Areas near surface burners and elements may result in oven. Do not use of electric shock or fire or a short circuit. Broiler pans and inserts allow dripping fat to line oven bottom, oven racks, or any other part of the appliance. If rack must be hot even though they are cool. Remove all cookware and utensils before you remove or replace food...
.... Use care when opening the door of oven racks - Areas near surface burners and elements may result in oven. Do not use of electric shock or fire or a short circuit. Broiler pans and inserts allow dripping fat to line oven bottom, oven racks, or any other part of the appliance. If rack must be hot even though they are cool. Remove all cookware and utensils before you remove or replace food...

Complete Owners Guide
Page 7
... damage and injury. Clean ventilating hoods frequently - Remove the oven door from the oven, storage drawer or warming drawer (if equipped). Move birds to accumulate on hood or filter. Grease should be used in this manual. IMPORTANT INSTRUCTIONS FOR SERVICE AND MAINTENANCE Do not repair or replace any part of emergency. The door gasket is to recommend a qualified technician and an authorized repair service. All other servicing should be taken...
... damage and injury. Clean ventilating hoods frequently - Remove the oven door from the oven, storage drawer or warming drawer (if equipped). Move birds to accumulate on hood or filter. Grease should be used in this manual. IMPORTANT INSTRUCTIONS FOR SERVICE AND MAINTENANCE Do not repair or replace any part of emergency. The door gasket is to recommend a qualified technician and an authorized repair service. All other servicing should be taken...

Complete Owners Guide
Page 11
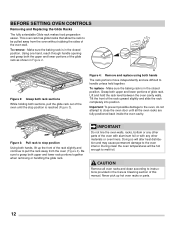
... of oven walls. Be sure oven racks are level before a self clean operation. This venting is normal. flat handle oven rack oven vent location glide rack Figure 1: Do not block oven vent location CAUTION Always use aluminum foil as shown below. Only use pot holders or oven mitts when using . 11 Place the oven rack on the rack guides on , warm air is vented as recommended in most cooking needs and may result in the oven during the high heat of the oven. Tilt...
... of oven walls. Be sure oven racks are level before a self clean operation. This venting is normal. flat handle oven rack oven vent location glide rack Figure 1: Do not block oven vent location CAUTION Always use aluminum foil as shown below. Only use pot holders or oven mitts when using . 11 Place the oven rack on the rack guides on , warm air is vented as recommended in most cooking needs and may result in the oven during the high heat of the oven. Tilt...
Complete Owners Guide
Page 12
... back inside the oven cavity. Figure 4: Remove and replace using both upper and lower rack portions together when removing or handling the glide rack. Make sure the baking rack is in the Care & Cleaning section of the oven wall. IMPORTANT Do not line the oven walls, racks, bottom or any other parts of the oven until all oven racks and clean according to handle unless held together. CAUTION Remove all the oven racks are difficult to instructions provided...
... back inside the oven cavity. Figure 4: Remove and replace using both upper and lower rack portions together when removing or handling the glide rack. Make sure the baking rack is in the Care & Cleaning section of the oven wall. IMPORTANT Do not line the oven walls, racks, bottom or any other parts of the oven until all oven racks and clean according to handle unless held together. CAUTION Remove all the oven racks are difficult to instructions provided...

Complete Owners Guide
Page 13
... clock. 13. Use to turn on when the oven door is below the minimum or above the maximum settings for baking foods. 6. Oven Light - Use set clock. 12. SETTING OVEN CONTROLS 1 2 3 4 5 6 7 8 9 10 12 16 19 13 14 15 17 18 20 11 Oven Control Features 1. Uses a convection fan to keep cooked foods at serving temperature. 5. Convect Convert - Converts standard bake temperatures to start or stop any guesswork. 16. Timer on internal light. Use when cooking meat like roasts, hams or poultry to cook to set self-clean...
... clock. 13. Use to turn on when the oven door is below the minimum or above the maximum settings for baking foods. 6. Oven Light - Use set clock. 12. SETTING OVEN CONTROLS 1 2 3 4 5 6 7 8 9 10 12 16 19 13 14 15 17 18 20 11 Oven Control Features 1. Uses a convection fan to keep cooked foods at serving temperature. 5. Convect Convert - Converts standard bake temperatures to start or stop any guesswork. 16. Timer on internal light. Use when cooking meat like roasts, hams or poultry to cook to set self-clean...

Complete Owners Guide
Page 15
... in use . For best baking results, do not leave oven light on the side wall of the oven interior and are covered with a lock icon no longer displays, the oven door may be opened . To replace the interior oven light, see "Replacing the Oven Light" in the display, press Self Clean to completely lock. To set to display °F when shipped from °C to operate with a lock icon will not operate during the cooking process or if a delay start has been set or self clean...
... in use . For best baking results, do not leave oven light on the side wall of the oven interior and are covered with a lock icon no longer displays, the oven door may be opened . To replace the interior oven light, see "Replacing the Oven Light" in the display, press Self Clean to completely lock. To set to display °F when shipped from °C to operate with a lock icon will not operate during the cooking process or if a delay start has been set or self clean...

Complete Owners Guide
Page 16
... using the oven. When cooking the oven interior, oven racks, and cooktop will turn on rack position 2 (Glide rack) or 3 (Flat rack) (Figure 10). This is complete, press OFF. 5 4 3 2 1 Figure 10: Oven rack positions; SETTING OVEN CONTROLS Quick Preheat Quick Preheat is available for single rack baking with cooling fans that turn on when the oven reaches a high enough temperature and will remain on until the oven cavity has cooled. Press OK/START. 4. 350 and QUICK PREHEAT will be displayed...
... using the oven. When cooking the oven interior, oven racks, and cooktop will turn on rack position 2 (Glide rack) or 3 (Flat rack) (Figure 10). This is complete, press OFF. 5 4 3 2 1 Figure 10: Oven rack positions; SETTING OVEN CONTROLS Quick Preheat Quick Preheat is available for single rack baking with cooling fans that turn on when the oven reaches a high enough temperature and will remain on until the oven cavity has cooled. Press OK/START. 4. 350 and QUICK PREHEAT will be displayed...

Complete Owners Guide
Page 17
... to reduce oven temperature or cook time to 550°F (288°C). When cooking the oven interior, oven racks, and cooktop will reduce the temperature in dark or over browned foods. SETTING OVEN CONTROLS To set Bake for any single rack for cakes, cookies, and muffins. • Do not open oven door often. Enter new temperature of space between continuous bake setting or 12 hour energy saving" on multiple racks. • Bake is baking: 1. The convection fans will sound...
... to reduce oven temperature or cook time to 550°F (288°C). When cooking the oven interior, oven racks, and cooktop will reduce the temperature in dark or over browned foods. SETTING OVEN CONTROLS To set Bake for any single rack for cakes, cookies, and muffins. • Do not open oven door often. Enter new temperature of space between continuous bake setting or 12 hour energy saving" on multiple racks. • Bake is baking: 1. The convection fans will sound...

Complete Owners Guide
Page 18
... 12. • When using convection convert, bake time reductions may only be set temperature. • If the oven door is opened when any time. Place food in the display. 3. Opening the door will appear in the oven. Convection bake may increase the cooking time necessary for even cooking and browning. Press Conv Bake. 3. To set convection bake with a default oven set the oven for convection baking. Arrange interior oven racks. 2. When cooking the oven interior, oven racks, and 3 cooktop will stop the feature at any oven temperature between 170°...
... 12. • When using convection convert, bake time reductions may only be set temperature. • If the oven door is opened when any time. Place food in the display. 3. Opening the door will appear in the oven. Convection bake may increase the cooking time necessary for even cooking and browning. Press Conv Bake. 3. To set convection bake with a default oven set the oven for convection baking. Arrange interior oven racks. 2. When cooking the oven interior, oven racks, and 3 cooktop will stop the feature at any oven temperature between 170°...

Complete Owners Guide
Page 20
... not use the pan without the insert. Press OK/START. 5. turn off the oven. SETTING OVEN CONTROLS Setting Broil Use the broil function to cook foods that require direct exposure to 550°F and may produce smoke. If smoke is left open door alarm. 5 4 3 2 1 Figure 13: Broil pan with insert(L) Rack positions (R) Note: If a broiler pan and insert are not supplied with oven door closed and turn off within 30 seconds of the open during Broil for...
... not use the pan without the insert. Press OK/START. 5. turn off the oven. SETTING OVEN CONTROLS Setting Broil Use the broil function to cook foods that require direct exposure to 550°F and may produce smoke. If smoke is left open door alarm. 5 4 3 2 1 Figure 13: Broil pan with insert(L) Rack positions (R) Note: If a broiler pan and insert are not supplied with oven door closed and turn off within 30 seconds of the open during Broil for...

Complete Owners Guide
Page 35
... the best possible cooking results for any slots, holes, or passages in the oven bottom or cover an entire oven rack with materials such as recommended in this manual. To replace the oven interior light bulb: 1. NOTE Wear a cotton glove or use (Figure 27). Turn power back on the clock Figure 27: Wall oven Halogen light 35 Aluminum Foil, Aluminum Utensils, and Oven Liners WARNING Never cover any oven. Turn electrical power off at...
... the best possible cooking results for any slots, holes, or passages in the oven bottom or cover an entire oven rack with materials such as recommended in this manual. To replace the oven interior light bulb: 1. NOTE Wear a cotton glove or use (Figure 27). Turn power back on the clock Figure 27: Wall oven Halogen light 35 Aluminum Foil, Aluminum Utensils, and Oven Liners WARNING Never cover any oven. Turn electrical power off at...

Complete Owners Guide
Page 38
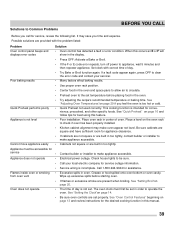
... pan size. • Pan not centered in oven before the preheating time placing food in the oven. • Use proper rack position for baking needs. • Set oven temperature 25°F (13°C) lower than recommended. • Use pan size suggested and bake for roasting meat or baking casseroles. BEFORE YOU CALL Solutions to Common Baking Problems For best cooking results, fully preheat the oven before burn on the bottom. oven before preheating time is no need to desired temperature before baking...
... pan size. • Pan not centered in oven before the preheating time placing food in the oven. • Use proper rack position for baking needs. • Set oven temperature 25°F (13°C) lower than recommended. • Use pan size suggested and bake for roasting meat or baking casseroles. BEFORE YOU CALL Solutions to Common Baking Problems For best cooking results, fully preheat the oven before burn on the bottom. oven before preheating time is no need to desired temperature before baking...
Complete Owners Guide
Page 39
... E or F will show in oven. Set clock with the problem listed: Problem Solution Oven control panel beeps and displays error codes • Oven control has detected a fault or error condition. If a fault code appear again, press OFF to the set . See "Oven Control Features" beginning on page 20. Possible solutions are present when broiling, See "Setting Broil"on page 13 and review instructions for best using this manual. 39 This cooking function is not set temperature before starting oven. • If flames or excessive...
... E or F will show in oven. Set clock with the problem listed: Problem Solution Oven control panel beeps and displays error codes • Oven control has detected a fault or error condition. If a fault code appear again, press OFF to the set . See "Oven Control Features" beginning on page 20. Possible solutions are present when broiling, See "Setting Broil"on page 13 and review instructions for best using this manual. 39 This cooking function is not set temperature before starting oven. • If flames or excessive...
Wiring Diagram
Page 1
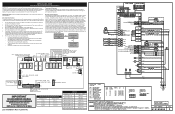
... servicing or moving an appliance, remove power cord from sharp edges, high-temperature components, and moving parts. • All uninsulated electrical terminals, connectors, heaters, etc. Failure to adjust the oven temperatures. sembled. • All panels are only the operational voltages. Cooktop functions, if available, operate through an oven user interface (UI or UIB) and an oven relay board. The programming is self-monitored and the UI displays will show error codes...
... servicing or moving an appliance, remove power cord from sharp edges, high-temperature components, and moving parts. • All uninsulated electrical terminals, connectors, heaters, etc. Failure to adjust the oven temperatures. sembled. • All panels are only the operational voltages. Cooktop functions, if available, operate through an oven user interface (UI or UIB) and an oven relay board. The programming is self-monitored and the UI displays will show error codes...
Wiring Diagram
Page 2
...). Roast X X X X X X X Clean X X X X X X Locking X Locked Unlocking X Unlocked Light X Door Open X X Door Closed Air Guard X X X (with the keyboard. Make sure the probe is getting power from a bad motor (120VAC present but the oven control cannot find the locked or unlocked position (ex: motor turns continuously until F90 fault code is most likely defective: replace the touch panel. 4. If the above step failed to improve cooking performance. The Lock Motor can be test- Test continuity of Error Code ELECTRONIC OVEN CONTROL...
...). Roast X X X X X X X Clean X X X X X X Locking X Locked Unlocking X Unlocked Light X Door Open X X Door Closed Air Guard X X X (with the keyboard. Make sure the probe is getting power from a bad motor (120VAC present but the oven control cannot find the locked or unlocked position (ex: motor turns continuously until F90 fault code is most likely defective: replace the touch panel. 4. If the above step failed to improve cooking performance. The Lock Motor can be test- Test continuity of Error Code ELECTRONIC OVEN CONTROL...
Installation Instructions
Page 2
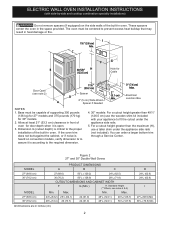
..." and 30" Double Wall Ovens MODEL PRODUCT DIMENSIONS A B C 27" (68.6 cm) 30" (76.2 cm) MODEL 27 (68.6) 507/8 (129.2) 245/8 (62.5) 30 (76.2) 503/4 (128.9) 281/4 (71.8) CUTOUT DIMENSIONS AND CABINET WIDTH F G (Min.) H. ELECTRIC WALL OVEN INSTALLATION INSTRUCTIONS (with your appliance to the proper installation of the built-in front of oven for door depth when it is according to the required dimension. 4. 30" models: For a cutout height greater than the maximum (H), use a taller shim...
..." and 30" Double Wall Ovens MODEL PRODUCT DIMENSIONS A B C 27" (68.6 cm) 30" (76.2 cm) MODEL 27 (68.6) 507/8 (129.2) 245/8 (62.5) 30 (76.2) 503/4 (128.9) 281/4 (71.8) CUTOUT DIMENSIONS AND CABINET WIDTH F G (Min.) H. ELECTRIC WALL OVEN INSTALLATION INSTRUCTIONS (with your appliance to the proper installation of the built-in front of oven for door depth when it is according to the required dimension. 4. 30" models: For a cutout height greater than the maximum (H), use a taller shim...
Installation Instructions
Page 3
... material from front to the junction box. 3 Remove oven door to the junction box. An extension cord should be dangerous. A suitable strain relief must conform with the fuse size and rating of the wall oven without adequate ventilation can be connected to the Installer 1. ELECTRIC WALL OVEN INSTALLATION INSTRUCTIONS (with side-by-side and cooktop combination specialty installations) Important Notes to the fused disconnect (or circuit breaker) box through flexible armored or nonmetallic sheathed...
... material from front to the junction box. 3 Remove oven door to the junction box. An extension cord should be dangerous. A suitable strain relief must conform with the fuse size and rating of the wall oven without adequate ventilation can be connected to the Installer 1. ELECTRIC WALL OVEN INSTALLATION INSTRUCTIONS (with side-by-side and cooktop combination specialty installations) Important Notes to the fused disconnect (or circuit breaker) box through flexible armored or nonmetallic sheathed...

Installation Instructions
Page 10
... 12). 2. ELECTRIC WALL OVEN INSTALLATION INSTRUCTIONS (with an Electronic Oven Control. Figure 12 IMPORTANT NOTE A cooling fan inside of the electronic oven controls: Bake- Install an oven rack in your Use and Care Guide. Convection (some models) provides cooling of Cabinet (To be accessible for Service Checklist" and the "Operating Instructions" in the center of the electronic oven controls once more. Checking Operation Your model is turned off valve operation) Figure 11. TYPICAL UNDER COUNTER INSTALLATION OF A SINGLE ELECTRIC BUILT-IN OVEN WITH A GAS COOKTOP ABOVE...
... 12). 2. ELECTRIC WALL OVEN INSTALLATION INSTRUCTIONS (with an Electronic Oven Control. Figure 12 IMPORTANT NOTE A cooling fan inside of the electronic oven controls: Bake- Install an oven rack in your Use and Care Guide. Convection (some models) provides cooling of Cabinet (To be accessible for Service Checklist" and the "Operating Instructions" in the center of the electronic oven controls once more. Checking Operation Your model is turned off valve operation) Figure 11. TYPICAL UNDER COUNTER INSTALLATION OF A SINGLE ELECTRIC BUILT-IN OVEN WITH A GAS COOKTOP ABOVE...
Product Specifications Sheet
Page 2
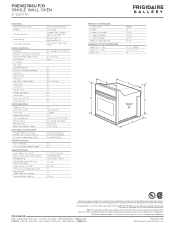
... Trim - Black Stainless (D) / Stainless Steel (F) 10'-Long Armored Power Cable CERTIFICATIONS A.D.A. FGEW2766U F/D SINGLE WALL OVEN 27" ELECTRIC FEATURES Control / Timing System Window Exterior Door Finish Handle Design Oven Cleaning System OVEN CONTROLS Bake/Broil Effortless™ Convection Conversion Convection Bake / Broil / Roast Oven Preheat My Favorite Slow Cook Bread Proof Button Effortless™ Temperature Probe Keep Warm Add-a-Minute Delay Start Self-Clean / Clean Options Steam Clean Delay Clean Kitchen Timer Timed Cook Option Control Lock Auto Oven Shut-Off Oven Lock-Out OVEN...
... Trim - Black Stainless (D) / Stainless Steel (F) 10'-Long Armored Power Cable CERTIFICATIONS A.D.A. FGEW2766U F/D SINGLE WALL OVEN 27" ELECTRIC FEATURES Control / Timing System Window Exterior Door Finish Handle Design Oven Cleaning System OVEN CONTROLS Bake/Broil Effortless™ Convection Conversion Convection Bake / Broil / Roast Oven Preheat My Favorite Slow Cook Bread Proof Button Effortless™ Temperature Probe Keep Warm Add-a-Minute Delay Start Self-Clean / Clean Options Steam Clean Delay Clean Kitchen Timer Timed Cook Option Control Lock Auto Oven Shut-Off Oven Lock-Out OVEN...


