
Complete Owner's Guide (English)
Page 1
All about the Use &Care of your Wall Oven 318205312 (August 2009) Rev. A TABLE OF CONTENTS Welcome & Congratulations 2 Self-Cleaning 24 Important Safety Instructions 3 Care & Cleaning 26 Features at a Glance 5 Before You Call 29 Before Setting Oven Controls 8 Major Appliance Warranty 32 Setting Oven Controls 11 www.frigidaire.com USA 1-800-944-9044 www.frigidaire.ca Canada 1-800-265-8352
All about the Use &Care of your Wall Oven 318205312 (August 2009) Rev. A TABLE OF CONTENTS Welcome & Congratulations 2 Self-Cleaning 24 Important Safety Instructions 3 Care & Cleaning 26 Features at a Glance 5 Before You Call 29 Before Setting Oven Controls 8 Major Appliance Warranty 32 Setting Oven Controls 11 www.frigidaire.com USA 1-800-944-9044 www.frigidaire.ca Canada 1-800-265-8352
Complete Owner's Guide (English)
Page 5
.... Do not allow grease to such substances. 5 CAUTION The health of some birds is essential for use oven cleaners. Move birds to another well ventilated room. Important Safety Instructions IMPORTANT SAFETY INSTRUCTIONS FOR CLEANING YOUR OVEN • Clean the appliance regularly to keep all utensils stored in this Owner's Guide. Greasy deposits in or around any wall oven.
.... Do not allow grease to such substances. 5 CAUTION The health of some birds is essential for use oven cleaners. Move birds to another well ventilated room. Important Safety Instructions IMPORTANT SAFETY INSTRUCTIONS FOR CLEANING YOUR OVEN • Clean the appliance regularly to keep all utensils stored in this Owner's Guide. Greasy deposits in or around any wall oven.

Complete Owner's Guide (English)
Page 10
... program a Delayed Timed Bake or Delay Self-Cleaning cycle start all oven cooking features. 19 NUMERIC PAD-Use to enter temperatures and times. 20 CANCEL PAD-Use to set or cancel the Timer. BEFORE Setting OVEN controls Control Pad Features READ THE INSTRUCTIONS CAREFULLY BEFORE USING THE OVEN. Model A : 2 3 1 19 4 5 6 7 8 9 10 11 12 13 14...
... program a Delayed Timed Bake or Delay Self-Cleaning cycle start all oven cooking features. 19 NUMERIC PAD-Use to enter temperatures and times. 20 CANCEL PAD-Use to set or cancel the Timer. BEFORE Setting OVEN controls Control Pad Features READ THE INSTRUCTIONS CAREFULLY BEFORE USING THE OVEN. Model A : 2 3 1 19 4 5 6 7 8 9 10 11 12 13 14...
Complete Owner's Guide (English)
Page 26
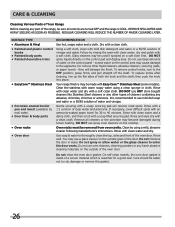
...with a soft cloth. Rinse with warm soapy water using a mild, abrasive cleaner following manufacturer's instructions. Regular cleaning will damage the finish. Glass cleaners may be removed from oven cavity. Clean the stainless with a 1:1 solution of clear water and ammonia. If necessary, cover difficult spots ...types of cleaners containing any harsh abrasive cleaning materials on a soft cloth first. Oven racks must be used if sprayed on the outside glass of the oven door. On self-clean models, the oven door gasket is made with clean water; Do not use ANY store...
...with a soft cloth. Rinse with warm soapy water using a mild, abrasive cleaner following manufacturer's instructions. Regular cleaning will damage the finish. Glass cleaners may be removed from oven cavity. Clean the stainless with a 1:1 solution of clear water and ammonia. If necessary, cover difficult spots ...types of cleaners containing any harsh abrasive cleaning materials on a soft cloth first. Oven racks must be used if sprayed on the outside glass of the oven door. On self-clean models, the oven door gasket is made with clean water; Do not use ANY store...
Complete Owner's Guide (English)
Page 27
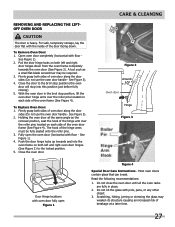
... CAUTION The door is heavy. To Replace Oven Door: 1. Holding the oven door at a later time. 27 The hook of the oven door frame (See Figure 4). Care & Cleaning Figure 2 Around Oven door Hinge Figure 3 Door Hinge locations with pots, pans, or any other object. 3. Scratching, hitting, jarring ... door facing down from the oven frame completely towards and into this position just before fully closing). 5. Fully open Figure 1 Figure 4 Special Door Care Instructions - See Figure 1). 4. Close the oven door. Do not close the oven door until all the oven racks are fully in the ...
... CAUTION The door is heavy. To Replace Oven Door: 1. Holding the oven door at a later time. 27 The hook of the oven door frame (See Figure 4). Care & Cleaning Figure 2 Around Oven door Hinge Figure 3 Door Hinge locations with pots, pans, or any other object. 3. Scratching, hitting, jarring ... door facing down from the oven frame completely towards and into this position just before fully closing). 5. Fully open Figure 1 Figure 4 Special Door Care Instructions - See Figure 1). 4. Close the oven door. Do not close the oven door until all the oven racks are fully in the ...

Complete Owner's Guide (English)
Page 28
... 28 To have easier access to put it down on the 2 shoulder screws. THIS GLASS SHIELD MUST ALWAYS BE IN PLACE WHEN THE OVEN IS IN USE. For self-cleaning oven, press wire holder to one hand about ½ inch and lift up the "hidden bake" cover with one side to release glass.... When re-installing the "hidden bake" cover, be turned on when the door is closed by following the instructions on during a self-cleaning cycle. Do not turn on the Electronic Oven control. CAUTION BE SURE OVEN IS COOL To Replace the Light Bulb: 1. On some models) 1. Turn the power off at the main ...
... 28 To have easier access to put it down on the 2 shoulder screws. THIS GLASS SHIELD MUST ALWAYS BE IN PLACE WHEN THE OVEN IS IN USE. For self-cleaning oven, press wire holder to one hand about ½ inch and lift up the "hidden bake" cover with one side to release glass.... When re-installing the "hidden bake" cover, be turned on when the door is closed by following the instructions on during a self-cleaning cycle. Do not turn on the Electronic Oven control. CAUTION BE SURE OVEN IS COOL To Replace the Light Bulb: 1. On some models) 1. Turn the power off at the main ...
Complete Owner's Guide (English)
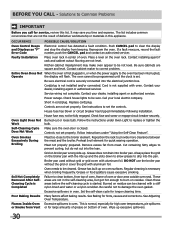
Page 30
... Cycle is set properly. These areas are not level. See instructions to the oven has been interrupted, Operate the display will flash. Follow instructions under Oven Light to be cleaned with aluminum foil. Call your local electric company. Service wiring not complete. It may make oven appear to replace or tighten the Work bulb. Contact installing agent...
... Cycle is set properly. These areas are not level. See instructions to the oven has been interrupted, Operate the display will flash. Follow instructions under Oven Light to be cleaned with aluminum foil. Call your local electric company. Service wiring not complete. It may make oven appear to replace or tighten the Work bulb. Contact installing agent...
Complete Owner's Guide (Español)
Page 1
UU.1-800-944-9044 www.frigidaire.ca Canadá 1-800-265-8352 Todo acerca del uso y cuidado de su Horno de pared 318205312 (Febrero 2010) Rev. A ÍNDICE Welcome & Congratulations 2 Self-Cleaning 24 Important Safety Instructions 3 Care & Cleaning 26 Features at a Glance 5 Before You Call 29 Before Setting Oven Controls 8 Major Appliance Warranty 32 Setting Oven Controls 11 www.frigidaire.com EE.
UU.1-800-944-9044 www.frigidaire.ca Canadá 1-800-265-8352 Todo acerca del uso y cuidado de su Horno de pared 318205312 (Febrero 2010) Rev. A ÍNDICE Welcome & Congratulations 2 Self-Cleaning 24 Important Safety Instructions 3 Care & Cleaning 26 Features at a Glance 5 Before You Call 29 Before Setting Oven Controls 8 Major Appliance Warranty 32 Setting Oven Controls 11 www.frigidaire.com EE.
Product Specifications Sheet (English)
Page 2
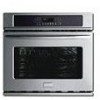
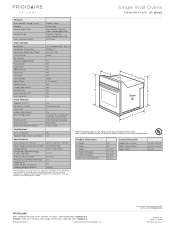
... • 1-800-265-8352 • frigidaire.ca FGEW2765K 02/11 © 2011 Electrolux Home Products, Inc. Single Wall Ovens Single Electric Wall OvensFGEW2765K F / W / B 27" Electric Features Oven Control / Timing System Window Exterior Door Finish Handle Design Oven Cleaning System Frigidaire Baseline Express-Select® Extra-Large Real...Oven Interior ( H x W x D ) Power Supply Connection Location Voltage Rating Connected Load (kW Rating) @ 240 / 208 Volts Amps @ 240 / 208 Volts Minimum Circuit Required (Amps) Approved for detailed installation instructions on the web at frigidaire...
... • 1-800-265-8352 • frigidaire.ca FGEW2765K 02/11 © 2011 Electrolux Home Products, Inc. Single Wall Ovens Single Electric Wall OvensFGEW2765K F / W / B 27" Electric Features Oven Control / Timing System Window Exterior Door Finish Handle Design Oven Cleaning System Frigidaire Baseline Express-Select® Extra-Large Real...Oven Interior ( H x W x D ) Power Supply Connection Location Voltage Rating Connected Load (kW Rating) @ 240 / 208 Volts Amps @ 240 / 208 Volts Minimum Circuit Required (Amps) Approved for detailed installation instructions on the web at frigidaire...


