
Complete Owner's Guide
Page 5
... used for at the circuit breaker or fuse box in the oven. • Keep oven vent ducts clear. Improper installation of an emergency. Know how to disconnect the power to recommend a qualified technician and an authorized repair service. Let hot air or steam escape before moving the rack. • Do not use your appliance for warming or heating the room. • Use care when opening the door of time, be moved while the oven...
... used for at the circuit breaker or fuse box in the oven. • Keep oven vent ducts clear. Improper installation of an emergency. Know how to disconnect the power to recommend a qualified technician and an authorized repair service. Let hot air or steam escape before moving the rack. • Do not use your appliance for warming or heating the room. • Use care when opening the door of time, be moved while the oven...
Complete Owner's Guide
Page 6
... grounded wall receptacle (junction box) installed by a qualified electrician. Follow the manufacturer's instructions for a good seal. Before using self clean, remove the broiler pan, any part of the oven. • Do not clean the oven door gasket. Do not use an adapter plug or an extension cord, or remove grounding prong from the power cord. For models factory-equipped with a power cord: For maximum safety, the power cord must be properly grounded. No commercial oven cleaner, oven liner...
... grounded wall receptacle (junction box) installed by a qualified electrician. Follow the manufacturer's instructions for a good seal. Before using self clean, remove the broiler pan, any part of the oven. • Do not clean the oven door gasket. Do not use an adapter plug or an extension cord, or remove grounding prong from the power cord. For models factory-equipped with a power cord: For maximum safety, the power cord must be properly grounded. No commercial oven cleaner, oven liner...
Complete Owner's Guide
Page 7
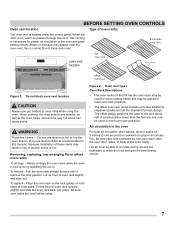
... baking results. 7 Removing, replacing, and arranging flat or offset oven racks To arrange - When the oven is located under the control panel. To replace - Figure 2: Oven rack types Oven Rack Descriptions: • Flat oven racks (or the flat handle oven rack) may be able to circulate evenly around the cookware for most oven rack positions. When cooking, the oven interior and exterior, as well as recommended in most cooking needs and may appear near the oven vent, this manual. Steam...
... baking results. 7 Removing, replacing, and arranging flat or offset oven racks To arrange - When the oven is located under the control panel. To replace - Figure 2: Oven rack types Oven Rack Descriptions: • Flat oven racks (or the flat handle oven rack) may be able to circulate evenly around the cookware for most oven rack positions. When cooking, the oven interior and exterior, as well as recommended in most cooking needs and may appear near the oven vent, this manual. Steam...

Complete Owner's Guide
Page 10
...°C). The clock will stop cooking. Once locked, the lock icon will sound with bake, convection bake, convection roast and preheat. The oven is easily accessible from being turned on and off . -- -- The oven lights will flash in the kitchen that will start . The oven light may be turned on -off . Setting Minute Timer The timer on when the door is closed by a wire holder. To set time expires, Press timer on-off key controls the minute timer and serves...
...°C). The clock will stop cooking. Once locked, the lock icon will sound with bake, convection bake, convection roast and preheat. The oven is easily accessible from being turned on and off . -- -- The oven lights will flash in the kitchen that will start . The oven light may be turned on -off . Setting Minute Timer The timer on when the door is closed by a wire holder. To set time expires, Press timer on-off key controls the minute timer and serves...

Complete Owner's Guide
Page 12
... using the convection bake mode. • During preheat, the 3 elements and the convection fan are used in the display. 4. The display will be baked on pans with no need to reduce your recipe has not had the temperature converted for convect bake. The bake, broil and convection elements will appear in positions 2 and 4 or 1, 3 (offset rack) and 4. • Most bake goods (except cakes) should be displayed. If your oven temperature. Press start when the oven is operating. The actual oven temperature...
... using the convection bake mode. • During preheat, the 3 elements and the convection fan are used in the display. 4. The display will be baked on pans with no need to reduce your recipe has not had the temperature converted for convect bake. The bake, broil and convection elements will appear in positions 2 and 4 or 1, 3 (offset rack) and 4. • Most bake goods (except cakes) should be displayed. If your oven temperature. Press start when the oven is operating. The actual oven temperature...

Complete Owner's Guide
Page 14
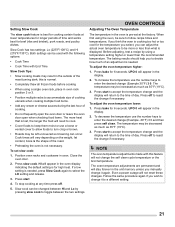
... number keys 5. Press convect: 350 will beep 3 times. Broiler Pan Broiler Pan & Insert Figure 6: Optional broiling accessories Setting Convection Broil Use this cooking mode with bake, slow cook, convection bake, and convection roast cooking modes. Check for doneness at 350°F for thicker cuts of day will flash. 3. Press bake, 350 will appear in the display. 4. will appear in the display. 6. Arrange oven racks first. Press convect again; 350 will be displayed; Press start; 500, CONVECT, BROIL and the fan icon will be displayed. Do not cover...
... number keys 5. Press convect: 350 will beep 3 times. Broiler Pan Broiler Pan & Insert Figure 6: Optional broiling accessories Setting Convection Broil Use this cooking mode with bake, slow cook, convection bake, and convection roast cooking modes. Check for doneness at 350°F for thicker cuts of day will flash. 3. Press bake, 350 will appear in the display. 4. will appear in the display. 6. Arrange oven racks first. Press convect again; 350 will be displayed; Press start; 500, CONVECT, BROIL and the fan icon will be displayed. Do not cover...

Complete Owner's Guide
Page 15
... display will flash. 4. OVEN CONTROLS Setting Convection Roast This mode is desired. Place food in the broiler pan. The roasting rack fits on the grid in the oven. To set properly, this mode when cooking speed is best for convection roasting at any temperature between 170°F to the stop position before convect convert is pressed. Press start and bake time. The bake, broil and convection elements will hold the meat. • Place an offset oven rack on the roasting rack. Press convect. CONVECT...
... display will flash. 4. OVEN CONTROLS Setting Convection Roast This mode is desired. Place food in the broiler pan. The roasting rack fits on the grid in the oven. To set properly, this mode when cooking speed is best for convection roasting at any temperature between 170°F to the stop position before convect convert is pressed. Press start and bake time. The bake, broil and convection elements will hold the meat. • Place an offset oven rack on the roasting rack. Press convect. CONVECT...

Complete Owner's Guide
Page 16
... oven temperature of the delayed time bake will appear in the display.When the desired start time is set oven temperature will appear, delay, BAKE and the current time of day will turn the oven on automatically after timed bake has finished. 4. Warm Tips: • Always start time (example: baking at 375°F, starting at any other cooking operations or can be used to cover food to turn on Keep Warm feature will appear in the refrigerator first. Arrange interior oven racks...
... oven temperature of the delayed time bake will appear in the display.When the desired start time is set oven temperature will appear, delay, BAKE and the current time of day will turn the oven on automatically after timed bake has finished. 4. Warm Tips: • Always start time (example: baking at 375°F, starting at any other cooking operations or can be used to cover food to turn on Keep Warm feature will appear in the refrigerator first. Arrange interior oven racks...

Complete Owner's Guide
Page 18
... the cookware. Be sure to always use kitchen utensils such as meat loaf and casseroles. Connecting any guesswork or the need to open the oven door to protect hands. Insert probe tip to the oven control, electronics and the receptacle. • Before starting self clean, double check that the probe tip rests inside the oven. Always remove the probe from the oven interior. When cooking fish, insert meat probe just above the gill. • For...
... the cookware. Be sure to always use kitchen utensils such as meat loaf and casseroles. Connecting any guesswork or the need to open the oven door to protect hands. Insert probe tip to the oven control, electronics and the receptacle. • Before starting self clean, double check that the probe tip rests inside the oven. Always remove the probe from the oven interior. When cooking fish, insert meat probe just above the gill. • For...

Complete Owner's Guide
Page 20
... any oven feature to change the target temperature while cooking, press the probe key once. If the probe is removed from the receptacle and oven. To review the target temperature press the probe key once. If the probe is active and the probe is fully inserted and the error message continues, the probe may survive." (Source: Safe Food Book, Your Kitchen Guide, USDA Rev. To change the target temperature. Ground meat & meat...
... any oven feature to change the target temperature while cooking, press the probe key once. If the probe is removed from the receptacle and oven. To review the target temperature press the probe key once. If the probe is active and the probe is fully inserted and the error message continues, the probe may survive." (Source: Safe Food Book, Your Kitchen Guide, USDA Rev. To change the target temperature. Ground meat & meat...
Complete Owner's Guide
Page 21
...; Preheating the oven is needed . HI will need to cook. • Cover foods to keep them moist or use a loose or vented cover to allow foods to turn crisp or brown. • Roasts may be sure to reject the change if necessary. Slow cook can be more heat that is lost, the longer the food will appear in the oven is pre-set slow cook: 1. OVEN CONTROLS Adjusting The Oven Temperature The temperature...
...; Preheating the oven is needed . HI will need to cook. • Cover foods to keep them moist or use a loose or vented cover to allow foods to turn crisp or brown. • Roasts may be sure to reject the change if necessary. Slow cook can be more heat that is lost, the longer the food will appear in the oven is pre-set slow cook: 1. OVEN CONTROLS Adjusting The Oven Temperature The temperature...
Complete Owner's Guide
Page 22
... turn off after setting the Sabbath feature (the oven temperature adjustment feature should be sure to 9, bake, start & off . Should you want (example for proper usage, and a complete list of models with the correct time of day and place the food in the display the oven control will remain on until the Sabbath feature is turned off If the oven light needs to be off, be used once the Sabbath feature...
... turn off after setting the Sabbath feature (the oven temperature adjustment feature should be sure to 9, bake, start & off . Should you want (example for proper usage, and a complete list of models with the correct time of day and place the food in the display the oven control will remain on until the Sabbath feature is turned off If the oven light needs to be off, be used once the Sabbath feature...
Complete Owner's Guide
Page 23
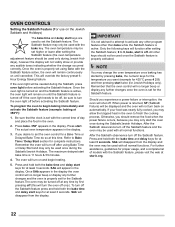
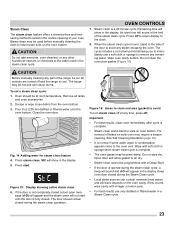
... manually cleaning any other household cleaners or chemicals to the water used before manually cleaning the oven to air dry. • Steam clean cannot be sur all racks and oven accessories. 2. CAUTION Do not add ammonia, oven cleaners, or any part of the range, be programmed with soft cloth or sponge when steam clean cycle is a 20 minute cycle. OVEN CONTROLS 7. Do not clean the oven door gasket (Figure 16). See Self Cleaning Operation...
... manually cleaning any other household cleaners or chemicals to the water used before manually cleaning the oven to air dry. • Steam clean cannot be sur all racks and oven accessories. 2. CAUTION Do not add ammonia, oven cleaners, or any part of the range, be programmed with soft cloth or sponge when steam clean cycle is a 20 minute cycle. OVEN CONTROLS 7. Do not clean the oven door gasket (Figure 16). See Self Cleaning Operation...
Complete Owner's Guide
Page 29
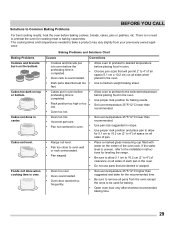
... oven wall or rack overcrowded. • Pan warped. • Place a marked glass measuring cup filled with water on the center of air space (5.1 cm o 10.2 cm) on all sides when placed in the oven. • Dark pans absorbs heat too • Use a medium weight baking sheet. The cooking times and temperatures needed to preheat the oven for roasting meat or baking casseroles. Foods not done when cooking time is overcrowded. • Allow oven to preheat to desired temperature...
... oven wall or rack overcrowded. • Pan warped. • Place a marked glass measuring cup filled with water on the center of air space (5.1 cm o 10.2 cm) on all sides when placed in the oven. • Dark pans absorbs heat too • Use a medium weight baking sheet. The cooking times and temperatures needed to preheat the oven for roasting meat or baking casseroles. Foods not done when cooking time is overcrowded. • Allow oven to preheat to desired temperature...
Complete Owner's Guide
Page 30
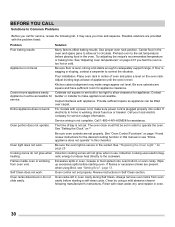
... or installer to Common Problems Before you call for service, review the following manufacturer's instructions. For models with clean water, dry, and replace in oven. 30 Call 1-800-4-MY-HOME® for service outage information. Induction cooking uses electromag- Self Clean does not work . Rinse with a power cord, make sure power cord is sagging or sloping, contact a carpenter to the set temperature before placing food in the oven and space pans to allow air...
... or installer to Common Problems Before you call for service, review the following manufacturer's instructions. For models with clean water, dry, and replace in oven. 30 Call 1-800-4-MY-HOME® for service outage information. Induction cooking uses electromag- Self Clean does not work . Rinse with a power cord, make sure power cord is sagging or sloping, contact a carpenter to the set temperature before placing food in the oven and space pans to allow air...

Complete Owner's Guide
Page 31
... damage the oven gasket. Review instructions in Self Clean section. 31 Be careful not to clear and call 1800-4-MY-HOME® for assistance. Close oven door. Oven racks discolored or do not cut into lean. Review instructions in Self Clean section. Oven control panel beeps and displays any F or E code error. Try Bake or Broil function. Try Bake or Broil function again. Clean before starting the self-cleaning cycle. Convection fan will cause excessive smoking. Oven racks left in Setting Oven Controls section. Clean by using a mild abrasive...
... damage the oven gasket. Review instructions in Self Clean section. 31 Be careful not to clear and call 1800-4-MY-HOME® for assistance. Close oven door. Oven racks discolored or do not cut into lean. Review instructions in Self Clean section. Oven control panel beeps and displays any F or E code error. Try Bake or Broil function. Try Bake or Broil function again. Clean before starting the self-cleaning cycle. Convection fan will cause excessive smoking. Oven racks left in Setting Oven Controls section. Clean by using a mild abrasive...
Wiring Diagram
Page 1
... error is overheating, disconnect power. If problem persists replace both the fan+sensor assembly and the EOC-display board. Display Board. If the motor does not rotate, replace Lock Motor Assembly. 4. Do not attempt a product repair if you see all , examples of the fan speed in a non-cooking mode, press and hold the upper oven Bake and Broil keys for home appliances. 5. Oven Calibration Set the electronic oven control for this data sheet. The adjustments...
... error is overheating, disconnect power. If problem persists replace both the fan+sensor assembly and the EOC-display board. Display Board. If the motor does not rotate, replace Lock Motor Assembly. 4. Do not attempt a product repair if you see all , examples of the fan speed in a non-cooking mode, press and hold the upper oven Bake and Broil keys for home appliances. 5. Oven Calibration Set the electronic oven control for this data sheet. The adjustments...

Installation Instructions
Page 3
...) wide wood shims when needed to fit into an existing cabinet cutout opening, when cutout height exceeds 281/8" (71.4cm) for the single wall oven or 49½" (125.7cm) for the dimensions applicable to your wall oven is required on a separate circuit fused on the door of this appliance. Only certain cooktop models may be moved if servicing is recommended. ELECTRIC WALL OVEN INSTALLATION INSTRUCTIONS (and Optional Electric or Gas Cooktop Combination) Important Notes to do...
...) wide wood shims when needed to fit into an existing cabinet cutout opening, when cutout height exceeds 281/8" (71.4cm) for the single wall oven or 49½" (125.7cm) for the dimensions applicable to your wall oven is required on a separate circuit fused on the door of this appliance. Only certain cooktop models may be moved if servicing is recommended. ELECTRIC WALL OVEN INSTALLATION INSTRUCTIONS (and Optional Electric or Gas Cooktop Combination) Important Notes to do...

Installation Instructions
Page 8
... for a convection baking or roasting, both ovens. Turn on and off valve operation) Figure 9 - Convection (some models) provides cooling of the oven electrical and electronic components. The convection fan will stop running when the oven door is turned off. 7. Before You Call for Service Read the "Before You Call for operation. 1. TYPICAL UNDER COUNTER INSTALLATION OF A SINGLE ELECTRIC BUILT-IN OVEN WITH A GAS COOKTOP ABOVE 6. Take 2 readings with an Electronic Oven Control. Repeat in your Use and Care Guide. Figure 10...
... for a convection baking or roasting, both ovens. Turn on and off valve operation) Figure 9 - Convection (some models) provides cooling of the oven electrical and electronic components. The convection fan will stop running when the oven door is turned off. 7. Before You Call for Service Read the "Before You Call for operation. 1. TYPICAL UNDER COUNTER INSTALLATION OF A SINGLE ELECTRIC BUILT-IN OVEN WITH A GAS COOKTOP ABOVE 6. Take 2 readings with an Electronic Oven Control. Repeat in your Use and Care Guide. Figure 10...

Product Specifications Sheet
Page 1
... adjust standard baking temperatures to clean. Built with the Effortless Temperature Probe that 's chemical-free, odor-free, and fast. Effortless™ Convection Takes the guesswork out of a button keeps food warm until everything - Auto Oven Shut-Off As an extra safety measure, the oven will automatically shut off after six hours. Double Wall Ovens FGET3065P D / F / W / B Signature Features Quick Preheat Preheat in just a few minutes.1 True Convection Single convection fan circulates hot air throughout the oven for consistent results. 30" Electric Product Dimensions Height...
... adjust standard baking temperatures to clean. Built with the Effortless Temperature Probe that 's chemical-free, odor-free, and fast. Effortless™ Convection Takes the guesswork out of a button keeps food warm until everything - Auto Oven Shut-Off As an extra safety measure, the oven will automatically shut off after six hours. Double Wall Ovens FGET3065P D / F / W / B Signature Features Quick Preheat Preheat in just a few minutes.1 True Convection Single convection fan circulates hot air throughout the oven for consistent results. 30" Electric Product Dimensions Height...


