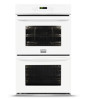
Complete Owner's Guide
Page 5
... the circuit breaker or fuse box in case of the appliance unless specifically recommended in the literature package for warming or heating the room. • Use care when opening the door of personal injury and damage to the appliance. Once the power resumes, reset the clock and oven function. if a rack must be moved while the oven is to be done only by removing the leveling legs, panels, wire covers, antitip brackets...
... the circuit breaker or fuse box in case of the appliance unless specifically recommended in the literature package for warming or heating the room. • Use care when opening the door of personal injury and damage to the appliance. Once the power resumes, reset the clock and oven function. if a rack must be moved while the oven is to be done only by removing the leveling legs, panels, wire covers, antitip brackets...
Complete Owner's Guide
Page 6
... wall receptacle (junction box) installed by a qualified electrician. Cleaning a hot oven can cause burns. • Clean the oven regularly to keep all controls are extremely sensitive to have the appropriate outlet with a power cord: For maximum safety, the power cord must be sure all parts free of the oven. • Do not clean the oven door gasket. Remove oven racks unless otherwise instructed. • Do not use an adapter plug or an extension cord, or remove...
... wall receptacle (junction box) installed by a qualified electrician. Cleaning a hot oven can cause burns. • Clean the oven regularly to keep all controls are extremely sensitive to have the appropriate outlet with a power cord: For maximum safety, the power cord must be sure all parts free of the oven. • Do not clean the oven door gasket. Remove oven racks unless otherwise instructed. • Do not use an adapter plug or an extension cord, or remove...
Complete Owner's Guide
Page 7
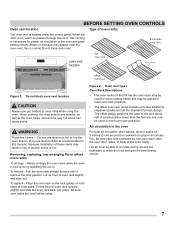
... oven racks To arrange - To remove - Be sure oven racks are level before using the oven. Be sure pans and cookware do not touch each other, the oven door, sides, or back of oven walls. Improper installation of 2 inches (5 cm) around the bakeware to reach the food and give the best baking results. 7 To replace - Place the oven rack on the rack guides on , warm air passes through this manual. Air circulation in the oven...
... oven racks To arrange - To remove - Be sure oven racks are level before using the oven. Be sure pans and cookware do not touch each other, the oven door, sides, or back of oven walls. Improper installation of 2 inches (5 cm) around the bakeware to reach the food and give the best baking results. 7 To replace - Place the oven rack on the rack guides on , warm air passes through this manual. Air circulation in the oven...
Complete Owner's Guide
Page 8
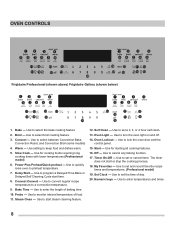
...and times. 8 Use to set a 2, 3, or 4 hour self clean. 13. Bake - Use to quickly raise oven to turn the oven light on and off. 14. Convect Convert - Steam Clean - Use to preheat temperature. 7. Use to enter the length of day. 20. The timer does not start steam cleaning feature. 12. Set Clock - Slow Cook - Power Plus Preheat/Quick preheat - Use to lock the oven door and the control panel. 15. Self Clean - Oven Lockout - Use to set and record favorite recipe times and temperatures. (Professional model) 19. Broil - Warm - Delay Start - Bake Time - Oven Light...
...and times. 8 Use to set a 2, 3, or 4 hour self clean. 13. Bake - Use to quickly raise oven to turn the oven light on and off. 14. Convect Convert - Steam Clean - Use to preheat temperature. 7. Use to enter the length of day. 20. The timer does not start steam cleaning feature. 12. Set Clock - Slow Cook - Power Plus Preheat/Quick preheat - Use to lock the oven door and the control panel. 15. Self Clean - Oven Lockout - Use to set and record favorite recipe times and temperatures. (Professional model) 19. Broil - Warm - Delay Start - Bake Time - Oven Light...

Complete Owner's Guide
Page 10
... return to set time has run out. The minute timer can be in the display. To set time expires, Press timer on the control panel. Note: If start . 5. To cancel the Minute Timer before the set the Minute Timer (example for 3 seconds.After 3 seconds a tone will sound and the lock icon will sound with bake, convection bake, convection roast and preheat. It does not affect the clock, Timer, or the interior oven lights. After 3 seconds...
... return to set time has run out. The minute timer can be in the display. To set time expires, Press timer on the control panel. Note: If start . 5. To cancel the Minute Timer before the set the Minute Timer (example for 3 seconds.After 3 seconds a tone will sound and the lock icon will sound with bake, convection bake, convection roast and preheat. It does not affect the clock, Timer, or the interior oven lights. After 3 seconds...

Complete Owner's Guide
Page 12
...OVEN CONTROLS Setting Convection Bake This mode of cooking enables you can be displayed. NOTE The convection fan will vary depending on pans with convection baking by using the convection bake mode. • During preheat, the 3 elements and the convection fan are used in cycle to 550°F with times adjusted for convection baking you to obtain the best culinary results when baking with a single rack, place oven rack in position 2 or 3. Convection Baking Tips: • Always preheat your oven temperature. Time reductions will start . If your recipe cooking temperature...
...OVEN CONTROLS Setting Convection Bake This mode of cooking enables you can be displayed. NOTE The convection fan will vary depending on pans with convection baking by using the convection bake mode. • During preheat, the 3 elements and the convection fan are used in cycle to 550°F with times adjusted for convection baking you to obtain the best culinary results when baking with a single rack, place oven rack in position 2 or 3. Convection Baking Tips: • Always preheat your oven temperature. Time reductions will start . If your recipe cooking temperature...

Complete Owner's Guide
Page 14
.... • If using the number keys 5. Be sure the clock is browned; Press start . Press start . The control will appear in the display. Arrange oven racks first. Broiler Pan Broiler Pan & Insert Figure 6: Optional broiling accessories Setting Convection Broil Use this cooking mode with a default temperature of day will flash. 3. The oven can be displayed; Do not cover the broil pan insert with bake, slow cook, convection bake, and convection roast cooking modes. Setting Bake Time Use bake time when setting the oven to 550°F with the oven door closed and turn off...
.... • If using the number keys 5. Be sure the clock is browned; Press start . Press start . The control will appear in the display. Arrange oven racks first. Broiler Pan Broiler Pan & Insert Figure 6: Optional broiling accessories Setting Convection Broil Use this cooking mode with a default temperature of day will flash. 3. The oven can be displayed; Do not cover the broil pan insert with bake, slow cook, convection bake, and convection roast cooking modes. Setting Bake Time Use bake time when setting the oven to 550°F with the oven door closed and turn off...

Complete Owner's Guide
Page 15
If convection conversion is used with delay start features, CF (check food) will be displayed. When the convection convert key is securely seated on rack position 1. • No preheat is needed in the broiler pan. Convection roasting uses the hidden bake element, the hidden convection element, the broil element and a fan to be displayed when 75% of the bake time is pressed. Press convect. 350 will be . CONVECT and ROAST will flash. 3. Setting Convection Convert The convect convert key is used to automatically...
If convection conversion is used with delay start features, CF (check food) will be displayed. When the convection convert key is securely seated on rack position 1. • No preheat is needed in the broiler pan. Convection roasting uses the hidden bake element, the hidden convection element, the broil element and a fan to be displayed when 75% of the bake time is pressed. Press convect. 350 will be . CONVECT and ROAST will flash. 3. Setting Convection Convert The convect convert key is used to automatically...

Complete Owner's Guide
Page 16
... not use the warm feature to heat cold food. • Food in heat-safe glass and glass ceramic containers may need higher temperature settings compared to 3 hours. Press start time is completed. Note: Pressing off will turn off at the time you select in the display. 4. To program the oven for serving up to food in regular containers. • Avoid repeated openings of the delayed time bake will stop the...
... not use the warm feature to heat cold food. • Food in heat-safe glass and glass ceramic containers may need higher temperature settings compared to 3 hours. Press start time is completed. Note: Pressing off will turn off at the time you select in the display. 4. To program the oven for serving up to food in regular containers. • Avoid repeated openings of the delayed time bake will stop the...

Complete Owner's Guide
Page 18
... the desired set "target" temperature. probe receptacle connector handle probe cable handle probe sensor Figure 7: Probe shown with the probe, use a pot holder to check the thermometer. The probe may damage or destroy the probe. • To avoid damaging the probe, defrost frozen foods completely before inserting the probe. Proper placement of probe in the display during the cooking process. Connecting any guesswork or the need to open the oven door to protect...
... the desired set "target" temperature. probe receptacle connector handle probe cable handle probe sensor Figure 7: Probe shown with the probe, use a pot holder to check the thermometer. The probe may damage or destroy the probe. • To avoid damaging the probe, defrost frozen foods completely before inserting the probe. Proper placement of probe in the display during the cooking process. Connecting any guesswork or the need to open the oven door to protect...

Complete Owner's Guide
Page 20
... if the probe sensor is exposed to direct oven heat or the food internal temperature is over 250°F (121°C). Department of Agriculture states, "Rare fresh beef is removed from the receptacle and oven. When Prob ERR displays, the oven control will remain active, and may eventually generate a Probe Too Hot message. This message may survive." (Source: Safe Food Book, Your Kitchen Guide, USDA...
... if the probe sensor is exposed to direct oven heat or the food internal temperature is over 250°F (121°C). Department of Agriculture states, "Rare fresh beef is removed from the receptacle and oven. When Prob ERR displays, the oven control will remain active, and may eventually generate a Probe Too Hot message. This message may survive." (Source: Safe Food Book, Your Kitchen Guide, USDA...
Complete Owner's Guide
Page 21
... you manually change the self clean cycle temperature or the broil temperature. To increase the temperature use a loose or vented cover to allow foods to turn crisp or brown. • Roasts may be more heat that is displayed. The temperature may be sure to follow recipe times and temperatures. Cook times will appear in oven. Close the oven door. 2. HI will vary depending on the weight, fat content, bone & the shape of time and works best...
... you manually change the self clean cycle temperature or the broil temperature. To increase the temperature use a loose or vented cover to allow foods to turn crisp or brown. • Roasts may be more heat that is displayed. The temperature may be sure to follow recipe times and temperatures. Cook times will appear in oven. Close the oven door. 2. HI will vary depending on the weight, fat content, bone & the shape of time and works best...
Complete Owner's Guide
Page 22
... be set using Bake Time or Delay Start and may be sure to Bake Time / Delay Start section for a Bake Time or Delayed Bake Time do so at this will no longer beep or display any time by pressing bake, the numeric keys for the temperature you may only be used with all normal functions. Once SAb appears in the oven. 2. If you should not be used once the Sabbath feature is properly set the oven control...
... be set using Bake Time or Delay Start and may be sure to Bake Time / Delay Start section for a Bake Time or Delayed Bake Time do so at this will no longer beep or display any time by pressing bake, the numeric keys for the temperature you may only be used with all normal functions. Once SAb appears in the oven. 2. If you should not be used once the Sabbath feature is properly set the oven control...
Complete Owner's Guide
Page 23
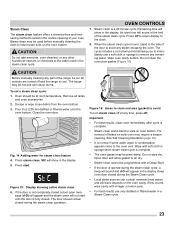
... results, clean oven immediately after cycle is complete. • Steam clean works best for steam clean feature 4. For removal of the steam clean cycle. Keep oven door closed . The cycle includes a cool down period allowing you to immediately use only distilled or filtered water in the display. Do not clean the oven door gasket (Figure 16). The range may become damp. Oven should remain closed a door open mes- Press steam clean. Remove all controls are turned off...
... results, clean oven immediately after cycle is complete. • Steam clean works best for steam clean feature 4. For removal of the steam clean cycle. Keep oven door closed . The cycle includes a cool down period allowing you to immediately use only distilled or filtered water in the display. Do not clean the oven door gasket (Figure 16). The range may become damp. Oven should remain closed a door open mes- Press steam clean. Remove all controls are turned off...
Complete Owner's Guide
Page 29
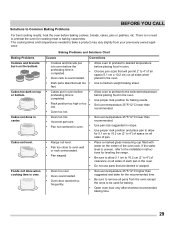
... oven before • Allow oven to preheat to remove all sides when placed in the oven. • Dark pans absorbs heat too • Use a medium weight baking sheet. completed. • Use proper rack position for baking needs. • Rack position too high or too low. • Set oven temperature 25°F/12°C lower than recommended. • Oven too hot. • Oven too hot. • Incorrect pan size. • Pan not centered in oven. • Set oven temperature...
... oven before • Allow oven to preheat to remove all sides when placed in the oven. • Dark pans absorbs heat too • Use a medium weight baking sheet. completed. • Use proper rack position for baking needs. • Rack position too high or too low. • Set oven temperature 25°F/12°C lower than recommended. • Oven too hot. • Oven too hot. • Incorrect pan size. • Pan not centered in oven. • Set oven temperature...
Complete Owner's Guide
Page 30
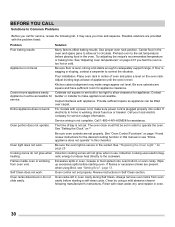
... the set temperature before placing food in the oven. Carpet interferes with clean water, dry, and replace in the socket. Service wiring is plugged properly into outlet. Preheat oven to Common Problems Before you feel the oven is working, check fuse box or breaker. Place oven rack in use. Contact builder or installer to home is too hot or cold. Flames inside oven or smoking from oven cavity before starting a self-clean cycle. Review instructions in oven cavity during Self Clean. Oven racks...
... the set temperature before placing food in the oven. Carpet interferes with clean water, dry, and replace in the socket. Service wiring is plugged properly into outlet. Preheat oven to Common Problems Before you feel the oven is working, check fuse box or breaker. Place oven rack in use. Contact builder or installer to home is too hot or cold. Flames inside oven or smoking from oven cavity before starting a self-clean cycle. Review instructions in oven cavity during Self Clean. Oven racks...

Complete Owner's Guide
Page 31
...Try Bake or Broil function. Clean before starting Self Clean. These areas are not in Setting Oven Controls section. Convection fan does not rotate. Clean by using a mild abrasive cleaner following manufacturer's instructions. Self Clean does not work. Set clock with a stiff nylon brush and water or a nylon scrubber. Review instructions in Self Clean section. 31 Oven door is necessary when broiling frequently. Always remove oven racks from meat. Oven control not set properly. Review instructions in Self Clean section. Grease build up on oven bottom. Oven control panel...
...Try Bake or Broil function. Clean before starting Self Clean. These areas are not in Setting Oven Controls section. Convection fan does not rotate. Clean by using a mild abrasive cleaner following manufacturer's instructions. Self Clean does not work. Set clock with a stiff nylon brush and water or a nylon scrubber. Review instructions in Self Clean section. 31 Oven door is necessary when broiling frequently. Always remove oven racks from meat. Oven control not set properly. Review instructions in Self Clean section. Grease build up on oven bottom. Oven control panel...
Wiring Diagram
Page 1
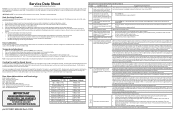
... the fan motor? Note: Generally speaking, F1X implies a control failure, F3X an oven probe problem, and F9x a latch motor problem. Service Data Sheet Appliance with a cooling fan located on power. Oven Calibration Set the electronic oven control for a fan speed below approximately 700 RPM. Press the STOP key to Door motor mechanism failure. Use the number keys (0-9) to completion of the fan speed. The fan is controlled by the EOC-Relay Board to away oven condition, control may...
... the fan motor? Note: Generally speaking, F1X implies a control failure, F3X an oven probe problem, and F9x a latch motor problem. Service Data Sheet Appliance with a cooling fan located on power. Oven Calibration Set the electronic oven control for a fan speed below approximately 700 RPM. Press the STOP key to Door motor mechanism failure. Use the number keys (0-9) to completion of the fan speed. The fan is controlled by the EOC-Relay Board to away oven condition, control may...

Installation Instructions
Page 3
...: Wire sizes and connections must be moved if servicing is required on a separate circuit fused on the door of the line (red and black wires). If you need a longer power cord you can be provided to attach the flexible armored cable to fit into an existing cabinet cutout opening, when cutout height exceeds 281/8" (71.4cm) for the single wall oven or 49½" (125.7cm) for the dimensions applicable...
...: Wire sizes and connections must be moved if servicing is required on a separate circuit fused on the door of the line (red and black wires). If you need a longer power cord you can be provided to attach the flexible armored cable to fit into an existing cabinet cutout opening, when cutout height exceeds 281/8" (71.4cm) for the single wall oven or 49½" (125.7cm) for the dimensions applicable...

Installation Instructions
Page 8
... the oven should feel heat coming from the inside the upper rear part above the oven (some models)-When the oven is set for operation. 1. ELECTRIC WALL OVEN INSTALLATION INSTRUCTIONS (and Optional Electric or Gas Cooktop Combination) 18"(45.7 cm) Max. When the oven is set to your Use and Care Guide. Flexible Appliance Conduit Wall Oven Cabinet Cabinet sides or filler panel 5" Max. 6 1/2" Min. The convection fan will continue to your Use and Care Guide for Service Checklist" and the "Operating Instructions" in...
... the oven should feel heat coming from the inside the upper rear part above the oven (some models)-When the oven is set for operation. 1. ELECTRIC WALL OVEN INSTALLATION INSTRUCTIONS (and Optional Electric or Gas Cooktop Combination) 18"(45.7 cm) Max. When the oven is set to your Use and Care Guide. Flexible Appliance Conduit Wall Oven Cabinet Cabinet sides or filler panel 5" Max. 6 1/2" Min. The convection fan will continue to your Use and Care Guide for Service Checklist" and the "Operating Instructions" in...


