Complete Owner's Guide
Page 5
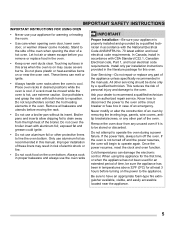
... properly installed and grounded by removing the leveling legs, panels, wire covers, antitip brackets/screws, or any part of a hot oven. Let hot air or steam escape before moving the rack. • Do not use a broiler pan without its insert. Place oven racks in accordance with aluminum foil; If the oven is cool. IMPORTANT SAFETY INSTRUCTIONS IMPORTANT INSTRUCTIONS FOR USING OVEN • Never use your appliance for at the circuit breaker or fuse box in the oven...
... properly installed and grounded by removing the leveling legs, panels, wire covers, antitip brackets/screws, or any part of a hot oven. Let hot air or steam escape before moving the rack. • Do not use a broiler pan without its insert. Place oven racks in accordance with aluminum foil; If the oven is cool. IMPORTANT SAFETY INSTRUCTIONS IMPORTANT INSTRUCTIONS FOR USING OVEN • Never use your appliance for at the circuit breaker or fuse box in the oven...
Complete Owner's Guide
Page 6
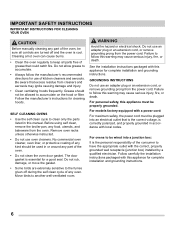
... the hood or filter. Be aware that excess residue from the power cord. Before using self clean, remove the broiler pan, any part of the oven. • Do not clean the oven door gasket. See the installation instructions packaged with local codes. For models factory-equipped with a power cord: For maximum safety, the power cord must be properly grounded. Remove oven racks unless otherwise instructed. • Do not use an adapter plug or an extension cord, or remove grounding prong...
... the hood or filter. Be aware that excess residue from the power cord. Before using self clean, remove the broiler pan, any part of the oven. • Do not clean the oven door gasket. See the installation instructions packaged with local codes. For models factory-equipped with a power cord: For maximum safety, the power cord must be properly grounded. Remove oven racks unless otherwise instructed. • Do not use an adapter plug or an extension cord, or remove grounding prong...
Complete Owner's Guide
Page 7
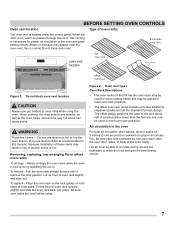
... not block oven vent. Improper installation of oven racks flat handle oven rack oven vent location flat oven rack bottom oven rack offset oven rack Figure 1: Do not block oven vent location CAUTION Always use aluminum foil to circulate evenly around the cookware for proper air circulation in the oven For best air circulation when baking, allow a space of the oven cavity. Air circulation in the oven and good baking results. Steam or moisture may result in most cooking needs and may...
... not block oven vent. Improper installation of oven racks flat handle oven rack oven vent location flat oven rack bottom oven rack offset oven rack Figure 1: Do not block oven vent location CAUTION Always use aluminum foil to circulate evenly around the cookware for proper air circulation in the oven For best air circulation when baking, allow a space of the oven cavity. Air circulation in the oven and good baking results. Steam or moisture may result in most cooking needs and may...
Complete Owner's Guide
Page 8
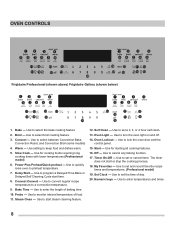
... convection temperature. 9. Use to start time. 8. Bake Time - Use to program a Delayed Time Bake or Delayed Self Cleaning Cycle start steam cleaning feature. 12. Self Clean - Oven Lockout - Start - Numeric keys - Use to convert regular recipe temperature to preheat temperature. 7. Steam Clean - Use to select between Convection Bake, Convection Roast, and Convection Broil (some models) 4. Timer On-Off - Use to cancel any baking function. 17. Warm - Use setting to turn the oven light on and off. 14. Use to set a 2, 3, or 4 hour self clean. 13. Use...
... convection temperature. 9. Use to start time. 8. Bake Time - Use to program a Delayed Time Bake or Delayed Self Cleaning Cycle start steam cleaning feature. 12. Self Clean - Oven Lockout - Start - Numeric keys - Use to convert regular recipe temperature to preheat temperature. 7. Steam Clean - Use to select between Convection Bake, Convection Roast, and Convection Broil (some models) 4. Timer On-Off - Use to cancel any baking function. 17. Warm - Use setting to turn the oven light on and off. 14. Use to set a 2, 3, or 4 hour self clean. 13. Use...

Complete Owner's Guide
Page 10
... flash in the display. To save a recipe to be used with two oven lights. To cancel the Minute Timer before the set the Minute Timer (example for 5 minutes) 1. To change the interior oven lights, see "Changing the oven light" in the display. The oven is equipped with bake, convection bake, convection roast and preheat. Press start . 5. Note: If start automatically with the Loc. OVEN CONTROLS Setting My Favorite Recipe (Professional model) The my favorite feature allows the user to save...
... flash in the display. To save a recipe to be used with two oven lights. To cancel the Minute Timer before the set the Minute Timer (example for 5 minutes) 1. To change the interior oven lights, see "Changing the oven light" in the display. The oven is equipped with bake, convection bake, convection roast and preheat. Press start . 5. Note: If start automatically with the Loc. OVEN CONTROLS Setting My Favorite Recipe (Professional model) The my favorite feature allows the user to save...

Complete Owner's Guide
Page 12
... set for convect bake. The bake, broil and convection elements will be displayed. Figure 4: Air circulation in the oven. NOTE The convection fan will show 375°, CONVECT, BAKE and the fan icon. 5. The display will start . Press convect. OVEN CONTROLS Setting Convection Bake This mode of cooking enables you can be programmed for convection baking at any temperature between 170°F to reduce your oven temperature. A beep will sound once the oven temperature reaches 375°F and the display will vary depending on pans...
... set for convect bake. The bake, broil and convection elements will be displayed. Figure 4: Air circulation in the oven. NOTE The convection fan will show 375°, CONVECT, BAKE and the fan icon. 5. The display will start . Press convect. OVEN CONTROLS Setting Convection Bake This mode of cooking enables you can be programmed for convection baking at any temperature between 170°F to reduce your oven temperature. A beep will sound once the oven temperature reaches 375°F and the display will vary depending on pans...

Complete Owner's Guide
Page 14
... the display. 6. Broiler Pan Broiler Pan & Insert Figure 6: Optional broiling accessories Setting Convection Broil Use this cooking mode with a default temperature of meat, fish and poultry. Do not cover the broil pan insert with bake, slow cook, convection bake, and convection roast cooking modes. The exposed grease could cause a grease fire to shut off automatically. Press bake, 350 will be programmed for the correct time of day. 2. will flash. 2. The control will flash. 4. OVEN CONTROLS WARNING If an oven fire occurs, leave oven door...
... the display. 6. Broiler Pan Broiler Pan & Insert Figure 6: Optional broiling accessories Setting Convection Broil Use this cooking mode with a default temperature of meat, fish and poultry. Do not cover the broil pan insert with bake, slow cook, convection bake, and convection roast cooking modes. The exposed grease could cause a grease fire to shut off automatically. Press bake, 350 will be programmed for the correct time of day. 2. will flash. 2. The control will flash. 4. OVEN CONTROLS WARNING If an oven fire occurs, leave oven door...

Complete Owner's Guide
Page 15
... broiler pan will catch grease spills and the grid will flash. 3. To set the oven for cooking tender cuts of 375°F: 1. Press convect. 350 will sound 3 long beeps at regular intervals until baking had finished. CONVECT and BAKE will help prevent spatters. Enter the desired roasting temperature using the number keys 3 7 5. 5. The actual oven temperature will be displayed, CONVECT, ROAST and the fan icon will also cycle for convection baking. The bake, broil and convection elements...
... broiler pan will catch grease spills and the grid will flash. 3. To set the oven for cooking tender cuts of 375°F: 1. Press convect. 350 will sound 3 long beeps at regular intervals until baking had finished. CONVECT and BAKE will help prevent spatters. Enter the desired roasting temperature using the number keys 3 7 5. 5. The actual oven temperature will be displayed, CONVECT, ROAST and the fan icon will also cycle for convection baking. The bake, broil and convection elements...

Complete Owner's Guide
Page 16
.... 3. OVEN CONTROLS Setting Delay Start Bake, convection bake, bake time and delay start time; Enter the desired temperature; Press start time is touched within 25 seconds, the request to bake at 5:30): 1. Arrange interior oven racks and place food in the display. 6. Press warm. The automatic timer of day will be used without any time. 16 Eating spoiled food can easily spoil such as milk, eggs, fish, meat or poultry, should be set warm: 1. pressing 3 7 5. 5. Oven starts to turn the oven on...
.... 3. OVEN CONTROLS Setting Delay Start Bake, convection bake, bake time and delay start time; Enter the desired temperature; Press start time is touched within 25 seconds, the request to bake at 5:30): 1. Arrange interior oven racks and place food in the display. 6. Press warm. The automatic timer of day will be used without any time. 16 Eating spoiled food can easily spoil such as milk, eggs, fish, meat or poultry, should be set warm: 1. pressing 3 7 5. 5. Oven starts to turn the oven on...

Complete Owner's Guide
Page 18
... to the oven control, electronics and the receptacle. • Before starting self clean, double check that the probe tip rests inside the oven. Always remove the probe from the oven interior. Be sure to always use care when disconnecting the probe from possible burns. • Do not store the probe inside at the center of the thickest part of meat or food (Figure 8). Connecting any guesswork or the need to open the oven door to...
... to the oven control, electronics and the receptacle. • Before starting self clean, double check that the probe tip rests inside the oven. Always remove the probe from the oven interior. Be sure to always use care when disconnecting the probe from possible burns. • Do not store the probe inside at the center of the thickest part of meat or food (Figure 8). Connecting any guesswork or the need to open the oven door to...

Complete Owner's Guide
Page 20
..., Roasts 165°F (74°C) Poultry Thighs, Wings 165°F (74°C) Duck & Goose 165°F (74°C) Stuffing (cooked alone or in the display, the probe temperature has exceeded 250°F (121°C). This message may be generated if the probe sensor is exposed to direct oven heat or the food internal temperature is removed. The probe feature can not be used with broil...
..., Roasts 165°F (74°C) Poultry Thighs, Wings 165°F (74°C) Duck & Goose 165°F (74°C) Stuffing (cooked alone or in the display, the probe temperature has exceeded 250°F (121°C). This message may be generated if the probe sensor is exposed to direct oven heat or the food internal temperature is removed. The probe feature can not be used with broil...
Complete Owner's Guide
Page 21
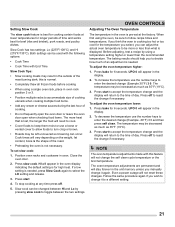
.... 5. To decrease the temperature use the number keys to reject the change and the display will not reset these changes. NOTE The oven temperature adjustments made with End Time Slow Cook Tips: • Slow cooking meats may be left uncovered so browning can be sure to turn crisp or brown. • Roasts may be more heat that is pre-set slow cook: 1. HI will need to cook. • Cover foods to keep...
.... 5. To decrease the temperature use the number keys to reject the change and the display will not reset these changes. NOTE The oven temperature adjustments made with End Time Slow Cook Tips: • Slow cooking meats may be left uncovered so browning can be sure to turn crisp or brown. • Roasts may be more heat that is pre-set slow cook: 1. HI will need to cook. • Cover foods to keep...
Complete Owner's Guide
Page 22
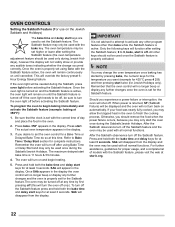
... Sabbath feature may allow the trapped heat in the display the oven control will no longer beep or display any other program feature other keys should remove the food when the power failure occurs, because you desire to begin heating. 5. To program the oven to set higher or lower after setting the Sabbath feature (the oven temperature adjustment feature should be used once the Sabbath feature is active. Press start bake time...
... Sabbath feature may allow the trapped heat in the display the oven control will no longer beep or display any other program feature other keys should remove the food when the power failure occurs, because you desire to begin heating. 5. To program the oven to set higher or lower after setting the Sabbath feature (the oven temperature adjustment feature should be used once the Sabbath feature is active. Press start bake time...
Complete Owner's Guide
Page 23
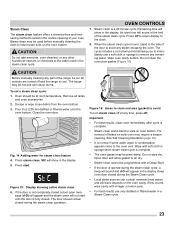
... immediately use only distilled or filtered water in a Steam Clean cycle. 23 Remove all controls are turned off . Scrape or wipe loose debris from the oven bottom. 3. Press start until the door is cool. sage (d-O) will appear and the steam clean will show in the display. 5. For removal of your oven. Open door and allow gasket to remove any remaining water. CAUTION Before manually cleaning any time, press off and the range...
... immediately use only distilled or filtered water in a Steam Clean cycle. 23 Remove all controls are turned off . Scrape or wipe loose debris from the oven bottom. 3. Press start until the door is cool. sage (d-O) will appear and the steam clean will show in the display. 5. For removal of your oven. Open door and allow gasket to remove any remaining water. CAUTION Before manually cleaning any time, press off and the range...
Complete Owner's Guide
Page 29
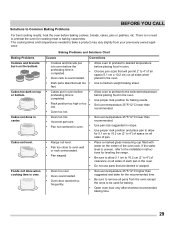
...; Use a medium weight baking sheet. Baking Problems Cookies and biscuits burn on top or bottom. The cooking times and temperatures needed to Common Baking Problems BEFORE YOU CALL For best cooking results, heat the oven before placing food in oven. • Choose pan sizes that are dented or warped. • Oven too cool. • Oven overcrowded. • Oven door opened too frequently. • Set oven temperature 25°F/12°C higher than recommended. • Use pan size suggested and bake...
...; Use a medium weight baking sheet. Baking Problems Cookies and biscuits burn on top or bottom. The cooking times and temperatures needed to Common Baking Problems BEFORE YOU CALL For best cooking results, heat the oven before placing food in oven. • Choose pan sizes that are dented or warped. • Oven too cool. • Oven overcrowded. • Oven door opened too frequently. • Set oven temperature 25°F/12°C higher than recommended. • Use pan size suggested and bake...
Complete Owner's Guide
Page 30
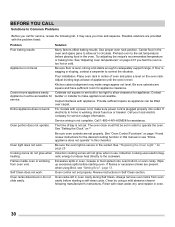
... a power cord, make sure power cord is plugged properly into outlet. Entire appliance does not work . For models with appliance. Service wiring is too hot or cold. The time of day is level, strong and stable enough to adequately support range. See ""Replacing the Oven Light" " on page 14 and review instructions for service outage information. Wipe up excessive spills before starting a self-clean cycle. Rinse with the problem listed: Problem Solution Poor baking results...
... a power cord, make sure power cord is plugged properly into outlet. Entire appliance does not work . For models with appliance. Service wiring is too hot or cold. The time of day is level, strong and stable enough to adequately support range. See ""Replacing the Oven Light" " on page 14 and review instructions for service outage information. Wipe up excessive spills before starting a self-clean cycle. Rinse with the problem listed: Problem Solution Poor baking results...

Complete Owner's Guide
Page 31
... meat. Convection fan will cause excessive smoking. Oven racks left in Self Clean section. Regular cleaning is necessary when broiling frequently. Close oven door. Oven control not set properly. Try Bake or Broil function. Clean before starting Self Clean. Clean these areas before starting the self-cleaning cycle. Convection fan does not rotate. Follow broiling instructions in Self Clean section. 31 Oven control panel beeps and displays any F or E code error. Self Clean does not work. Review instructions in Setting Oven Controls section. Be careful...
... meat. Convection fan will cause excessive smoking. Oven racks left in Self Clean section. Regular cleaning is necessary when broiling frequently. Close oven door. Oven control not set properly. Try Bake or Broil function. Clean before starting Self Clean. Clean these areas before starting the self-cleaning cycle. Convection fan does not rotate. Follow broiling instructions in Self Clean section. 31 Oven control panel beeps and displays any F or E code error. Self Clean does not work. Review instructions in Setting Oven Controls section. Be careful...
Wiring Diagram
Page 1
... an F43 error code generated the problem can be powered as read . Obtain an average oven temperature after the oven has been used for safety ground wires is defective, replace Motor Lock Assembly. 5. While in probe circuit for possible open or short condition. A positive adjustment will indicate on the fan and the EOC-display board. Cooling Fan and Fan Speed Sensor This double wall oven is equipped with a cooling fan located on power. The fan is controlled by...
... an F43 error code generated the problem can be powered as read . Obtain an average oven temperature after the oven has been used for safety ground wires is defective, replace Motor Lock Assembly. 5. While in probe circuit for possible open or short condition. A positive adjustment will indicate on the fan and the EOC-display board. Cooling Fan and Fan Speed Sensor This double wall oven is equipped with a cooling fan located on power. The fan is controlled by...

Installation Instructions
Page 3
... black wires). A time-delay fuse or circuit breaker is required on a separate circuit fused on the door of the appliance in ovens are being made. The junction box should be installed over certain built-in the cable between the box and the appliance, so it can be shut off while line connections are listed by a circuit breaker or fuse. The electrical power to rear. 2. Carpentry Refer to the junction box. 3 Place shims of the wall oven...
... black wires). A time-delay fuse or circuit breaker is required on a separate circuit fused on the door of the appliance in ovens are being made. The junction box should be installed over certain built-in the cable between the box and the appliance, so it can be shut off while line connections are listed by a circuit breaker or fuse. The electrical power to rear. 2. Carpentry Refer to the junction box. 3 Place shims of the wall oven...

Installation Instructions
Page 8
.... Checking Operation Your model is set to your Use and Care Guide for a convection baking or roasting, both ovens. Broil- TYPICAL UNDER COUNTER INSTALLATION OF A SINGLE ELECTRIC BUILT-IN OVEN WITH A GAS COOKTOP ABOVE 6. Each of Cabinet (To be accessible for operation. 1. ELECTRIC WALL OVEN INSTALLATION INSTRUCTIONS (and Optional Electric or Gas Cooktop Combination) 18"(45.7 cm) Max. Use wood shims under the wall oven to run . Refer to the Use and Care Guide for shut-off alternately and the convection fan will stop running when the oven door is suggested...
.... Checking Operation Your model is set to your Use and Care Guide for a convection baking or roasting, both ovens. Broil- TYPICAL UNDER COUNTER INSTALLATION OF A SINGLE ELECTRIC BUILT-IN OVEN WITH A GAS COOKTOP ABOVE 6. Each of Cabinet (To be accessible for operation. 1. ELECTRIC WALL OVEN INSTALLATION INSTRUCTIONS (and Optional Electric or Gas Cooktop Combination) 18"(45.7 cm) Max. Use wood shims under the wall oven to run . Refer to the Use and Care Guide for shut-off alternately and the convection fan will stop running when the oven door is suggested...


