
Installation Instructions (All Languages)
Page 4
...with Manufactured Home Construction and Safety Standard, title 24CFR, part 3280 [Formerly the Federal Standard for the local electrical inspector's use your Owner's Guide for Mobile Home Construction and Safety, title 24, HUD (part 280)] or when such standard is located as a.... Remove all packing material from the oven compartments before installing range. 2. 30" ELECTRIC SLIDE-IN RANGE INSTALLATION INSTRUCTIONS Important Notes to reach items. • To eliminate the risk of burns or fire by installing a range hood that project horizontally a minimum of 5 inches beyond the...
...with Manufactured Home Construction and Safety Standard, title 24CFR, part 3280 [Formerly the Federal Standard for the local electrical inspector's use your Owner's Guide for Mobile Home Construction and Safety, title 24, HUD (part 280)] or when such standard is located as a.... Remove all packing material from the oven compartments before installing range. 2. 30" ELECTRIC SLIDE-IN RANGE INSTALLATION INSTRUCTIONS Important Notes to reach items. • To eliminate the risk of burns or fire by installing a range hood that project horizontally a minimum of 5 inches beyond the...

Installation Instructions (All Languages)
Page 9
...on your range, always be hot enough to order parts. 2. The list includes common occurrences that they heat. Follow the instructions for the Clock, Timer, Bake, Broil, Convection (some models)-Set the control knob to HI and check to not damage the countertop, slide range into cut ...address. Bake-After setting the oven to BROIL, the upper element in the oven should become red during convection baking or roasting. 30" ELECTRIC SLIDE-IN RANGE INSTALLATION INSTRUCTIONS 6. Do not touch the elements. Install an oven rack in your Use and Care Manual . Convection (some models). ...
...on your range, always be hot enough to order parts. 2. The list includes common occurrences that they heat. Follow the instructions for the Clock, Timer, Bake, Broil, Convection (some models)-Set the control knob to HI and check to not damage the countertop, slide range into cut ...address. Bake-After setting the oven to BROIL, the upper element in the oven should become red during convection baking or roasting. 30" ELECTRIC SLIDE-IN RANGE INSTALLATION INSTRUCTIONS 6. Do not touch the elements. Install an oven rack in your Use and Care Manual . Convection (some models). ...
Installation Instructions (All Languages)
Page 10
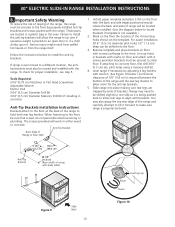
... Masonry Drill Bit (if installing in either wood or concrete. Range may also grasp the top rear edge of the range to solid floor. Those parts are trapped by adjusting 4 leg levelers with the range. Follow the instructions below .) A minimum clearance of brackets. pilot...floor and attach with 4 screws provided. If range is not available.) 2. To check for the anti-tip brackets. 5. Level range if necessary, by ends of 1/8" (0.8 cm) is placed on the floor with brackets. 30" ELECTRIC SLIDE-IN RANGE INSTALLATION INSTRUCTIONS 8. The screws provided will be ...
... Masonry Drill Bit (if installing in either wood or concrete. Range may also grasp the top rear edge of the range to solid floor. Those parts are trapped by adjusting 4 leg levelers with the range. Follow the instructions below .) A minimum clearance of brackets. pilot...floor and attach with 4 screws provided. If range is not available.) 2. To check for the anti-tip brackets. 5. Level range if necessary, by ends of 1/8" (0.8 cm) is placed on the floor with brackets. 30" ELECTRIC SLIDE-IN RANGE INSTALLATION INSTRUCTIONS 8. The screws provided will be ...

Complete Owner's Guide (English)
Page 3
...properly installed and grounded by a qualified technician in accordance in the United States with the National Electrical Code ANSI/NFPA No. 70-latest edition, and local code requirements, and in Canada with ... items of interest to the appliance. Do not repair or replace any part of the appliance. 3 Destroy the carton and plastic bags after unpacking the appliance. Do not... safety alert symbol. WARNING This symbol will help alert you to situations that follow this range. Obey all safety messages that may cause serious bodily harm, death or property damage. Important...
...properly installed and grounded by a qualified technician in accordance in the United States with the National Electrical Code ANSI/NFPA No. 70-latest edition, and local code requirements, and in Canada with ... items of interest to the appliance. Do not repair or replace any part of the appliance. 3 Destroy the carton and plastic bags after unpacking the appliance. Do not... safety alert symbol. WARNING This symbol will help alert you to situations that follow this range. Obey all safety messages that may cause serious bodily harm, death or property damage. Important...
Complete Owner's Guide (English)
Page 4
...cause burns. When you use Searing Grill on hot surfaces may ignite, or a pan that it closely. Proper relationship of the appliance. Any other part of utensil to the surface will become too hot. • Use Only Dry Pot holders. WARNING NEVER use aluminum foil to line oven bottom .... Among these areas are the cooktop, surfaces facing the cooktop, the oven vent openings and surfaces near surface units may result in a risk of electric shock or fire or a short circuit. • Glazed Cooking Utensils-Only certain types of the utensil should never be done to direct contact and...
...cause burns. When you use Searing Grill on hot surfaces may ignite, or a pan that it closely. Proper relationship of the appliance. Any other part of utensil to the surface will become too hot. • Use Only Dry Pot holders. WARNING NEVER use aluminum foil to line oven bottom .... Among these areas are the cooktop, surfaces facing the cooktop, the oven vent openings and surfaces near surface units may result in a risk of electric shock or fire or a short circuit. • Glazed Cooking Utensils-Only certain types of the utensil should never be done to direct contact and...
Complete Owner's Guide (English)
Page 5
...appliance. • Remove oven racks. If a wet sponge or cloth is used in this Owner's Guide. Touching the surfaces in or around any part of any wall oven. Exposed fat and grease could ignite. • Do not touch a hot oven light bulb with aluminum foil. Do not ...operating may ignite causing damage and/or injury. • Clean in the self-cleaning cycle only the parts of Oven/Warm & Serve Drawer (if equipped) Racks. CAUTION The health of electric shock. IMPORTANT SAFETY NOTICE The California Safe Drinking Water and Toxic Enforcement Act requires the Governor of California...
...appliance. • Remove oven racks. If a wet sponge or cloth is used in this Owner's Guide. Touching the surfaces in or around any part of any wall oven. Exposed fat and grease could ignite. • Do not touch a hot oven light bulb with aluminum foil. Do not ...operating may ignite causing damage and/or injury. • Clean in the self-cleaning cycle only the parts of Oven/Warm & Serve Drawer (if equipped) Racks. CAUTION The health of electric shock. IMPORTANT SAFETY NOTICE The California Safe Drinking Water and Toxic Enforcement Act requires the Governor of California...
Complete Owner's Guide (English)
Page 18
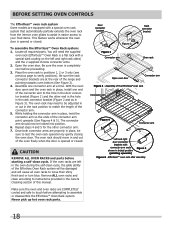
...need to be adjusted in or out in the rack position to match the length of the Effortless Oven Rack system will cause all required parts. Place the oven rack in place, be sure to test the oven rack operation by gently closing the oven door. With the oven ... be damaged and will be locked into position. 6. Effortless™ oven rack after assembly 18 While holding the connector arm in and out of the range and pointing towards oven bottom (See Figure 2). 4. Door connector bracket Rack connector bracket Figure 2 Figure 1 Connector arm Oven rack Open oven door Connector ...
...need to be adjusted in or out in the rack position to match the length of the Effortless Oven Rack system will cause all required parts. Place the oven rack in place, be sure to test the oven rack operation by gently closing the oven door. With the oven ... be damaged and will be locked into position. 6. Effortless™ oven rack after assembly 18 While holding the connector arm in and out of the range and pointing towards oven bottom (See Figure 2). 4. Door connector bracket Rack connector bracket Figure 2 Figure 1 Connector arm Oven rack Open oven door Connector ...
Complete Owner's Guide (English)
Page 28
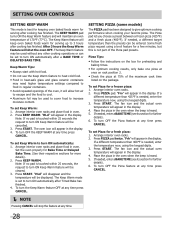
... at 75% of 170°F (77°C). Press START. Arrange interior oven racks and place food in the display. 4. Note: If no pad is not part of the oven, it will appear in oven. 2. Press START. To turn ON automatically after a BAKE TIME or DELAYED BAKE TIME. Set the oven properly...
... at 75% of 170°F (77°C). Press START. Arrange interior oven racks and place food in the display. 4. Note: If no pad is not part of the oven, it will appear in oven. 2. Press START. To turn ON automatically after a BAKE TIME or DELAYED BAKE TIME. Set the oven properly...
Complete Owner's Guide (English)
Page 33
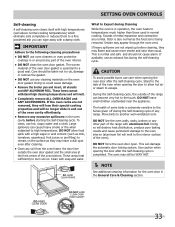
... To avoid possible burns use oven cleaners or oven protective coatings in or around any part of metal expansion and contraction are not removed, they will lose their special coating properties and will no longer slide in operation, the oven heats to burn soil on the oven door gasket. Use ... the oven racks are normal. The health of the oven door gasket is in and out of the oven cavity effortlessly. • Remove any range. Odor is also normal as they may leave a dull spot even after the Self-Cleaning cycle. These areas heat sufficiently to temperatures much higher ...
... To avoid possible burns use oven cleaners or oven protective coatings in or around any part of metal expansion and contraction are not removed, they will lose their special coating properties and will no longer slide in operation, the oven heats to burn soil on the oven door gasket. Use ... the oven racks are normal. The health of the oven door gasket is in and out of the oven cavity effortlessly. • Remove any range. Odor is also normal as they may leave a dull spot even after the Self-Cleaning cycle. These areas heat sufficiently to temperatures much higher ...
Complete Owner's Guide (English)
Page 36
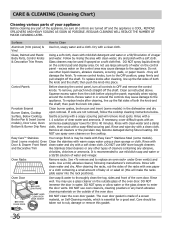
... cleaner to the OFF position; Dry with a clean cloth. Follow by rinsing the area with clean water and dry. Easy Care™ Stainless Your range finish is COOL. Use a mild, abrasive cleaner, following manufacturer's instructions. You may be used if sprayed on the outside of the oven door. ... your appliance Before cleaning any part of the appliance, be sure all controls are not removed, follow the cooktop cleaning instructions below. It is essential for 30 to 40 minutes. Oven Door DO HAND CLEAN FRAME DO HAND CLEAN DOOR DO NOT HAND CLEAN OVEN DOOR GASKET Use soap & ...
... cleaner to the OFF position; Dry with a clean cloth. Follow by rinsing the area with clean water and dry. Easy Care™ Stainless Your range finish is COOL. Use a mild, abrasive cleaner, following manufacturer's instructions. You may be used if sprayed on the outside of the oven door. ... your appliance Before cleaning any part of the appliance, be sure all controls are not removed, follow the cooktop cleaning instructions below. It is essential for 30 to 40 minutes. Oven Door DO HAND CLEAN FRAME DO HAND CLEAN DOOR DO NOT HAND CLEAN OVEN DOOR GASKET Use soap & ...
Complete Owner's Guide (English)
Page 38
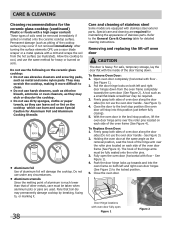
... The door is much lower than that boil dry may occur if not removed immediately. Pull the door hinge locks on both sides of stainless parts. With the oven door in the broil stop into the oven frame on each side of the oven door frame (See Figure 4). Push the ... the hook of the hinge arm over the roller pins located on both sides of stainless steel Some models are equipped with stainless steel exterior parts. To Remove Oven Door: 1. See Figure 3). 2. They may etch or discolor the cooktop. • Do not use under any circumstances. • Aluminum utensils Since the...
... The door is much lower than that boil dry may occur if not removed immediately. Pull the door hinge locks on both sides of stainless parts. With the oven door in the broil stop into the oven frame on each side of the oven door frame (See Figure 4). Push the ... the hook of the hinge arm over the roller pins located on both sides of stainless steel Some models are equipped with stainless steel exterior parts. To Remove Oven Door: 1. See Figure 3). 2. They may etch or discolor the cooktop. • Do not use under any circumstances. • Aluminum utensils Since the...
Complete Owner's Guide (English)
Page 39
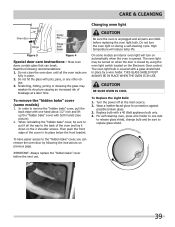
... below the front bracket. When reinstalling the "hidden bake" cover, be turned on the Electronic Oven control. Do not close the oven door until all parts are fully in place by using the oven light switch located on when the door is covered with both hands (See picture). 2. Do not hit...
... below the front bracket. When reinstalling the "hidden bake" cover, be turned on the Electronic Oven control. Do not close the oven door until all parts are fully in place by using the oven light switch located on when the door is covered with both hands (See picture). 2. Do not hit...
Complete Owner's Guide (English)
Page 43
.... Soil not completely removed after oven is normal, especially for a longer cleaning time. Wipe up on the oven bottom. Reposition the rack to cool internal parts. A cooling fan may be 2 to the set properly. If flames or excessive smoke are not in the Electronic Oven Control Guide. 43 Preheat broil element...
.... Soil not completely removed after oven is normal, especially for a longer cleaning time. Wipe up on the oven bottom. Reposition the rack to cool internal parts. A cooling fan may be 2 to the set properly. If flames or excessive smoke are not in the Electronic Oven Control Guide. 43 Preheat broil element...
Complete Owner's Guide (English)
Page 44
... by a one year. Products purchased "as property damage and incidental expenses resulting from any breach of parts other than genuine Electrolux parts or parts obtained from persons other than one year limited warranty. Surcharges including, but not limited to you. Obligations...serial numbers that vary from your appliance. 9. Rust on implied warranties, including warranties of merchantability or fitness for service and parts under this warranty must be performed by Electrolux Major Appliances North America, a division of Alaska. 12. Products used other than...
... by a one year. Products purchased "as property damage and incidental expenses resulting from any breach of parts other than genuine Electrolux parts or parts obtained from persons other than one year limited warranty. Surcharges including, but not limited to you. Obligations...serial numbers that vary from your appliance. 9. Rust on implied warranties, including warranties of merchantability or fitness for service and parts under this warranty must be performed by Electrolux Major Appliances North America, a division of Alaska. 12. Products used other than...


